Do a Zendesk Data Dip
Using Talkdesk Connections™ and Talkdesk Studio™
Overview
Talkdesk provides an out-of-the-box Zendesk Connector that already covers a multitude of use cases. However, Zendesk offers many other capabilities that are not addressed by the existing integration.
In such cases, you may want to create a custom integration with Zendesk using Connections. This custom integration will enable you to, for example, perform a data dip into Zendesk and utilize the retrieved information for conditional routing in Studio.
Required Tools
- A Zendesk account or instance.
- A user with Zendesk Admin profile.
Implementation Steps
1 - Generate a Zendesk API token access.
2 - Create a Zendesk Connection.
3 - Create an Action to trigger a Zendesk data dip.
4 - Create a function to Parse the results of the data dip.
5 - Build a studio flow to execute the action and perform a conditional routing.
1 - Generate a Zendesk API Token Access
Zendesk provides several authentication methods to interact with Zendesk APIs.
In this blueprint, HTTP basic authentication is used. You will need the generated API token access before proceeding to step 2.
To get started:
1.1 - Log in to your Zendesk account.
1.2 - Navigate to the Admin Center (Figure 1) and click Zendesk API (Figure 1 - 1) under the Apps and integrations menu.
1.3 - From your Zendesk dashboard, click the Settings tab (Figure 1 - 2), and then click the Add API token button (Figure 1 - 3) to generate a new token.
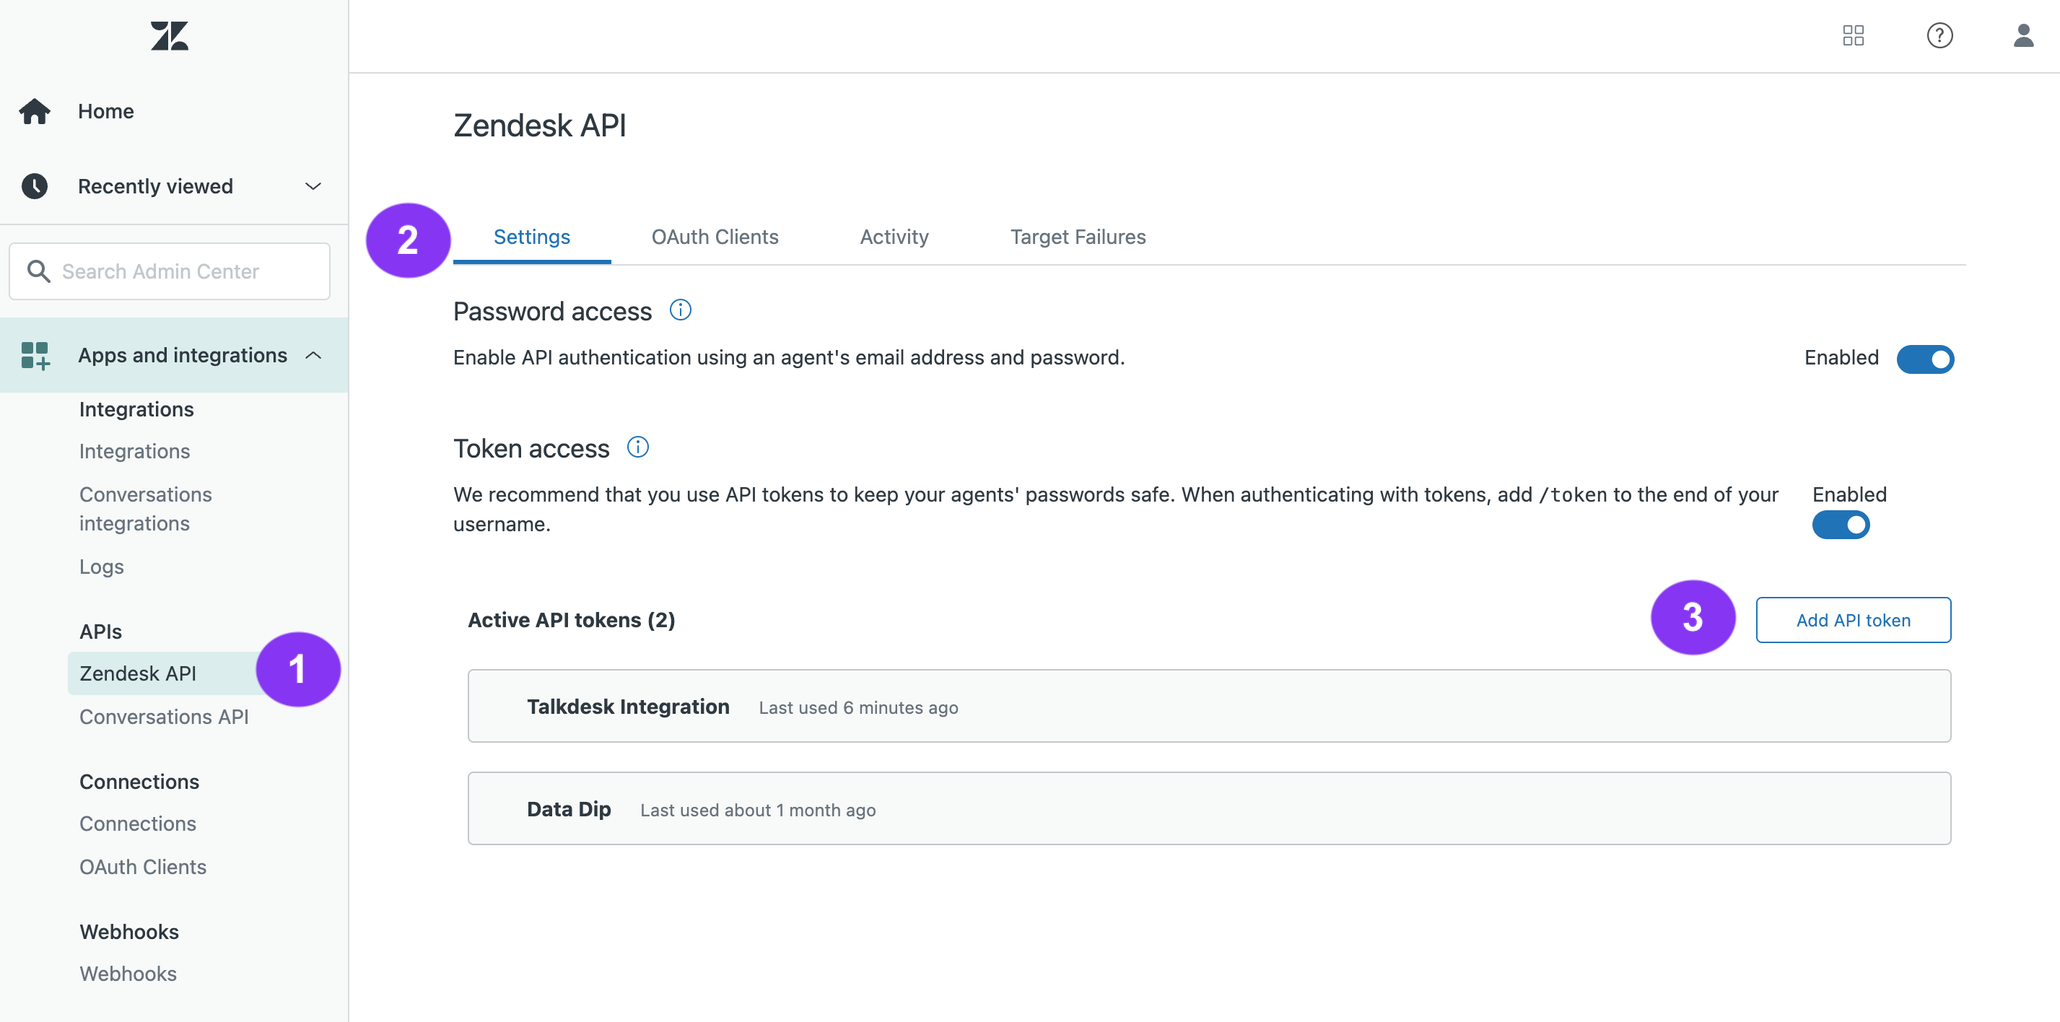
Figure 1 - Zendesk dashboard
1.4 - Give the token a description (optional; Figure 2 - 1) and store the API token information.
1.5 - Once you've completed adding the information, click the Save button (Figure 2 - 2).
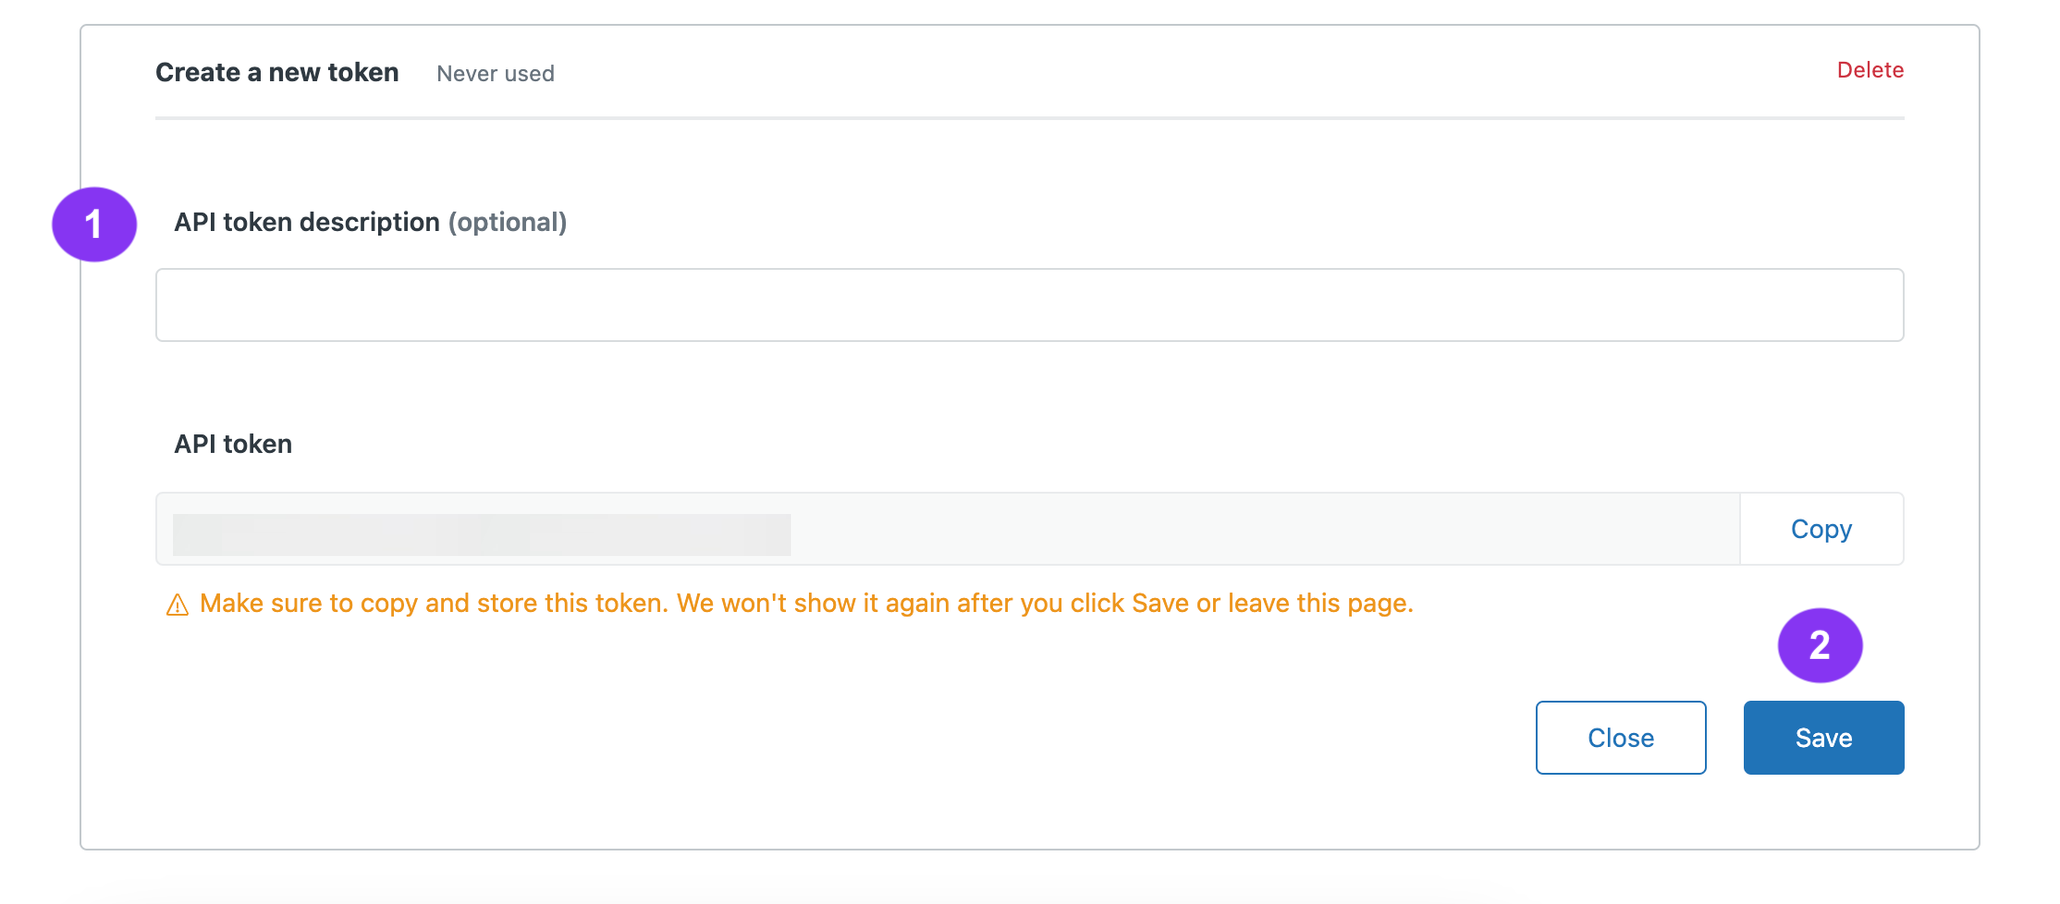
Figure 2 - Token information
2 - Create a Zendesk Connection
After generating the Zendesk API token access, the next step is to go to your Talkdesk instance and create a Connection using the Zendesk credentials.
2.1 - In Talkdesk, navigate to Talkdesk Builder™ (Figure 2 - 1), and then to the Integrations section (Figure 2 - 2).
2.2 - Click the Add Integration button (Figure 2 - 3).
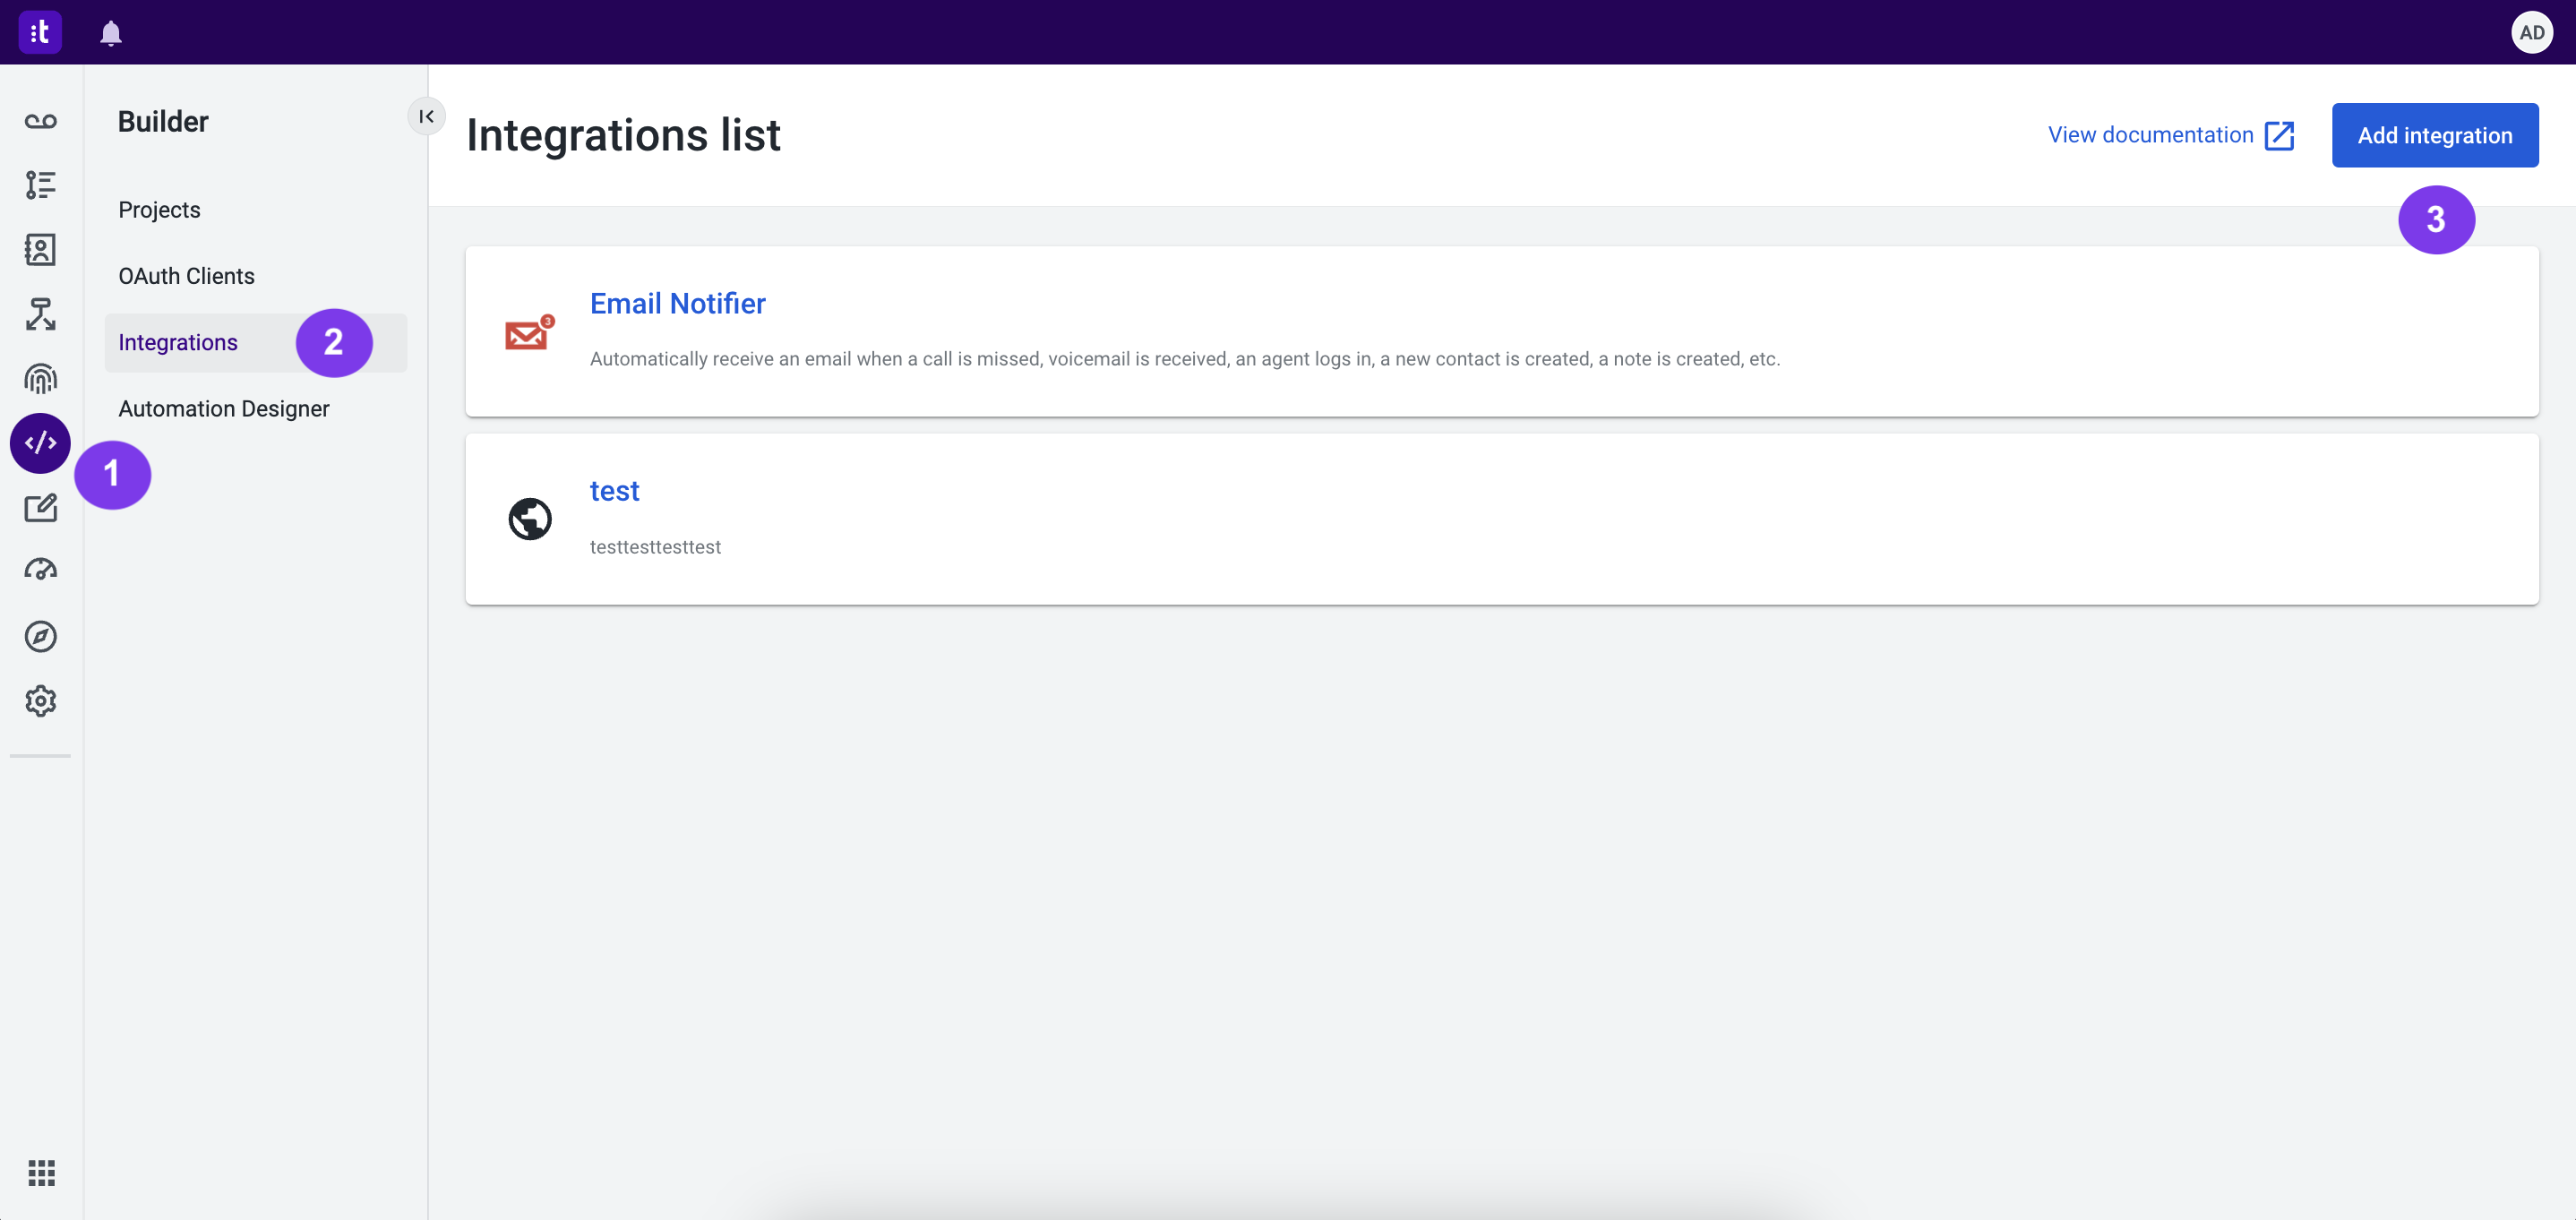
Figure 2 - Integrations
2.3 - A menu with several options will appear. Locate the Custom Integration – Powered by CONNECTIONS option (Figure 3 - 1) , and then click the Add Integration button (Figure 3 - 2).
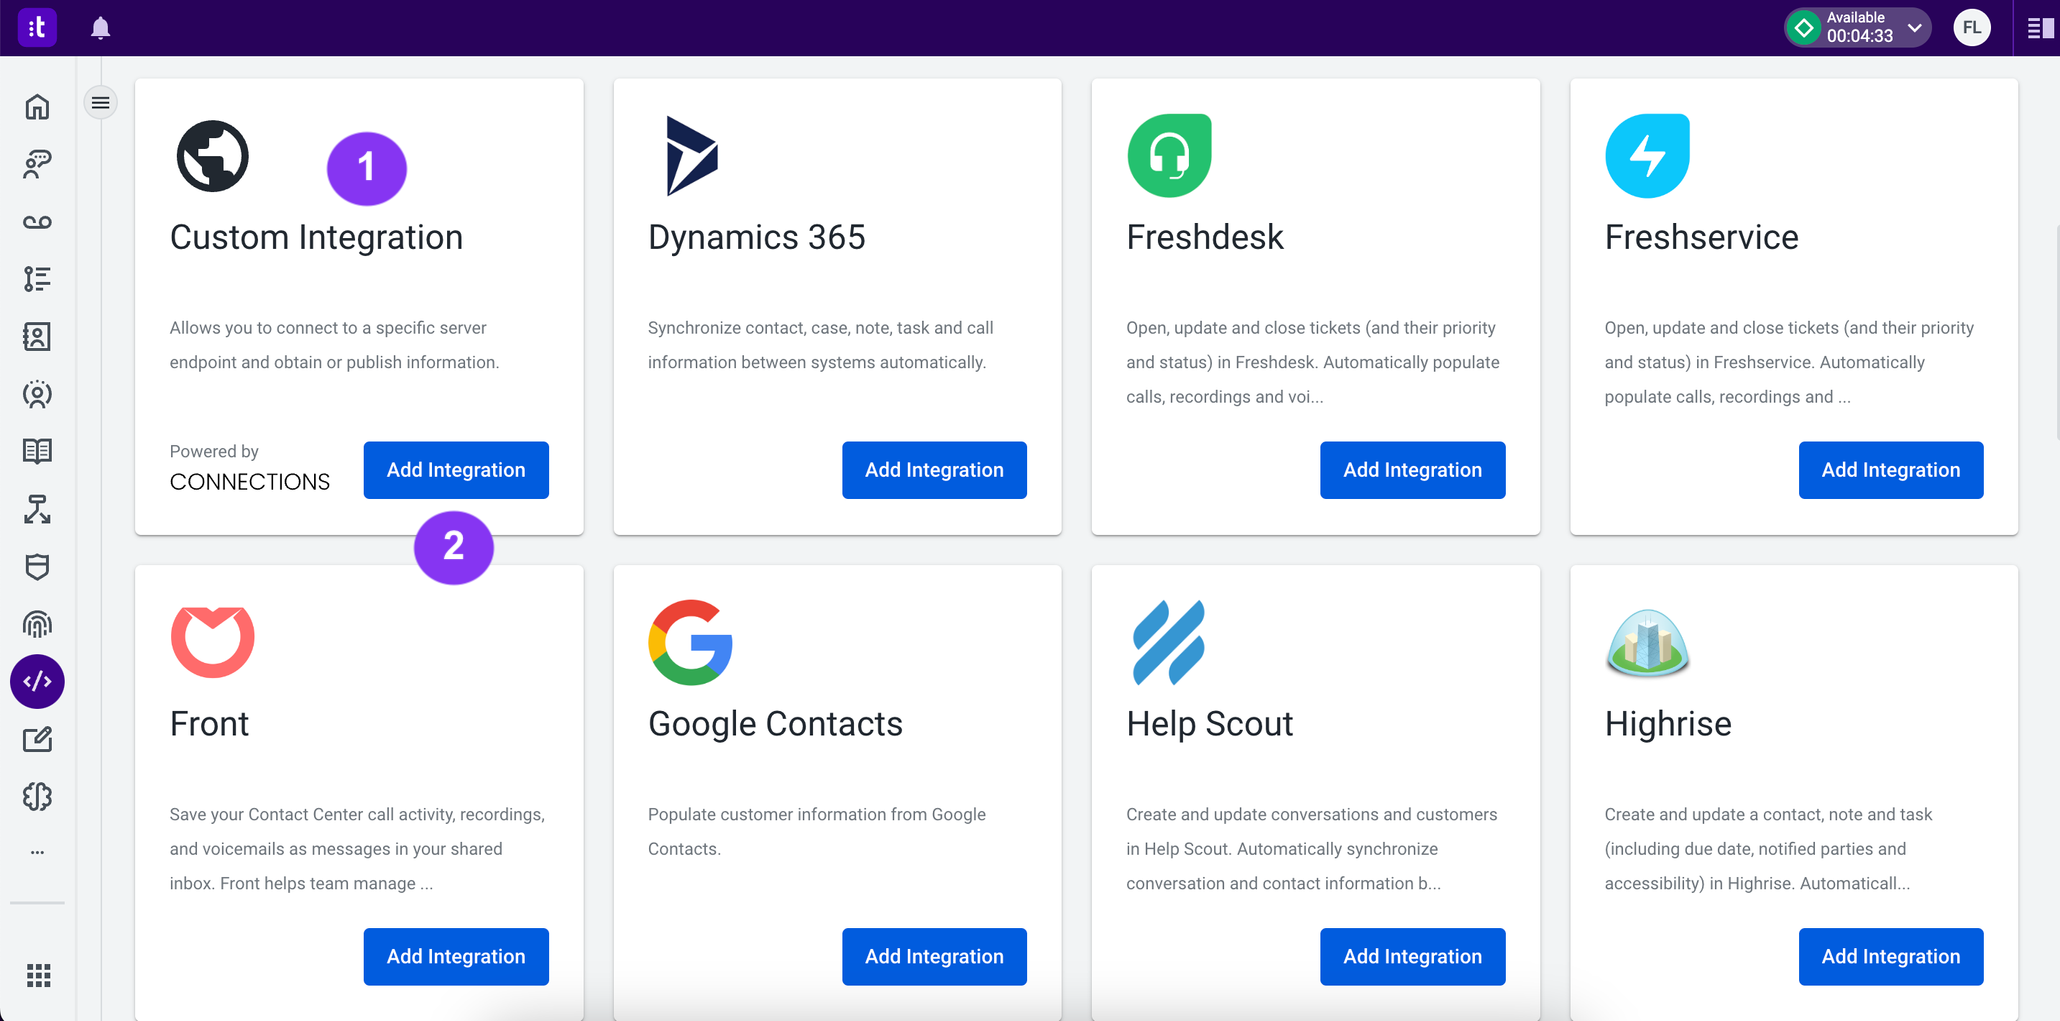
Figure 3 - Custom integration
2.4 - A panel will open (Figure 4) for you to configure the integration details. Under Basic information:
2.4.1 - Provide a name (Figure 4 - 1) and description (Figure 4 - 2) for the integration (required fields).
2.5 - Under Point of origin and authentication:
2.5.1 - Fill the Base path field (mandatory; Figure 4 - 3) with the URL of your Zendesk instance (e.g.: https://login.zendesk.com).
2.5.2 - From the Authentication Type dropdown menu, select Http Basic (mandatory; Figure 4 - 4).
2.5.3 - In the Username field (mandatory; Figure 4 - 5), enter your user details with /token in the end (e.g.: [email protected]/token).
2.5.4 - In the Password field (mandatory; Figure 4 - 6), enter the token generated in step 1.
2.6 - After completing these steps, click the Save button (Figure 4 - 7) to store your integration settings.
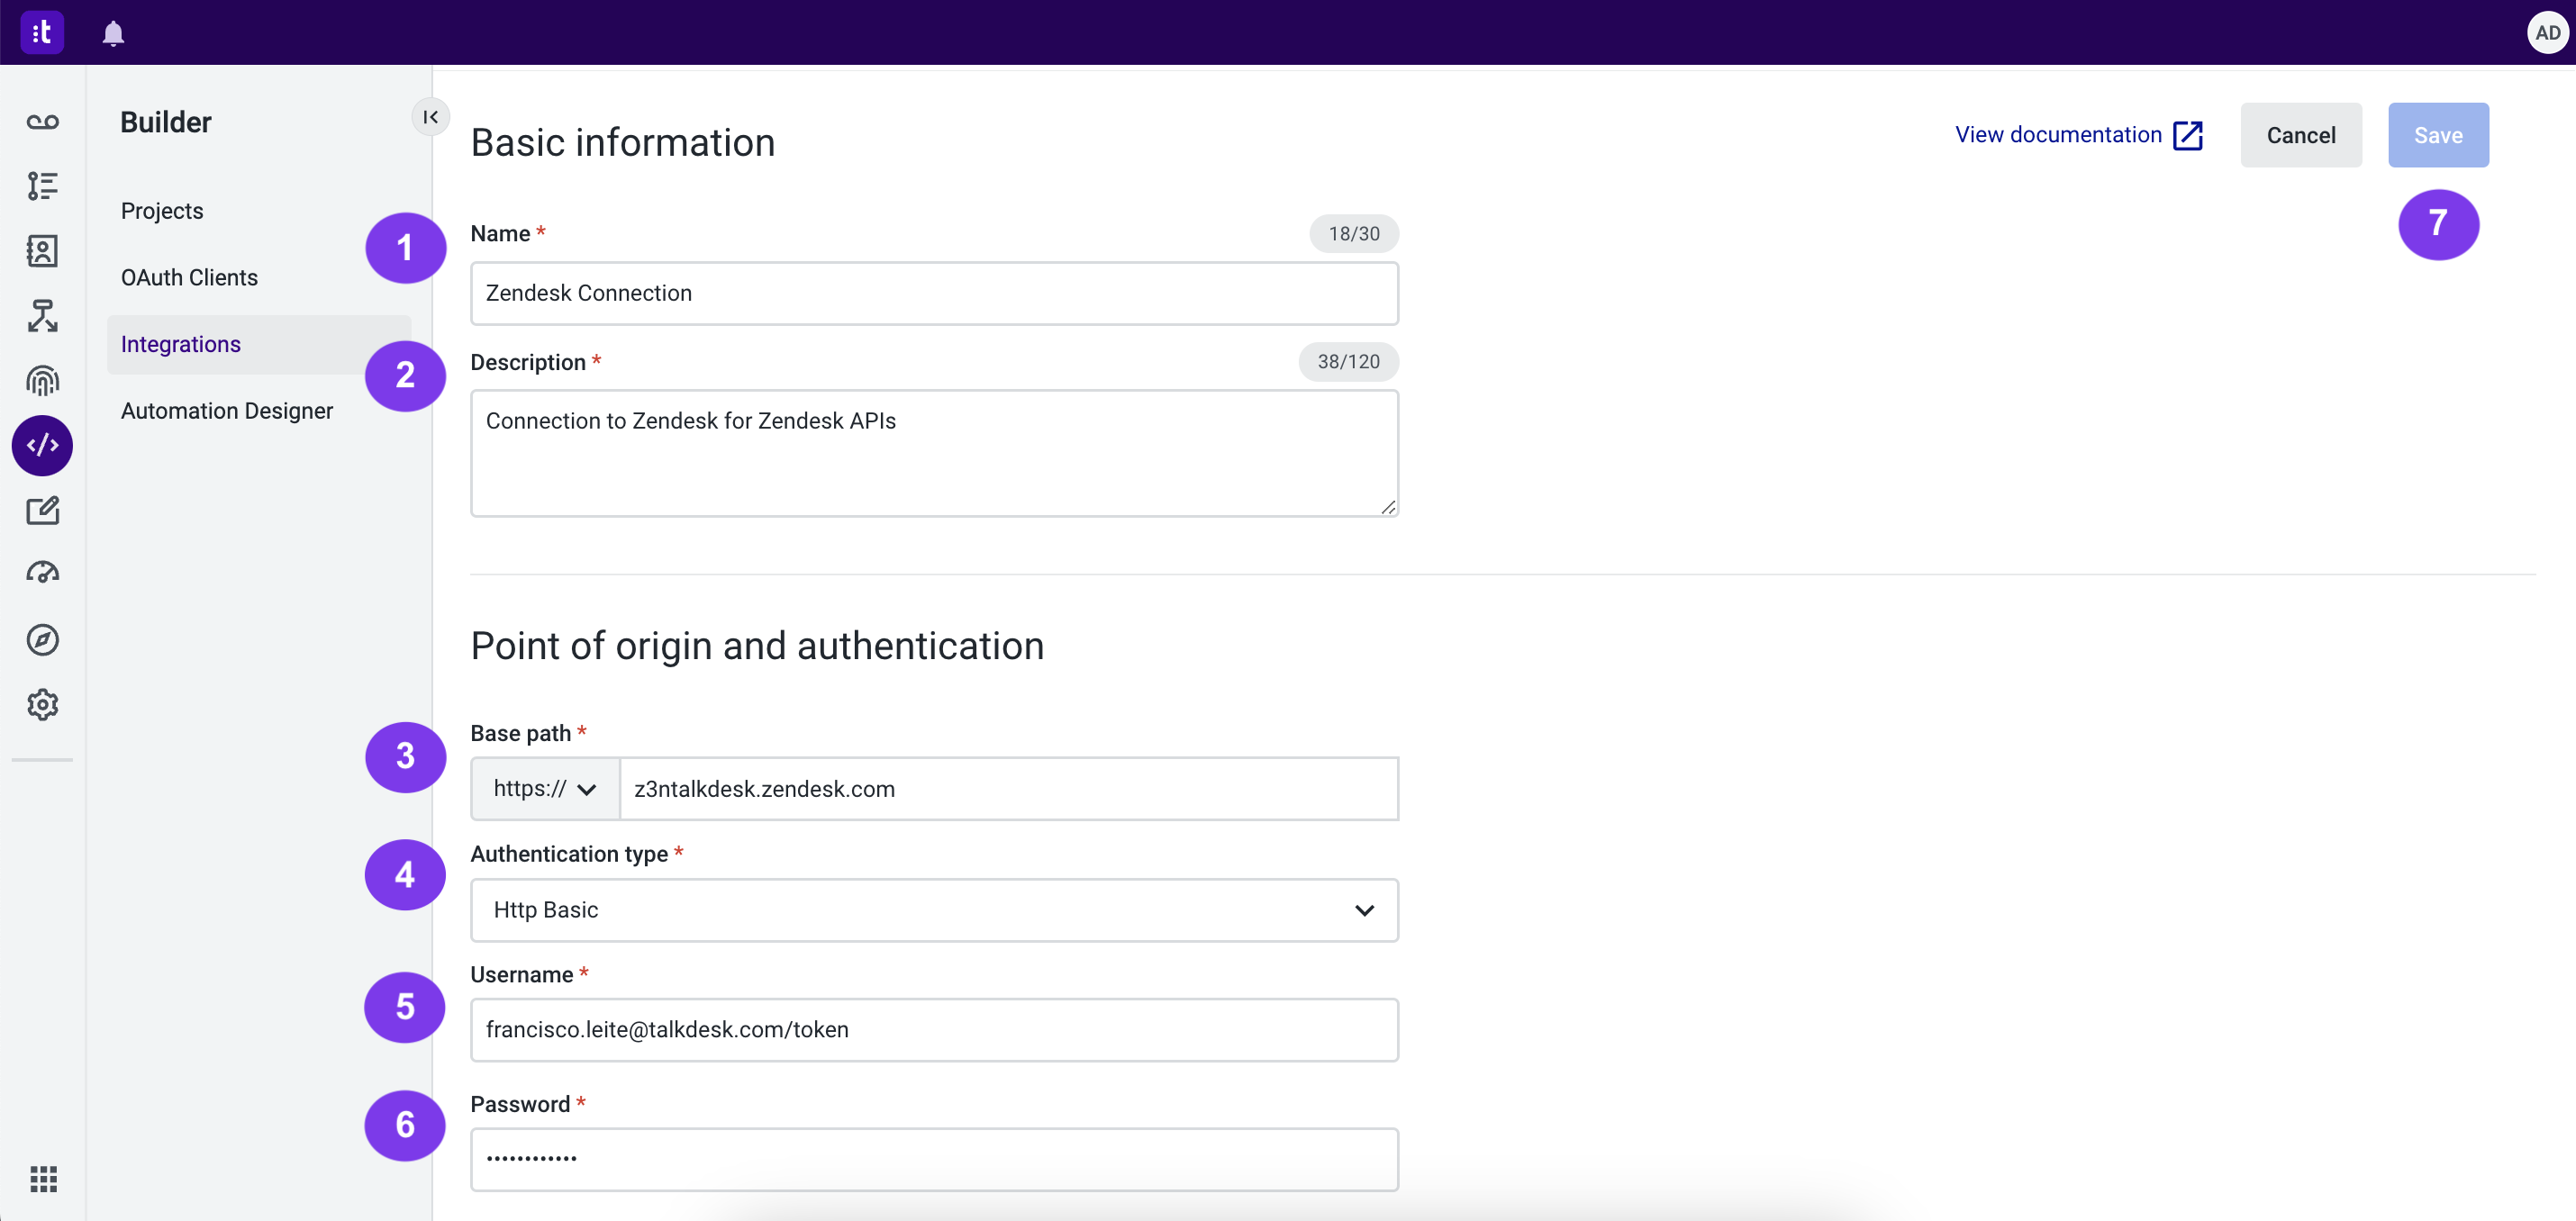
Figure 4 - Integration configuration
3 - Create an Action to Trigger a Zendesk Data Dip
In this use case, an Action will be created to perform a data dip to Zendesk. To do this, follow these steps:
3.1 - Go to Builder (Figure 2 - 1) > Integrations (Figure 2 - 2).
3.2 - Locate and open the Zendesk Connection you previously created in step 2 (in this case, the connection is called Zendesk Connection - Figure 5 - 3).
3.3 - Within the Connection, find and open the Actions tab (Figure 5 - 1).
3.4 - Click the Add action button (Figure 5 - 2). A panel will open (Figure 6) for you to configure the connection details.

Figure 5 - Zendesk connection
3.5 - Provide a Name (mandatory; Figure 6 - 1) and Description (mandatory; Figure 6 - 2) for the Action.
3.6 - In the Relative path field (Figure 6 - 3), input the Zendesk endpoint you intend to invoke. For querying users and retrieving user details, use the following endpoint: /api/v2/search.json?query=type:user role:"end-user" phone:"{{phone_number}}".
3.7 - Configure the parameter named phone_number (Figure 6 - 4) by assigning it a Display name (Figure 6 - 5).
3.8 - Ensure that the Parameter type is set to String(Figure 6 - 6).
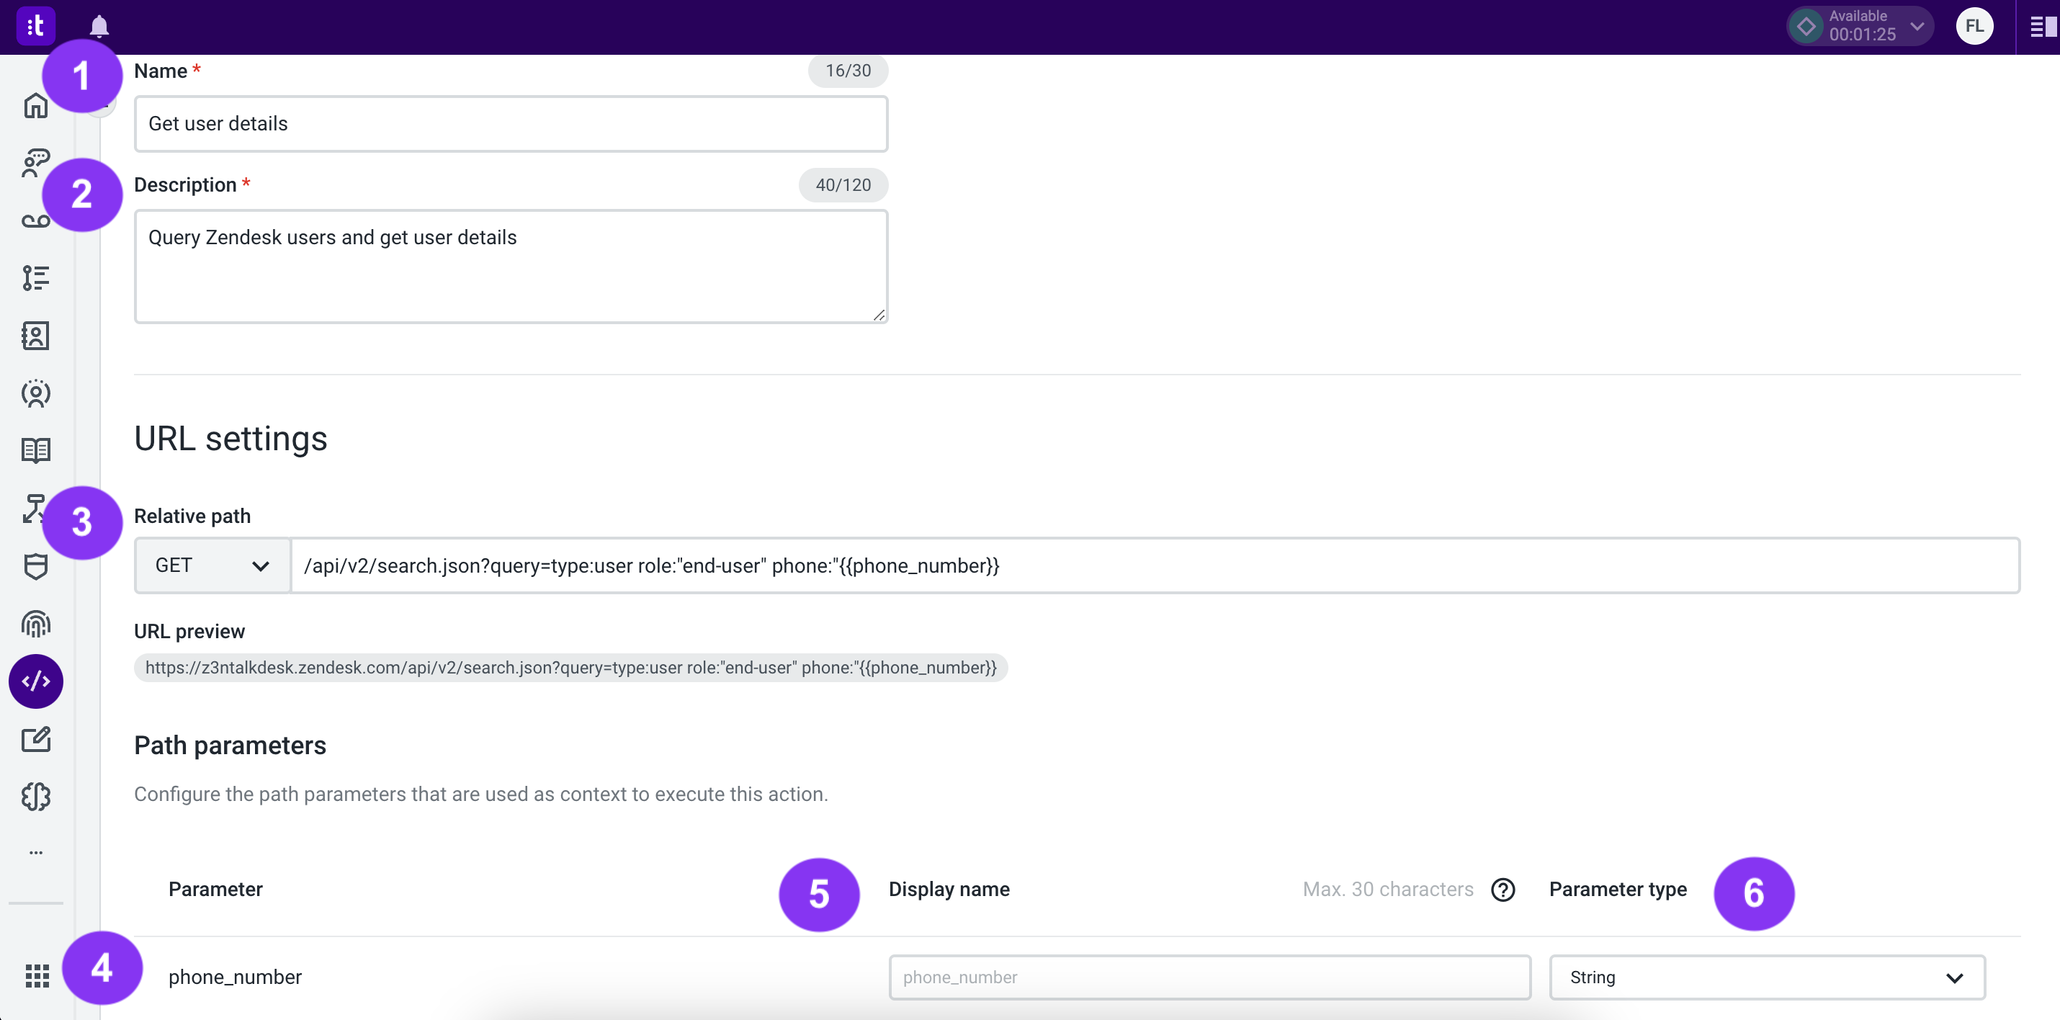
Figure 6 - Action configuration
3.9 - Configuring the Output JSON Schema
3.9.1 - In the Output JSON Schema of the action (Figure 7 - 1), provide a JSON Schema (see below) that validates the API’s response. Zendesk Contacts API returns an array with results. The results key will be available in Studio as an output variable of this Action, which later will be processed using a Function (step 4).
{
  "$schema": "http://json-schema.org/draft-07/schema#",
  "title": "Generated schema for Root",
  "type": "object",
  "properties": {
    "results": {
      "title": "results",
      "type": "array"
    }
  },
  "required": [
    "results"
  ]
}Keep in mind that when adapting this example to other APIs, the JSON Schema must reflect and validate your API, as well as provide access to the output variables you then need to process in the Studio flow.
3.9.2 - If your workflow involves input variables, it's essential to configure them within your Input JSON Schema. However, in this specific use case, input variables are not used, so this section remains empty (Figure 7 - 2).
3.9.3 - You also have the option to customize the timeout setting (Figure 7 - 3) according to your requirements. By default, the Action is configured with a timeout of 10 seconds. This default setting was retained for this use case.
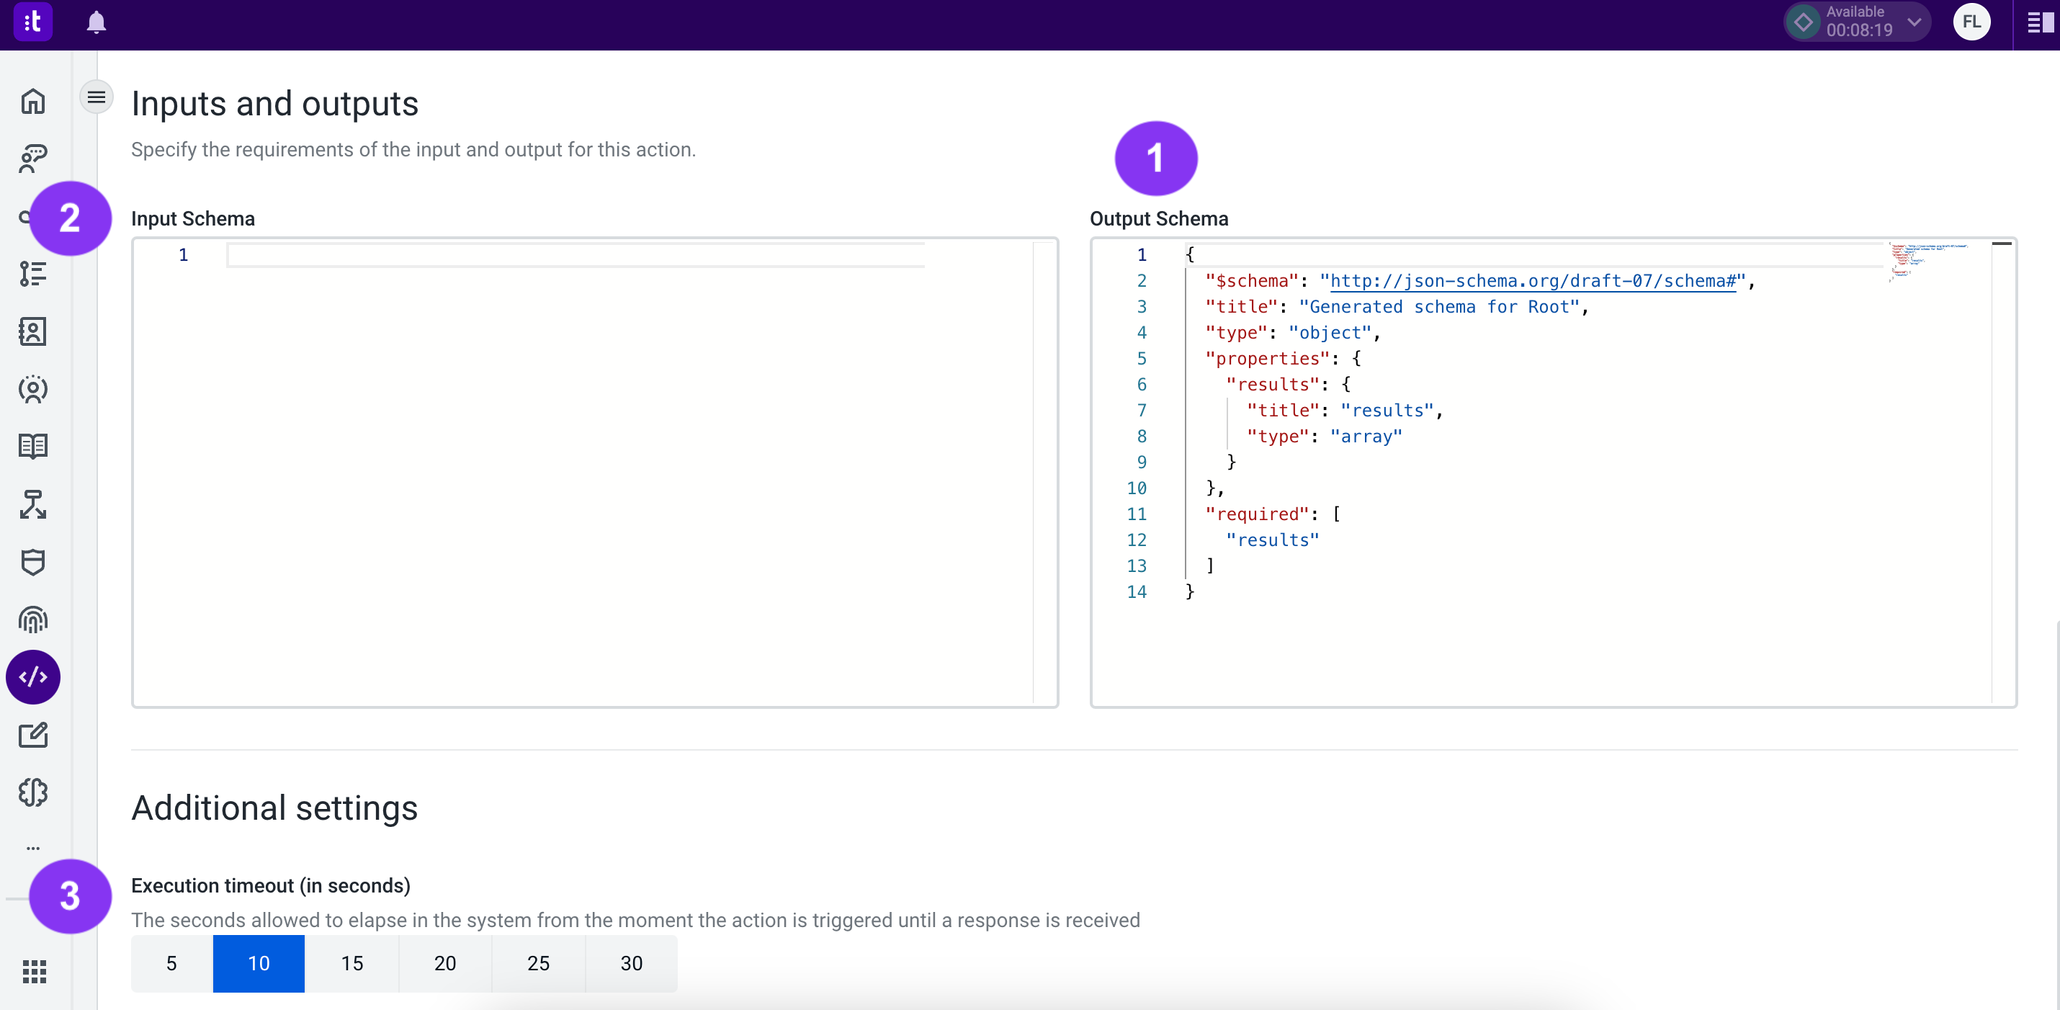
Figure 7 - Outputs and inputs
4.10 - Click the Save as a draft button (Figure 8 - 1) once you've completed filling out the fields.
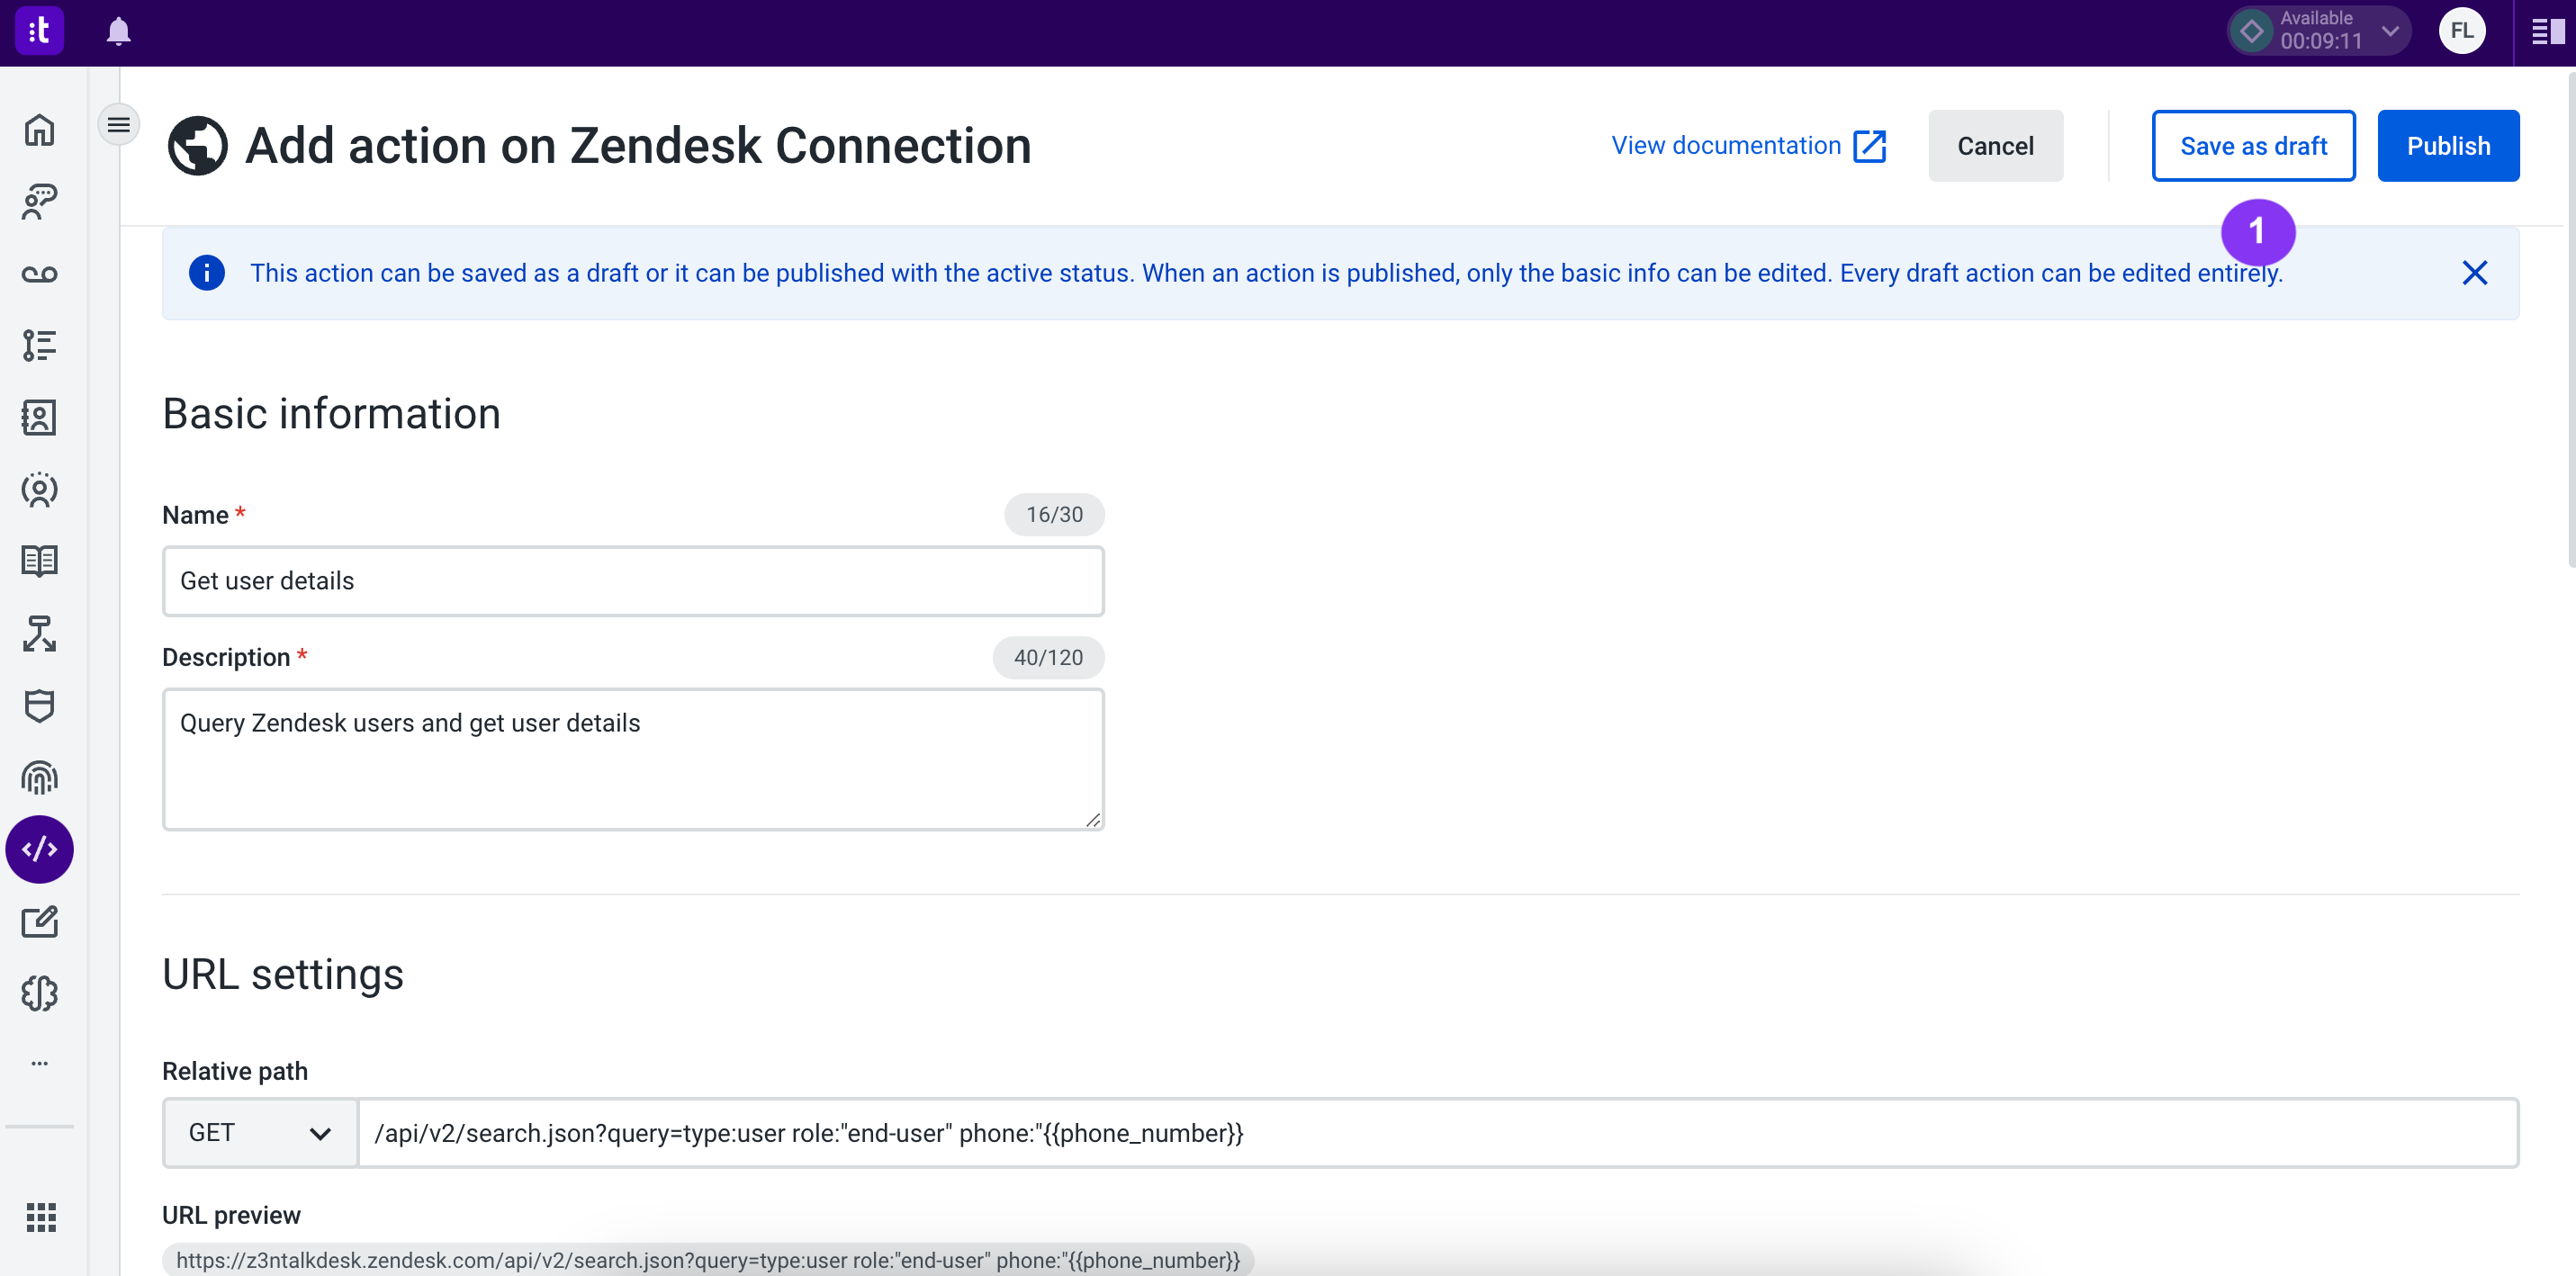
Figure 8 - Save as draft
4.11 - Go back to the Actions tab (Figure 5 - 1) and click the Get user details Action (Figure 5 - 4).
4.12 - Click the Test Action button (Figure 9 - 1) to test the Action.
4.13 - If everything functions as expected, click the Publish button (Figure 9 - 2) to publish your Action.
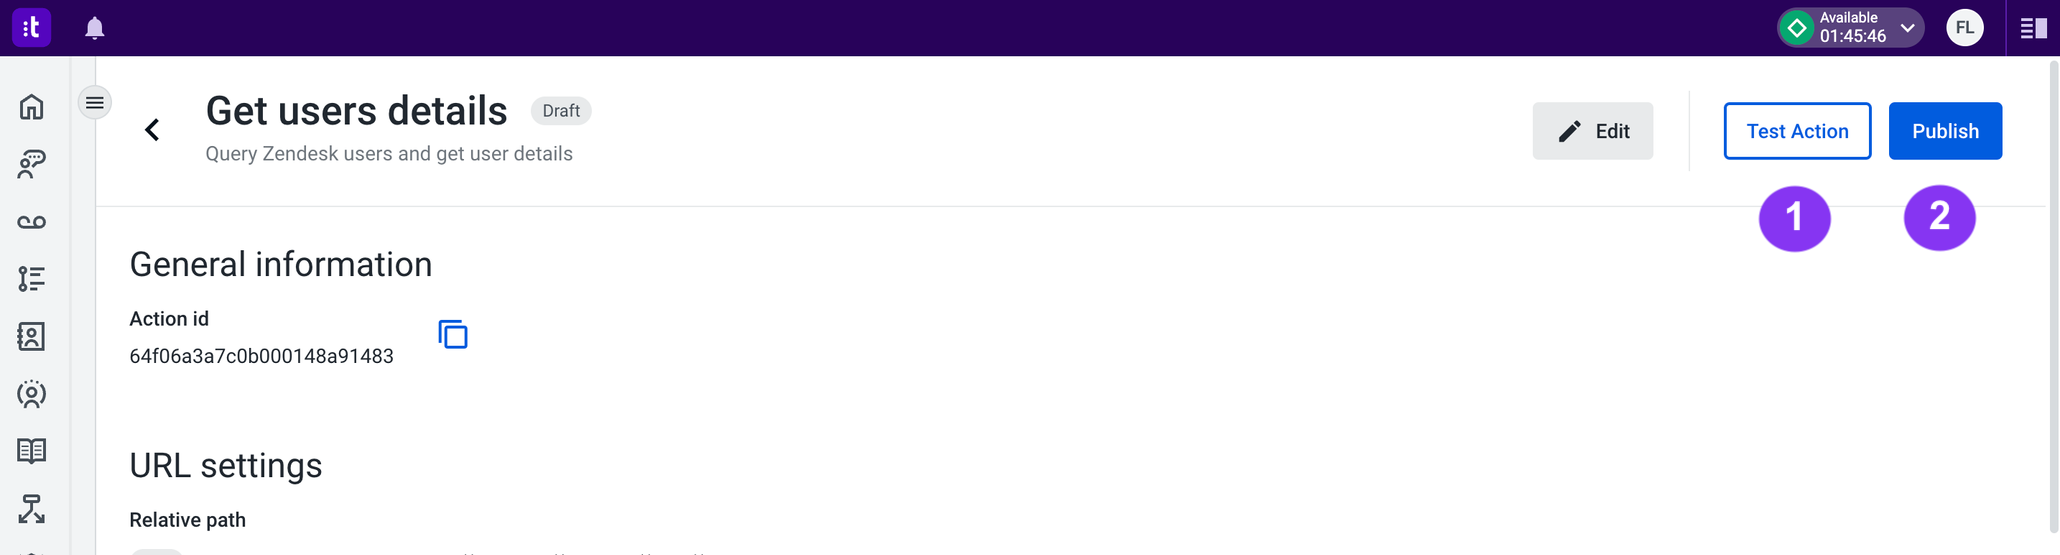
Figure 9 - Publish and test the action
4 - Create a Function to Parse the Results of the Data Dip
Now a Function will be created to parse the results and use a custom field in Studio to route the calls based on the custom field value.
4.1 - To create the custom field, return to Zendesk (Figure 10).
4.2 - Navigate to the Admin Center, select the People section (Figure 10 - 1), enter the User fields section (Figure 10 - 2), and click the Add field button (Figure 10 - 3).
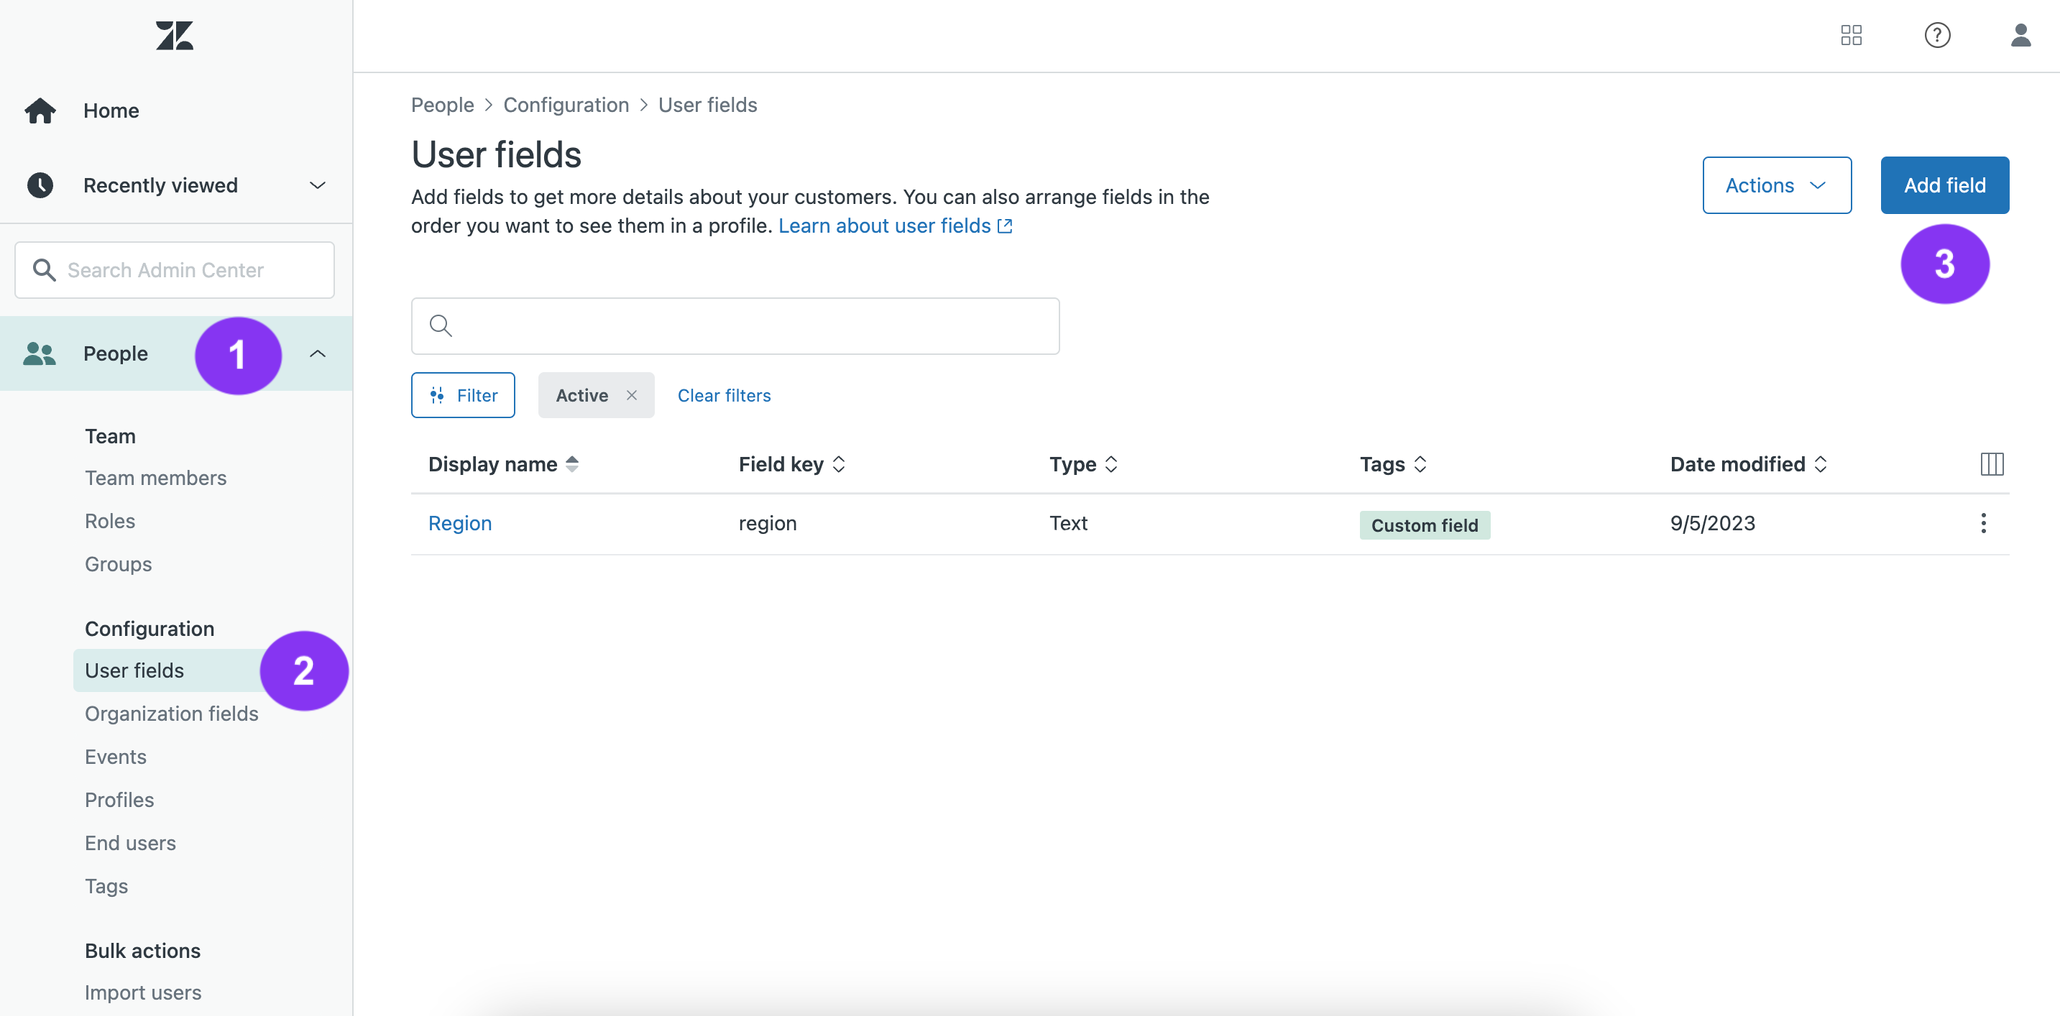
Figure 10 - Zendesk dashboard
4.3 - Select a Text field (Figure 11 - 1) and enter the required information. In this example, Region (Figure 11 - 2) was selected to enable call routing based on the customer's region.
4.4 - Once you've completed all the fields, click the Save button (Figure 11 - 3).
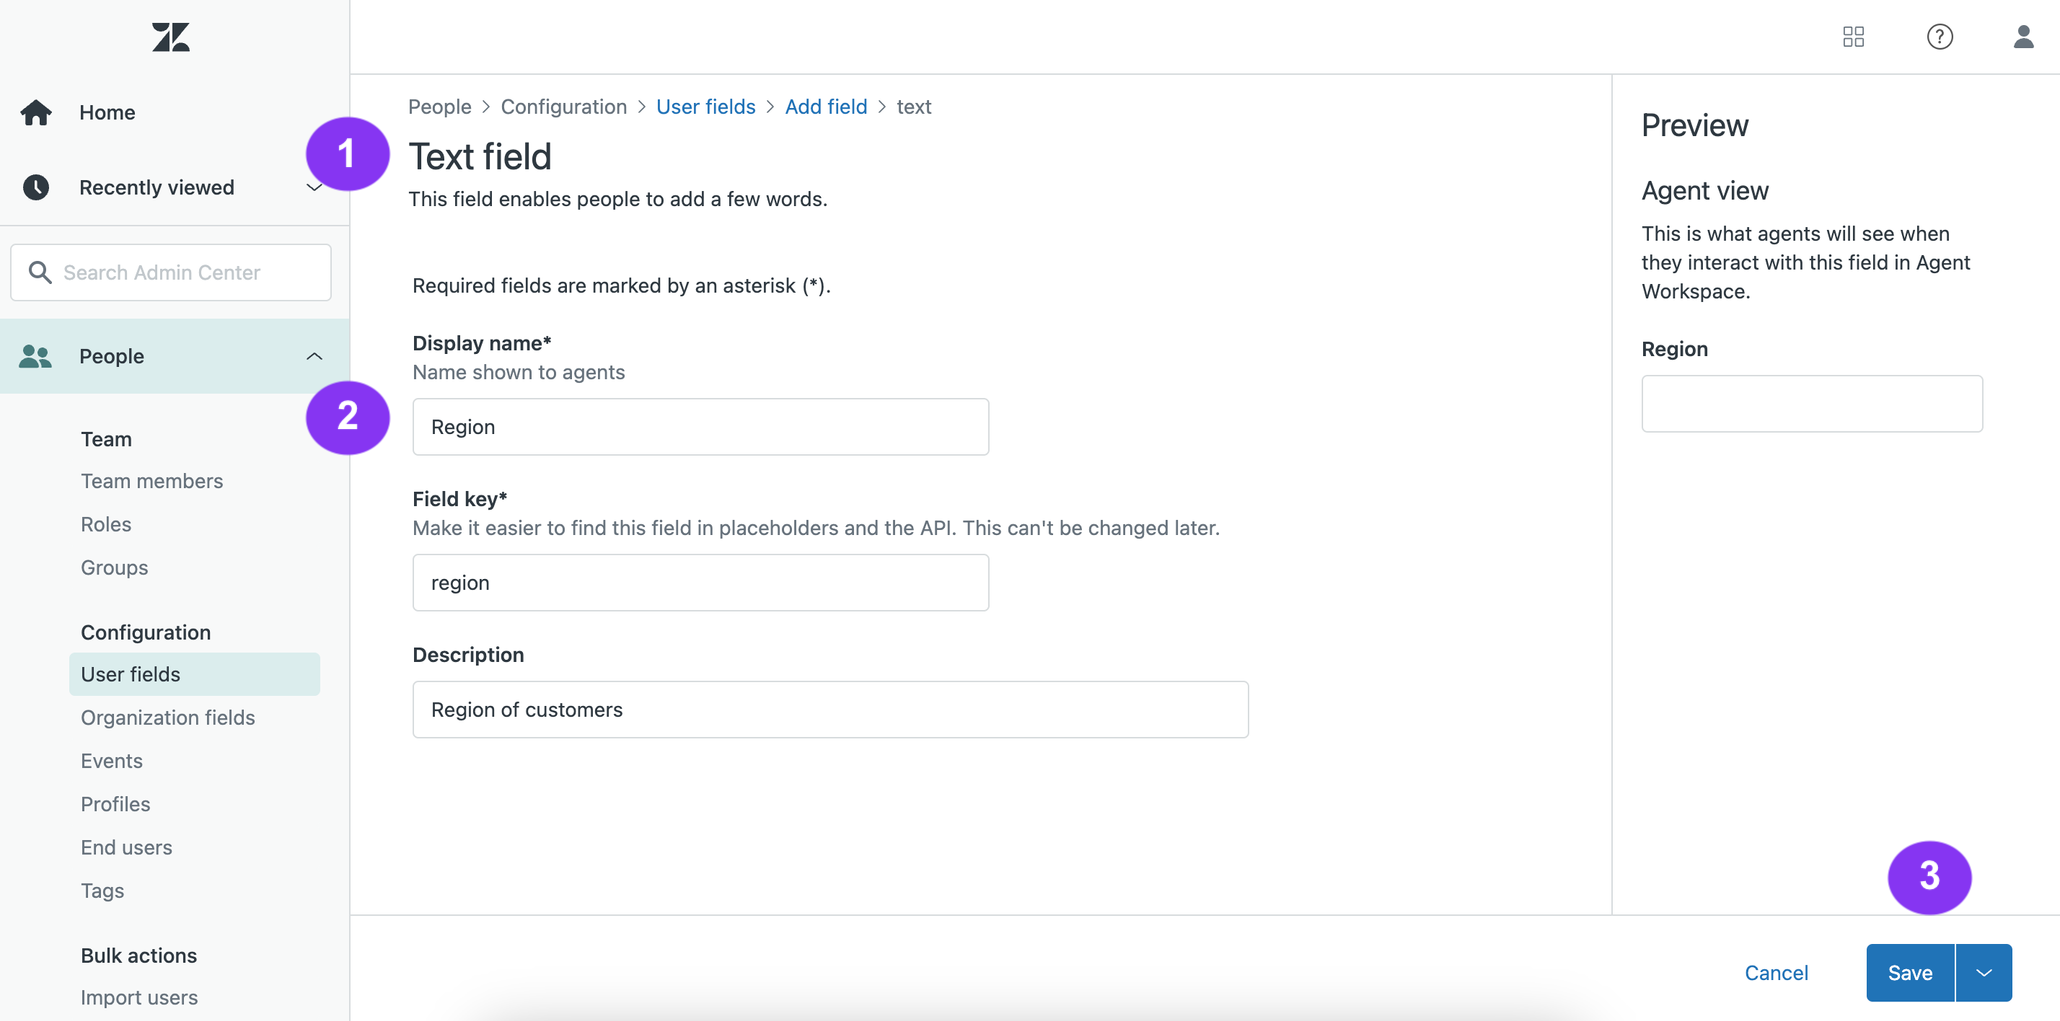
Figure 11 - Text field configuration
4.5 - Return to Talkdesk to begin creating the Function. Enter Studio (Figure 12 - 1), click Flows (Figure 12 - 2), and then select the Functions tab (Figure 12 - 3).
4.6 - Click the Create function button (Figure 12 - 4).
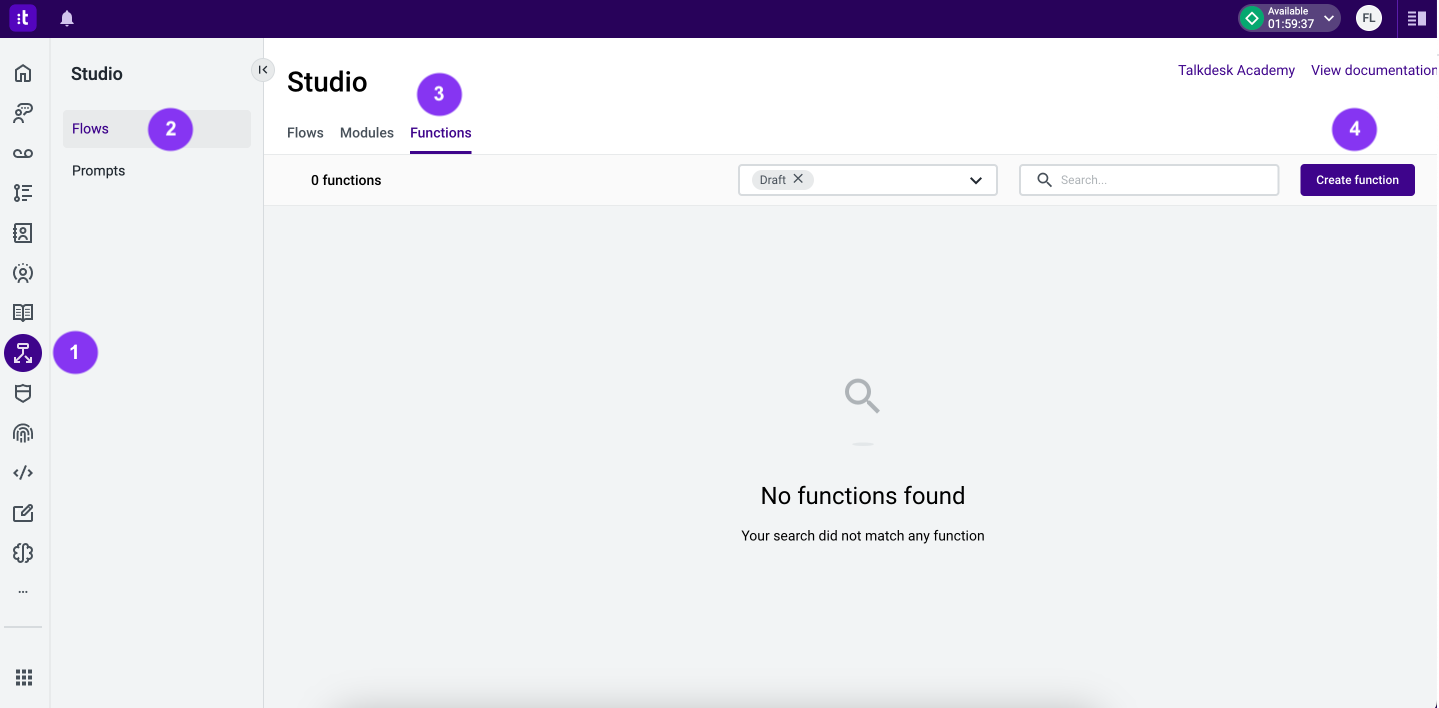
Figure 12 - Studio function
4.7 - A modal (Figure 13 - 1) will open for configuring the Function details.
4.8 - Add a Function name (mandatory; Figure 13 - 2) and a description (Figure 13 - 3).
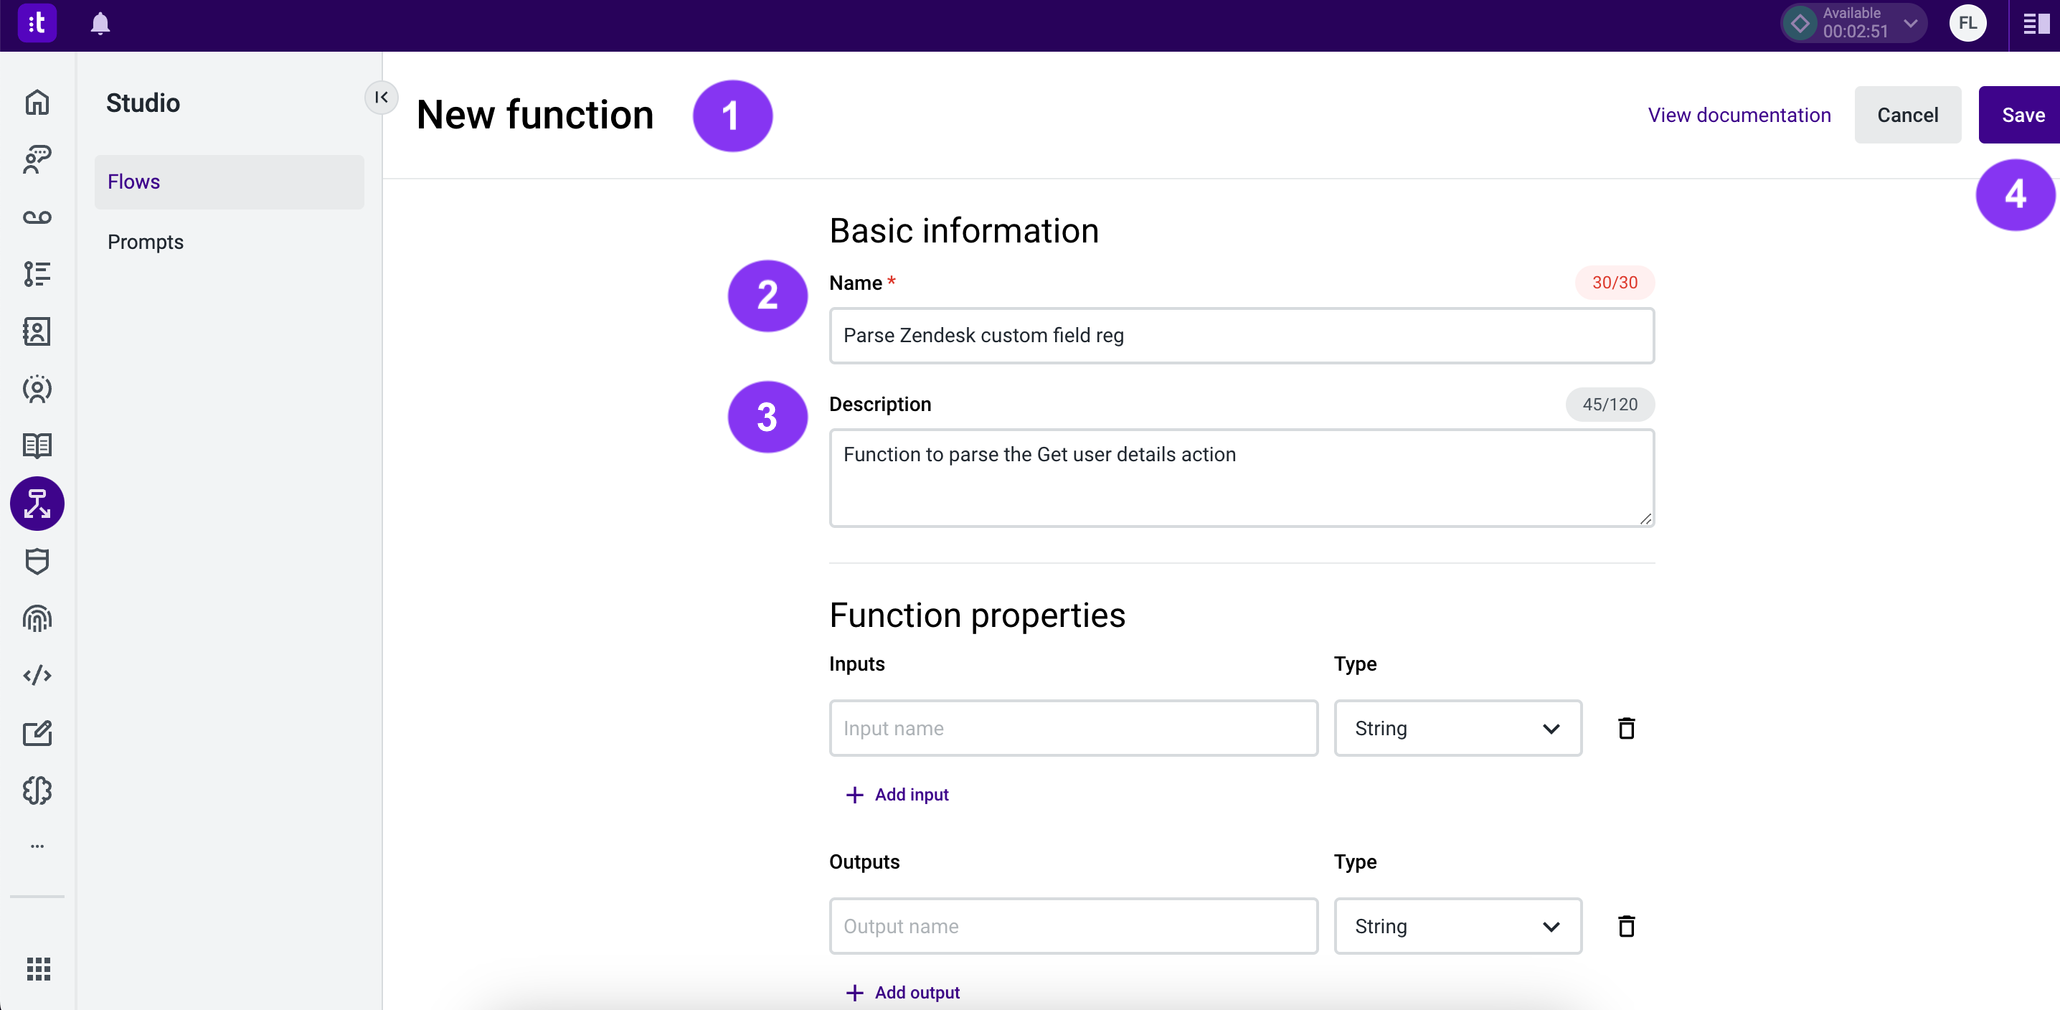
Figure 13 - Function configuration
4.9 - Specify the values for Inputs (Figure 14 - 1) and Outputs (Figure 14 - 2). In this case, raw_response is used as input and user_region as output.
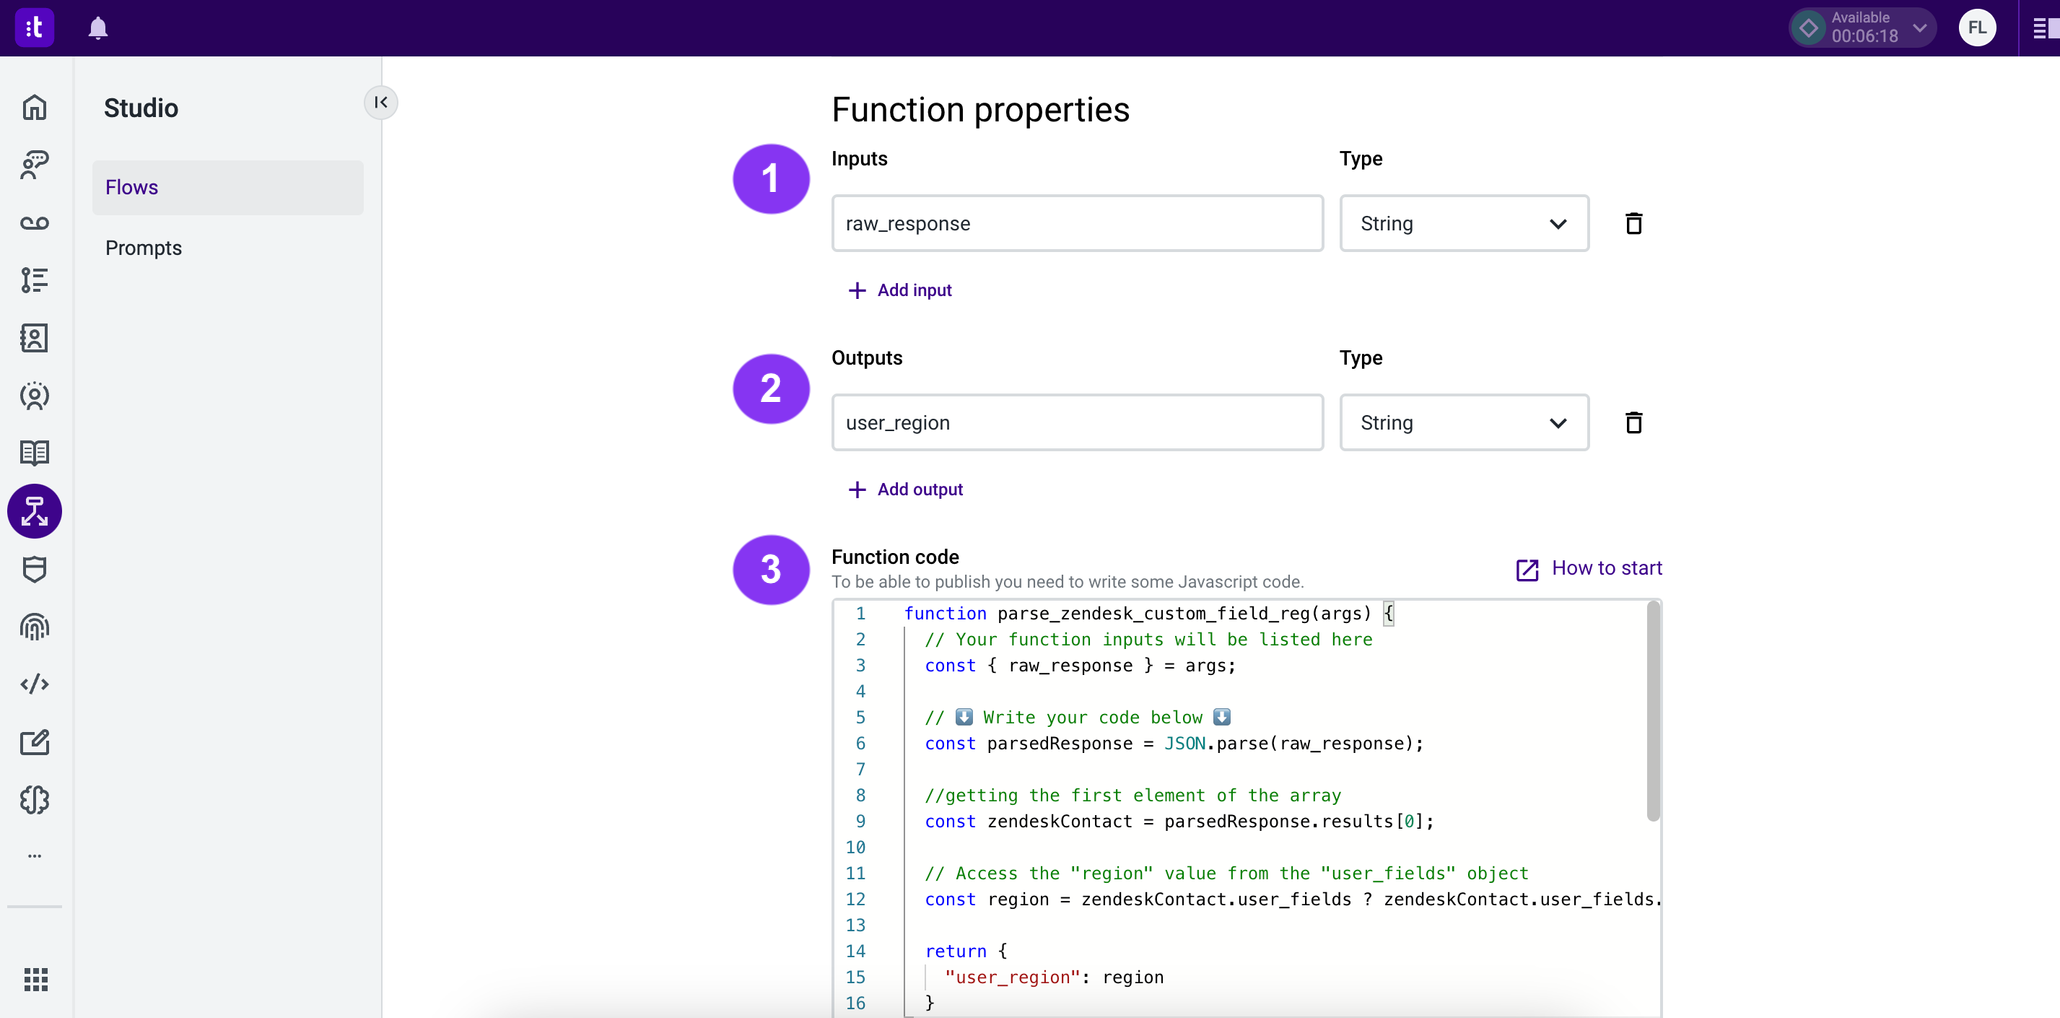
Figure 14 - Inputs and outputs
In the Function code (Figure 14 - 3), you will need to use JavaScript to parse the result and store only the custom field
region. For this purpose, the following code was used.
function parse_zendesk_custom_field_reg(args) {
  // Your function inputs will be listed here
  const { raw_response } = args;

  // ⬇️ Write your code below ⬇️
  const parsedResponse = JSON.parse(raw_response);

  //getting the first element of the array
  const zendeskContact = parsedResponse.results[0];

  // Access the "region" value from the "user_fields" object
  const region = zendeskContact.user_fields ? zendeskContact.user_fields.region : null;

  return {
    "user_region": region
  }
}
4.10 - Once you've completed all the fields, click the Save button (Figure 13 - 4).
5 - Build a Studio Flow to Execute the Action and Perform a Conditional Routing
Finally, you need to put it all together and build the Studio flow that will route calls based on the caller's region stored in Zendesk.
5.1 - Still in Studio (Figure 15 - 1), enter Flows (Figure 15 - 2).
5.2 - Select the Flows tab (Figure 15 - 3), and click the Create Flow button (Figure 15 - 4).
5.3 - Select an empty flow (Figure 15 - 5).
5.4 - A modal will open (Figure 15 - 5). Here, choose Voice (Figure 15 - 6) > Incoming Call (Figure 15 - 7).
5.5 - Click the Next button (Figure 15 - 8), and provide a name and description for the flow.
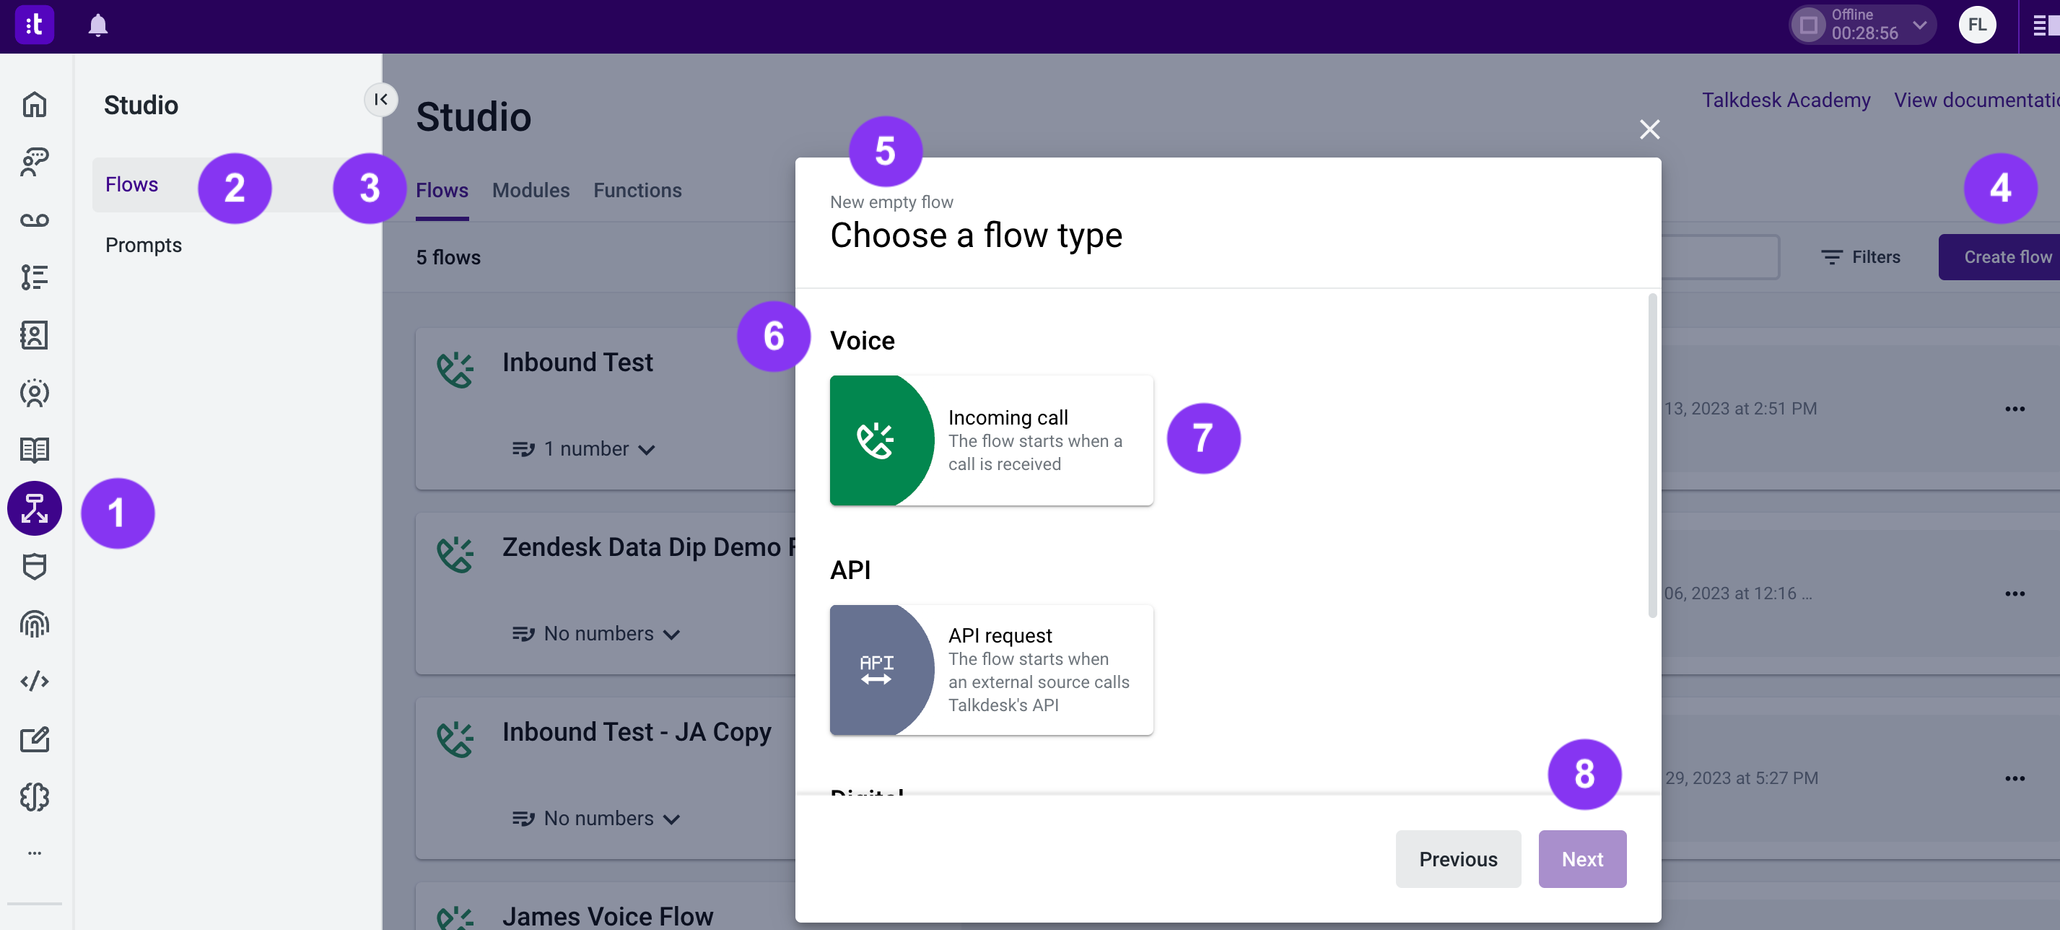
Figure 15 - New empty flow
5.6 - Select the Incoming call component (Figure 16 - 1) and, in thePreferences tab (Figure 16 - 2), create a variable for the Source phone field (Figure 16 - 3). In this example, this variable is user_phone.
5.7 - Once you're done, click the Save button (Figure 16 - 4).
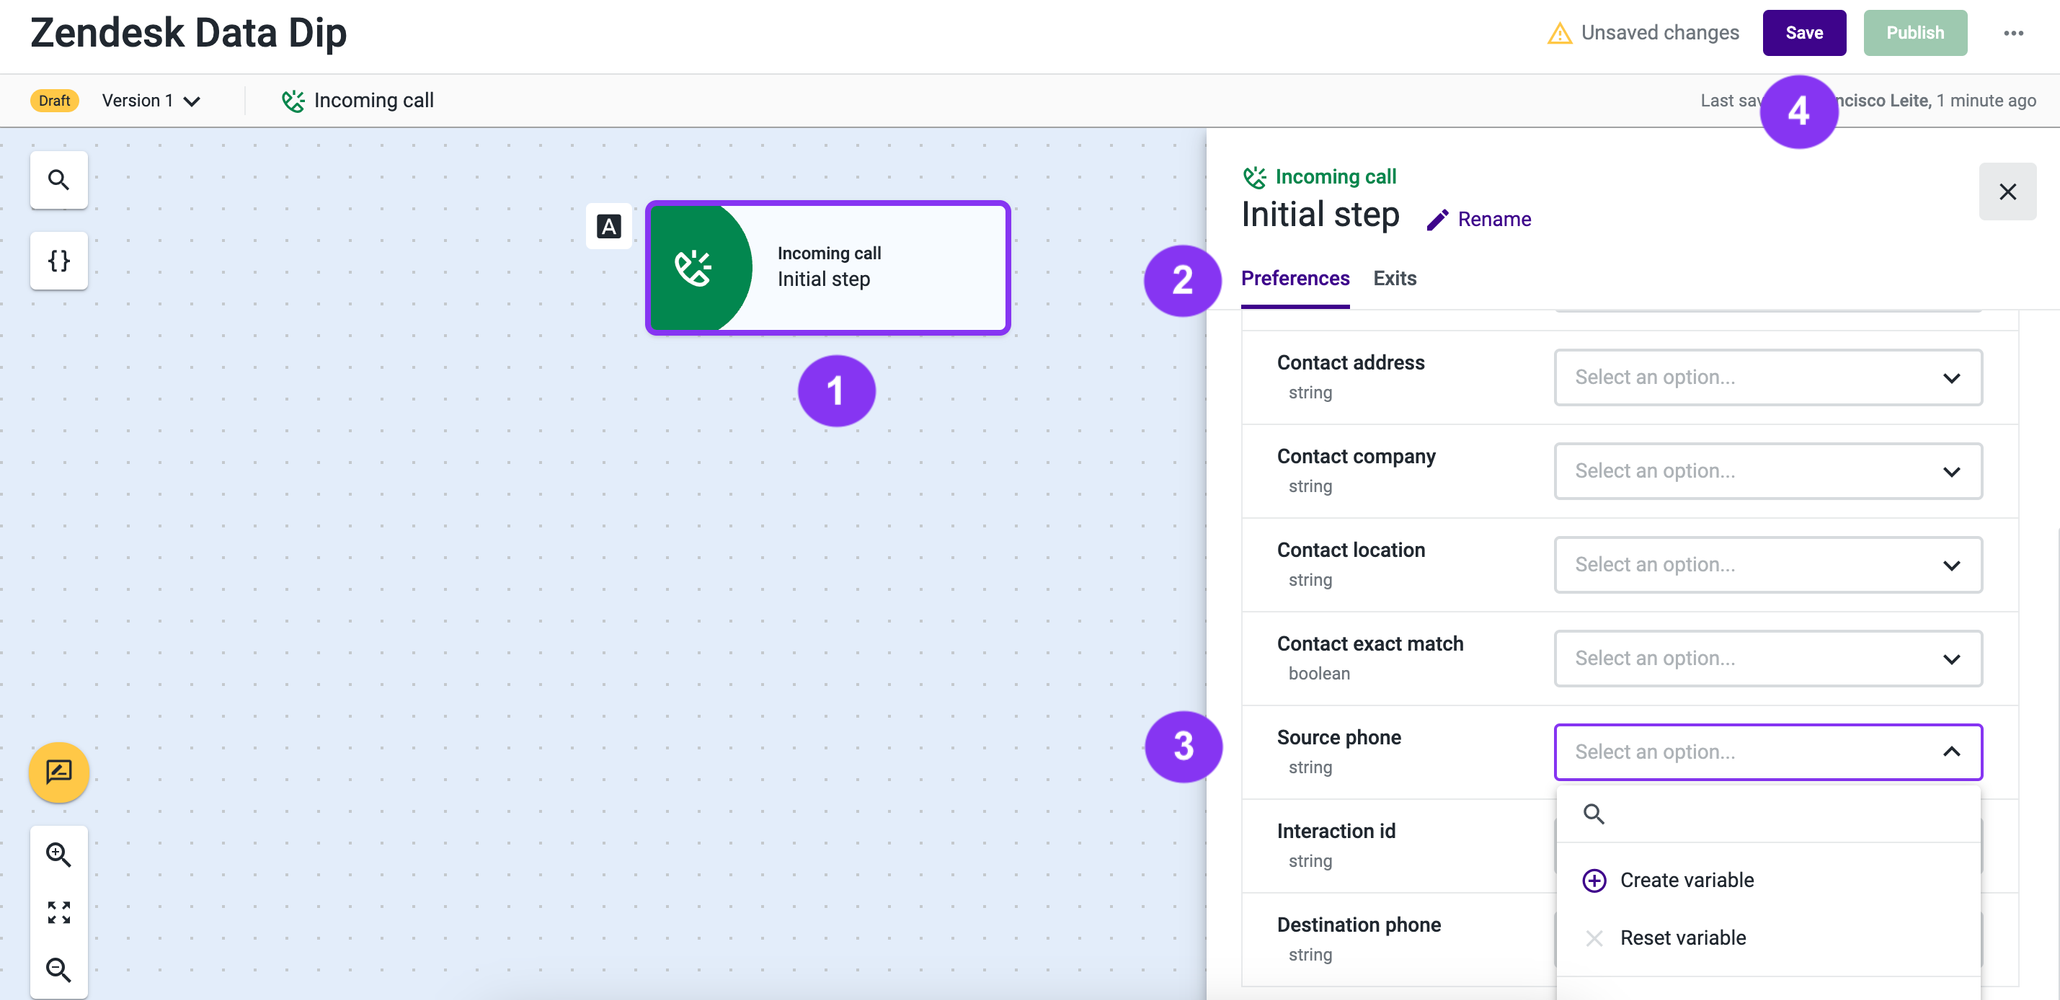
Figure 16 - Preferences
5.8 - Proceed by clicking the Exits tab (Figure 17 - 1) to add a new step. A modal will open (Figure 17 - 2).
5.8 - Add, as a new step, an Execute action powered by Connections (Figure 17 - 3), and name it.
5.9 - Once you're done, click the Save button (Figure 17 - 4).
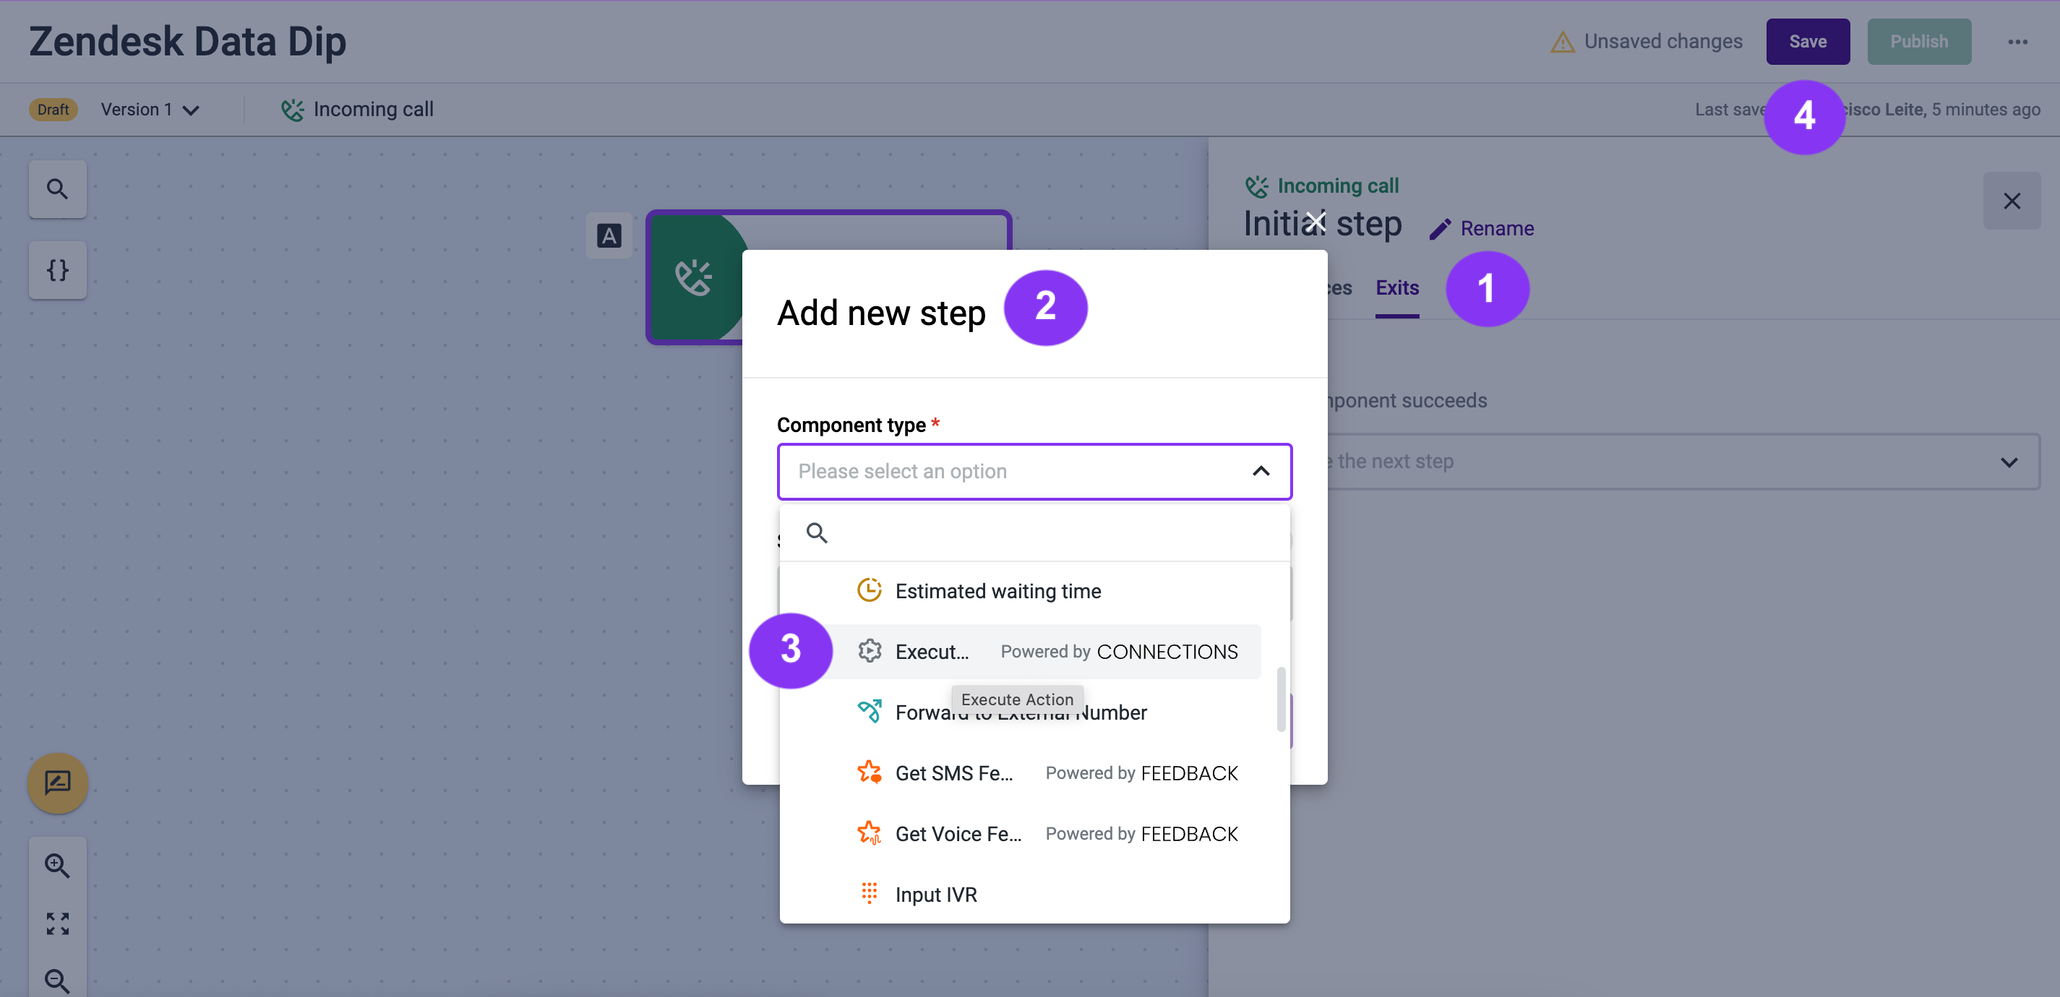
Figure 17 - Add new step modal
5.10 - Select the previously created step (Figure 18 - 6), and in the Preferences tab (Figure 16 - 2), choose the Connection created in step 2, and the Action created in step 3.
5.10 - Configure the Inputs (Figure 18 - 1) and the Output (Figure 18 - 2) to use your variables. In this case, user_phone (Figure 18 - 3) goes as Input, and raw_zendesk_results (Figure 18 - 4) goes as Output. Once you're done, click the Save button (Figure 18 - 5).
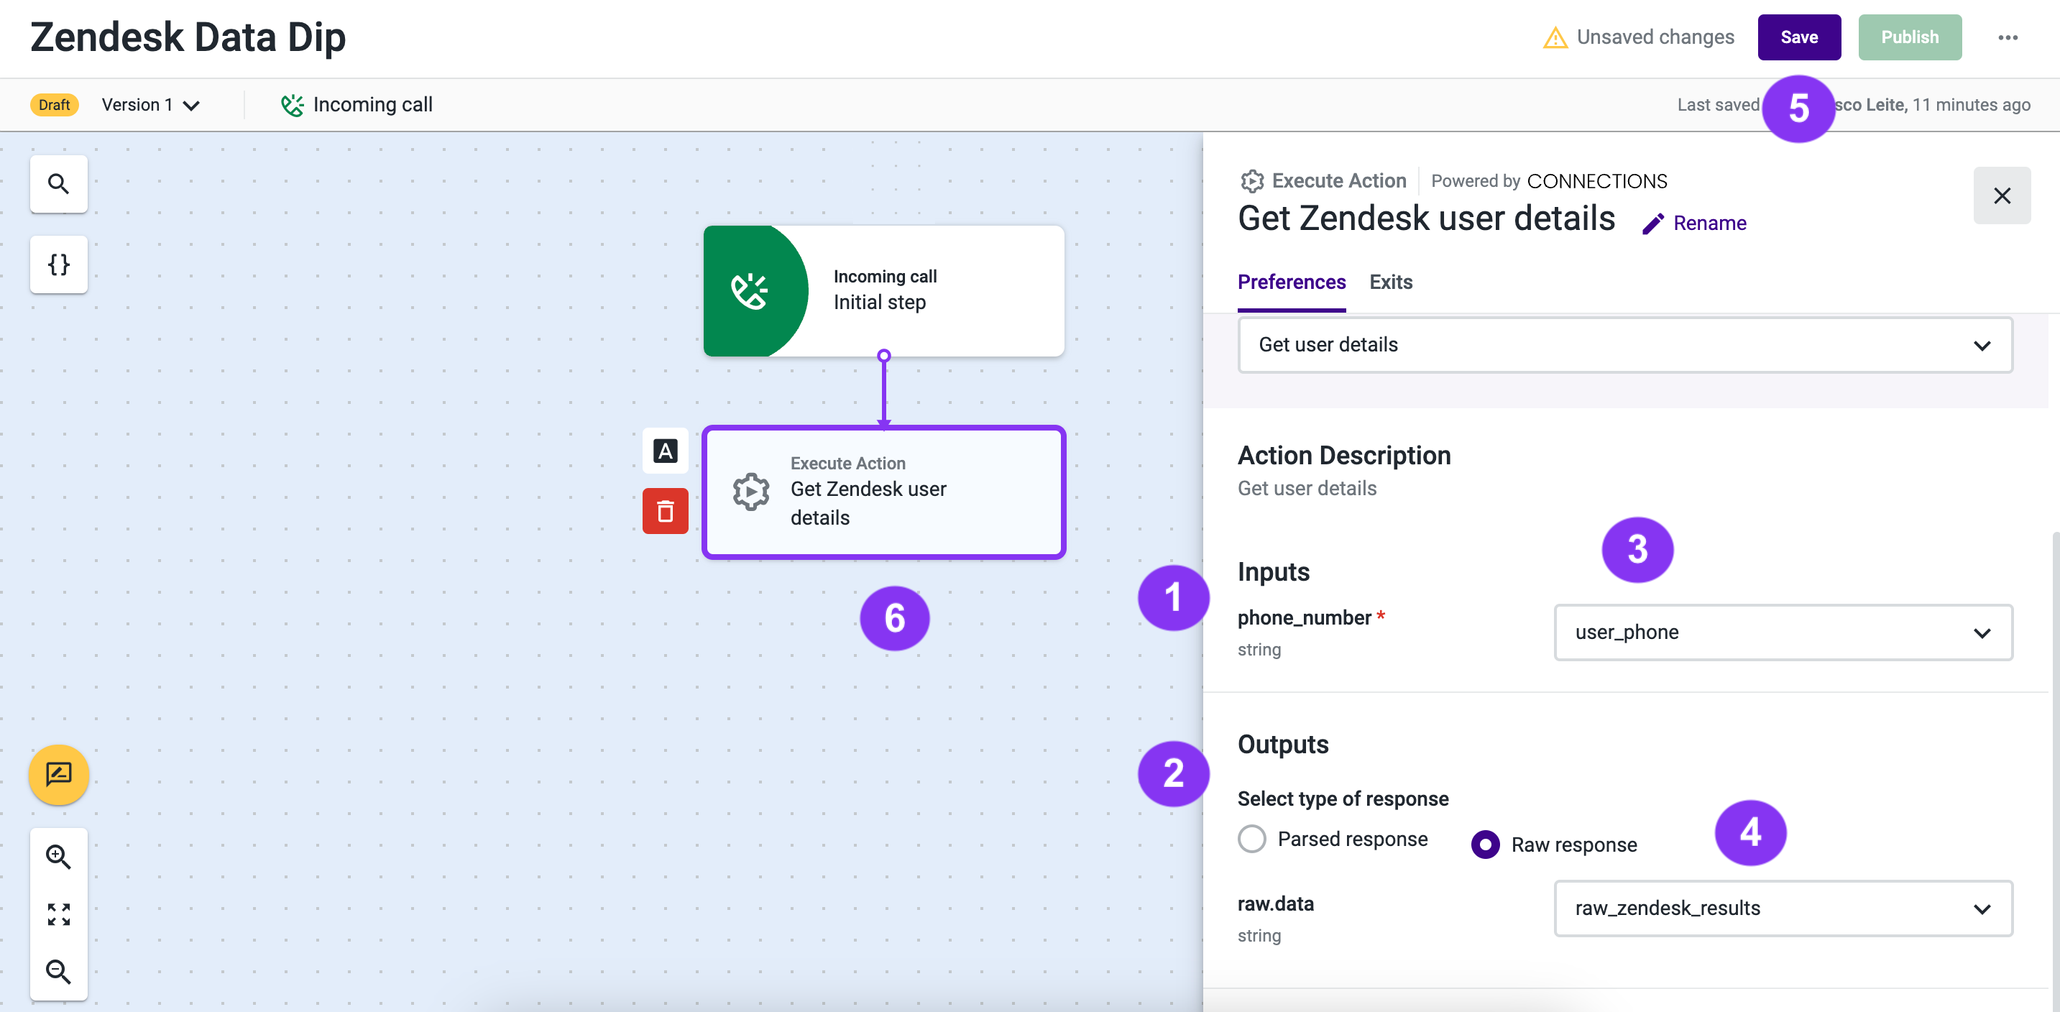
Figure 18 - Inputs and outputs
5.11 - To proceed, in the Exits tab (Figure 19 - 1), add a new step: a Run Function component (Figure 19 - 2), and give it a name.
5.12 - Select End Flow as the Execution Error component (Figure 19 - 3).
5.12 - Once you're done, click the Save button (Figure 19 - 4).
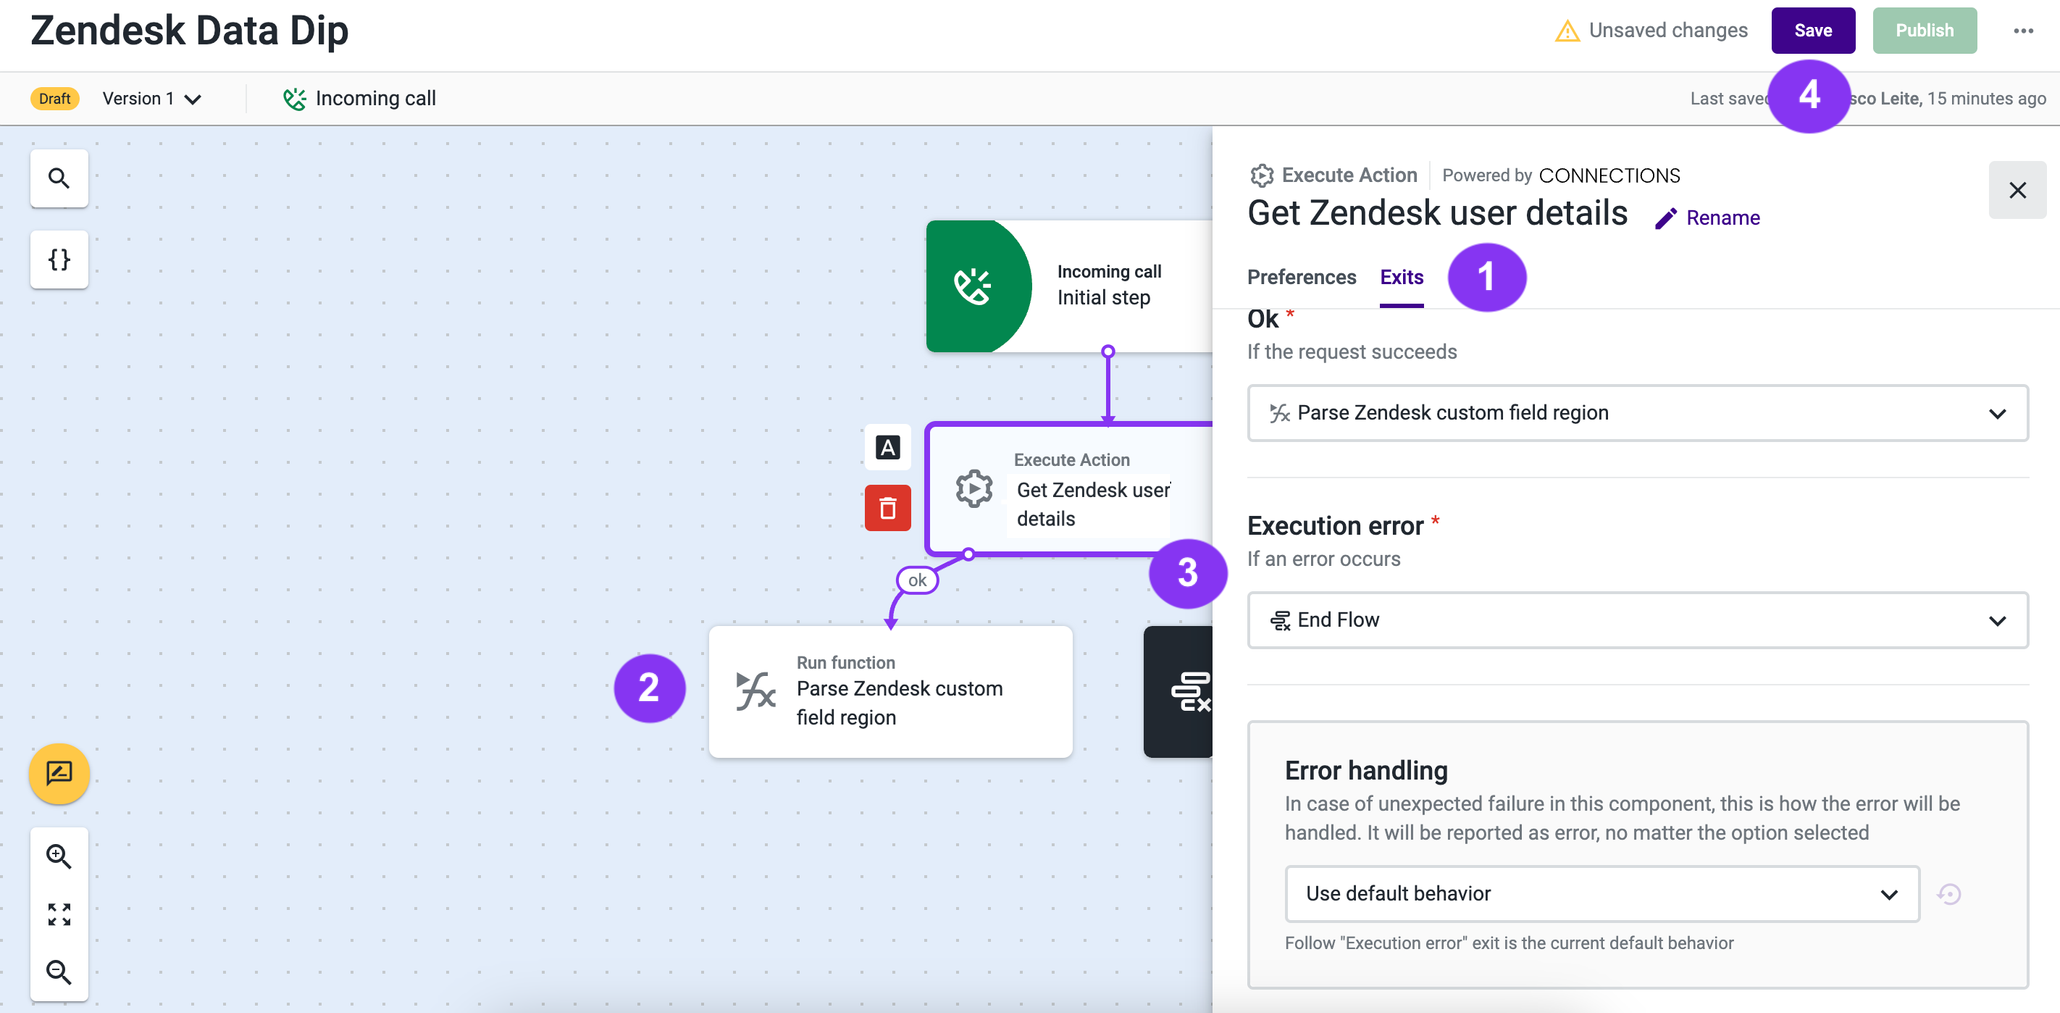
Figure 19 - Exits tab
5.13 - Select the previously created step (Figure 20 - 1=, and in the Preferences tab (Figure 20 - 2), choose the Function (Figure 20 - 3) created in step 4.
5.13 - Configure the Input (Figure 20 - 4) and Output (Figure 20 - 5) fields to use your variables. In this case, they are raw_zendesk_results as Input (Figure 20 - 6) and user_region as Output (Figure 20 - 7). Once you're done, click the Save button (Figure 20 - 8).
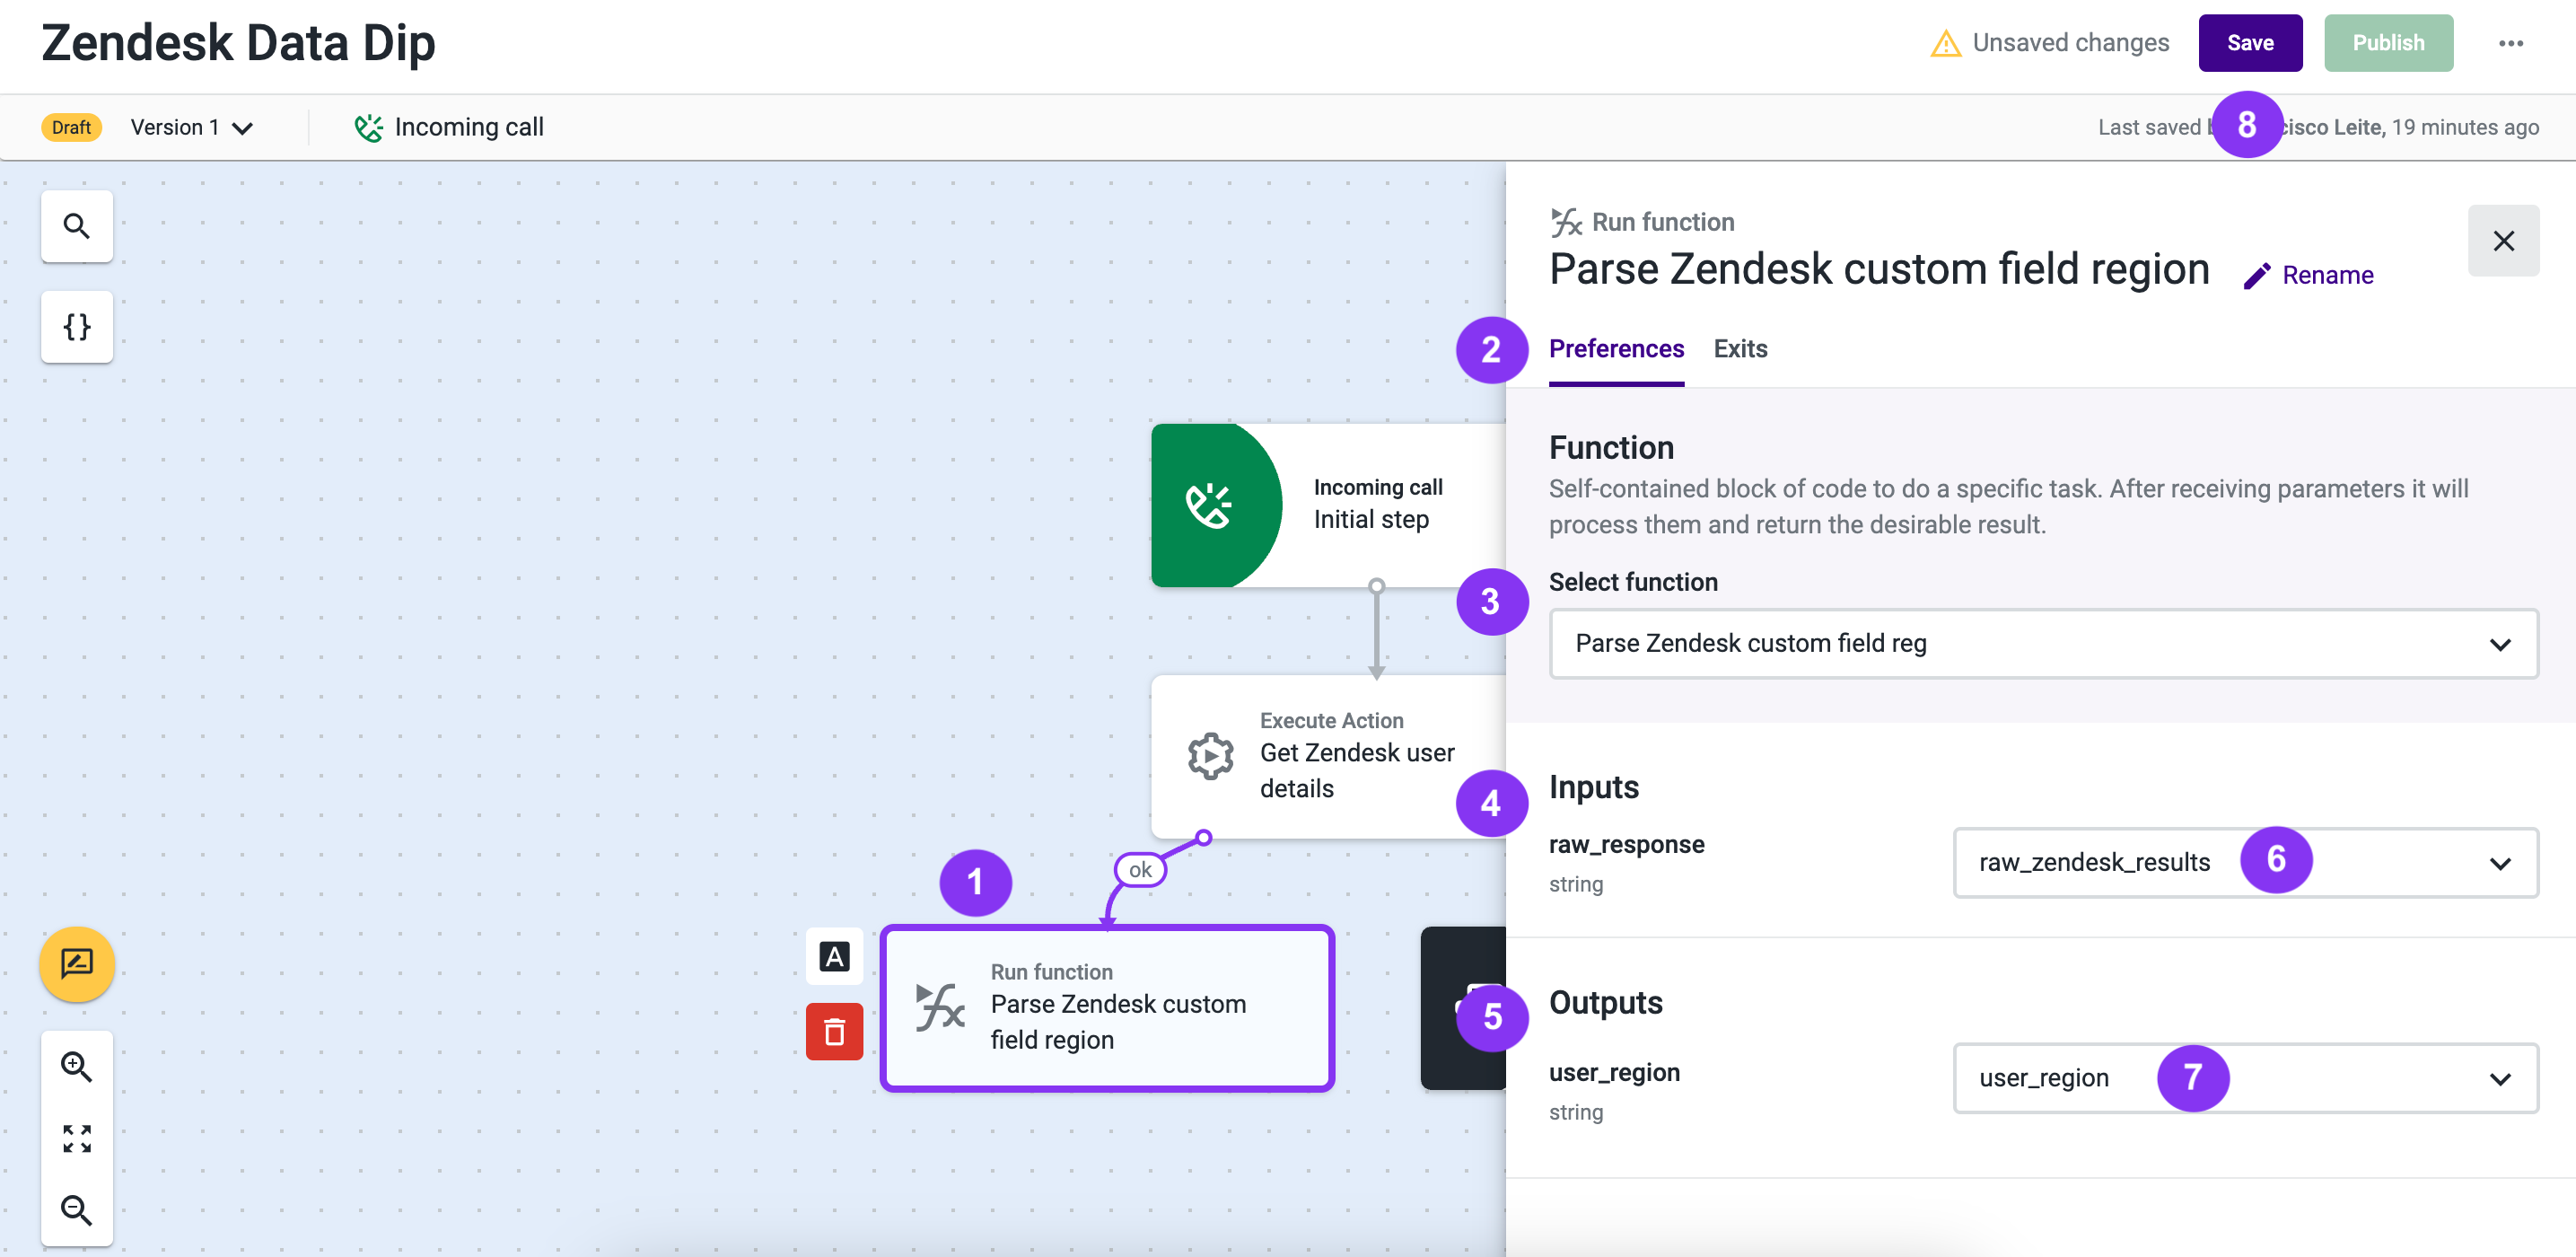
Figure 20 - Preferences tab
5.13 - To proceed, in the Exits tab (Figure 21 - 1), add a new step using a Conditional Statement component and give it a name.
5.14 - Select the End Flow component in the Execution error field (mandatory; Figure 21 - 2).
5.15 - Once you're done, click the Save button (Figure 21 - 3).
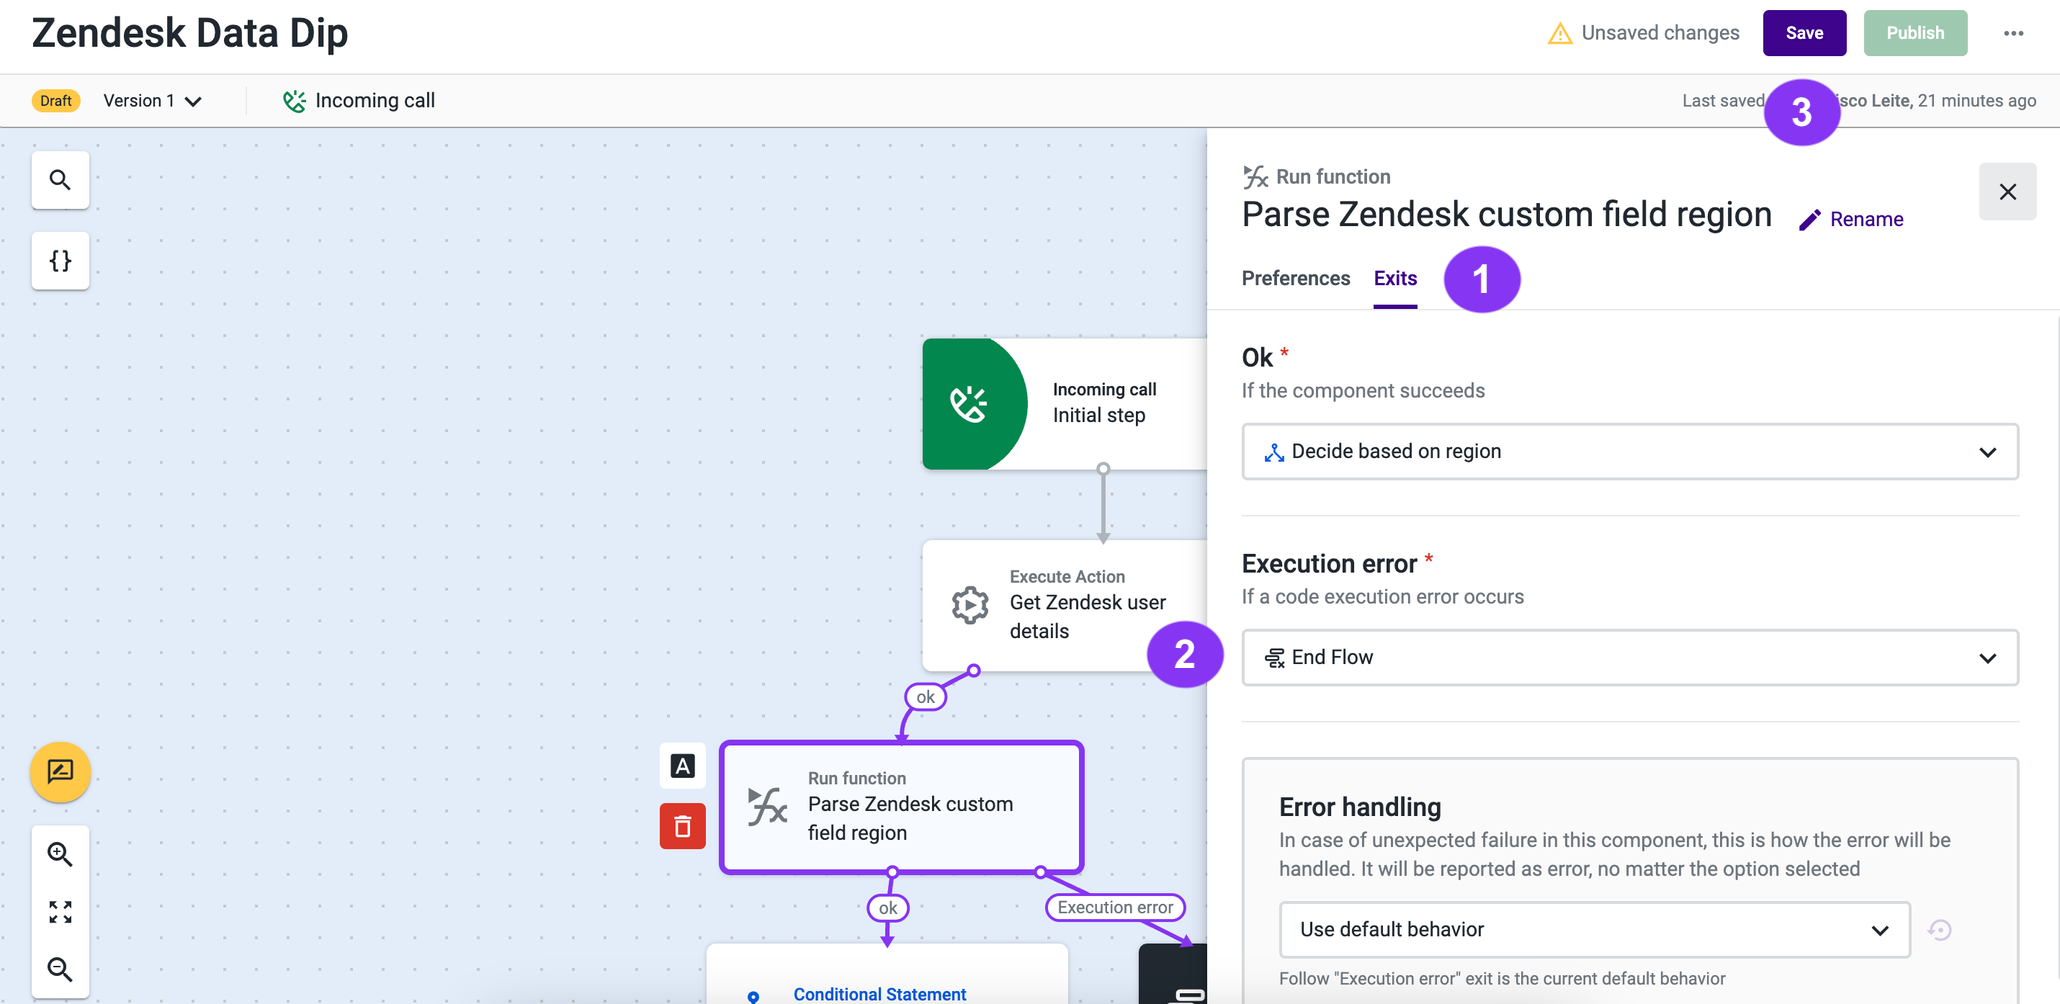
Figure 21 - Exits tab
5.16 - Select the previously created step (Figure 22 - 3) and, in the Exits tab (Figure 22 - 1), define the conditions and exits based on your specific use case.
In this example, only one condition is used. It is definied as Matching All (mandatory; Figure 22 - 2) and setting
user_regiontoEqualstoEMEA(Figure 22 - 3) which will direct the flow to a Play audio component (mandatory; Figure 22 - 4).
5.17 - Define a name for the exit (mandatory; Figure 22 - 5).
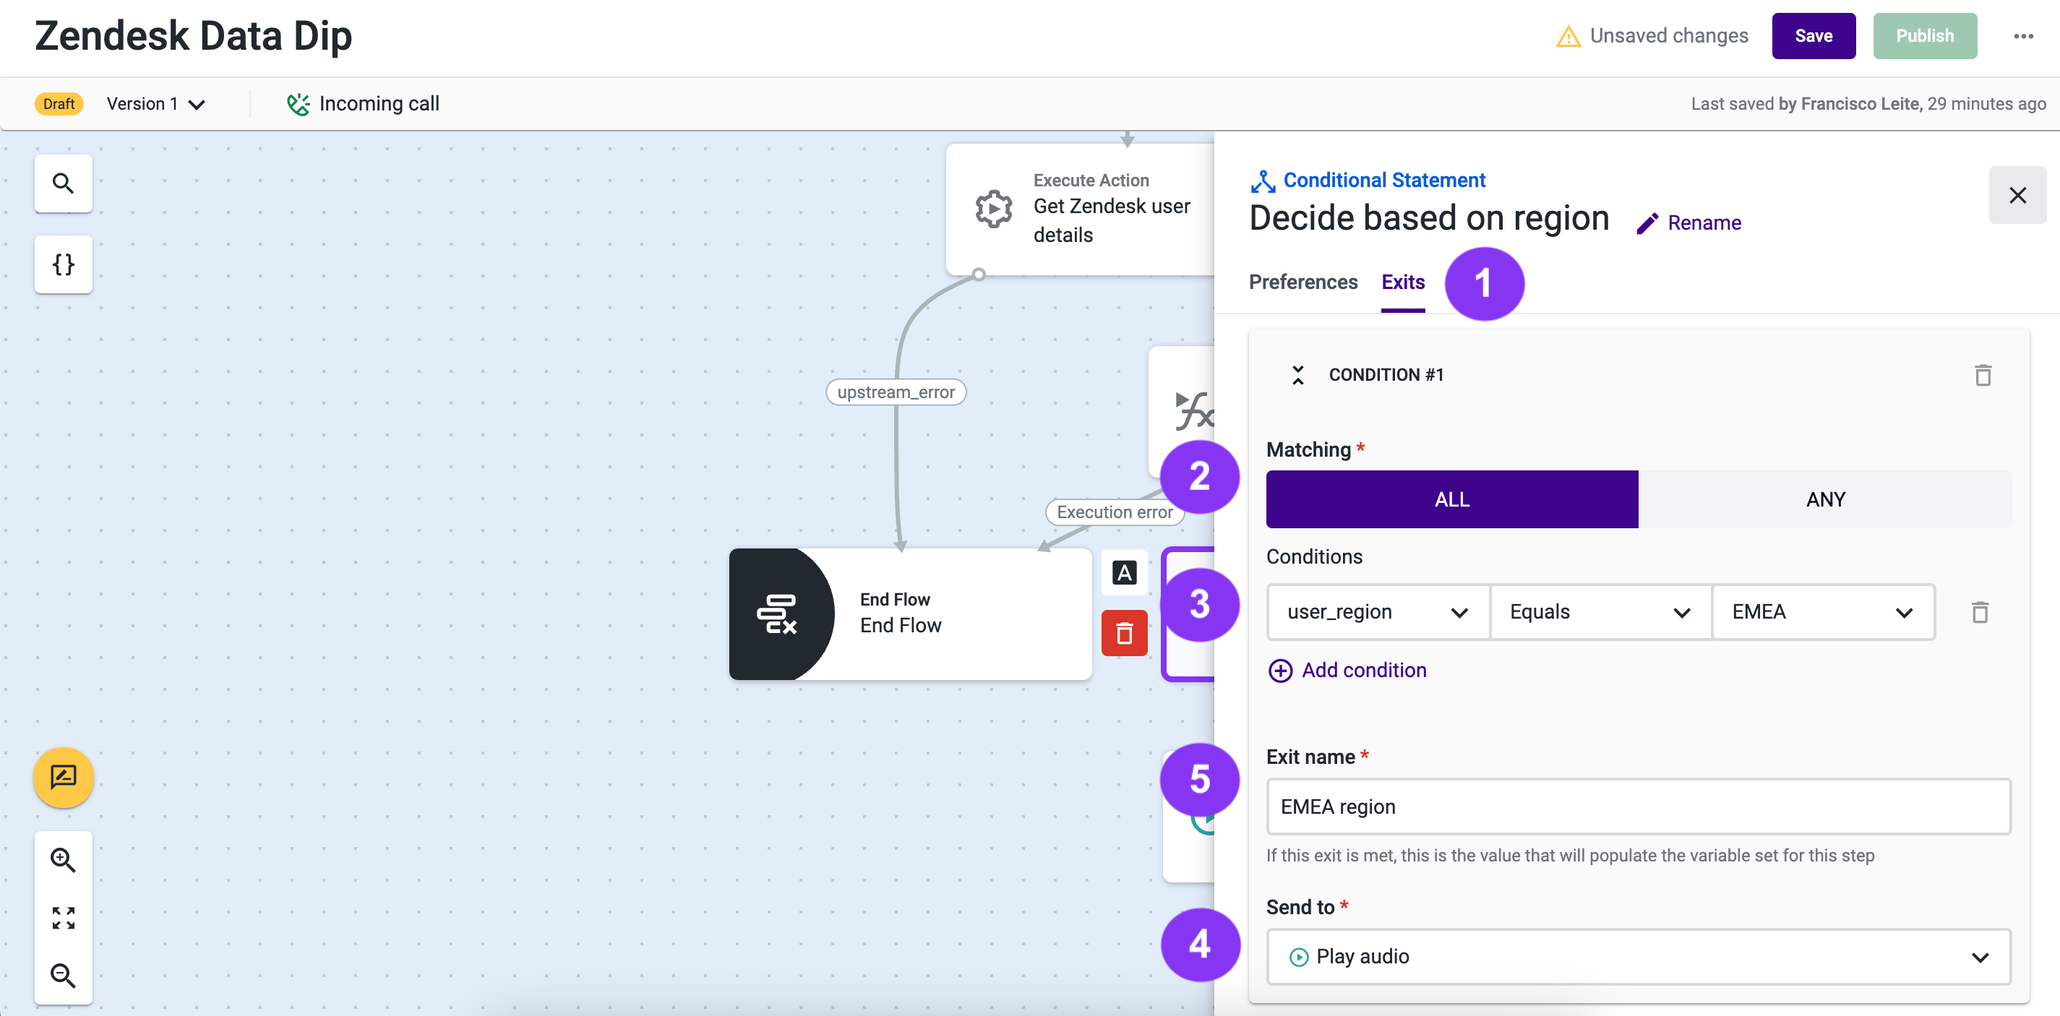
Figure 22 - Conditions and exits
5.18 - Define the next step for handling a No Match (mandatory; Figure 23 - 1) scenario that, in this example, is being sent to an Assign to an agent component (Figure 23 - 2).
5.19 - Once you're done, click the Save button (Figure 23 - 3).
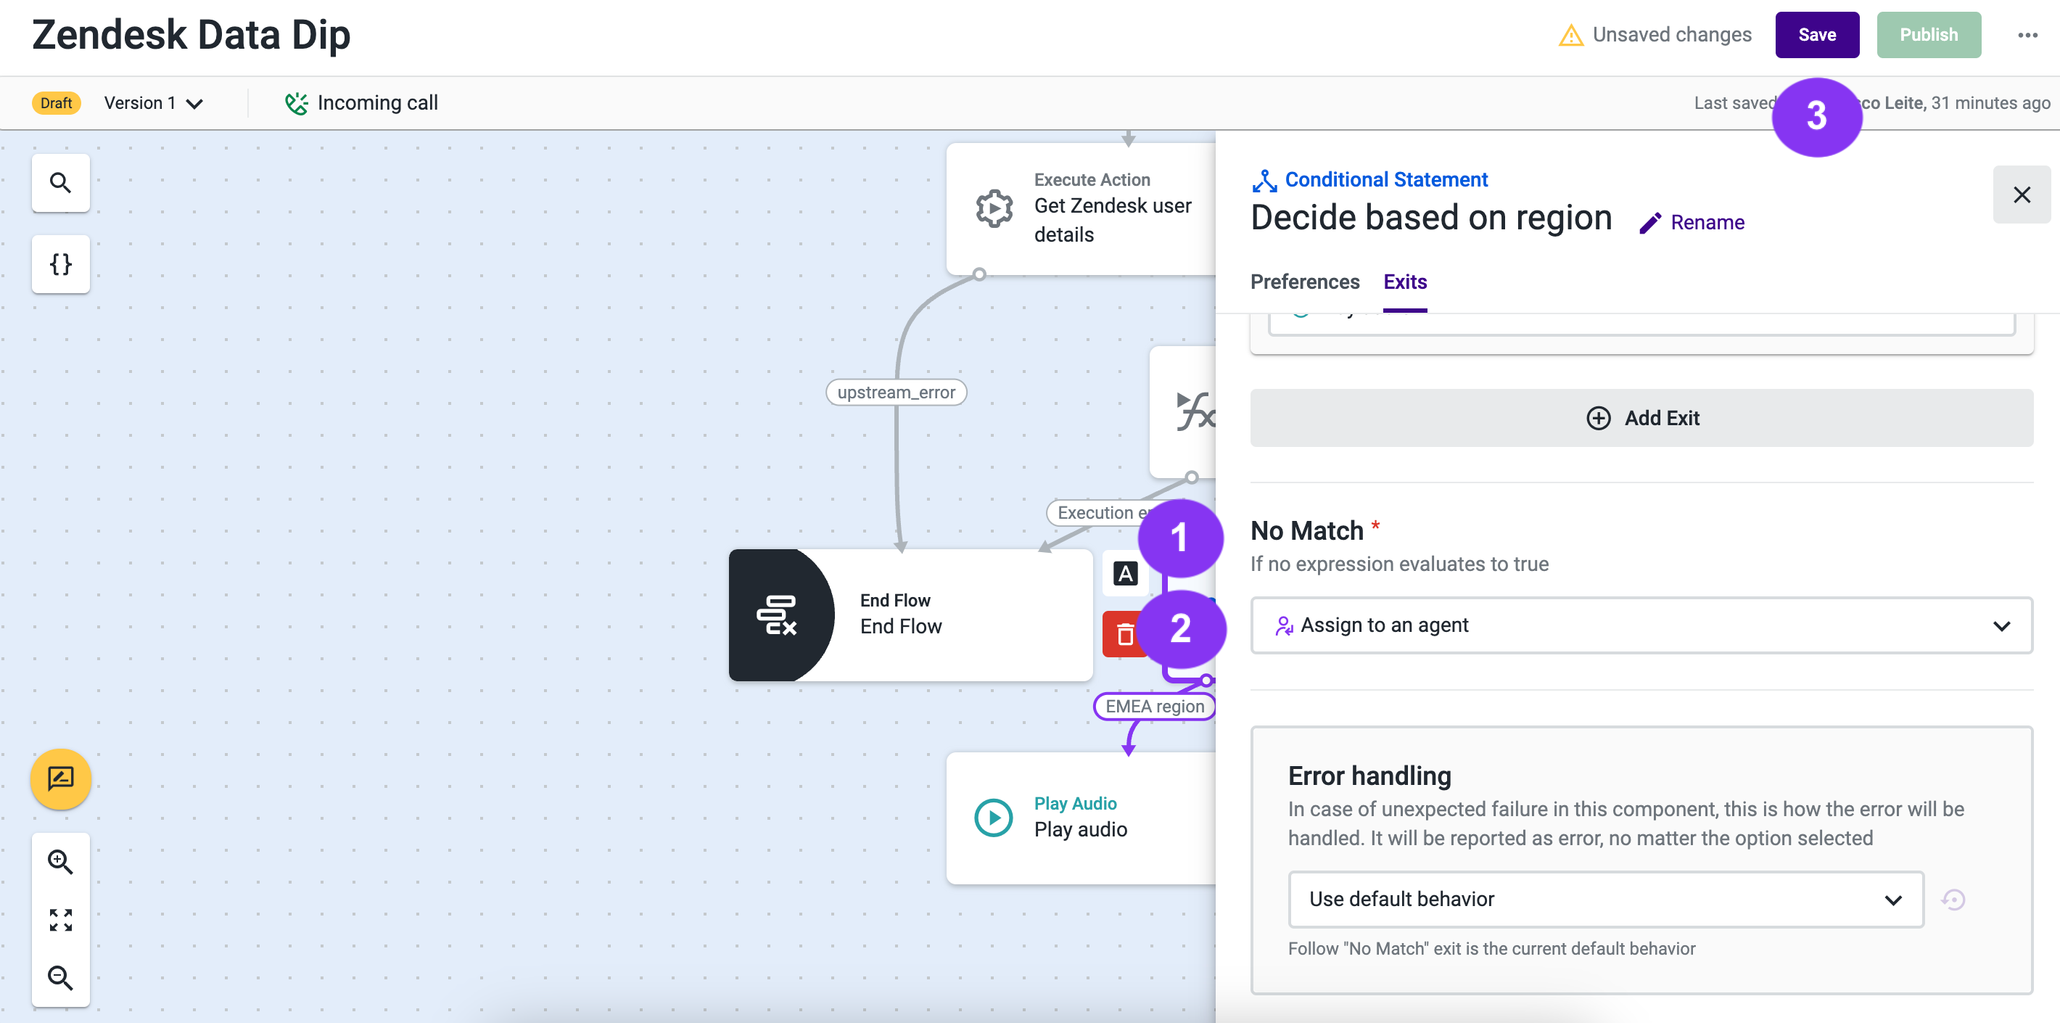
Figure 23 - No match
5.18 - Select the previously created step (Figure 24 - 4).
5.19 - In the Preferences tab (Figure 24 - 1), choose the type of message (Figure 24 - 2) to play and configure it (Figure 24 - 3; 4).
In this example,
Text-to-Speech(mandatory; Figure 24 - 2) is used with the message: Thanks for calling Company. We've noticed that you are calling fromuser_region. We are currently experiencing a service disruption in your region. Updates are available on our webpage (mandatory; Figure 24 - 4). This message utilizes the variable created in step 4, which is available in Studio.
5.20 - Once you're done, click the Save button (Figure 24 - 5).
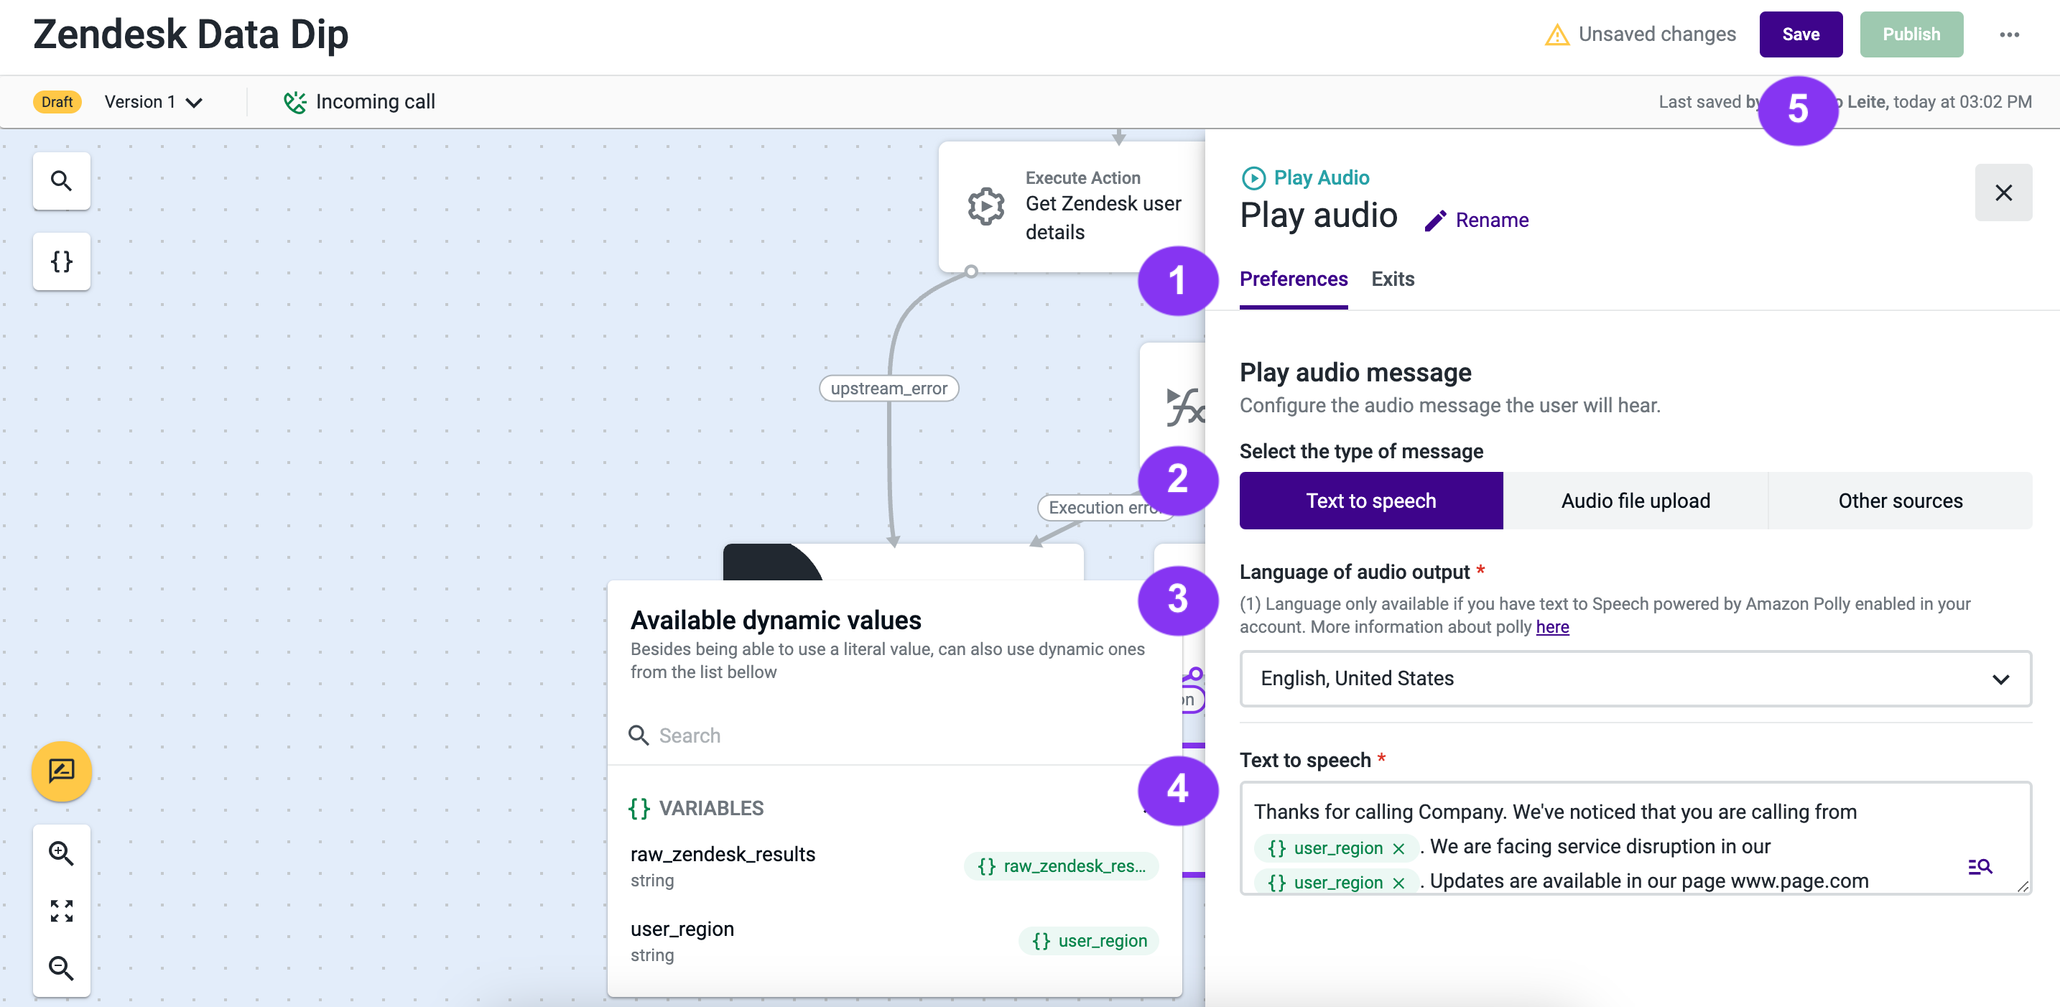
Figure 24 - Text to speech
5.21 - To proceed, in the Exits tab (Figure 25 - 1), add a new step using the End Flow component (mandatory; Figure 25 - 2).
5.22 - After completing the configuration, click the Save button (Figure 25 - 3), followed by the Publish button (Figure 25 - 4).
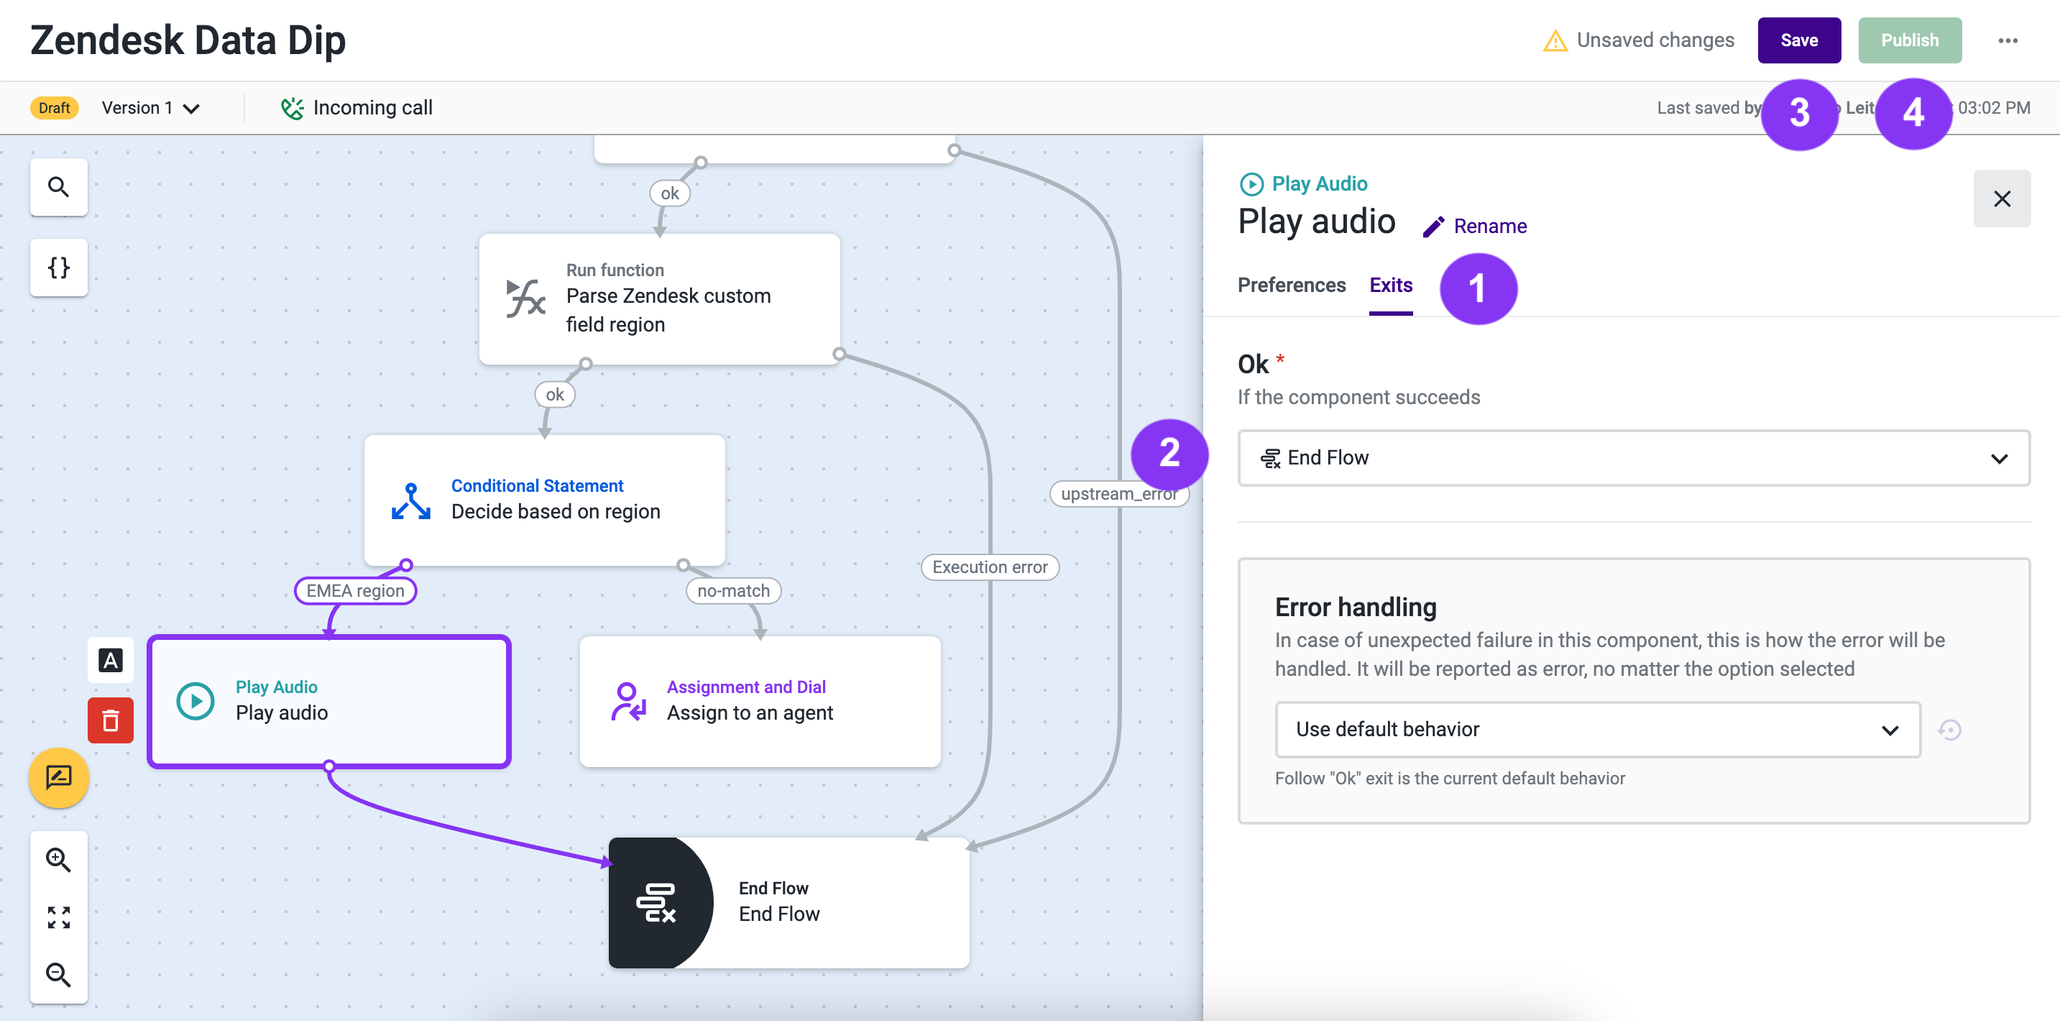
Figure 25 - Publish the flow
Your flow is now completed and published.
Additional Resources
- Zendesk Search API documentation
- Zendesk Custom Fields documentation
- Talkdesk Connections
- Studio Documentation: Flows, Functions
- Talkdesk Knowledge Base: Creating a Connection, Creating an Action with Talkdesk Connections, Studio
TroubleshootingIf you have questions or technical issues, please open a ticket using this form.
Updated 6 months ago