Custom Action
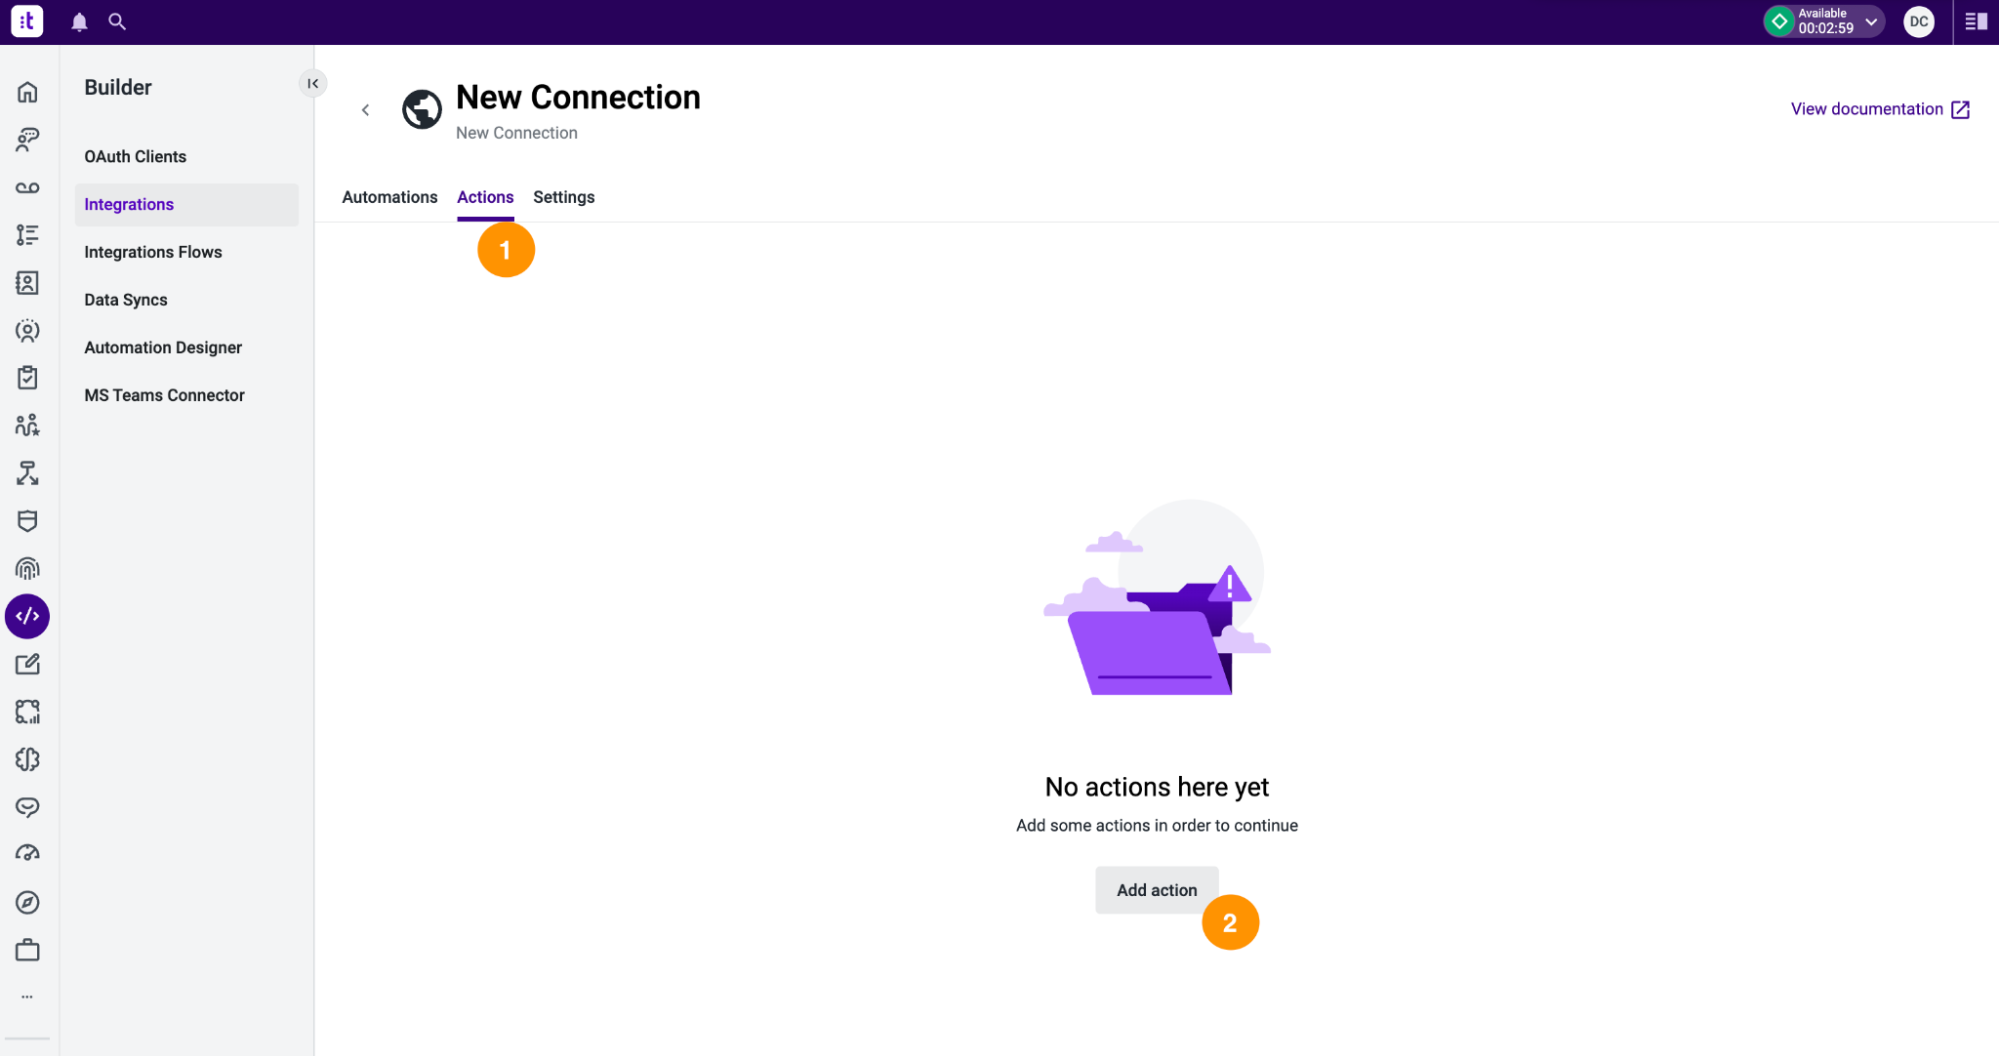
Once the custom connection is configured, it's possible to configure custom actions that will be associated to it. Click the Actions tab (1 - Figure 8) and then the Add action button (2 - Figure 8).

Figure 8 - Add a custom action
An action can be a data dip, a data push, or simply a “ping” to a specific URL within the custom connection context.
Basic Info
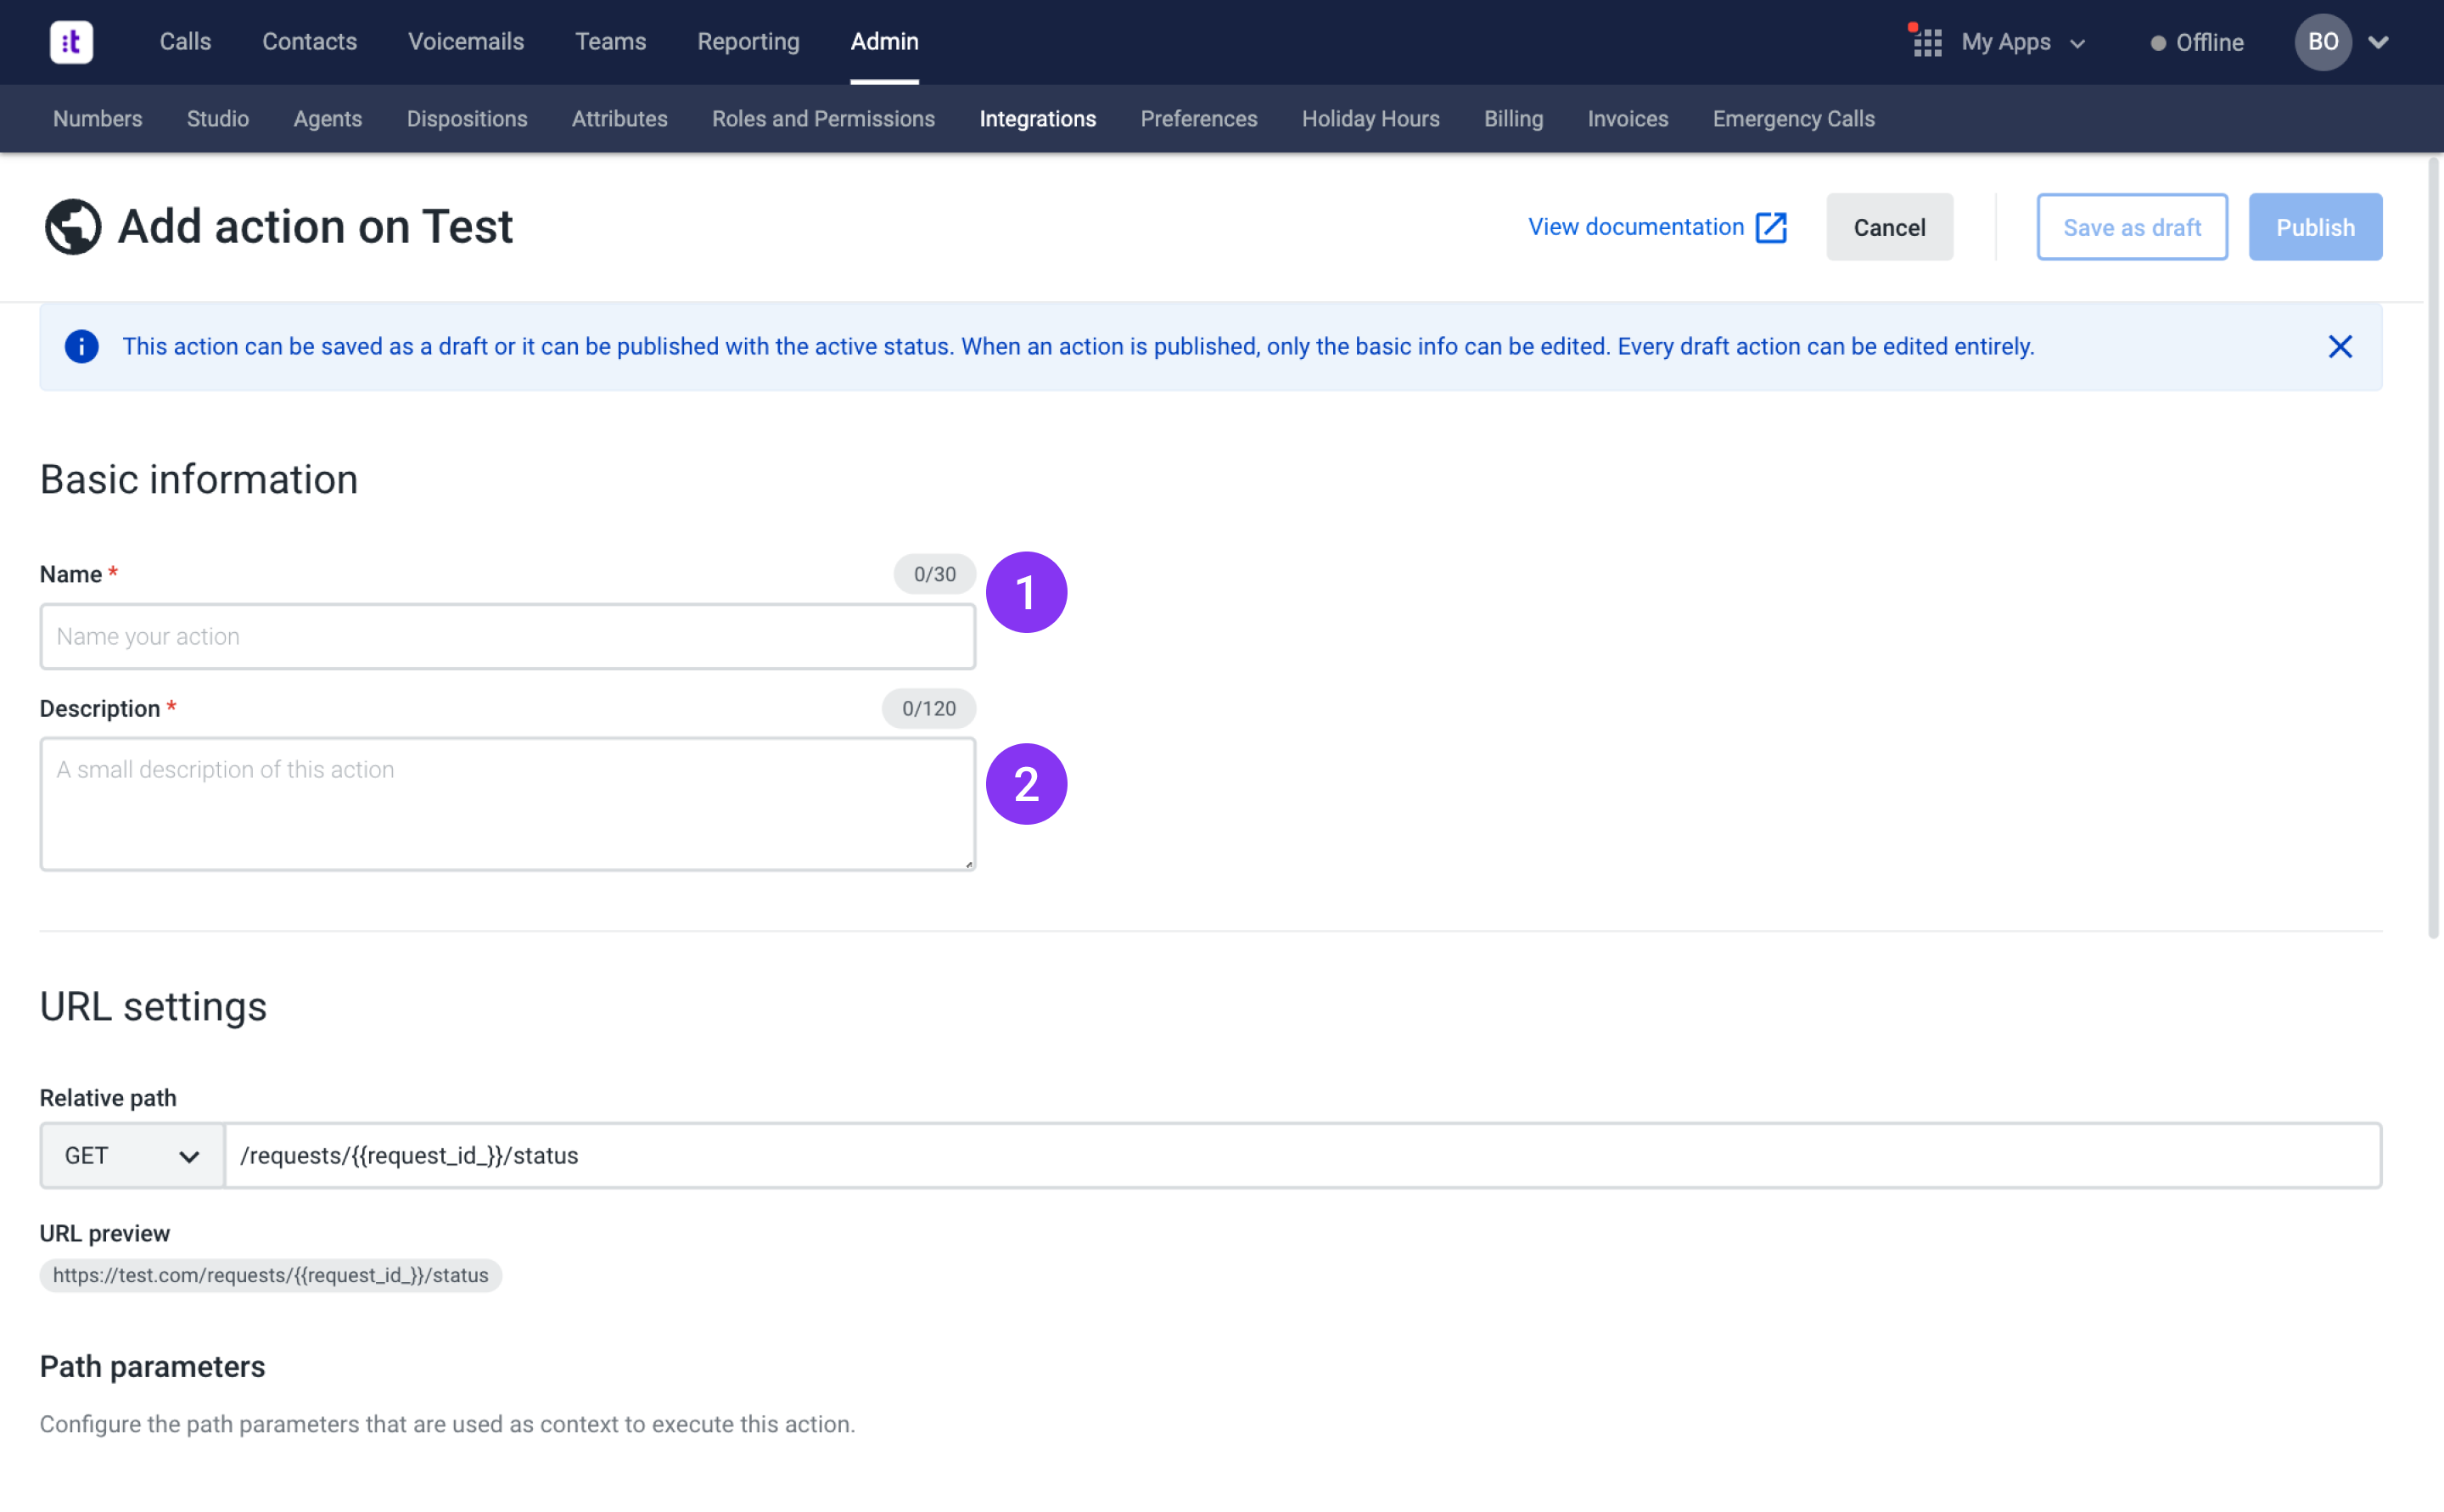
Name (1 - Figure 9) and Description (2 - Figure 9) identify the action being configured.

Figure 9 - Add a custom action
Relative Path and Schemas
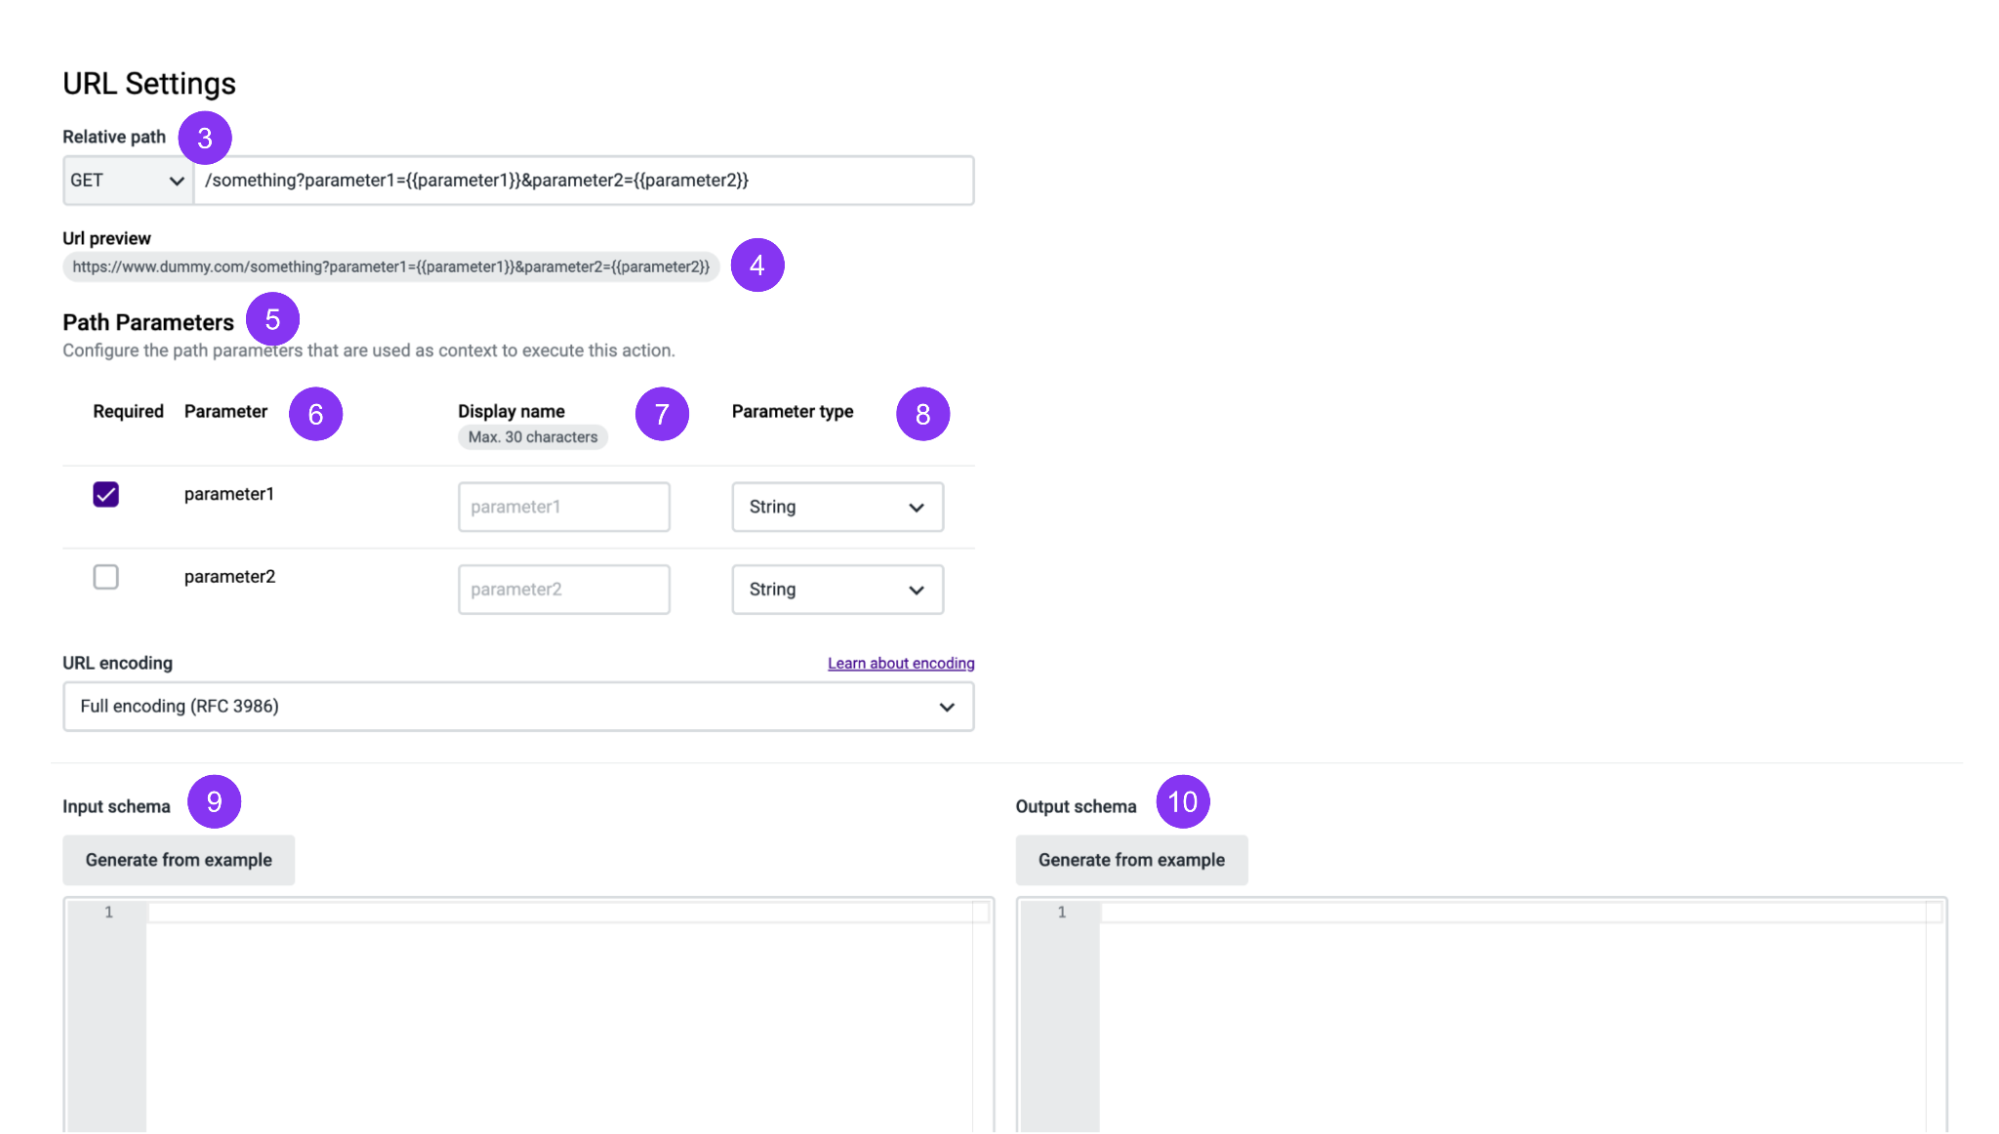
The Relative path (3 - Figure 10) indicates the URI to be used inside the custom connection to get this information.
When executing an action, the endpoint that will be invoked is the Base path configured in the custom connection concatenated with the Relative path of the action. The URL Preview (4 - Figure 10) will display the final result.

Figure 10 - Add a custom action
The Relative path (3) contains a query parameter: request_id. The double curly brackets identify it as such. From the moment this parameter is added, it appears under the Path Parameters (5 - Figure 10) section, and it can be configured:
- You can define if a given parameter is required or not, which allows you to fulfill additional use cases by adding parameters that might not always be required or present.
- By default, the Display name (7 - Figure 10) is the same as the parameter name (displayed on Parameter (6)), but it can be changed.
- By default, the Parameter type (8 - Figure 10) has the value string. However, this type must match the one that will be configured on the Studio Execute Action component. You must adjust the parameter type to match the type that will be configured on the Studio Execute Action component (otherwise, the execution will fail even though the configuration seems successful).
It is also possible to configure the Inputs and Outputs (9 - Figure 10).
This is a configuration of the action in the format of schemas, so here you will not insert the values to be sent as input, nor the ones to be received as output.
The Input Schema (10 - Figure 10) represents the structure of the input body the action will receive when executed, and the Output Schema (11 - Figure 10) represents the structure of the output body the action will return when executed.
Each of these schemas is optional, and their definition highly depends on the action being defined. If it is a data dip (as per the example of Figure 7), usually only the output schema is defined. If it is a data push, either just the Input schema is defined or both, depending on whether there is any interest in the response. If the action is simply a ping, for instance, none of the schemas is necessary.
A schema, be it for the input or the output, must always be a JSON with these fields:
- Schema with value
"http://json-schema.org/draft-07/schema#". "object"value.title(must be a string).requiredas an optional field (an array with the names of the properties that must be present in the body when the action is executed).properties- must be an object with the fields to be expected in the body when the action is executed. Thepropertieskeys in the input schema can't:
- Be blank.
- Contain.
- Start with$
Please see the examples below.
{
  "$schema": "http://json-schema.org/draft-07/schema",
  "$id": "http://talkdesk.com/accountid/connectionid/salesforce/createcasesl-uri-qs",
  "type": "object",
  "properties": {
    "username": {
      "title": "User Name",
      "type": "string"
    },
    "age": {
      "title": "Age",
      "type": "string"
    }
  }
}{
"$schema": "http://json-schema.org/draft-07/schema",
"$id": "http://talkdesk.com/accountid/connectionid/salesforce/createcasesl-uri-qs",
"type": "object",
"properties": {
"user.name": {
"title": "User Name",
"type": "string"
},
"$age": {
"title": "Age",
"type": "string"
}
}
}If a property named here is not present in the body during the execution, the execution fails.
The Output Schema (11) in Figure 10 is as follows (an Input Schema could be the same; it all depends on the important information).
{
  "$schema": "http://json-schema.org/draft-07/schema#", // this value must remain unchanged
  "type": "object",         // this value must remain unchanged
  "title": "Output",        // this value must remain unchanged (Input for the input schema)
  "required": [             // list of the properties that are required. All properties here listed must also be defined in the properties field
    "id"
  ],
  "properties": {           // the properties that will be received in the output and that you want to match in Studio
    "id": {
      "type": "integer",    // the property "id" is an integer
      "title": "Request ID" //the description/name of the property "id" is "Request ID"
    },
    "status": {
      "type": "string",
      "title": "Status of the request"
    }
  }
}
This schema means that when the action is executed, two properties are expected:
- id (type integer).
- status (type string).
Type and title fieldsThe name of the property must exactly match the field that will be in the body (in the execution). For each property, the type and title fields are mandatory.
Unlike the output schema, all the fields that may be received as input must be defined in the input schema. If they may not always be present, they must not be specified.
Here is more information on the types of fields that can be configured.
Action Timeout
It’s also possible to configure the timeout of the action up to a maximum of 30 seconds in intervals of five seconds (Figure 11). By default, the timeout is 10 seconds. The timeout of an action indicates the amount of time, in seconds, that Talkdesk waits for the third-party system to respond before considering the execution a failure.
- Available values on the dropdown are 1, 2, 3, 4, 5, 10, 15, 20, 25, 30 seconds.
- 10 seconds is the default.

Figure 11 - Execution timeout
Talkdesk supports this timeout in testing an action, Studio Execute Action component, and automations. Other products may require a smaller timeout - please contact your Talkdesk representative to validate.
Once everything is configured, you can save the action as a draft or publish it.
Executing an Action Outside ConnectionsPlease note that if you are able to successfully execute an action on a product other than Connections (e.g. Postman), it does not mean the same configuration will work on Connections, as they are different products with different capabilities.
Troubleshooting
If you have questions or technical issues, please open a ticket using this form.
Updated 6 days ago