Creating a Card with an Iframe
Overview
This tutorial explains how you can configure a card to contain an iframe, enabling you to embed an HTML page into a Workspace Designer™ card. The specific example featured in this documentation consists of creating a card that allows tracking an order by inserting its tracking number.
This blueprint also goes through the different Workspace Designer concepts, explaining how to configure variables and use the Render Form component to build interactive forms.
From the moment this blueprint was available, a new component was implemented. It allows embedding an HTML page in a card by only requiring the insertion of the Iframe’s source and permissions. If there is no need to have more steps in the automation (e.g.: having a button to return to a form), you can just use the Render Iframe component. This will also allow you enable specific permissions, such as pop-ups, camera, or microphone.
Required Background Knowledge
So that you can make the most of this tutorial, you must understand:
- The basic concepts of Workspace Designer: cards, panels, and canvas:
- How to create a card, a panel, and how to associate a panel to a canvas.
- How to manage variables.
- The basics of the HTML iframe element, namely its
allowandsandboxproperties.
Implementation Steps
1 - Create a new card
2 - Add a custom variable
3 - Use the Render Form to insert the tracking number
4 - Use the Render View to display the iframe
5 - Save and publish the card
6 - Add the card to a panel
7 - Associate the panel with a canvas
1 - Create a New Card
To start building the card that will display the iframe, first, you need to create it. You can do it by following these steps:
1 - Navigate to Workspace Designer in your account (find the Workspace Designer icon to launch the app on your Talkdesk dock - Figure 1 - 1).
2 - On the Cards tab (Figure 1 - 2), click the Create card button (Figure 1 - 3).
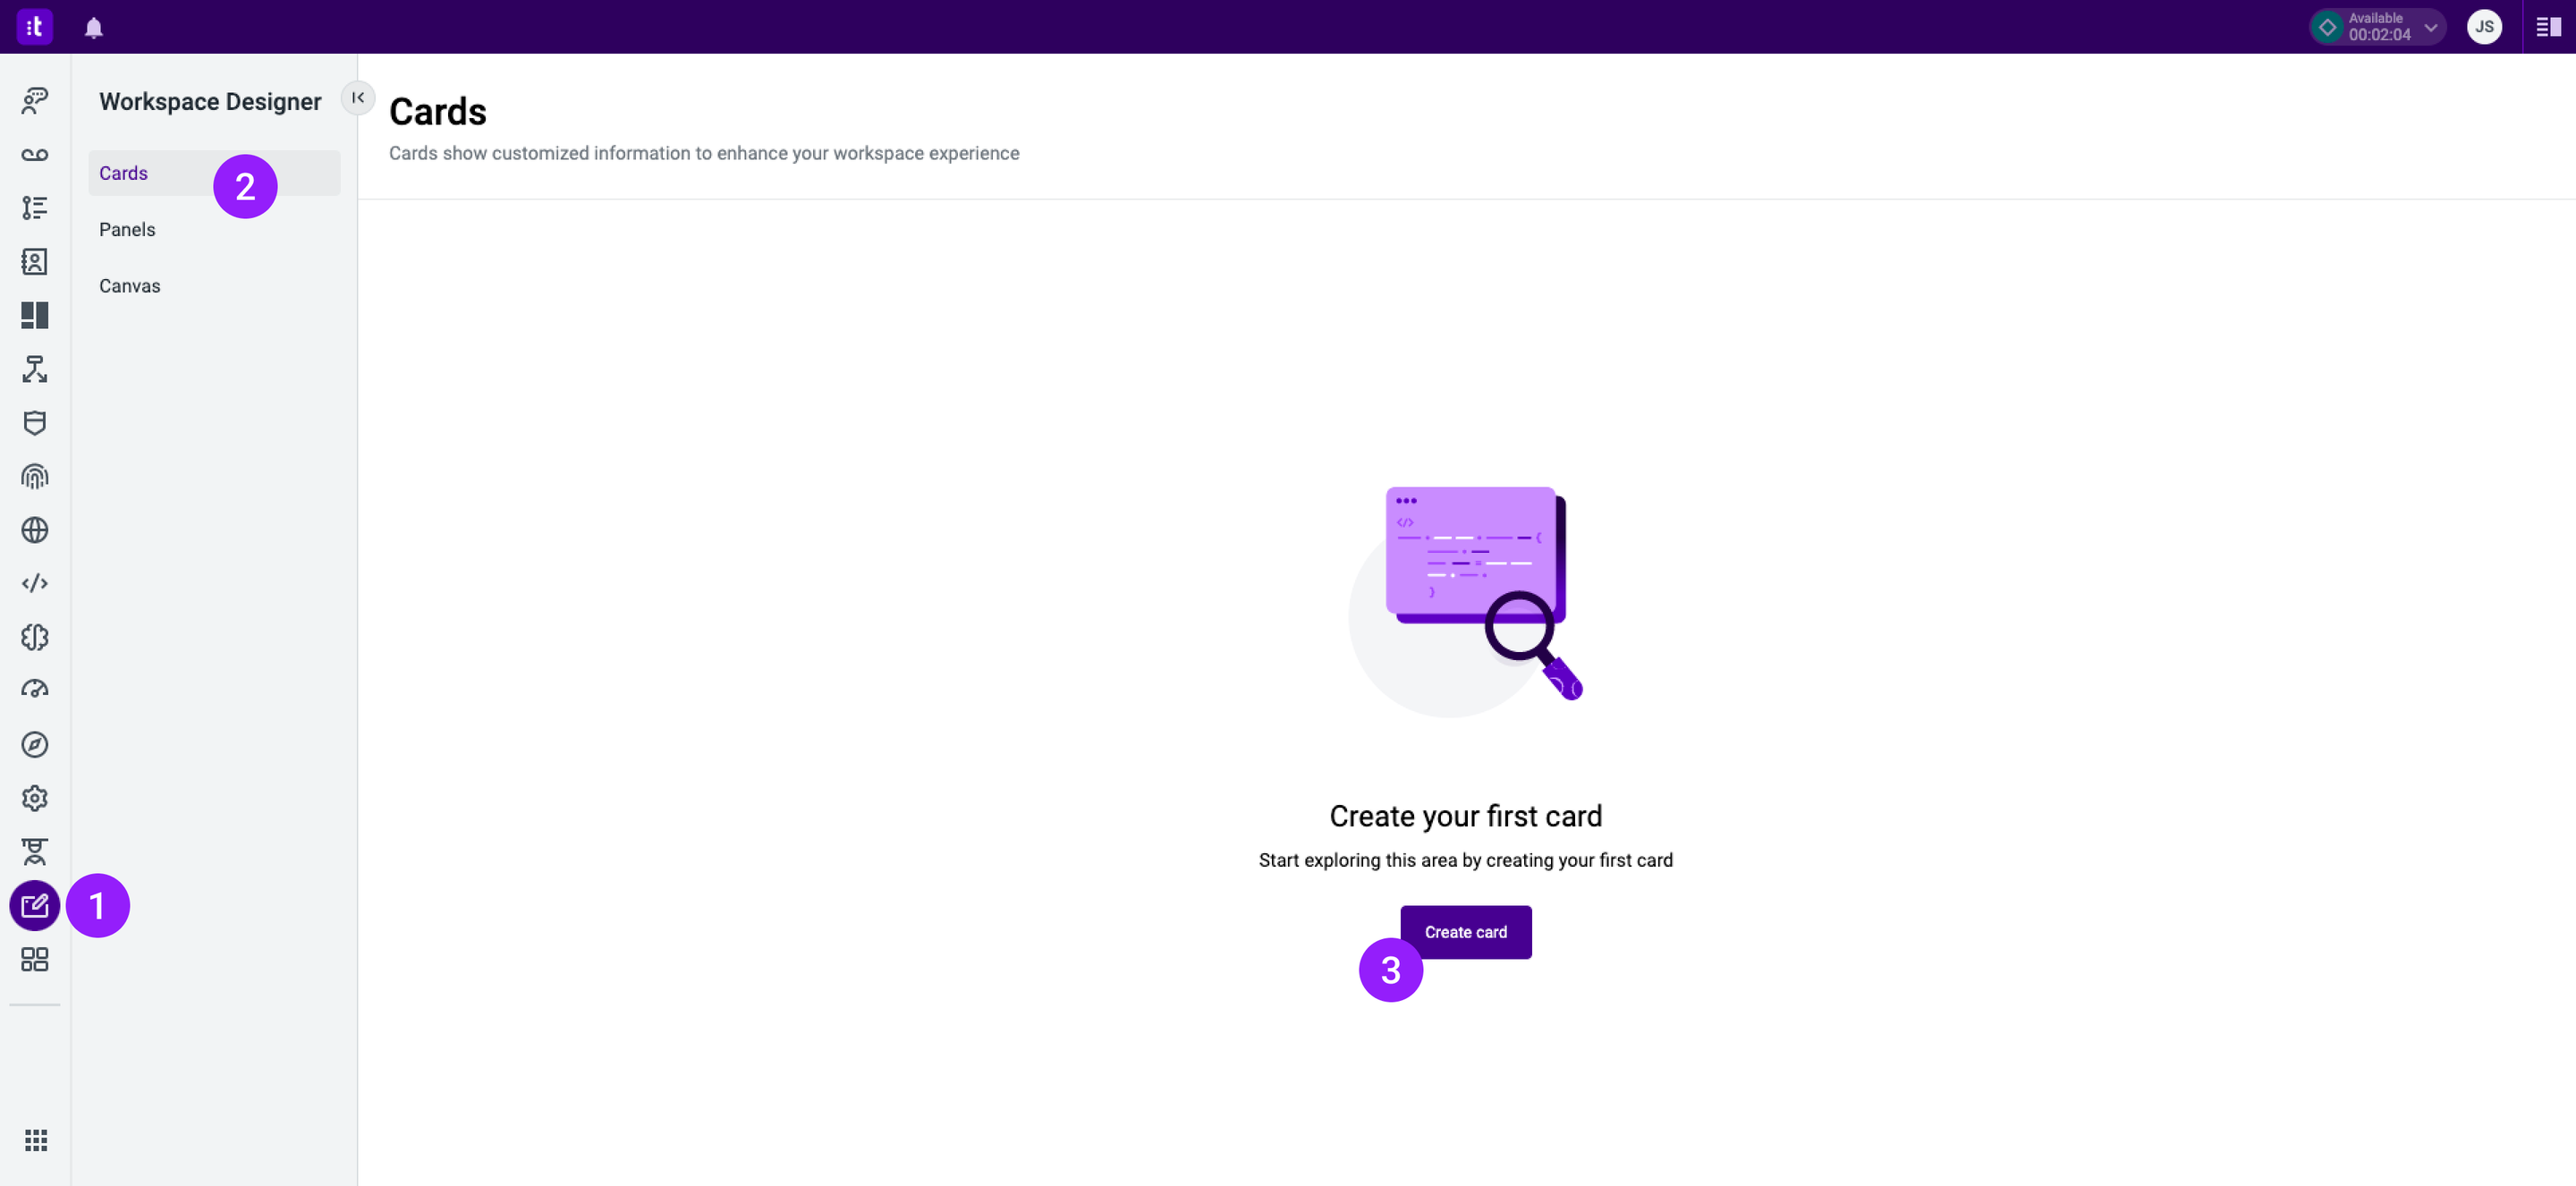
Figure 1 - Create card button in Workspace Designer
3 - A settings modal (Figure 2 - 1) will open, asking for information for this new card. Write the card title (required field; Figure 2 - 2) and its description (optional field; Figure 2 - 3).
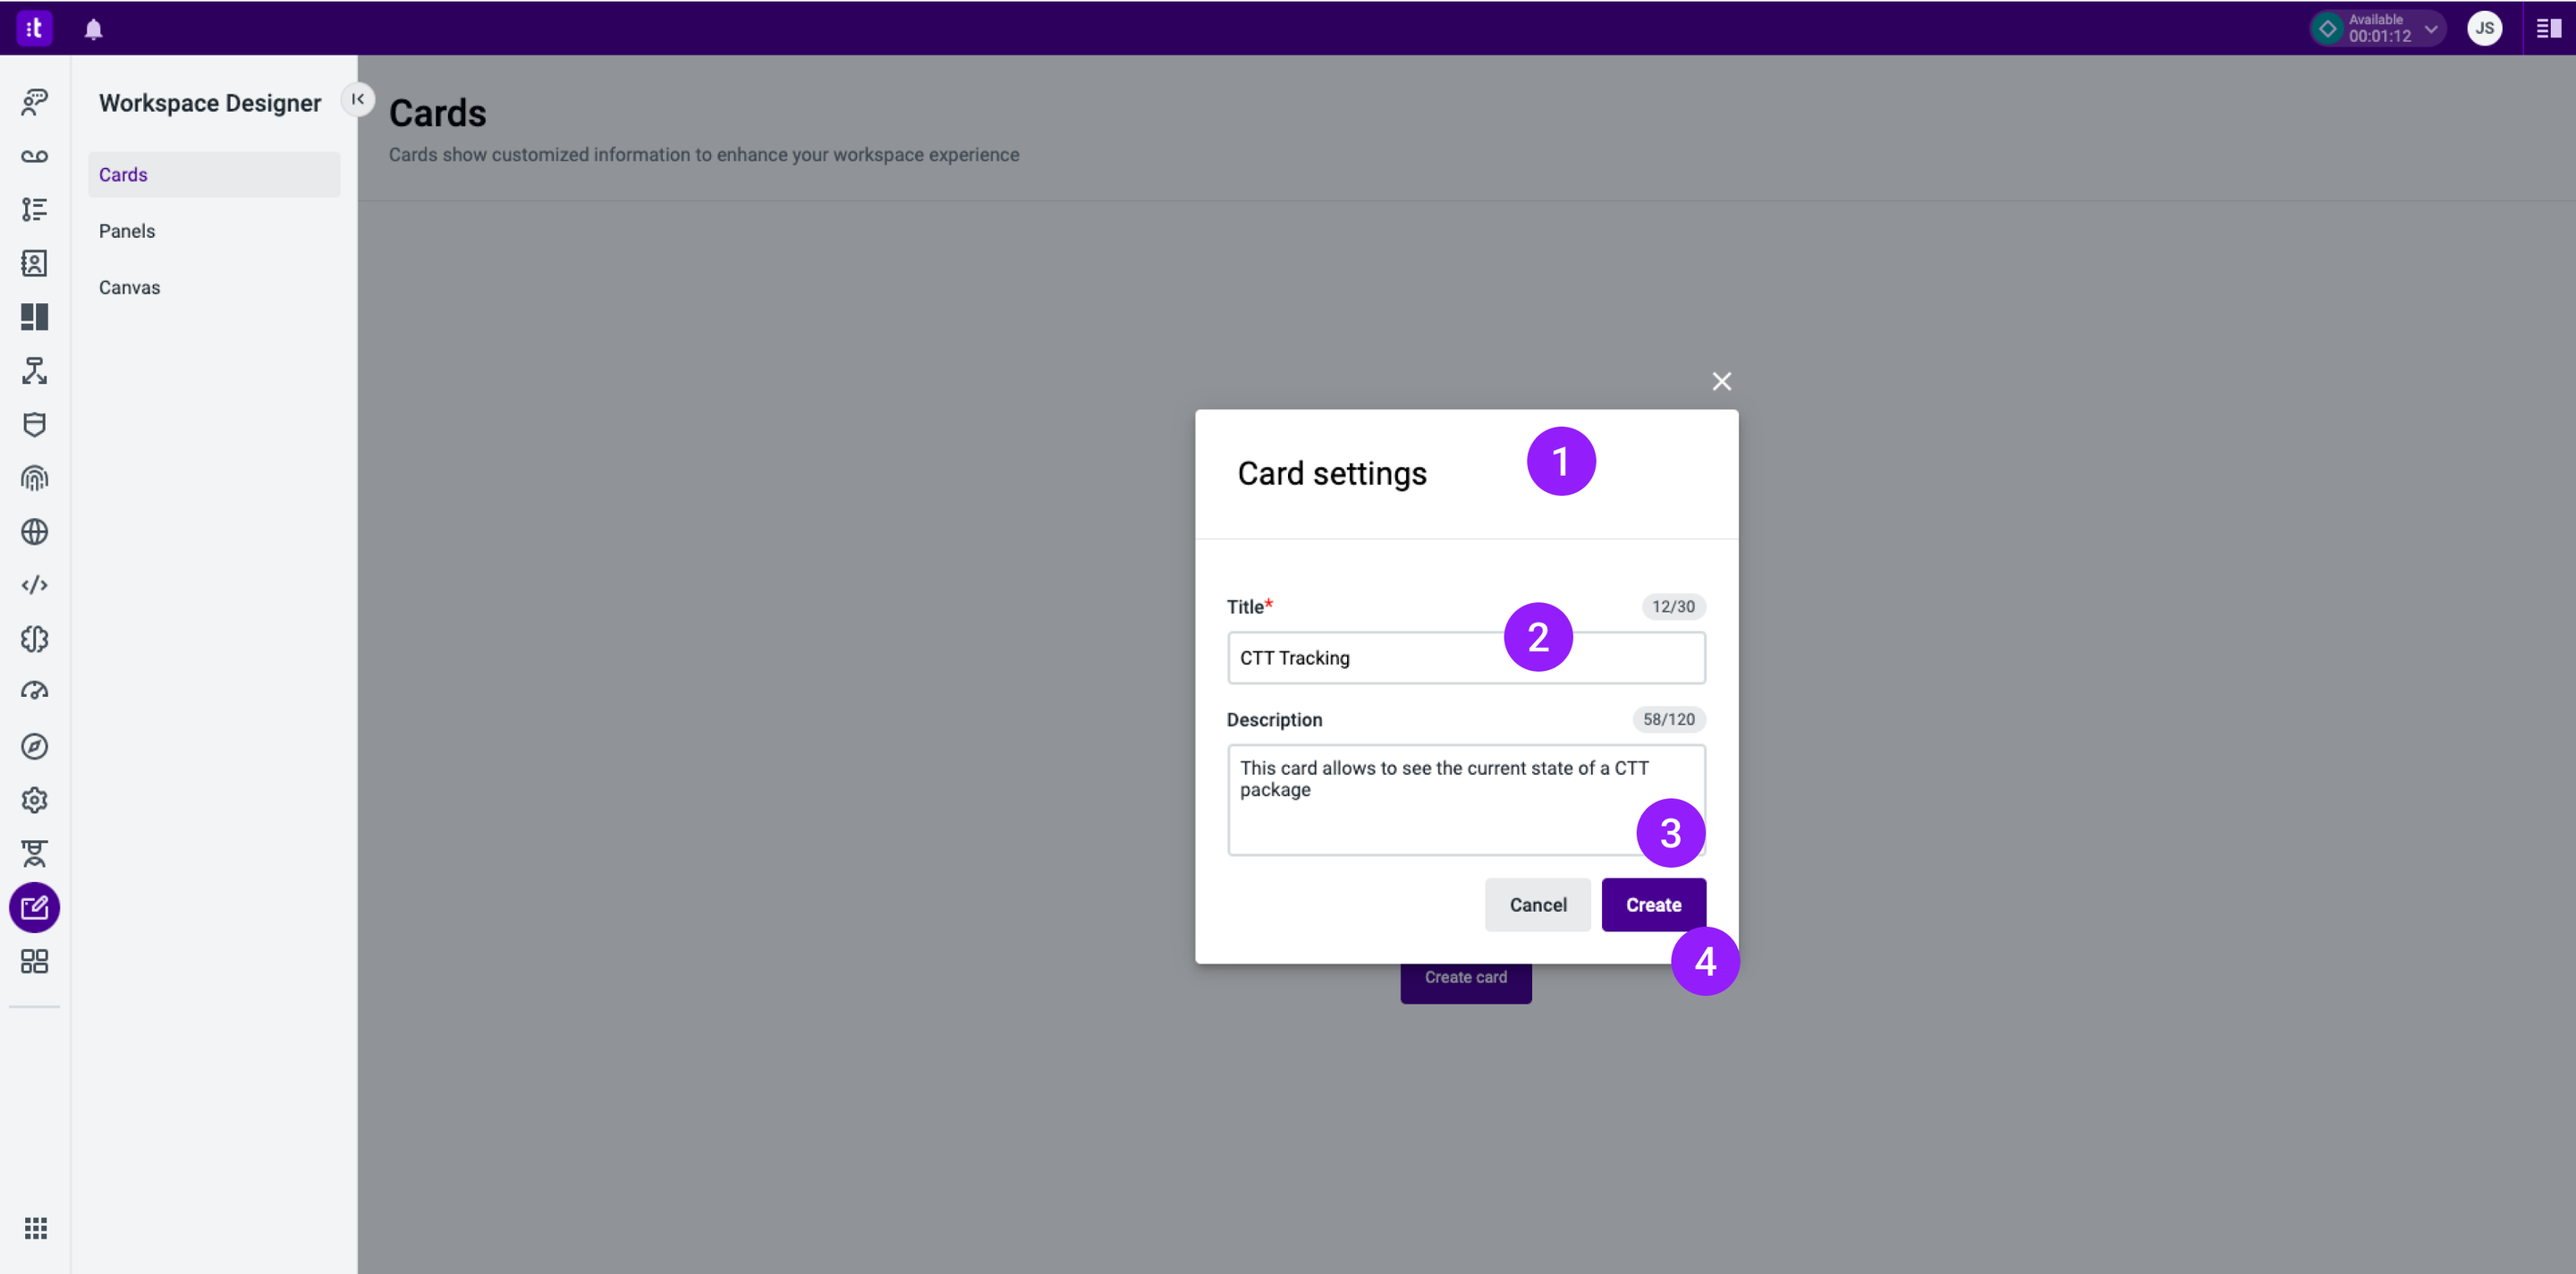
Figure 2 - Card settings modal
4 - Click the Create button (Figure 2 - 4). After clicking the Create button, you will be redirected to the Card configuration page (Figure 3) in Automation Designer, where you will be able to detail the card’s flow.

Figure 3 - Initial card configuration flow
2 - Add a Custom Variable
In this use case, you will embed a package tracking web app in your card. The goal is that an agent can search for a tracking order status within a card. To accomplish this, you need two things:
- A tracking number.
- The web app URL.
In this step, you will learn how to create a custom variable in the flow.
To create the tracking_number variable:
1 - Click the Variables tab of the tools panel (Figure 4 - 1).
2 - Click the Add variable button on the Custom tab of the Variables side panel (Figure 4 - 2). A modal will open (Figure 4 - center).
3 - Fill in the variable name and select its source (Figure 4 - 3). In this case, the current automation as the variable source was chosen, but you can get this variable via Studio, for example.
4 - Once all fields are filled, click the Confirm button in the modal (Figure 4 - 5). The variable is now created.
Figure 4 - Add tracking number custom variable modal
3 - Use the Render Form to Insert the Tracking Number
Now that you have the tracking_number variable created, you can add a Render Form component to provide a form to the users where they will be able to insert the value for the variable. To start this step, you can drag a Render Form component to the flow and connect it to the Card Trigger component. Then, by double-clicking the Render Form component, its editor panel will appear (Figure 5 - right side), allowing you to configure its settings:
1 - Insert the component name (required field; Figure 5 - 1).
2 - Add a title to the form (optional field; Figure 5 - 2).
3 - Add the field for the tracking number input:
3.1 - Select the label for the field (required field; Figure 5 - 3).
3.2 - Select the field type. In this case, the selected option is the Text option (required field - Figure 5 - 4).
3.3 - Choose the previously created tracking_number variable to store the input (Figure 5 - 5).
4 - Click the Save button (Figure 5 - 6).
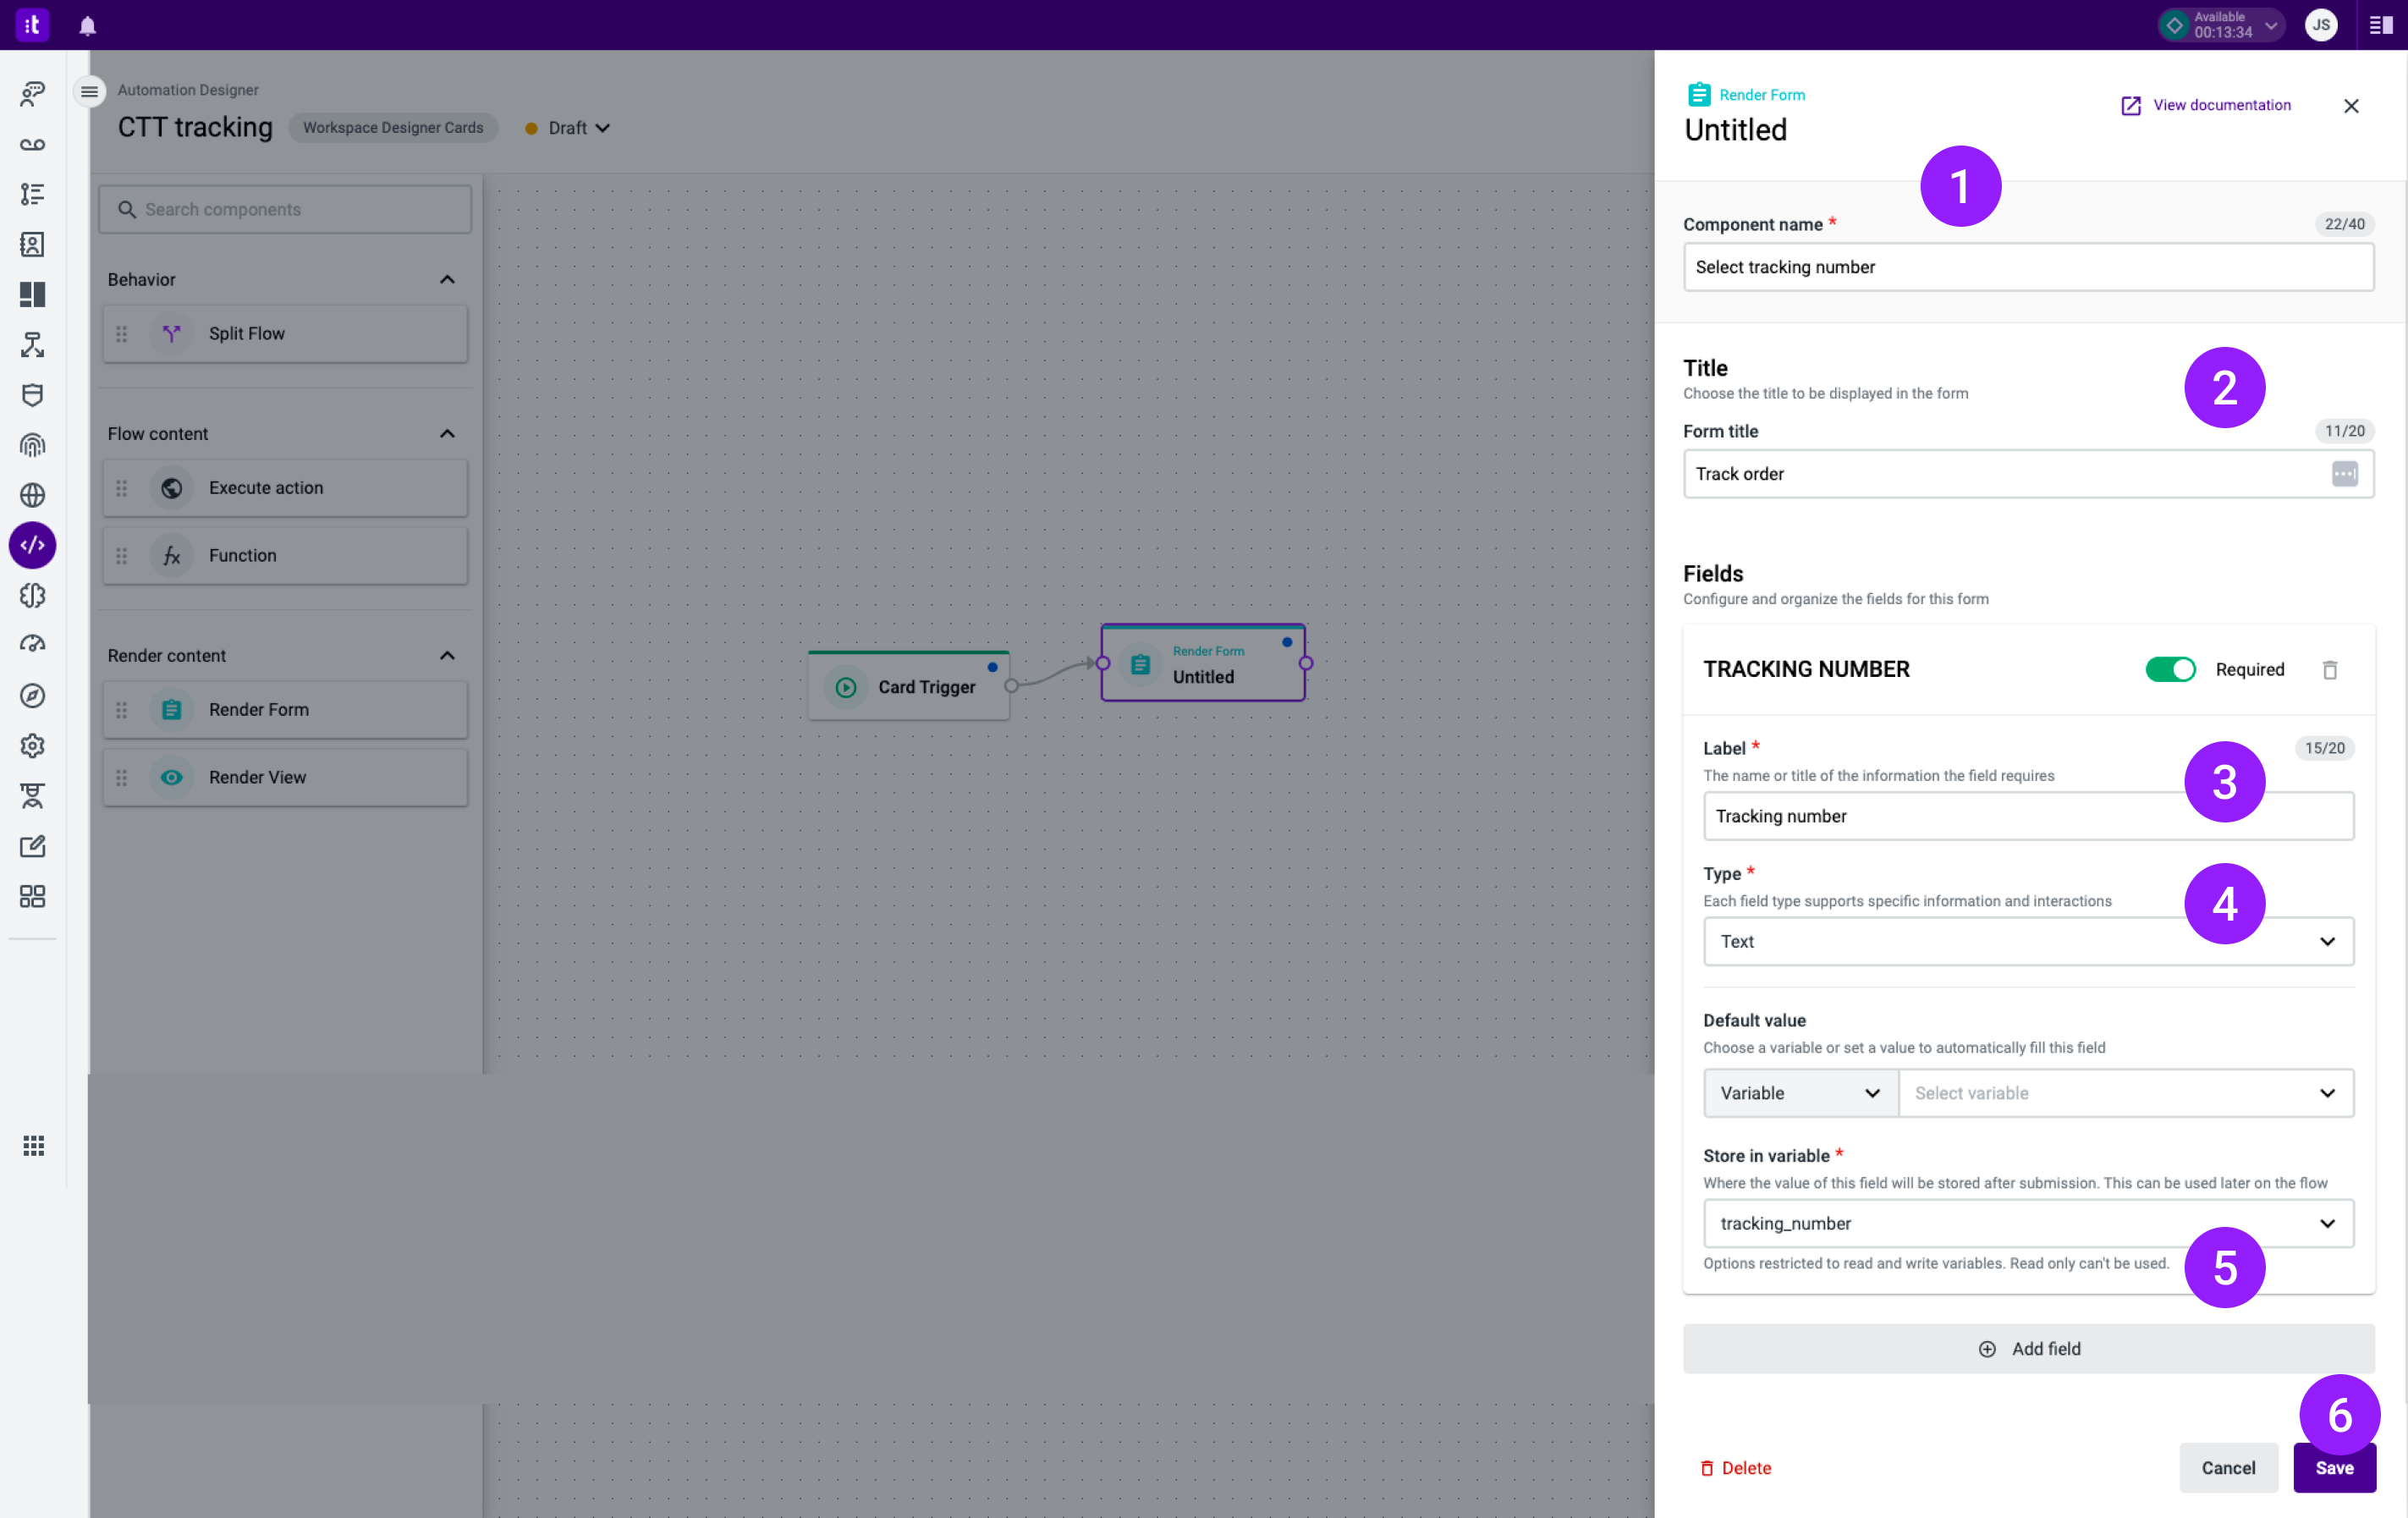
Figure 5 - Render Form editor configuration
4 - Use the Render View to Display the Iframe
After the agent submits the form with the tracking number, you have to load the web app, sending the tracking number within the URL. To achieve this, you can use the Render View component.
4.1 - Drag a Render View component and connect it to the Render Form component in the flow.
4.2 - Open the editor side panel and add the component name (Figure 6 - 1). To configure the component, you have to:
4.2.1 - Configure the code
In the code configuration of the component (Figure 6 - 2) you can add the HTML and JSX code to render the defined use case.
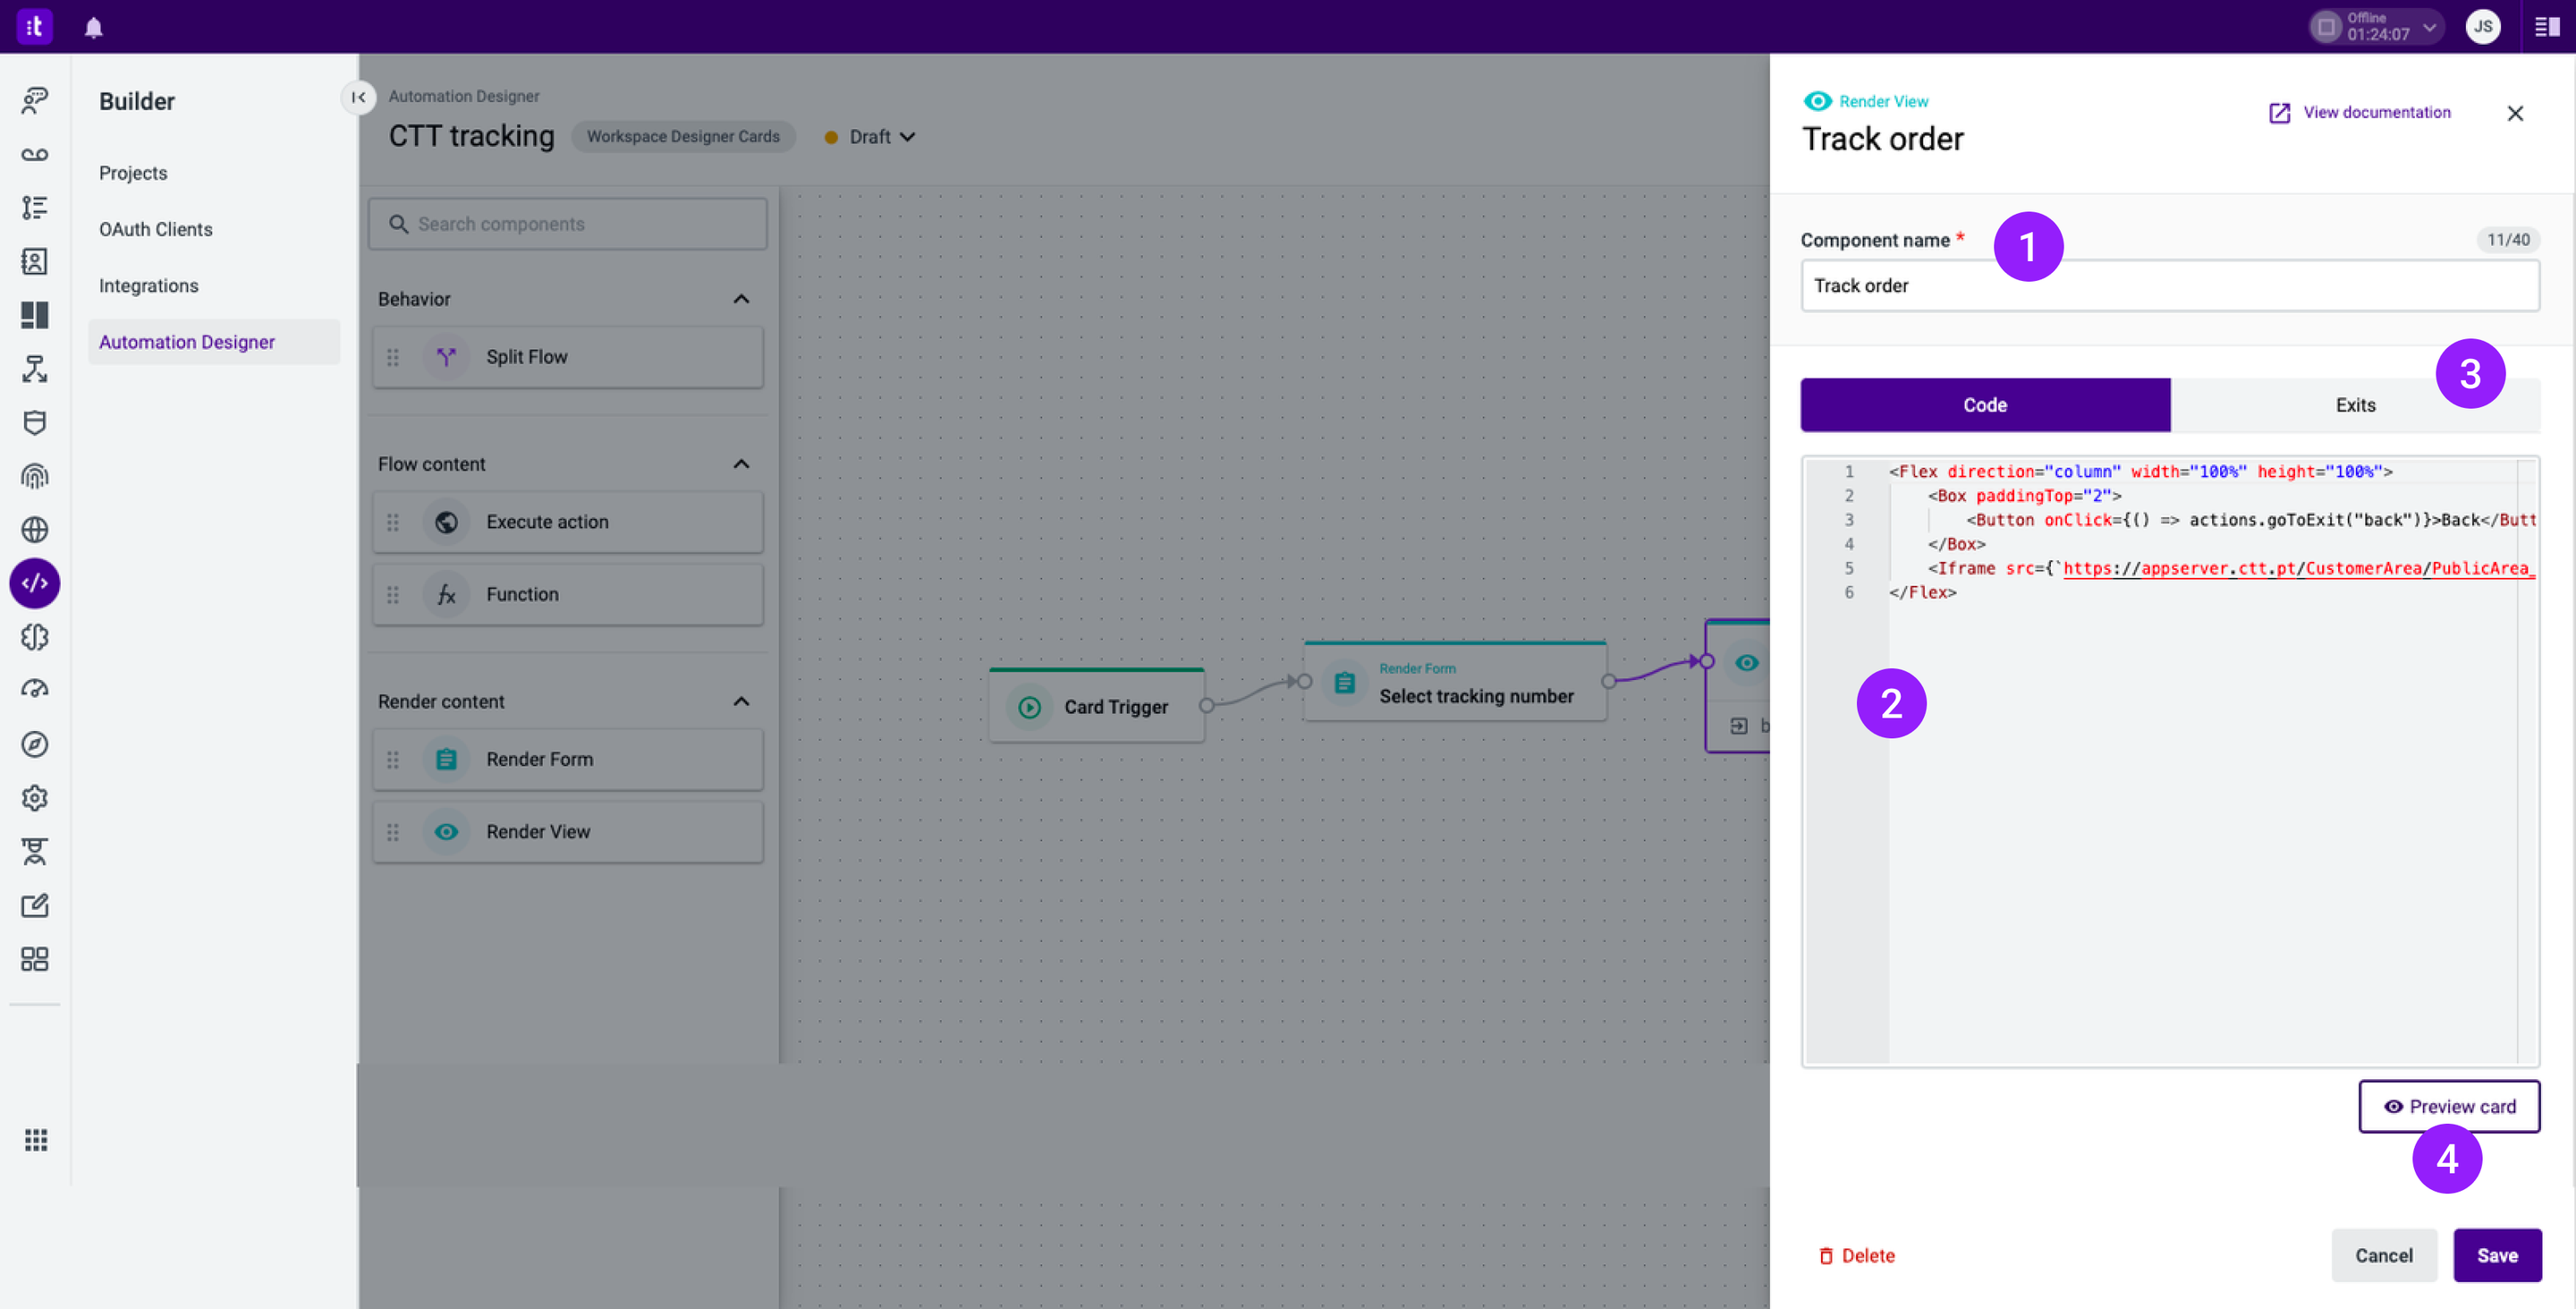
Figure 6 - Render View component code editor
As you can see in the code below, there's a Flex component wrapping the elements to be displayed:
- A Box adding a
paddingTopis wrapping the Button component. In the Button, you only need to pass theactions.goToExit("back")method so that when the button is clicked, the flow is redirected to the specified exit. In this case, the goal is to go back to the Render Form component so that a user can select another tracking number. To know how to create an exit, go to the Configure the component's exit section (4.2.2, below). - The Iframe is displayed using the Iframe component. In this case, only the
scrpasses as props, which corresponds to the URL you wish to render. You can also add theallowandsandboxproperties if you want to add more features or restrictions to the iframe.
As you can see in the example below, to use the tracking number variable, you just have to get the variable via theContext.getVariable("tracking_number")method.
<Flex direction="column" width="100%" height="100%">
    <Box paddingTop="2">
        <Button onClick={() => actions.goToExit("back")}>Back</Button>
    </Box>
    <Iframe src={`https://appserver.ctt.pt/CustomerArea/PublicArea_Detail?IsFromPublicArea=true&ObjectCodeInput=${Context.getVariable("tracking_number")}&SearchInput=${Context.getVariable("tracking_number")}`} />
</Flex>You can also use the Card Preview feature (Figure 6 - 4) to visualize your card during the configuration process. You just need to keep in mind that, in other use cases, some attributes passed in the
allowandsandboxproperties might not be available at this stage.
4.2.2 - Configure the component's exit
The back exit for the component is the handle that will allow you to choose where the flow will go next after the Render View component. To configure it:
4.2.2.1 - Go to the Exits tab (Figure 7 - 1) in the Render View component.
4.2.2.2 - Click the Add exit button (Figure 7 - 2).
4.2.2.3 - Insert the exit name and save (Figure 7 - 3).
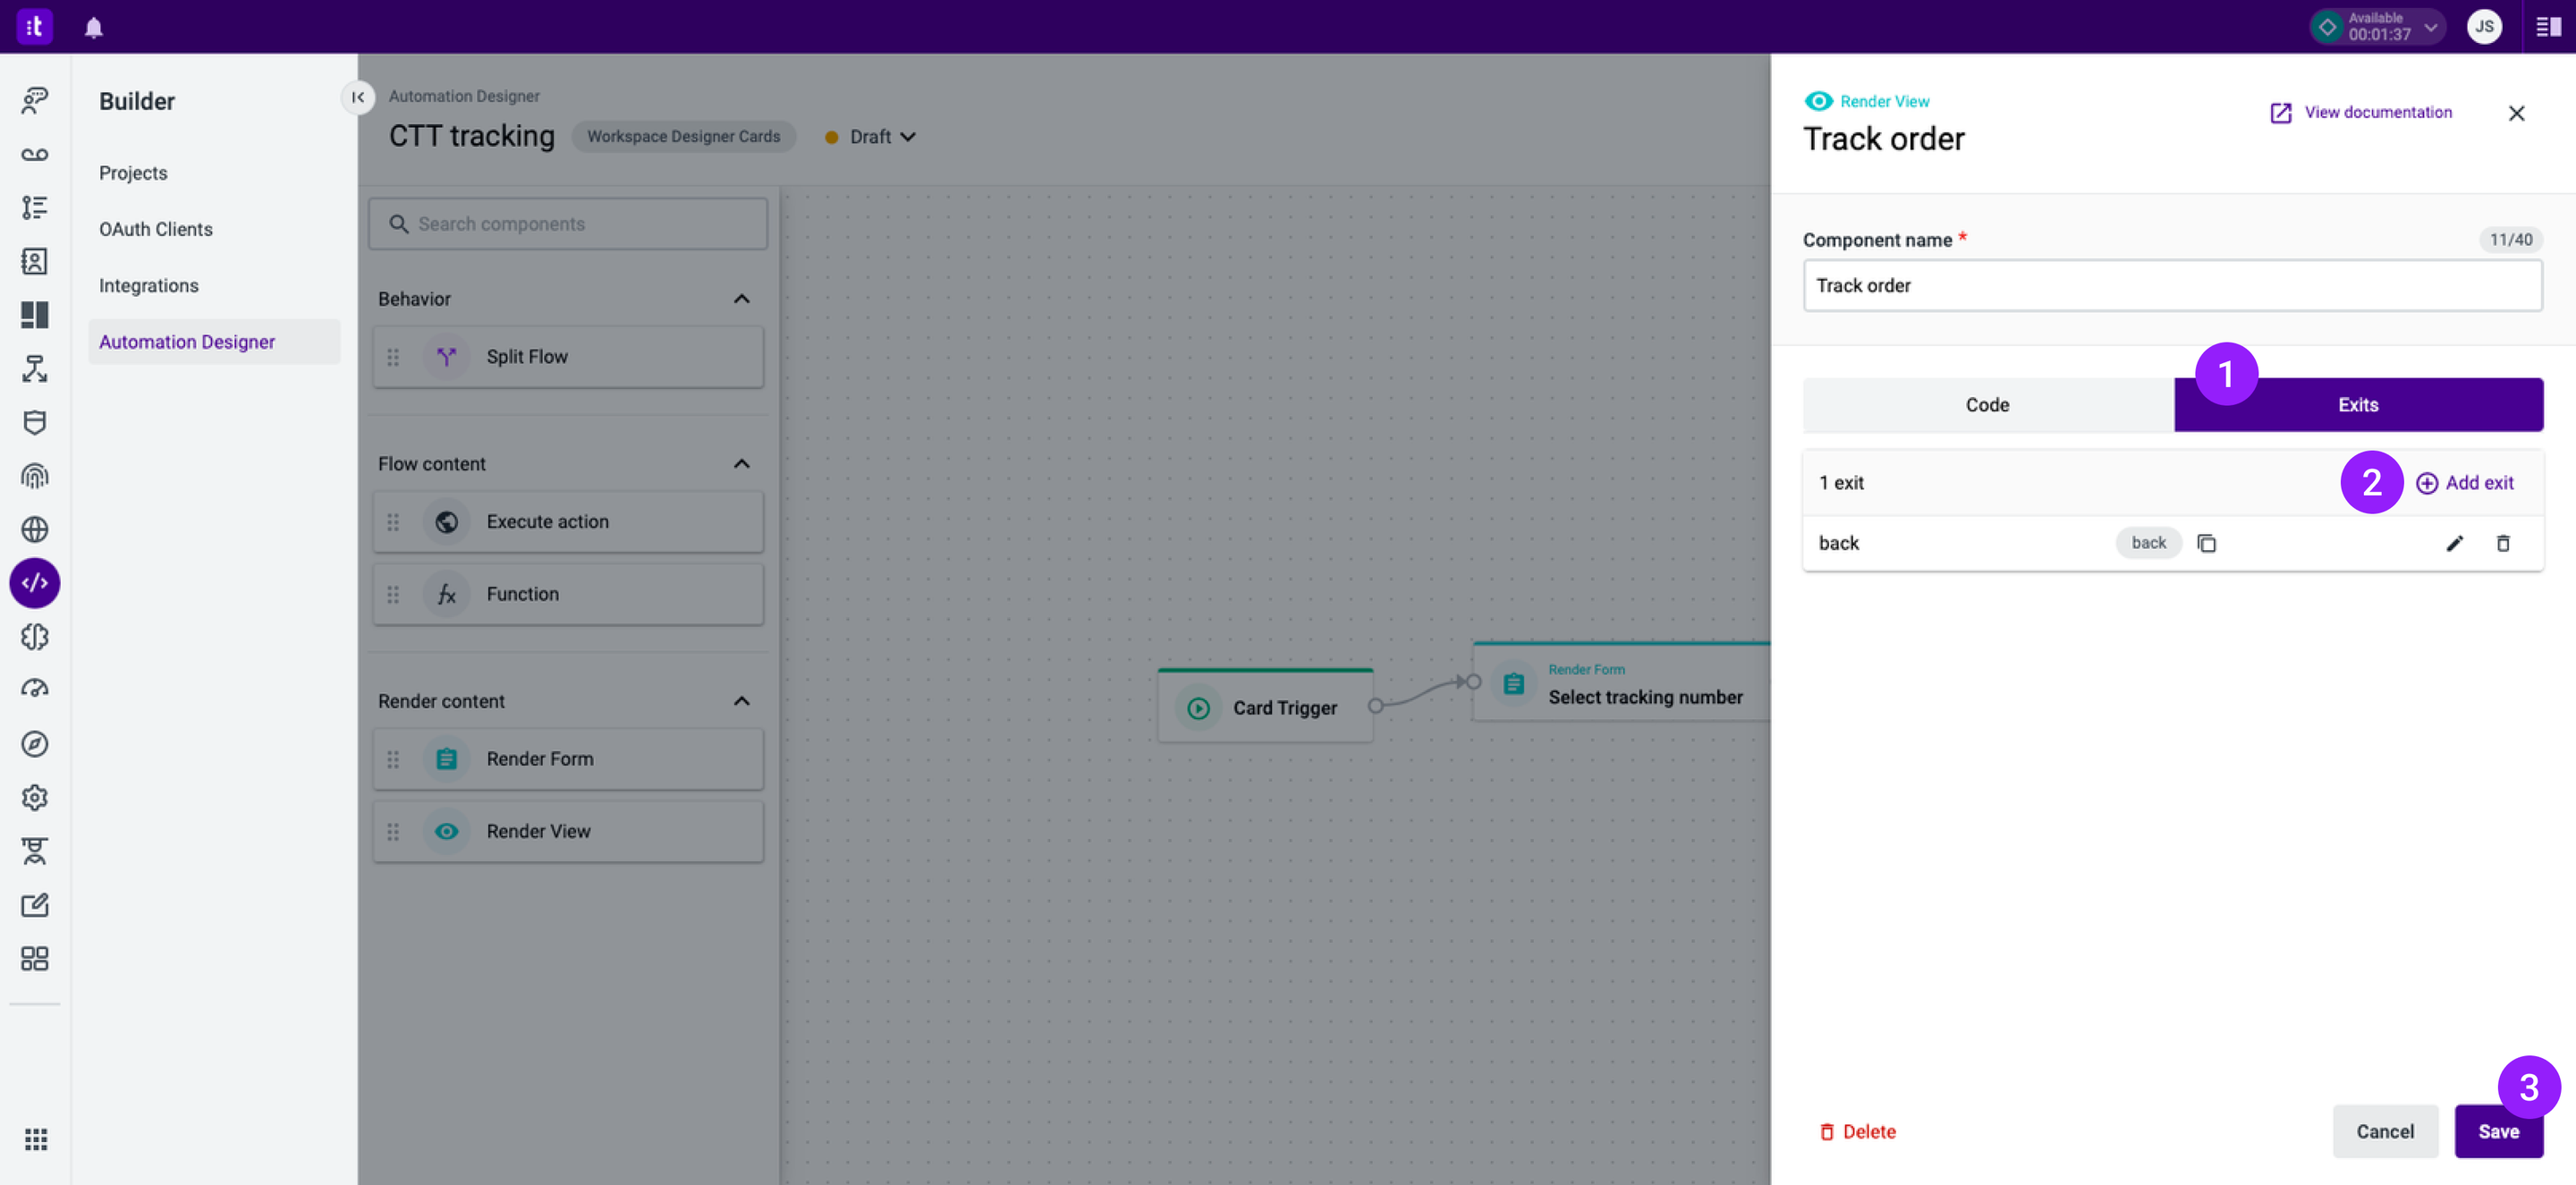
Figure 7 - Render View Exits tab
After configuring the code and the exit, you can save the configuration by clicking the Save button (Figure 7 - 3). To finalize the automation, you just need to connect the back exit to the Render Form component as seen in Figure 7. With this, the automation configuration is complete:
- You must input the tracking number using the Render Form component and the number is stored in an automation variable.
- Then the Iframe with the tracking page is displayed, along with a Back button that allows you to go back to the form.

Figure 8 - Render View exit connected to Render Form
5 - Save and Publish the Card
Once the configuration is complete, you need to save and publish the automation using the respective buttons in the automation header (Figure 9 - top right corner).

Figure 9 - Publish the card
6 - Add the Card to a Panel
Now, you can add your card to a panel. First, you need to go back to Workspace Designer and ensure that you have a panel. To do so, follow these simple steps.
Once you have a panel of your choosing, click the Add card button (Figure 10 - 1). A side panel with your list of cards will appear and you can add the created card to the panel (Figure 10 - 2).
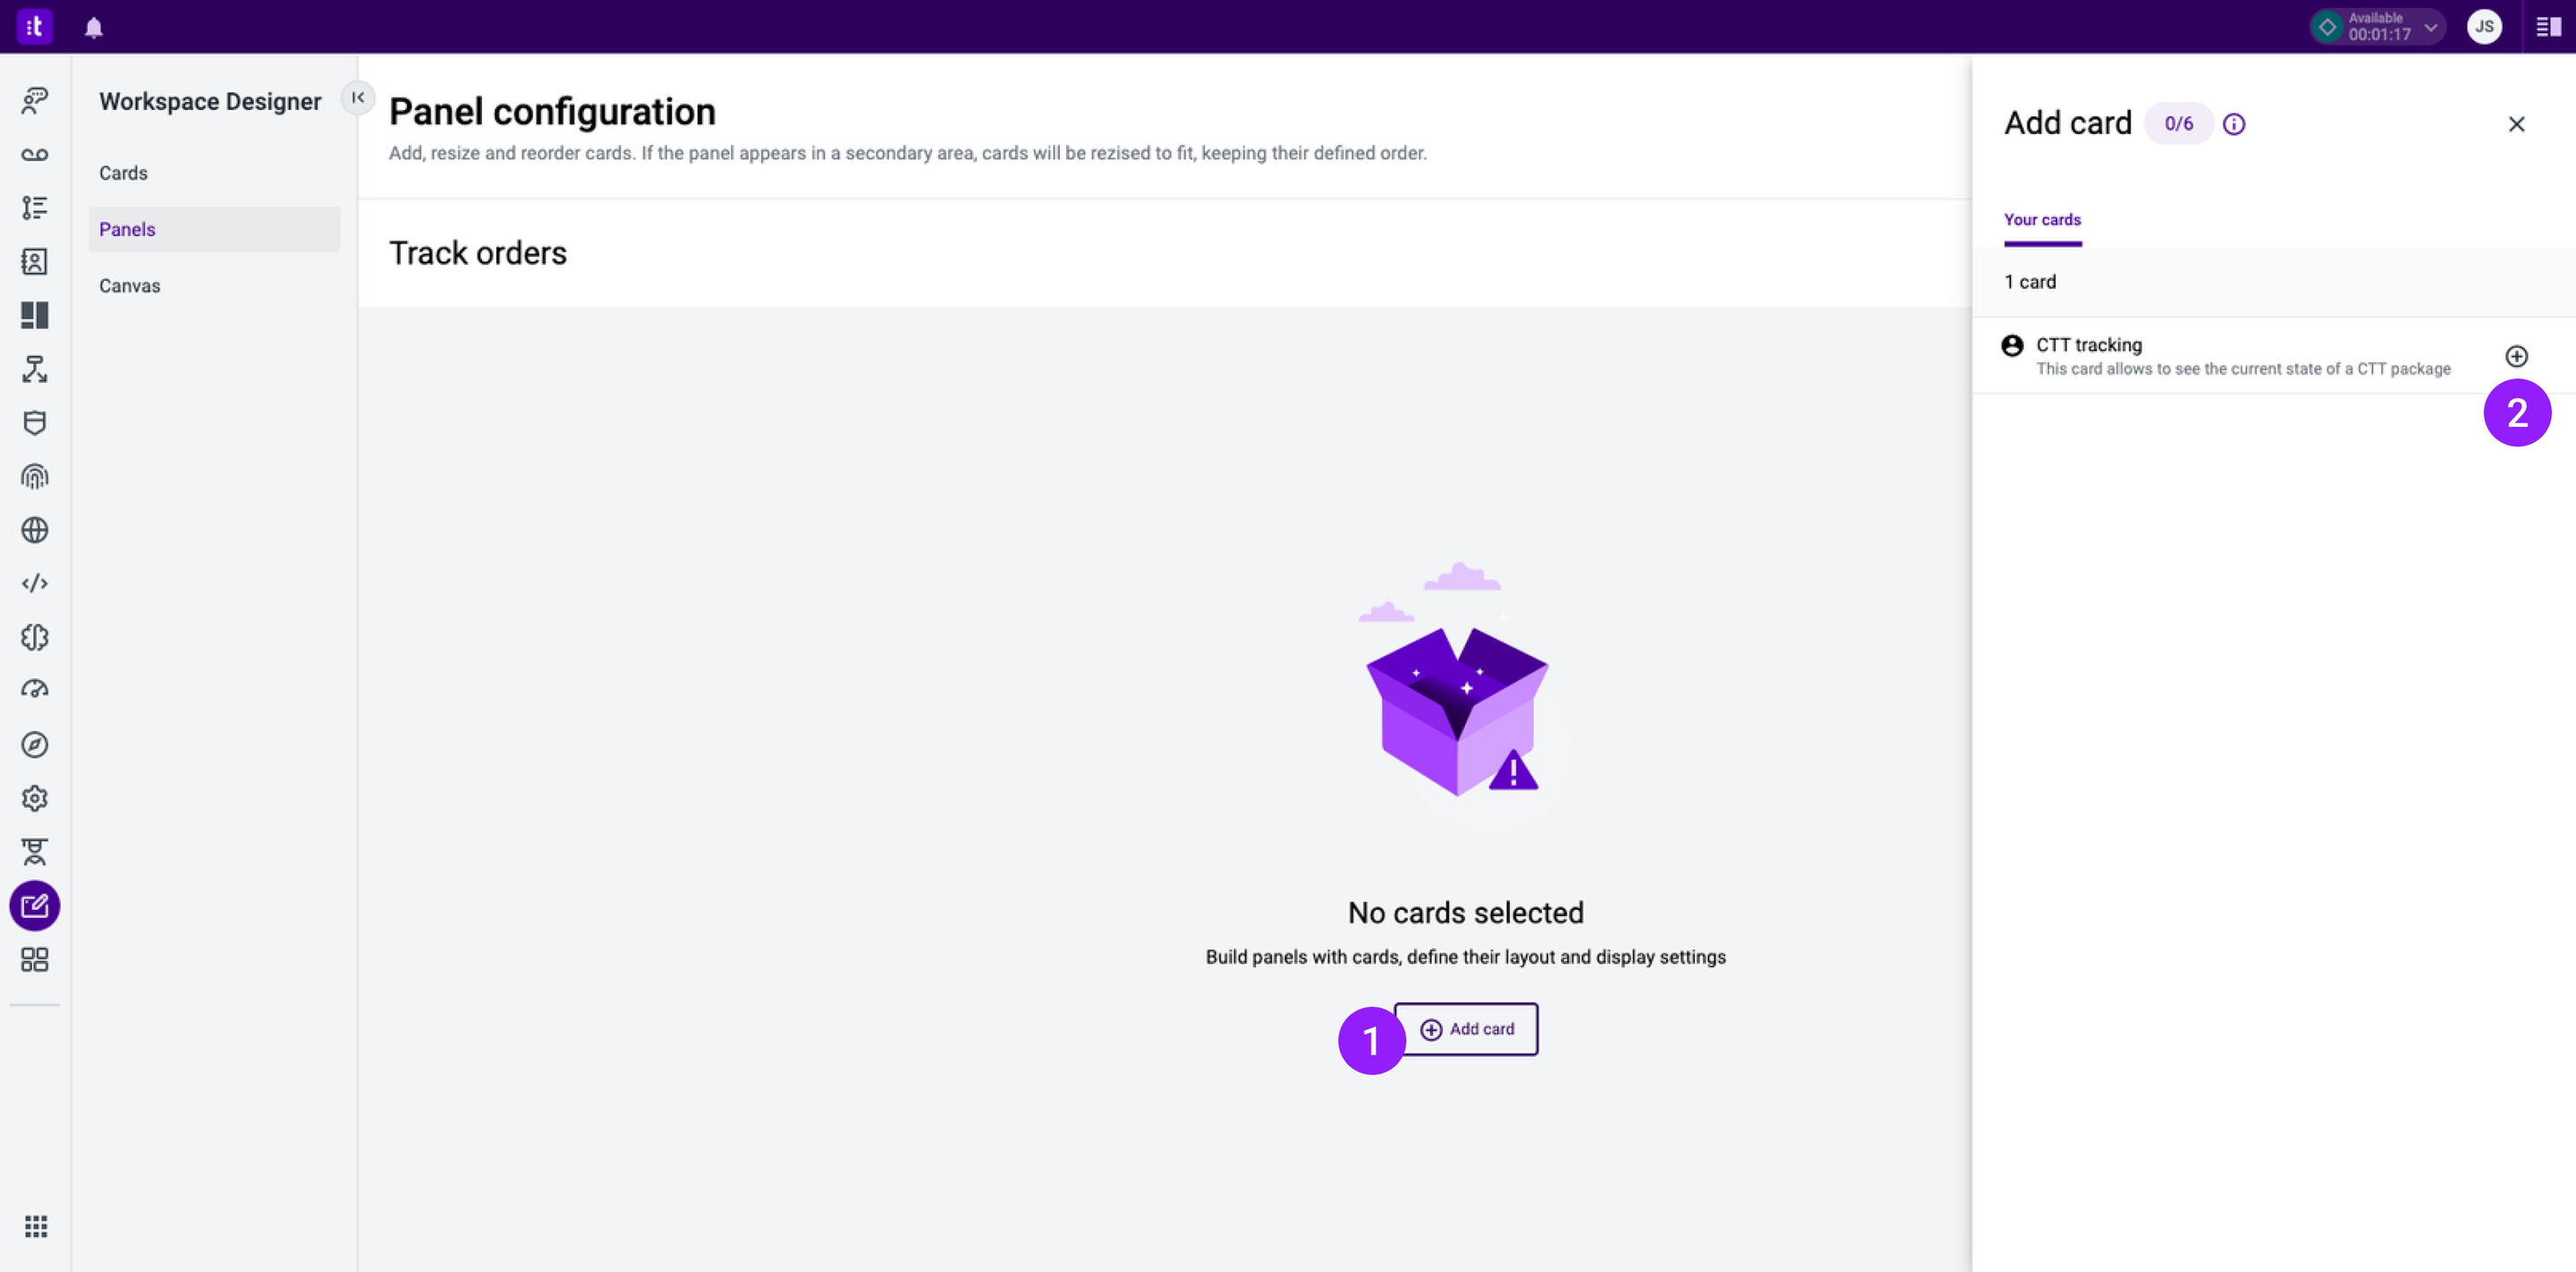
Figure 10 - Panel configuration
The card is then added to the panel, as you can see in Figure 10. To test it, you can pass a valid tracking number (Figure 11 - 1) and click the Submit button (Figure 11 - 2).
Figure 11 - CTT tracking card in a panel
Keep in mind that the tracking number used in this tutorial is for demonstration purposes only. To test this card, you need a valid tracking number.
After submitting, the tracking order page should appear (Figure 12). To go back to the form, you can click the Back button on the card (Figure 12 - 1).
Figure 12 - Tracking order page
The card in Figure 12 has been resized. See here more about customizing the display settings.
7 - Associate the Panel with a Canvas
The final step is to associate the panel with a canvas.
Import this Automation
You can import the card automation created in this tutorial:
1 - Create a JSON file with the code below.
{
    "id":"2a194420-4de6-4554-8ea5-1fee66e0bee9",
    "name":"CTT tracking",
    "type":"WORKSPACE_DESIGNER_CARDS",
    "publish_state":"DEPLOYED",
    "last_updated":"2023-03-06T15:50:59.821269Z",
    "last_published":"2023-03-06T15:51:03.958735Z",
    "content":[
        {
            "id":"4b321db2-ebef-4591-84b8-13e1ac4ee6a4",
            "name":"",
            "creation_index":1,
            "nodes":[
                {
                    "id":"dc52d049-4d5d-40f5-8c34-e719f33adbd4",
                    "type":"card-trigger",
                    "position":{
                        "x":-70,
                        "y":65
                    },
                    "data":{}
                },
                {
                    "id":"29721d04-c9e8-402e-8118-af205f34e43a",
                    "type":"render-form",
                    "namespace":"workspace_designer_cards",
                    "position":{
                        "x":165,
                        "y":45
                    },
                    "data":{
                        "configuration":{
                            "title":"Track order",
                            "fields":[
                                {
                                    "id":"70846bb6-30e6-4d64-a849-a21d8236eb22",
                                    "label":"Tracking number",
                                    "value":"",
                                    "type":"text",
                                    "required":true,
                                    "default_value":{
                                        "id":"",
                                        "input_type":"variable",
                                        "variable":"",
                                        "value":""
                                    },
                                    "output":"51fc9ff9-bb6c-48ed-81c8-37decd805869"
                                }
                            ]
                        }
                    },
                    "name":"Select tracking number"
                },
                {
                    "id":"f6fe21e0-bad5-49b7-b189-99a942d42bea",
                    "type":"render-view",
                    "namespace":"workspace_designer_cards",
                    "position":{
                        "x":465,
                        "y":30
                    },
                    "data":{
                        "configuration":{
                            "code":"<Flex direction=\"column\" width=\"100%\" height=\"100%\">\n    <Box paddingTop=\"2\">\n        <Button onClick={() => actions.goToExit(\"back\")}>Back</Button>\n    </Box>\n    <Iframe src={`https://appserver.ctt.pt/CustomerArea/PublicArea_Detail?IsFromPublicArea=true&ObjectCodeInput=${Context.getVariable(\"tracking_number\")}&SearchInput=${Context.getVariable(\"tracking_number\")}`} />\n</Flex>",
                            "compiled_code":"PQKgxA+hAKCqBKBRKJgCh4FMCGBjALgHS4BOO+miANpgLaYB2+AFFnkQGInYDm9TAGgAEDAK5Uqw0JBgJkEVGwLEy2CtTqMWHGgA9hAbzRChAEwCWZAuYD2DAFxCARLhtVRtBk4HGhAd3NTfAALRycARgAGSIBSb19gzHMeYPwwqNinNABfKXAoOCQUYCUiUnJKGn4WACEbfSEjEwAHbFMLBh4AFRtmsIAmLNyhaQK5YtKVCo1q5hrRfHw7Q187AGEqc1wAa0dmAEohAF4APiF2WwYAZ0IeGx7EXXMWJwAjPG2nfZzhJxqPr77PIyQryRQ4ZTlNSVTRMZgASQAZtx6CsTFcSLhHAADVL4ZpXezAYDYZoEzAkABuFOIi0IzXwwDWoiuS3oJAAgqpgNBRK9NrguTgIAARTD4bDmKgAfnhVy4NlovP5WyF2CO+BIokwADIAPKvABWmAIaxspkw8IYzQWRwAJAYzUxMLoiDxxQA1bAkczYfmYZhOTUfcydCBiWivClfbI6gDKOExwStNvw9sddgortunu9vv9geDO1DPHDHijJBj2Jy+1rAG4gA",
                            "exits":[
                                {
                                    "handle":"render-view-exit-12c1495f-9020-4cff-bfe0-e91aa671dba9",
                                    "name":"back",
                                    "slug":"back"
                                }
                            ]
                        }
                    },
                    "name":"Track order"
                }
            ],
            "edges":[
                {
                    "id":"reactflow__edge-dc52d049-4d5d-40f5-8c34-e719f33adbd4trigger-exit-29721d04-c9e8-402e-8118-af205f34e43arender-form-target",
                    "source":"dc52d049-4d5d-40f5-8c34-e719f33adbd4",
                    "target":"29721d04-c9e8-402e-8118-af205f34e43a",
                    "source_handle":"trigger-exit",
                    "target_handle":"render-form-target",
                    "type":"edge"
                },
                {
                    "id":"reactflow__edge-29721d04-c9e8-402e-8118-af205f34e43arender-form-source-f6fe21e0-bad5-49b7-b189-99a942d42bearender-view-target",
                    "source":"29721d04-c9e8-402e-8118-af205f34e43a",
                    "target":"f6fe21e0-bad5-49b7-b189-99a942d42bea",
                    "source_handle":"render-form-source",
                    "target_handle":"render-view-target",
                    "type":"edge"
                },
                {
                    "id":"reactflow__edge-f6fe21e0-bad5-49b7-b189-99a942d42bearender-view-exit-12c1495f-9020-4cff-bfe0-e91aa671dba9-29721d04-c9e8-402e-8118-af205f34e43arender-form-target",
                    "source":"f6fe21e0-bad5-49b7-b189-99a942d42bea",
                    "target":"29721d04-c9e8-402e-8118-af205f34e43a",
                    "source_handle":"render-view-exit-12c1495f-9020-4cff-bfe0-e91aa671dba9",
                    "target_handle":"render-form-target",
                    "type":"edge"
                }
            ]
        }
    ],
    "metadata":{
        "type":"WORKSPACE_DESIGNER_CARDS",
        "variables":[
            {
                "id":"51fc9ff9-bb6c-48ed-81c8-37decd805869",
                "name":"tracking_number",
                "configuration":{
                    "source":"currentAutomation",
                    "path":""
                },
                "type":"CUSTOM"
            },
            {
                "id":"80dfab71-0264-4a67-a460-a5150d8f744c",
                "name":"active_user_id",
                "descriptioni18n_key":"workspaceDesignerCards:system.variables.active_user_id",
                "type":"SYSTEM"
            },
            {
                "id":"c09d303b-4fb6-4038-806e-317e0938669f",
                "name":"active_user_email",
                "descriptioni18n_key":"workspaceDesignerCards:system.variables.active_user_email",
                "type":"SYSTEM"
            }
        ]
    },
    "schema_version":"1.0.0"
}
2 - In the card automation configuration, click the ... and then select the Import version option (Figure 13 - 1).
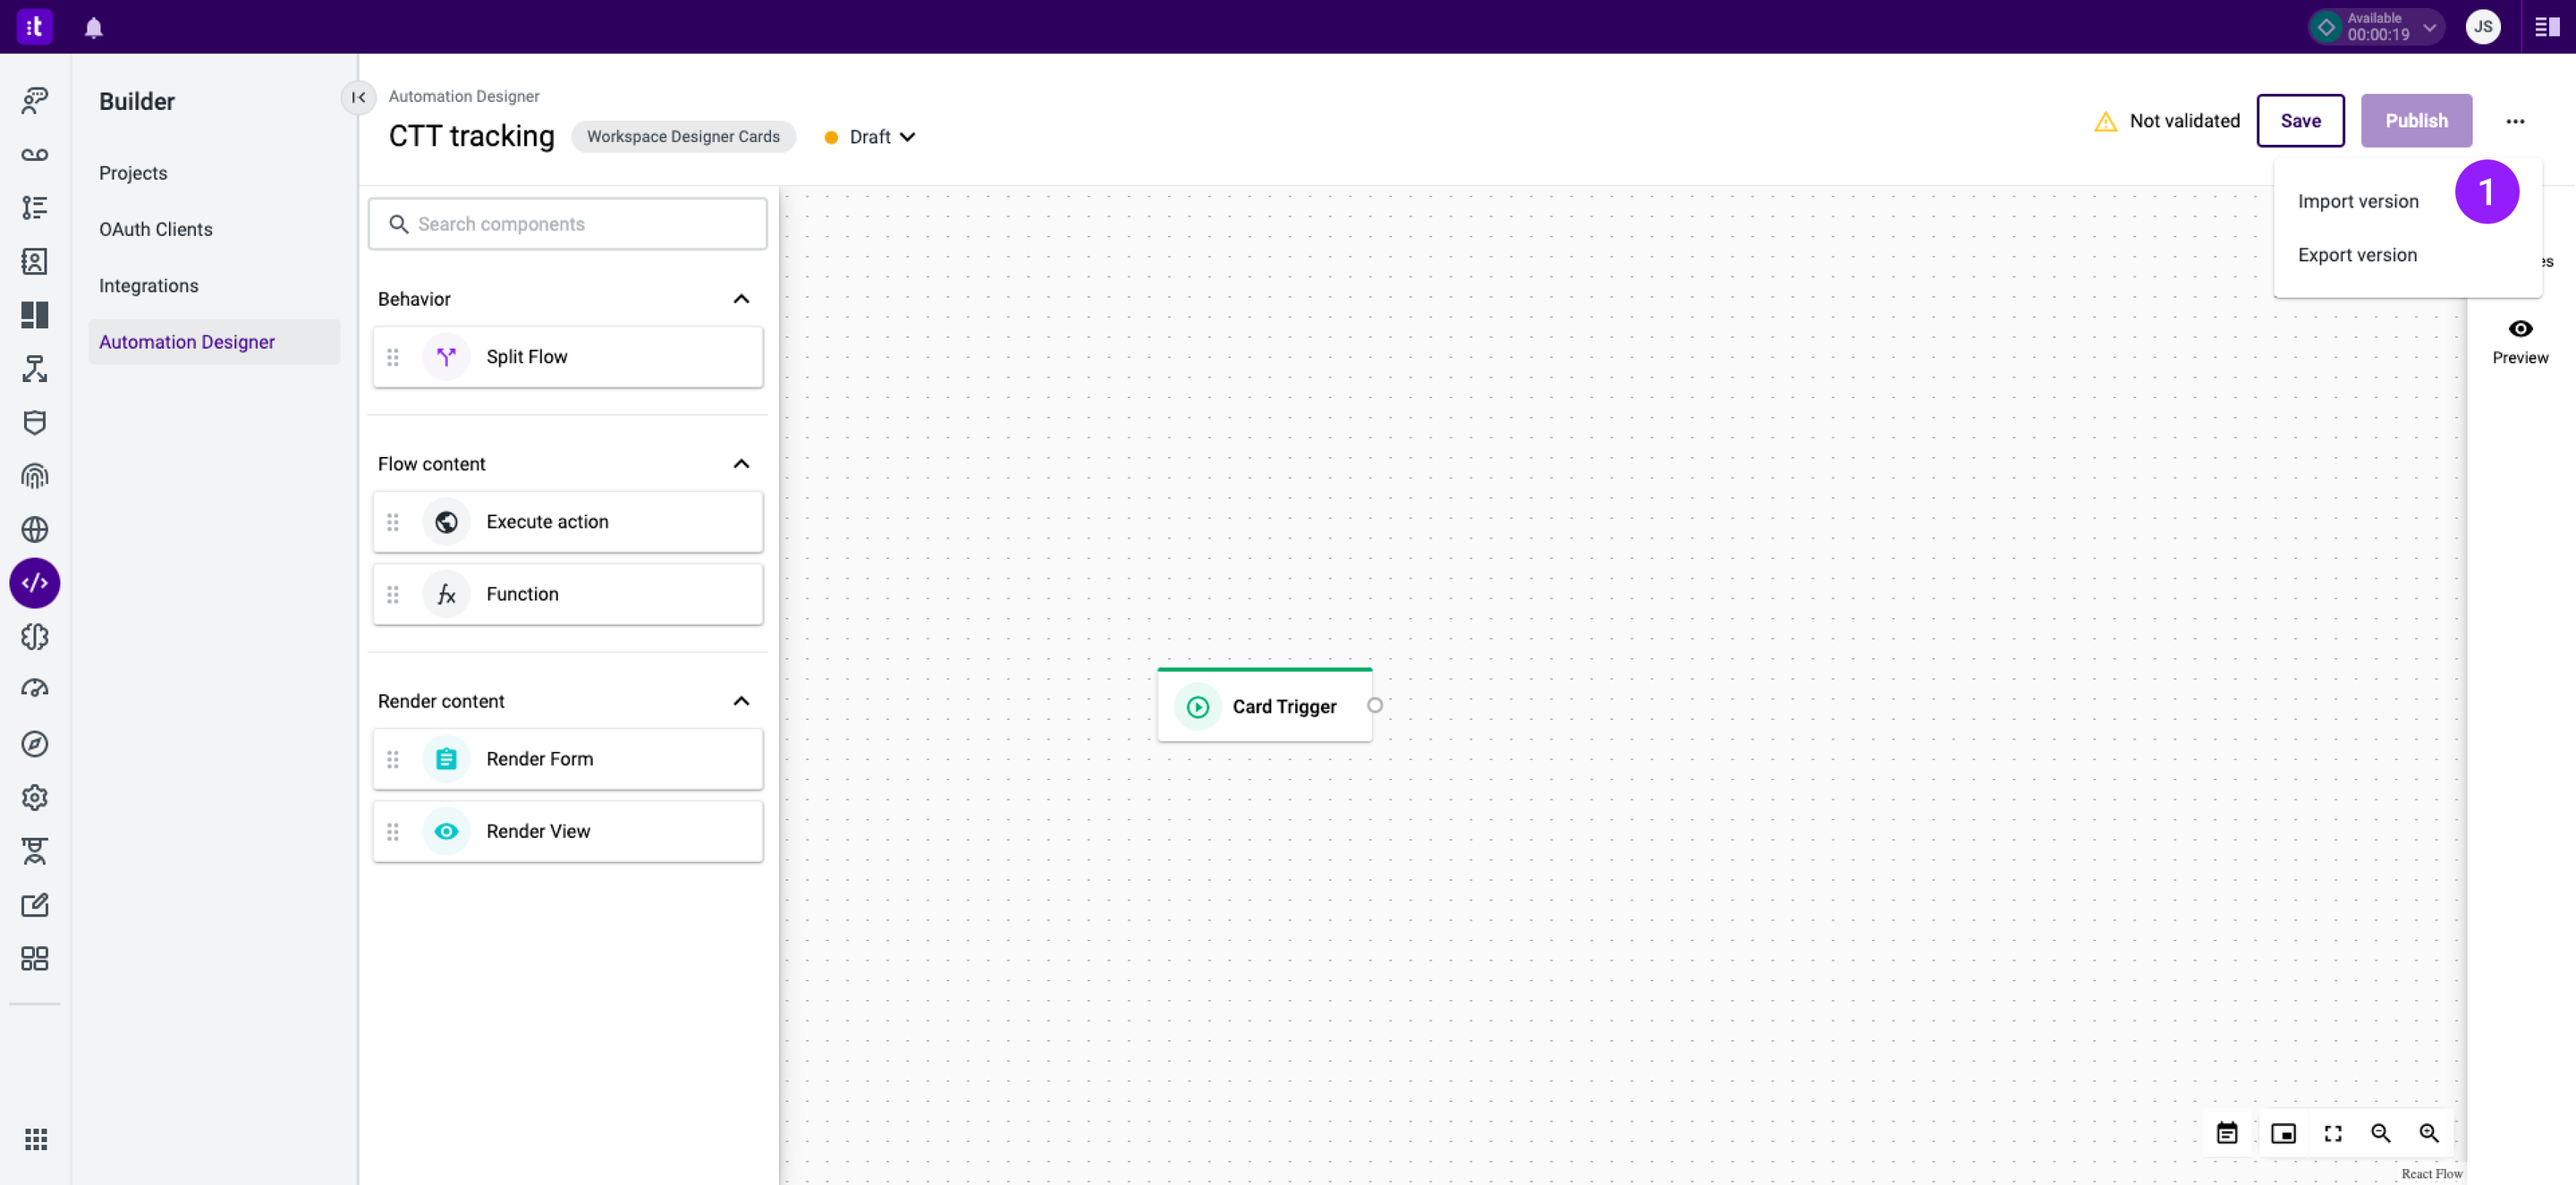
Figure 13 - Import version option
3 - A modal will open (Figure 14). There, insert the JSON file and click the Confirm button (Figure 14 - 1).
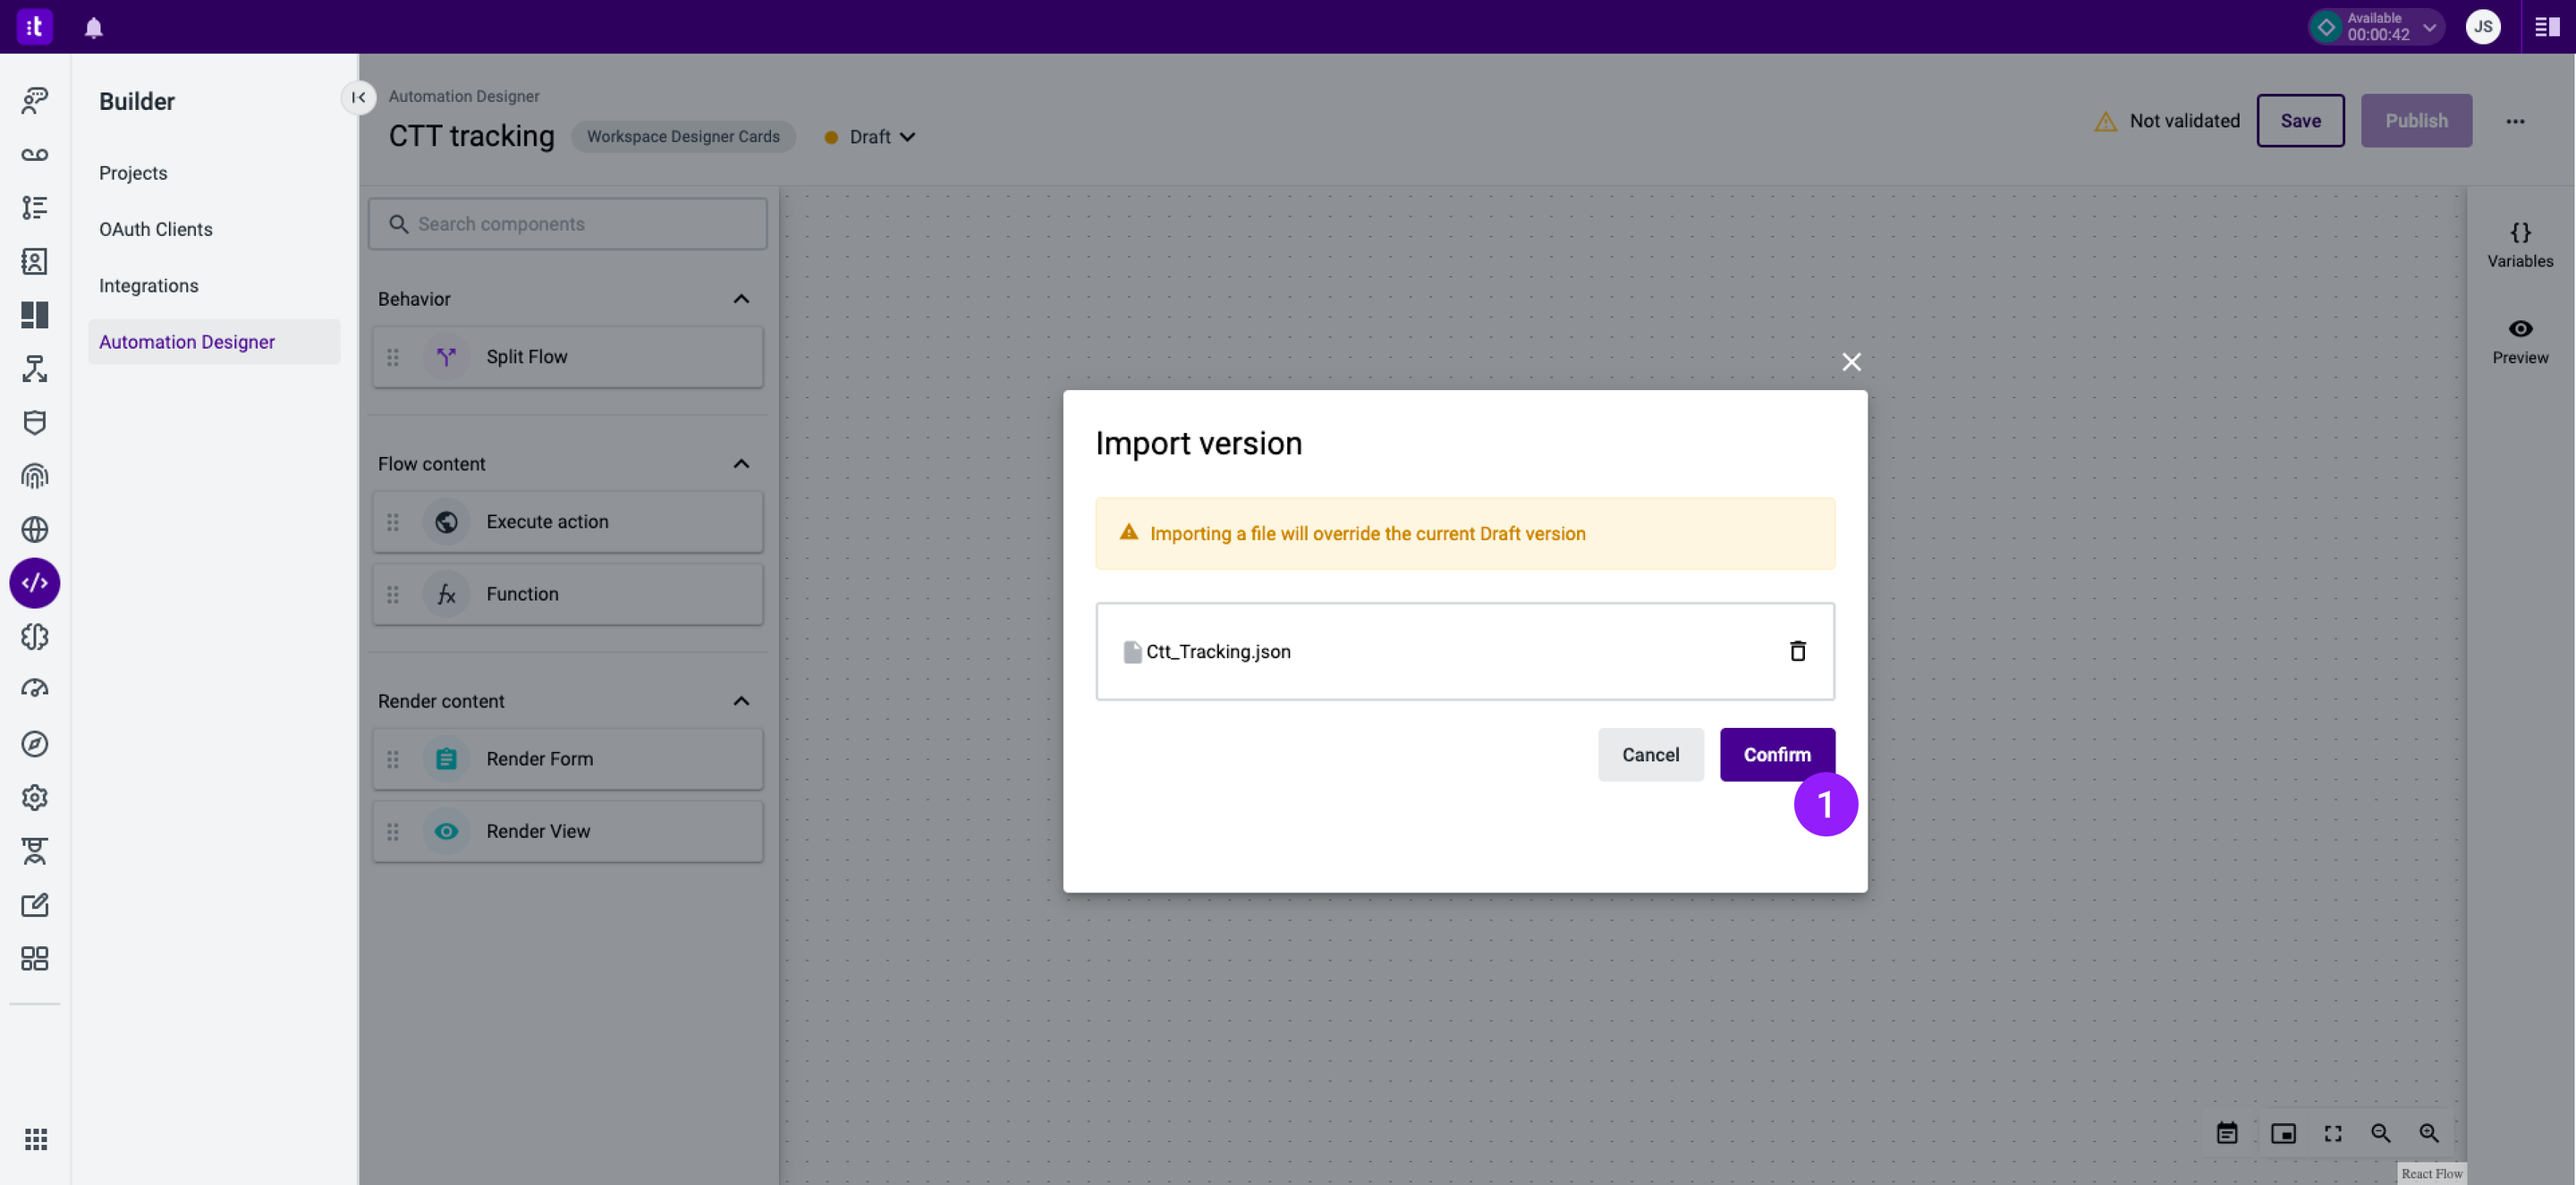
Figure 14 - Import version modal
4 - The automation's version (which consists of the card flow created in this tutorial) is then successfully imported, as shown in Figure 15.

Figure 15 - Automation with imported version
Additional Resources
TroubleshootingIf you have questions or technical issues, please open a ticket using this form.
Updated 6 months ago