Displaying Different Panels
Based on an Agent Variable
Overview
This blueprint offers a step-by-step guide for integrating business logic into a canvas flow using the Fetch Data component. It enables the display of distinct panels based on an agent's variable.
Throughout this guide, you'll encounter a practical use case where the goal is to present different panels, each containing groups of cards, based on the user's team. Additionally, you'll explore implementing an empty state message in specific scenarios. This approach empowers you to dynamically determine the most suitable panel for your business logic, all within the same canvas.
The blueprint will also delve into various Talkdesk Workspace Designer™ concepts, providing insights into configuring variables and utilizing the Split Flow component for introducing conditional logic.
Required Background Knowledge
To fully benefit from this tutorial, it's helpful to have an understanding of:
- The key concepts of Workspace Designer: cards, panels, and canvas:
- How to create a card, a panel, and how to link a panel to a canvas.
- How to manage variables.
- Familiarity with of Queues (Ring Groups) and Agent attributes.
Implementation Steps
1 - Edit a Canvas Flow
2 - Integrate the Fetch Data Component
3 - Incorporate the Split Flow Component
4 - Define Different Panels for the First Two Scenarios
5 - Define a Fallback Interface for the Last Scenario
5 - Save and Publish the Canvas Flow
6 - Create a Fallback Interface for Error and Timeout Exits
7 - Save and Publish the Canvas Flow
8 - Conclusion
1 - Edit a Canvas Flow
To integrate your business logic into a canvas, you'll need to edit the associated canvas flow. Here's how:
1 - Access Workspace Designer in your account. You can launch the app by locating the Workspace Designer icon on your Talkdesk dock (Figure 1 - 1).
2 - Inside the Canvas tab (Figure 1 - 2), click the edit button for the specific canvas you want to modify (Figure 1 - 3).
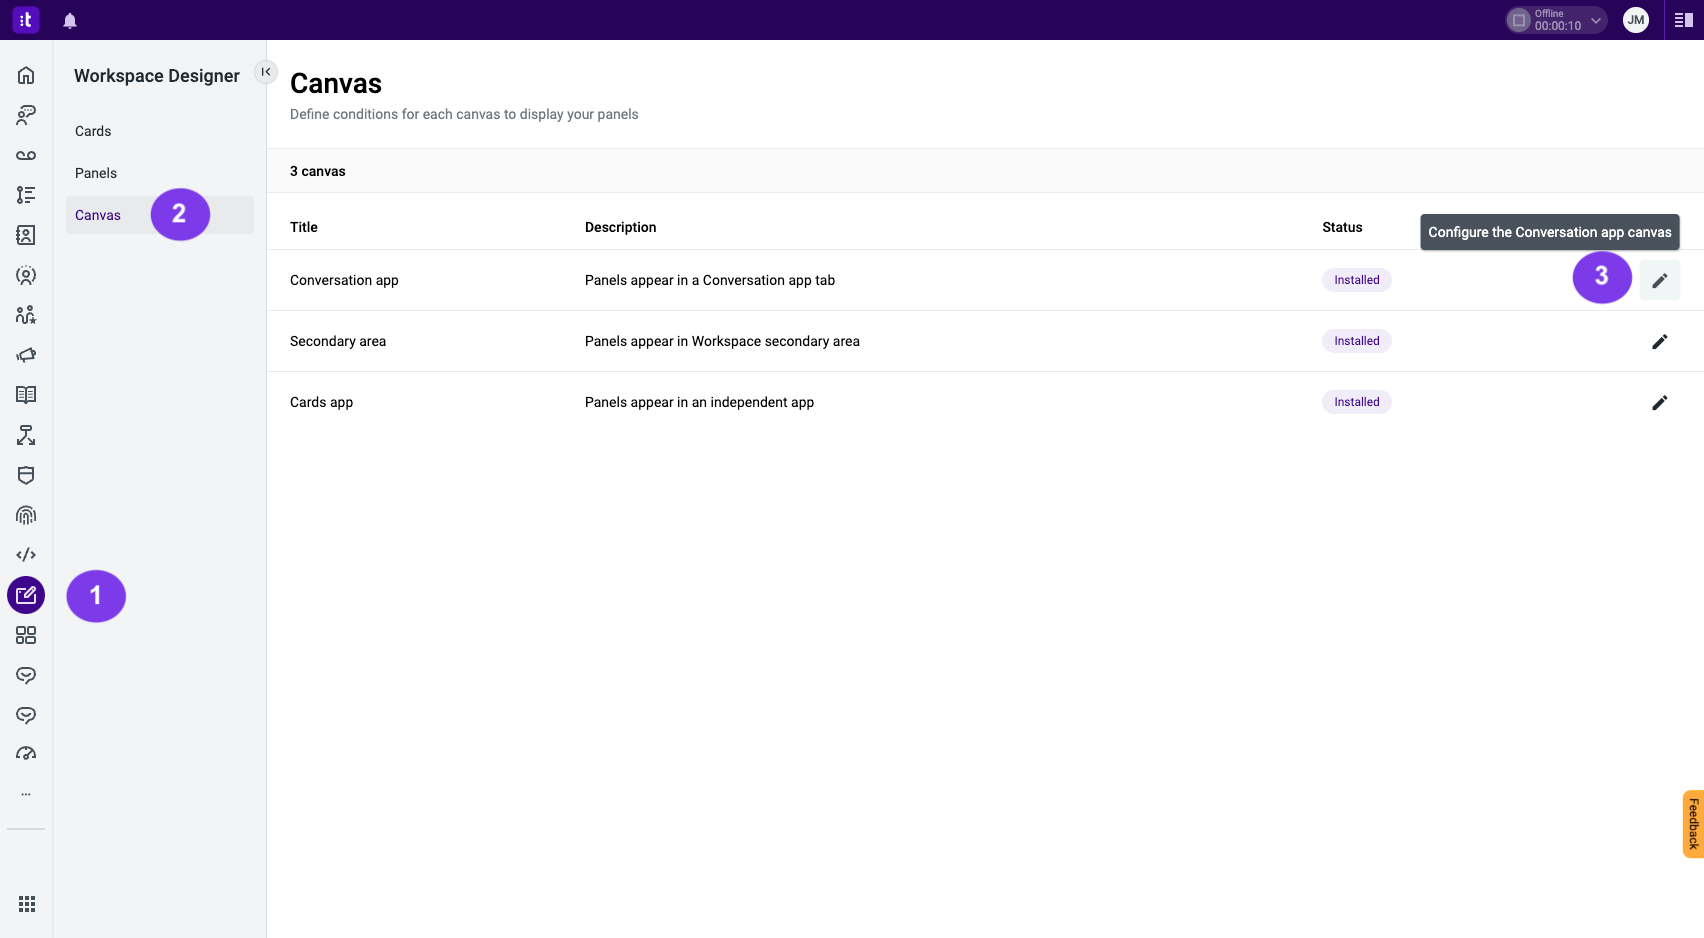
Figure 1 - Edit a canvas flow in Workspace Designer
2 - Integrate the Fetch Data Component
Every canvas flow begins with the Canvas Trigger component, which activates when the canvas is presented to the user. To accomplish this use case, follow these steps:
1 - Add the Fetch Data component (Figure 2 - 1). Drag and drop it onto the canvas, and connect it to the Canvas Trigger component (Figure 2 - 2).
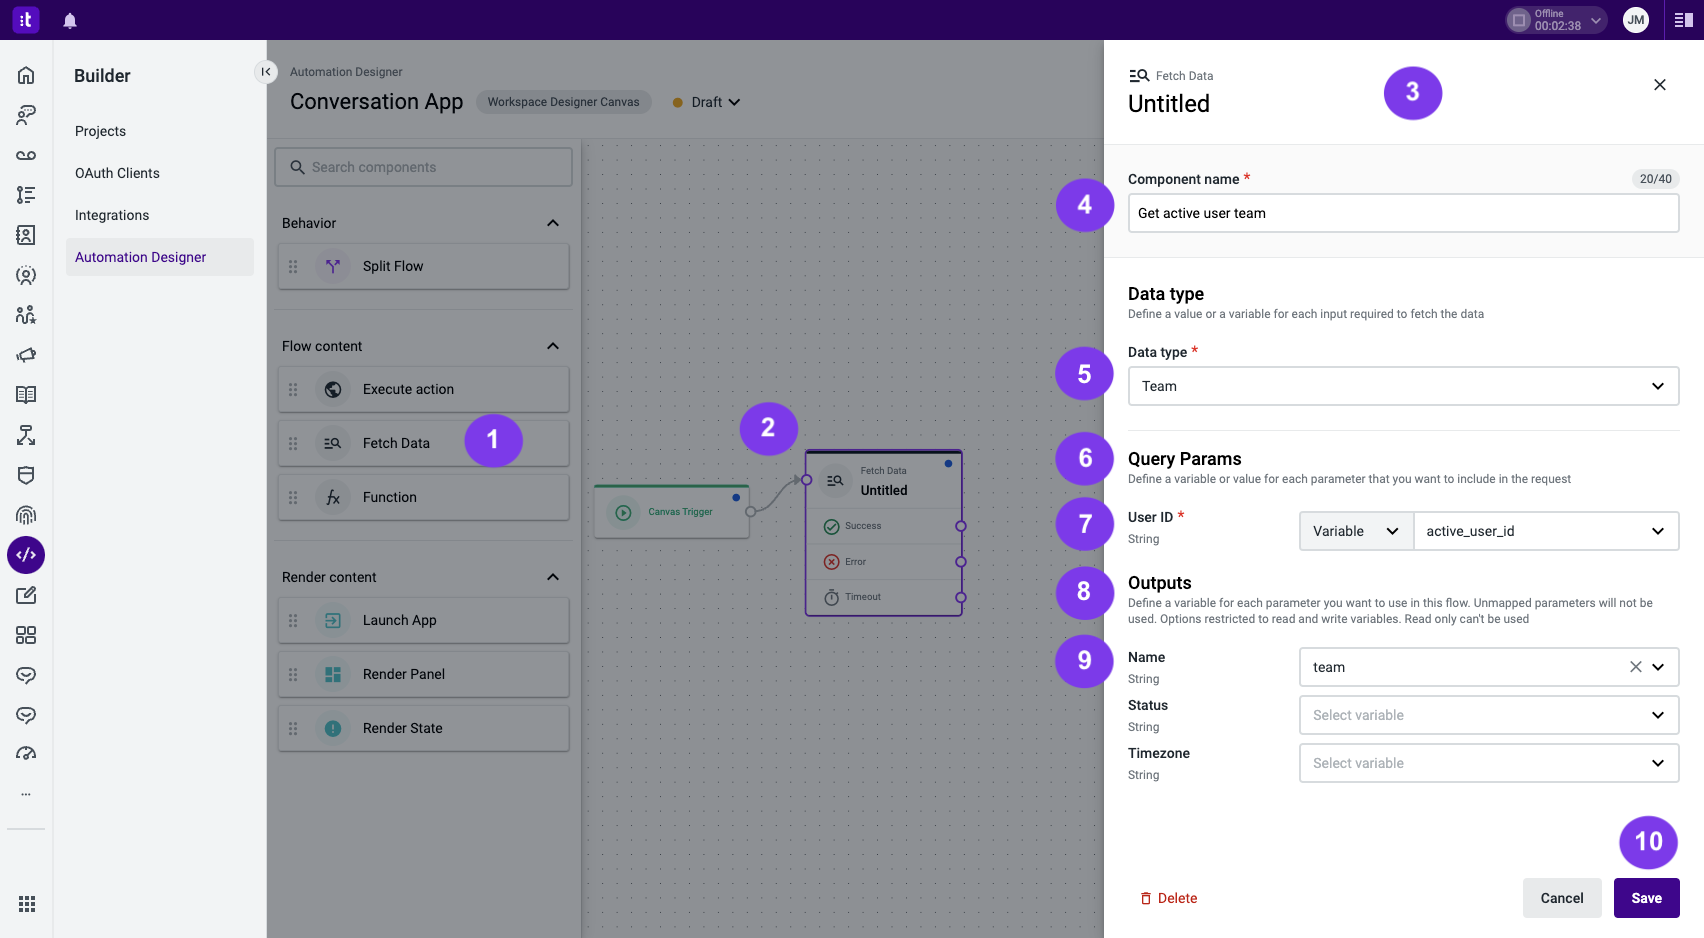
Figure 2 - Add the Fetch Data component to your canvas flow in Workspace Designer
2 - Double-click the Fetch Data component to open the configuration panel (Figure 2 - 3).
3 - Enter the component name (required field) (Figure 2 - 4).
4 - Choose the desired data type. In this use case, “Team” is selected, but different data types are available (Figure 2 - 5).
5 - In the Query Params section (Figure 2 - 6), insert the user ID of the agent viewing the card. Use the existing active_user_id system variable for this purpose (Figure 2 - 7).
6 - Within the Outputs (Figure 2 - 8) section, you have access to specific data type details. For this scenario, only the team's name field is required. You can either select an existing variable (in this case, "team" is used - Figure 2 - 9) or create a new one (if you're unfamiliar with variables, refer to this guide).
7 - Click Save (Figure 2 - 10).
You have now set up a canvas flow that retrieves the user's team information and stores it in a designated variable upon presentation to the user (Figure 3).
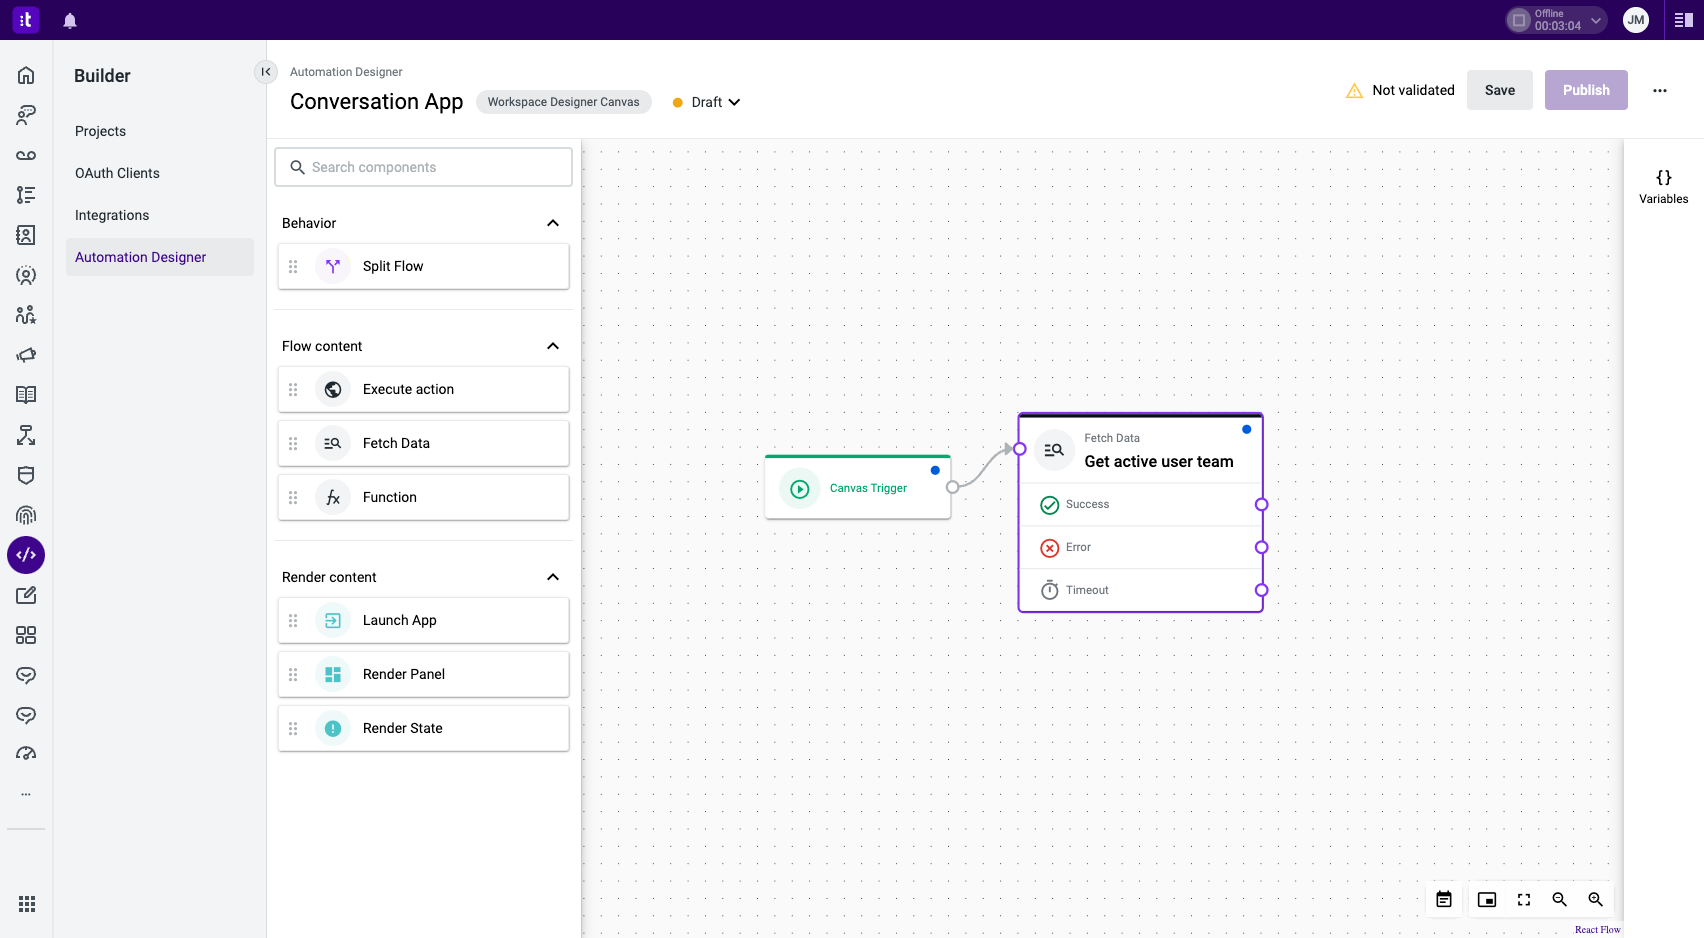
Figure 3 - New established canvas flow
3 - Incorporate the Split Flow Component
With your variable established, you can now integrate a Split Flow component. This component empowers you to establish multiple conditions, thereby determining which panel is displayed to the agent. Follow these steps:
1 - Place a Split Flow component into the flow and connect it to the Card Trigger component (Figure 4 - 1).
2 - Double-click the Split Flow component (Figure 4 - 2) to open its configuration panel (Figure 4 - 3).
3 - Enter the Component name (mandatory field) (Figure 4 - 4).
Now, you can define the exits based on the specific scenarios of this use case (Figure 4 - 5).
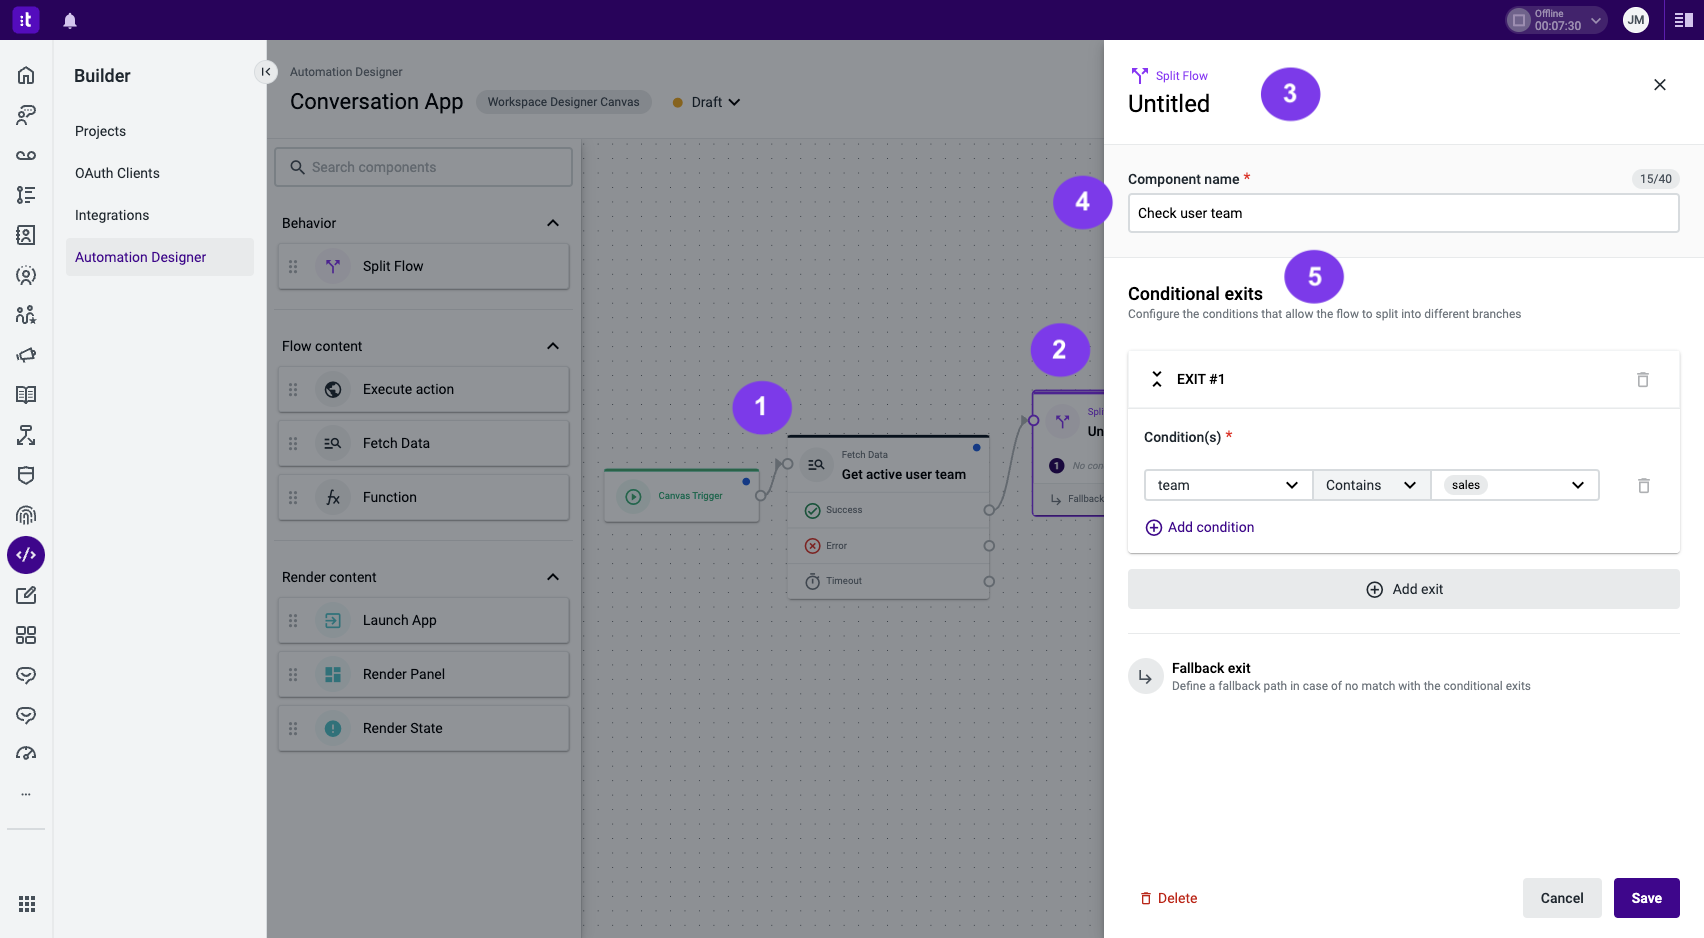
Figure 4 - Split Flow Panel Configuration
Depending on your specific use case, you can define different conditions. For illustrative purposes, consider the scenario below.
The available teams are:
- sales_pt.
- sales_us.
- sales_support
- support.
- admin.
The conditions for the use cases are as follows:
- Display panel A if team starts with “sales”, but is not “support”.
- Display panel B if the team is “support”.
- No panel must be displayed if the team is “admin” or any other.
Follow these steps to create the various conditional exits (Figure 5):
1 - Configure the initial scenario in Exit #1, “Display panel A if team starts with ‘sales’, but is not ‘support’” (Figure 5 - 1):
a) Select the created variable "team" in the first dropdown menu (Figure 5 - 2).
b) Choose the option Contains in the middle dropdown (Figure 5 - 3).
c) In the last dropdown, click the Add value button. This action will generate a text input field (this button is replaced by the input). Insert the value "sales" by typing it and pressing Enter (Figure 5 - 4).
You also have the option to input multiple values for comparison purposes and to compare the variable with other pre-existing variables.
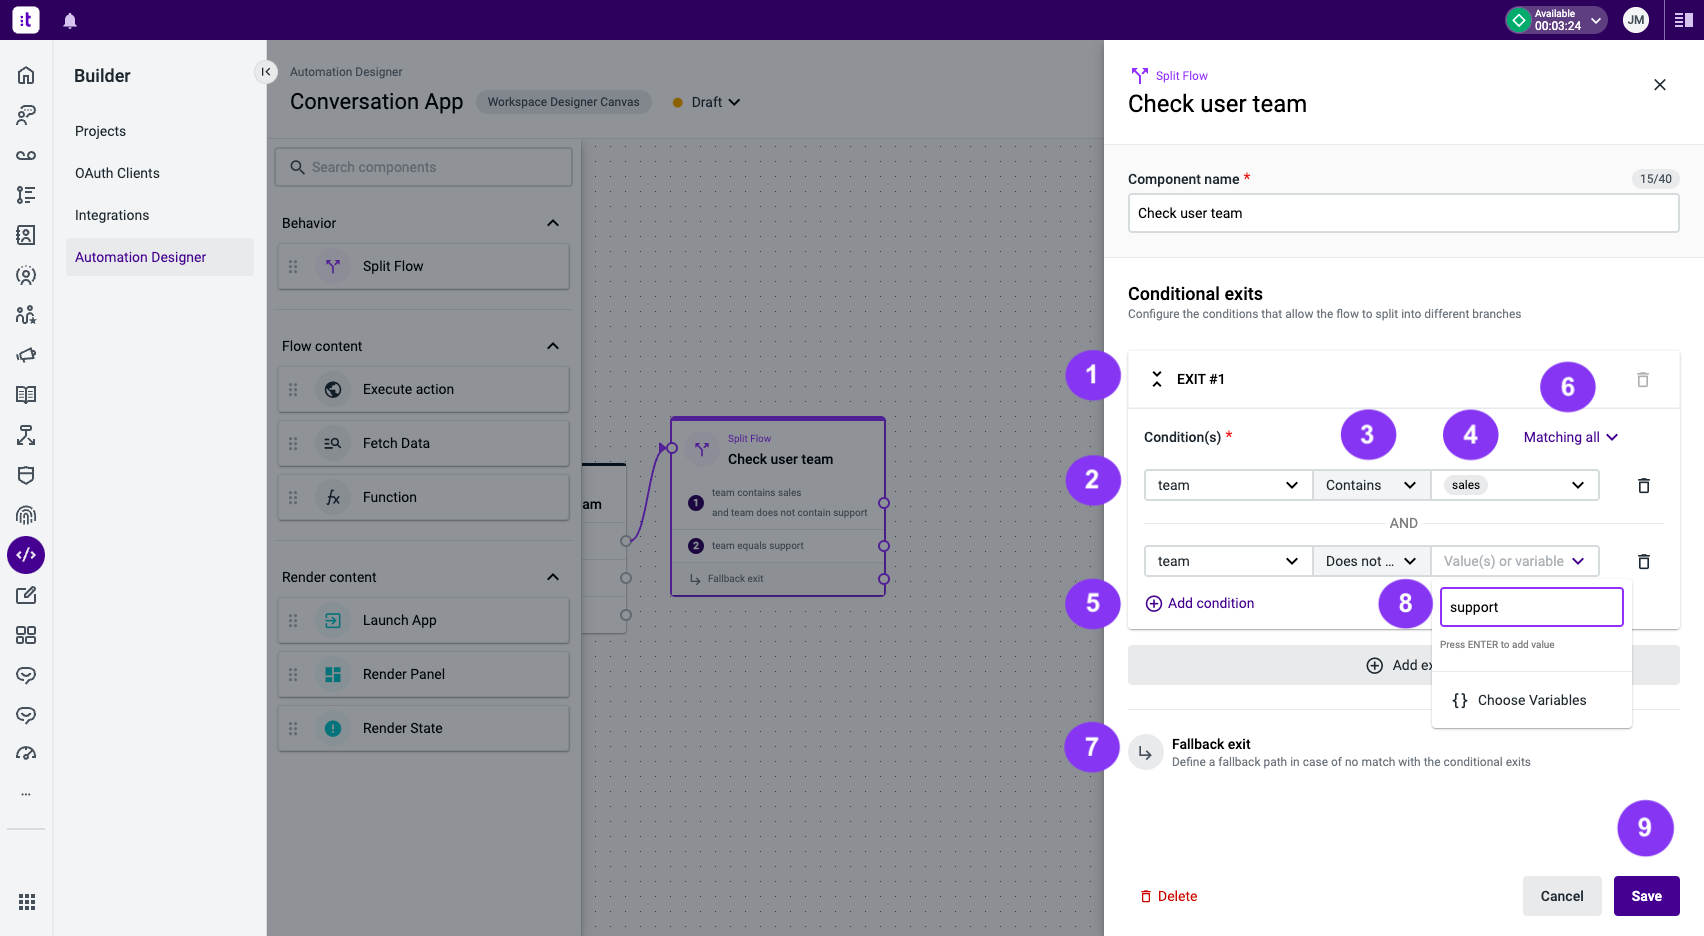
Figure 5 - Defining the first conditional exit
2 - Now you need to add another condition to this exit:
a) Click the Add condition button (Figure 5 - 5) to include the second condition within this scenario.
b) Repeat the previous step while using the Does not contain comparator and entering "support" (Figure 5 - 8) as the value to be compared.
c) Click Save (Figure 5 - 9 ).
The first scenario is now complete. However, you still need to configure the second scenario, which is as follows: Display panel B if the team is 'support'.
It’s also possible to define if all the conditions should be met to follow the exit or any of the conditions. To use this feature click the Matching all button (Figure 5 - 6).
3 - Now you need another exit to configure the second scenario: Show panel B if team equals ‘support’ (Figure 6).
a) Click the Add exit button (Figure 6 - 1).
b) Repeat Step 1 on this new exit, using the Equals comparator and "support" as the value to compare.
The last scenario Do not show any panel if the team equals admin or any other can be accomplished by the Fallback Exit (Figure 5 - 7). This exit will be followed if there is no match with the conditional exits created earlier.
c) Click Save (Figure 6 - 2).
It’s also possible to define if All the conditions should be met to follow the Exit or Any of the conditions. To use this feature, click the Matching all button (Figure 6 - 3).
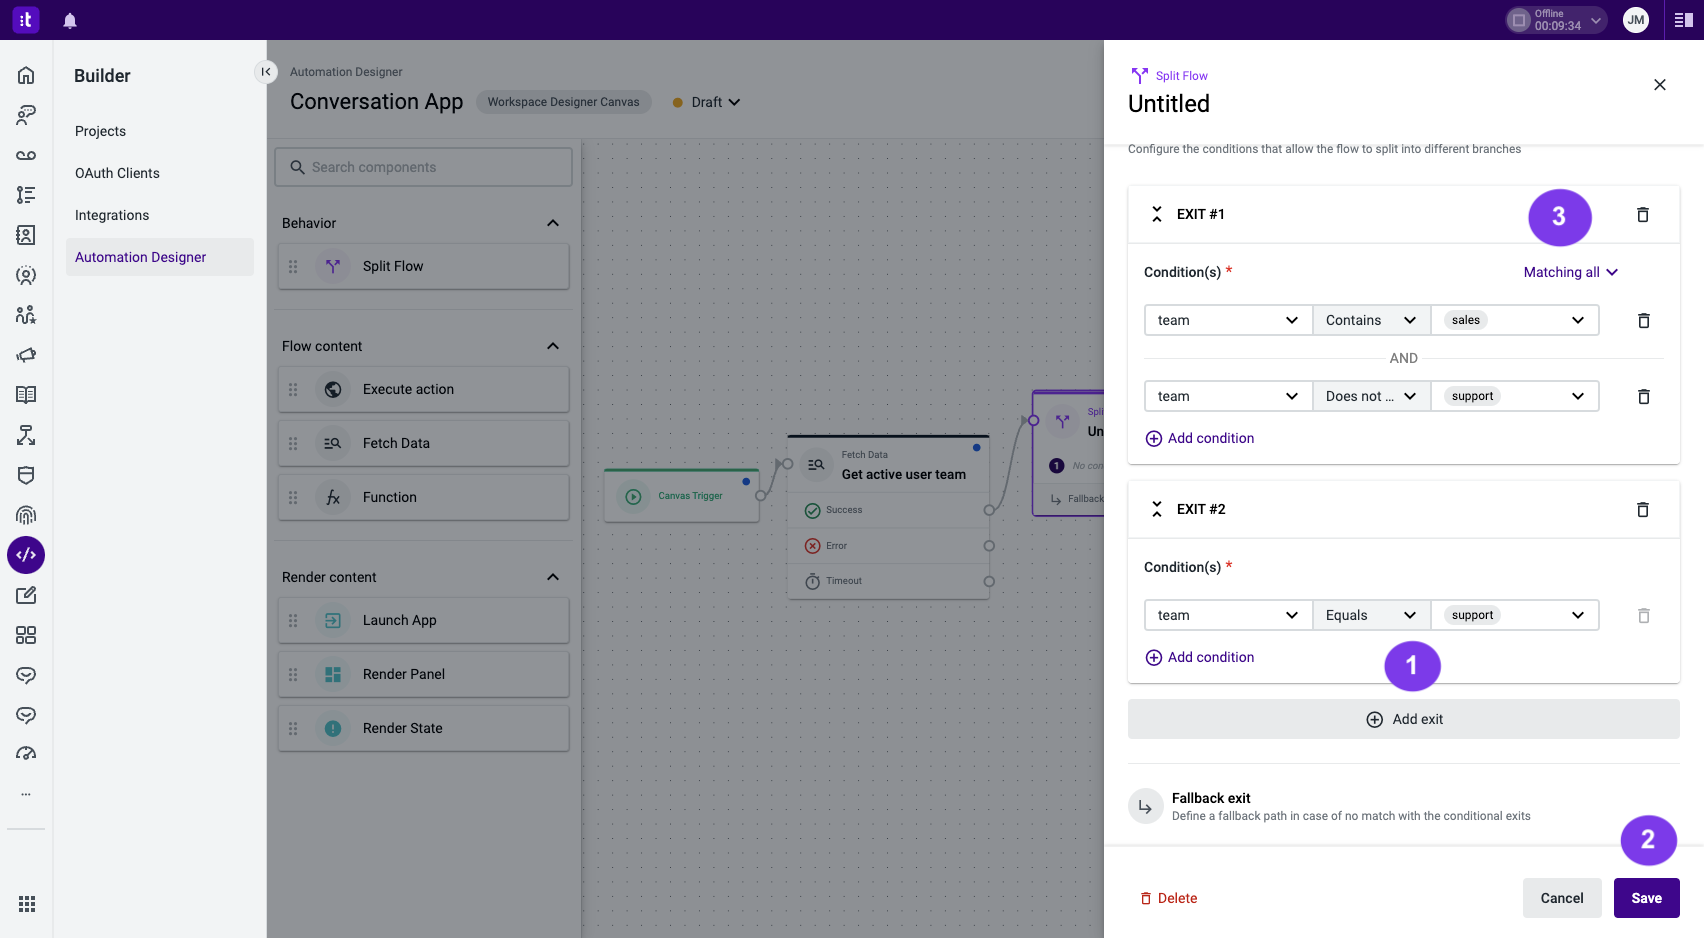
Figure 6 - All conditions are now defined
4 - Define Different Panels for the First Two Scenarios
Now that you have your canvas flow fetching the active user team and following different exits based on the defined scenarios, you need to connect the Split Flow component exits to the desired panels:
1 - Drag and drop different Render Panel components (Figure 7 - 1) and connect them to the exits corresponding to the first two scenarios (Figure 7 - 2).
2 - Double-click each Render Panel component (Figure 7 - 1), to open its configuration panel (Figure 7 - 3).
3 - Insert the Component name (required field) (Figure 7 - 4).
4 - Choose the desired panel from the dropdown menu (Figure 7 - 5).
5 - Click Save (Figure 7 - 6).
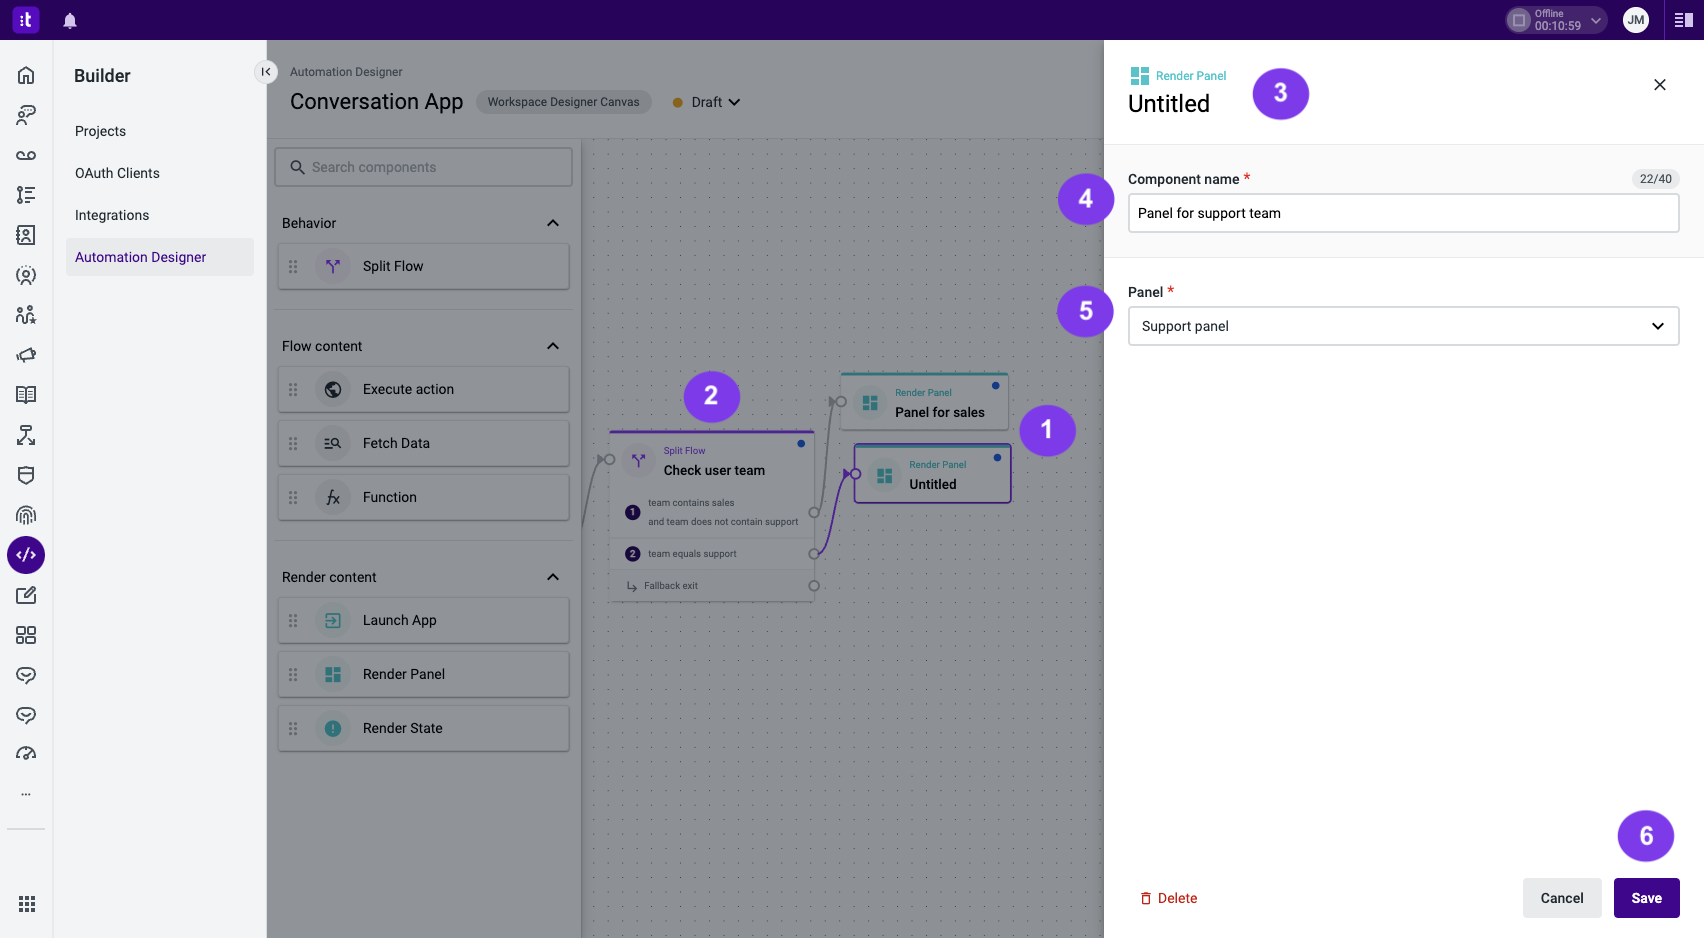
Figure 7 - Defining panels for the first two scenarios
Once you're done, the canvas will look like the one represented below (Figure 8).
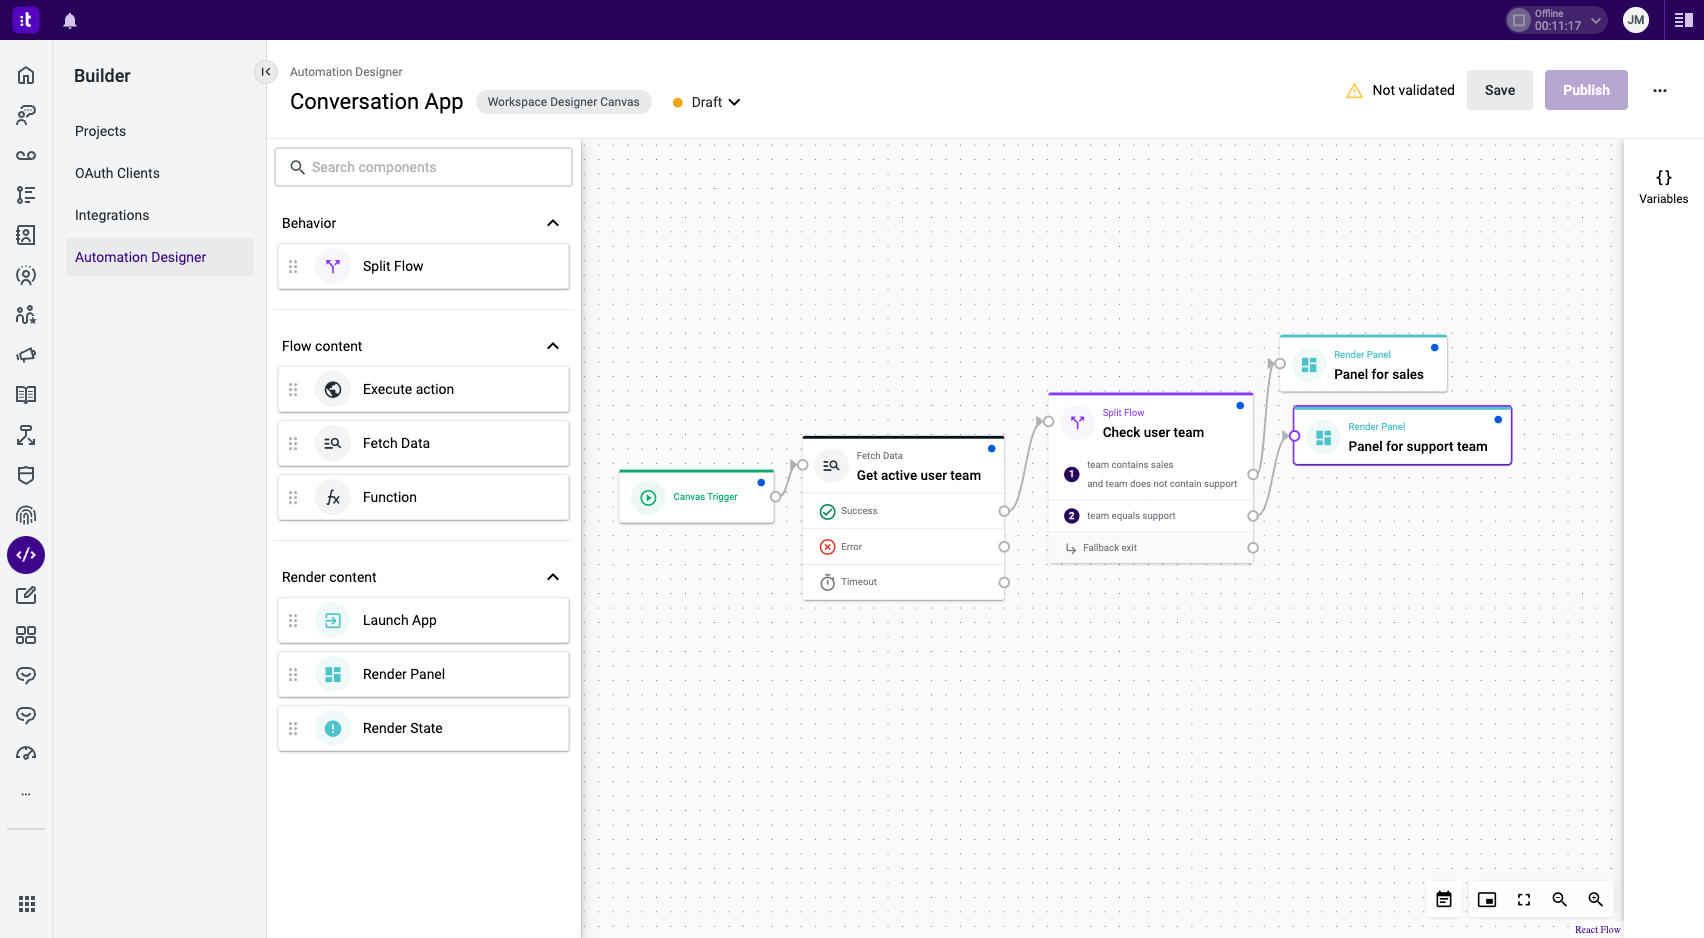
Figure 8 - Panels configured
5 - Define a Fallback Interface for the Last Scenario
Since the objective is to avoid displaying any panel when the last scenario Do not show any panel if the team equals admin or any other is met, you can effectively utilize the Render State component to present an empty state message.
1 - Drag and drop a Render State component (Figure 9 - 1) and connect it to the Fallback exit (Figure 9 - 2).
2 - Double-click the Render State component (Figure 9 - 1) to access its configuration panel (Figure 9 - 3).
3 - Insert the Component name (mandatory field) (Figure 9 - 4).
4 - Choose the state type. In this case, select Empty (Figure 9 - 5).
5 - Provide a title: No defined panel for your team (mandatory field; Figure 9 - 6) and provide an optional description: Your team does not have an associated panel (Figure 9 - 7).
6 - Preview the interface in the preview area (scroll down). Once you're done, click Save (Figure 9 - 8).

Figure 9 - Defining an empty state message for the fallback scenario
After completing these steps, the canvas will resemble the one represented below (Figure 10).
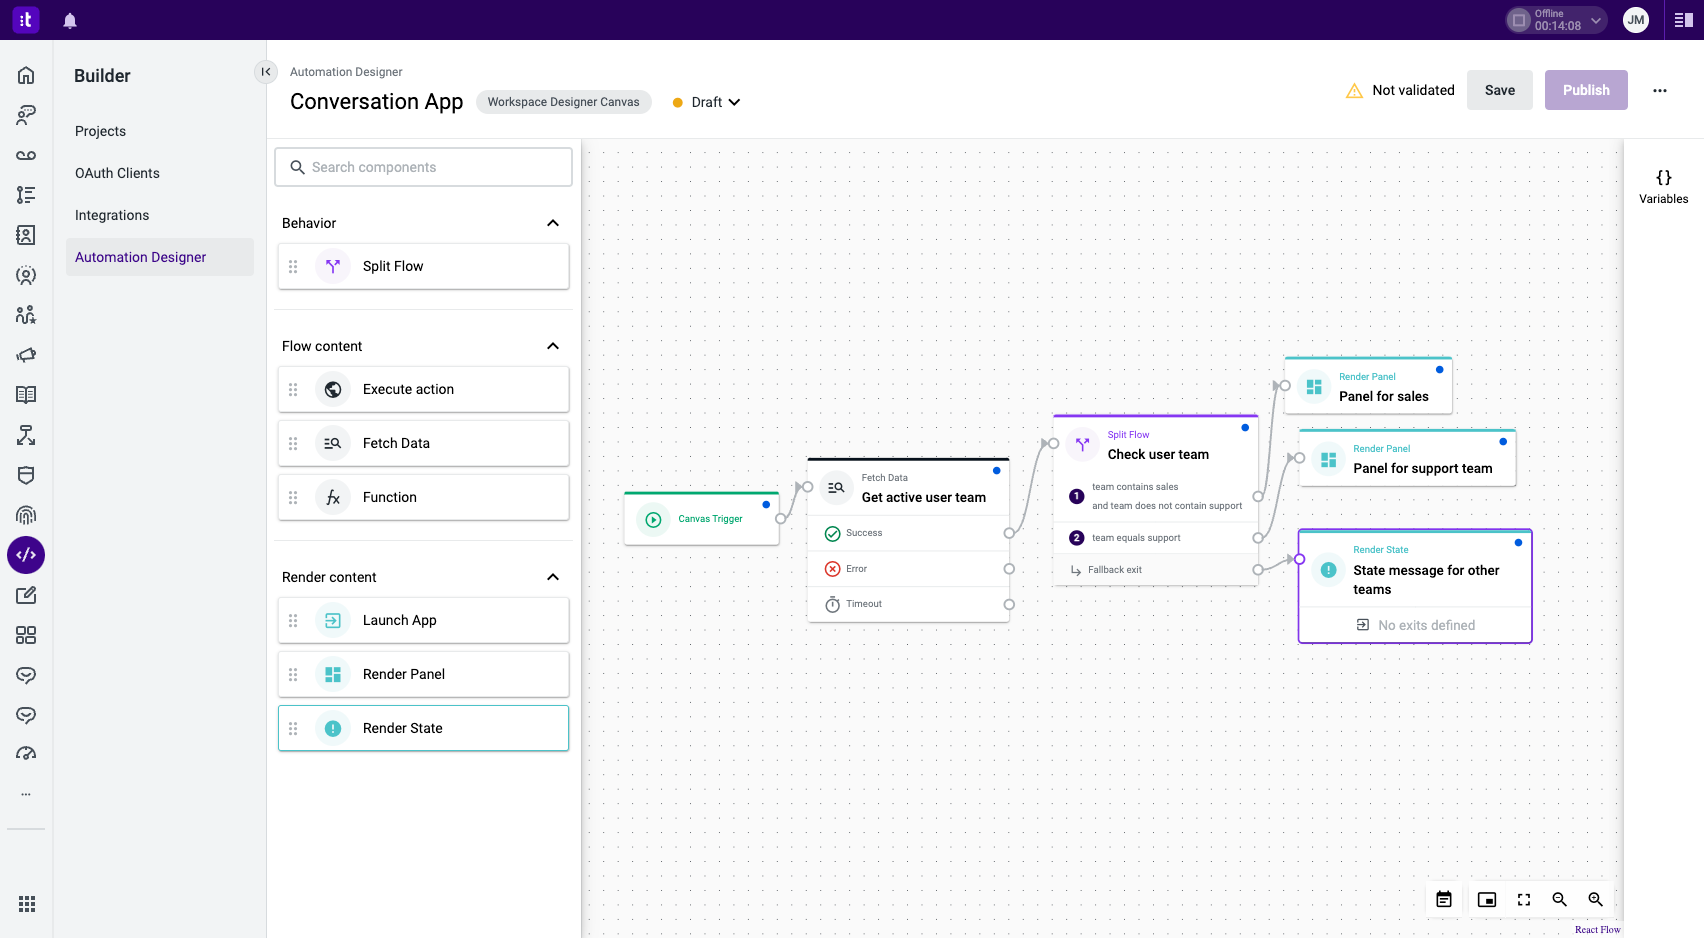
Figure 10 - Final canvas flow defined
In this particular use case, an exit is not required. However, if necessary, refer to the component documentation for guidance on defining exits.
6 - Create a Fallback Interface for Error and Timeout Exits
Every component exit must be connected to a component. To achieve this, you can employ a Render State component to display a message with a Try Again button (Figure 11):
1 - Drag and drop a Render State component (Figure 11 - 1) and connect it to the Fallback exit (Figure 11 - 2).
2 - Double-click the Render State component (Figure 11 - 1) to access its configuration panel (Figure 11 - 3).
3 - Insert the Component name (mandatory field; Figure 11 - 4).
4 - Choose the state type; in this case, it is Error (Figure 11 - 5).
5 - Enter a title. In this case, the title is No defined panel for your team (mandatory field; Figure 11 - 6). You can provide an optional description (Figure 11 - 7).
6 - Under Exits, you can define two exit types: Internal or External (Figure 11 - 8). The default exit type (internal) creates a component exit to be connected to another component. The external exit type allows you to open a URL in a new tab. In this case, use the internal option, and simply provide a button title, like Try again (Figure 11 - 9).
7 - Preview the interface in the preview area (scroll down). Once you're done, click Save (Figure 11 - 10).
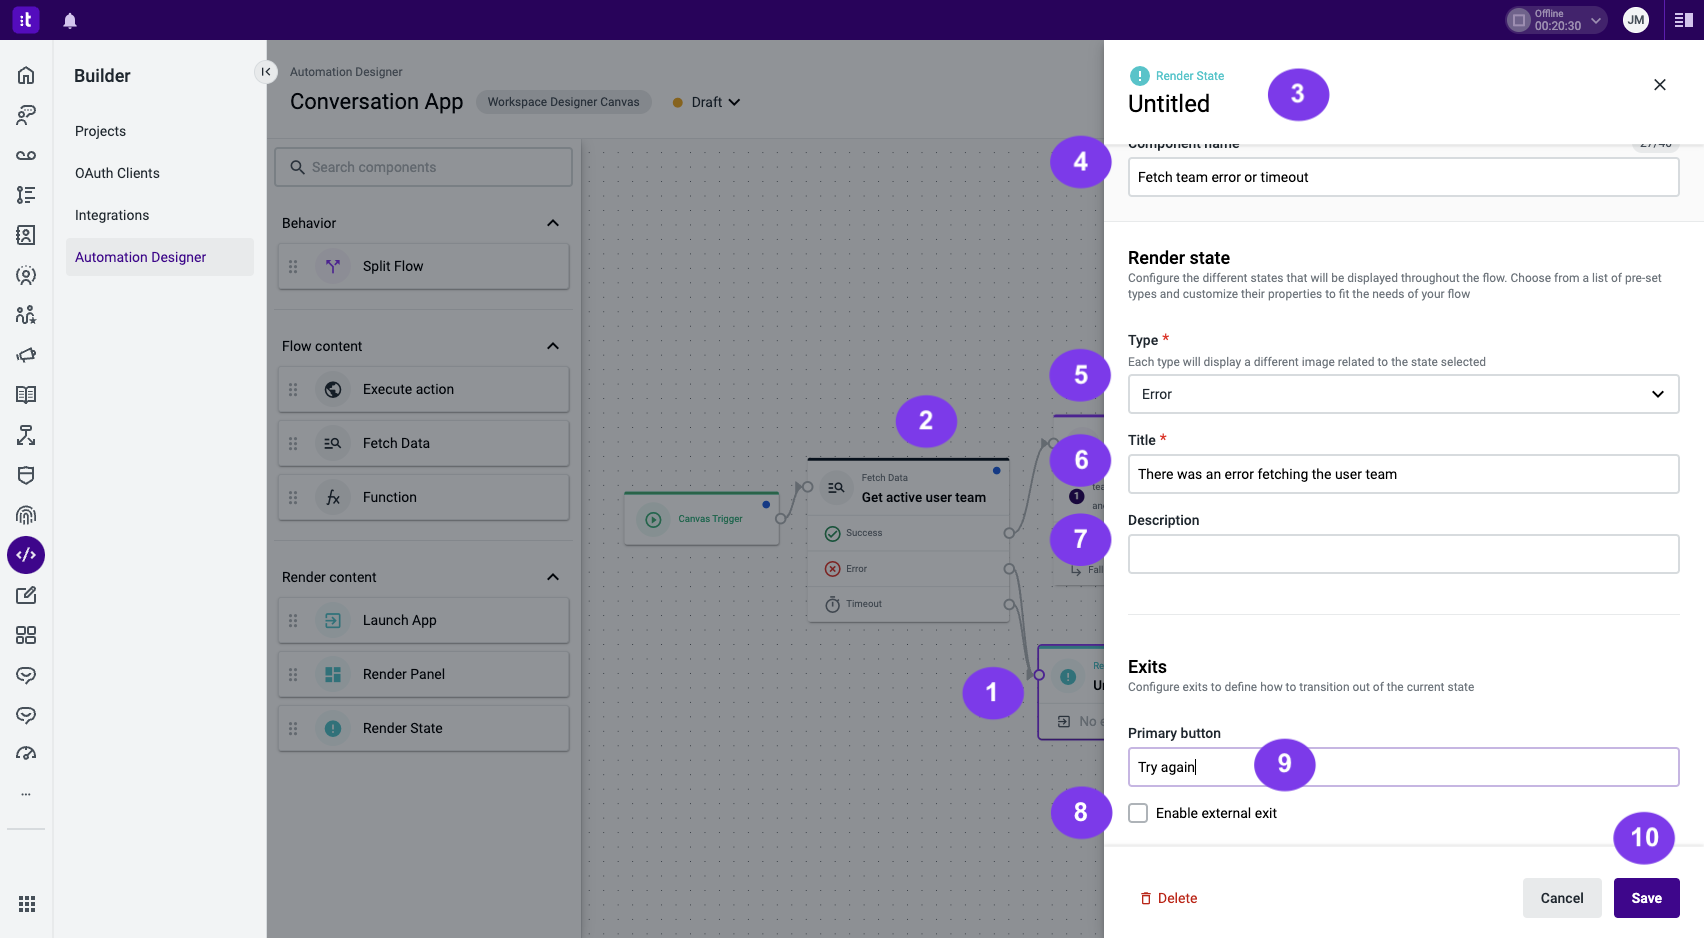
Figure 11 - Connect component exit to a component
Ensure that you connect the newly created Try again exit to the Fetch Data component. This way, when a user clicks the button, it will rerun the Fetch Data component.
7 - Save and Publish the Canvas Flow
Upon completing the configuration, make sure to save (Figure 12 - 1) and/or publish (Figure 12 - 2) the canvas flow using the buttons in the automation header.
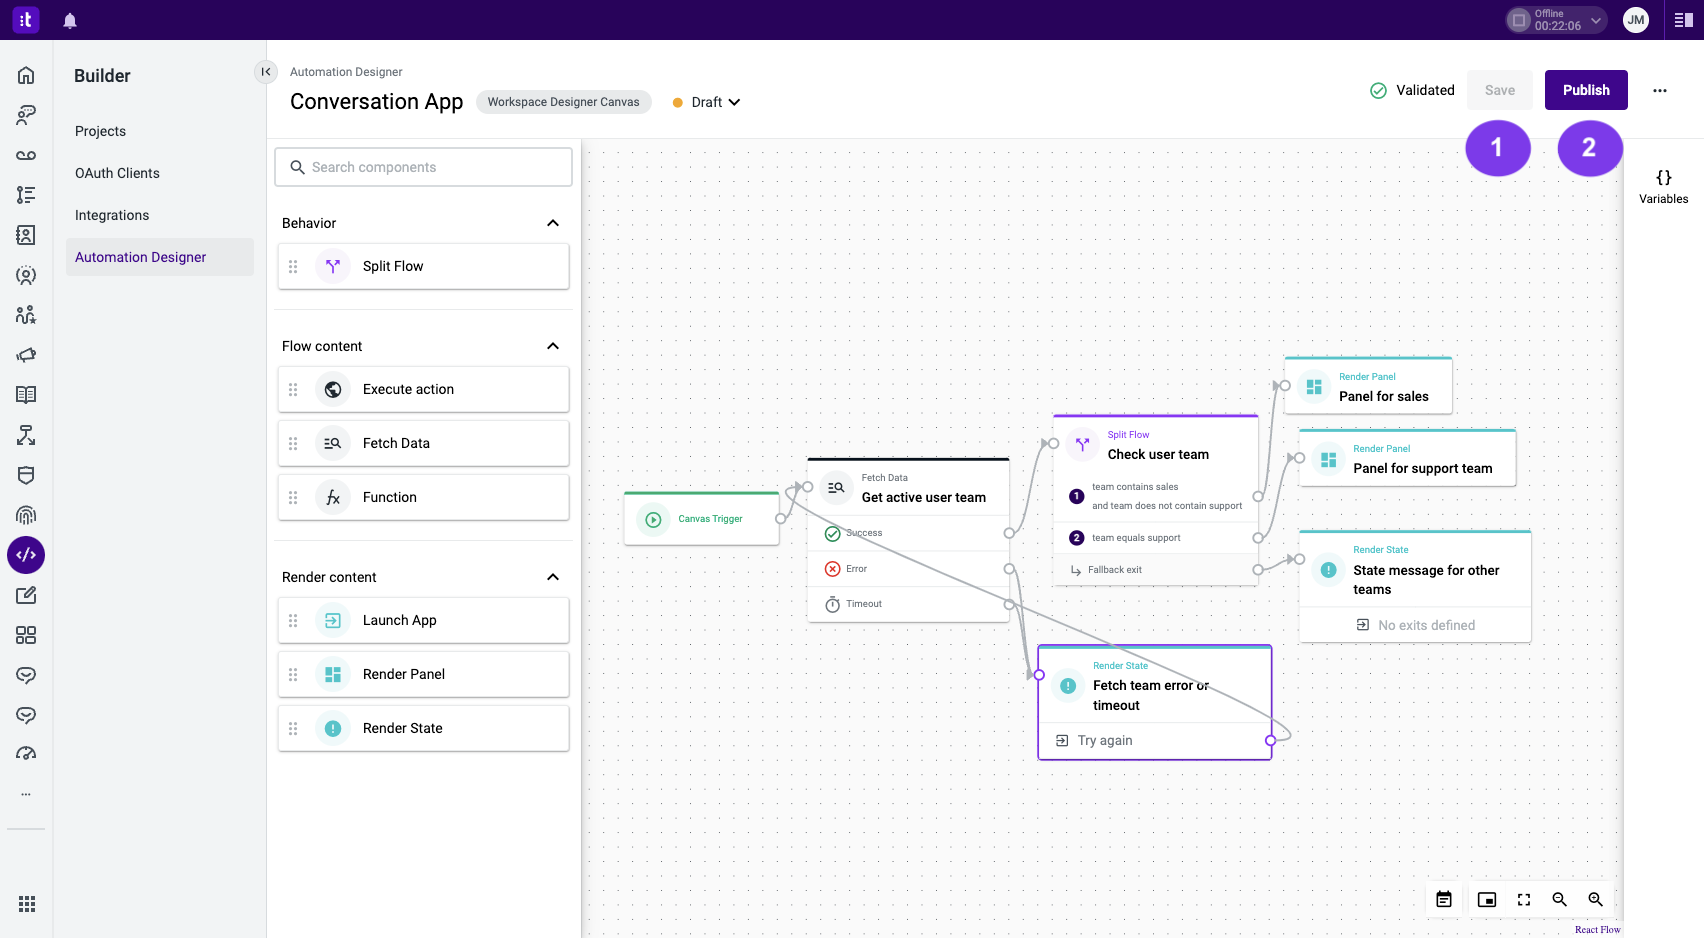
Figure 12 - Save and publish the canvas flow
8 - Conclusion
At this point, you have successfully developed a canvas that evaluates the user's team and, based on predefined scenarios, displays different panels or an empty state message when presented to the agent.
You can now import the canvas flow automation (see below).
To extend this blueprint to more advanced use cases, refer to the components documentation.
8.1 - Import the Canvas Flow Automation
You can import the canvas automation created in this tutorial by following these steps:
1 - Create a JSON file containing the code below.
{
  "id": "0509708b-0309-474c-8db4-313bcc298f96",
  "name": "Conversation App",
  "type": "WORKSPACE_DESIGNER_CANVAS",
  "publish_state": "DEPLOYED",
  "last_updated": "Wed Sep 13 2023 12:13:15 GMT+0100 (Western European Summer Time)",
  "last_published": "2023-09-12T09:45:05.703991Z",
  "content": [
    {
      "id": "2855f56c-bee5-42d1-9278-0503a63dd664",
      "name": "",
      "creation_index": 1,
      "nodes": [
        {
          "id": "afa50062-ce6c-4bb6-935b-247de62ad3ab",
          "type": "canvas-trigger",
          "position": {
            "x": -910,
            "y": -310
          },
          "data": {
            "configuration": {}
          }
        },
        {
          "type": "fetch-data",
          "namespace": "common",
          "position": {
            "x": -720,
            "y": -345
          },
          "id": "56bb824e-fc7f-40b9-8f71-9cb7fef72a65",
          "data": {
            "configuration": {
              "data_type": "get_user_team",
              "query_params": [
                {
                  "id": "get_user_team-dcdbb5d7-3987-474f-9797-51770333a16c",
                  "name": "user_id",
                  "title": "User ID",
                  "type": "string",
                  "required": true,
                  "variable": "e8077283-19e6-4a9b-890d-c88784851a19",
                  "input_type": "variable"
                }
              ],
              "outputs": [
                {
                  "id": "get_user_team-dd6888c3-0e95-46b6-b82f-98f68571a02e",
                  "name": "name",
                  "title": "Name",
                  "type": "string",
                  "required": false,
                  "variable": "545a3c8c-987b-4aa7-b2c6-030d4f2123a4",
                  "input_type": "variable"
                },
                {
                  "id": "get_user_team-f089013a-5943-4879-a390-103f3ffd8fdf",
                  "name": "state",
                  "title": "Status",
                  "type": "string",
                  "required": false,
                  "variable": "",
                  "input_type": "variable"
                },
                {
                  "id": "get_user_team-8c4ce3e7-bde3-4f1d-b547-791b3d156304",
                  "name": "timezone",
                  "title": "Timezone",
                  "type": "string",
                  "required": false,
                  "variable": "",
                  "input_type": "variable"
                }
              ]
            }
          },
          "name": "Get active user team"
        },
        {
          "type": "split-flow",
          "namespace": "common",
          "position": {
            "x": -465,
            "y": -390
          },
          "id": "a80ca1f2-e384-41b7-bd2f-bbad465c45c7",
          "data": {
            "configuration": {
              "exits": [
                {
                  "identifier": "1032bfaf-39fe-4647-bde0-c47ae21d7a27",
                  "matching": "AND",
                  "conditions": [
                    {
                      "identifier": "13facf09-4f08-4de8-989b-38fd4b01cb17",
                      "entry_operand": "545a3c8c-987b-4aa7-b2c6-030d4f2123a4",
                      "operator": "CONTAINS",
                      "compare_operand": {
                        "is_variable": false,
                        "values": [
                          {
                            "text": "sales"
                          }
                        ]
                      }
                    },
                    {
                      "identifier": "f19f75c2-0fd0-44cb-8cc5-59d120308626",
                      "entry_operand": "545a3c8c-987b-4aa7-b2c6-030d4f2123a4",
                      "operator": "DOES_NOT_CONTAIN",
                      "compare_operand": {
                        "is_variable": false,
                        "values": [
                          {
                            "text": "support"
                          }
                        ]
                      }
                    }
                  ]
                },
                {
                  "identifier": "e94250b0-c937-4326-8f40-2c5606699e44",
                  "matching": "AND",
                  "conditions": [
                    {
                      "identifier": "e1ea4fd0-e400-45c7-b496-11cf707cc1d8",
                      "entry_operand": "545a3c8c-987b-4aa7-b2c6-030d4f2123a4",
                      "operator": "EQUALS",
                      "compare_operand": {
                        "is_variable": false,
                        "values": [
                          {
                            "text": "support"
                          }
                        ]
                      }
                    }
                  ]
                }
              ]
            }
          },
          "name": "Check user team"
        },
        {
          "type": "render-panel",
          "namespace": "workspace_designer_canvas",
          "position": {
            "x": -225,
            "y": -450
          },
          "id": "7b49cfa0-b5a4-4310-84d4-892bd590fbf3",
          "data": {
            "configuration": {
              "panel_id": "64d3c276c0018a11f7923d49"
            }
          },
          "name": "Panel for sales"
        },
        {
          "type": "render-panel",
          "namespace": "workspace_designer_canvas",
          "position": {
            "x": -210,
            "y": -375
          },
          "id": "e5ef6ba7-510f-4032-83ee-8a447a3d5448",
          "data": {
            "configuration": {
              "panel_id": "64d1117cdbddcc7df7742a11"
            }
          },
          "name": "Panel for support team"
        },
        {
          "type": "render-state",
          "namespace": "common",
          "position": {
            "x": -210,
            "y": -270
          },
          "id": "a61b58b8-d023-4638-9fc7-43e8da552b9b",
          "data": {
            "configuration": {
              "title": "No defined panel for your team",
              "type": "empty",
              "description": "Your team does not have an associated panel."
            }
          },
          "name": "State message for other teams"
        },
        {
          "type": "render-state",
          "namespace": "common",
          "position": {
            "x": -480,
            "y": -150
          },
          "id": "cac07a87-b794-4210-8ee8-3f58dd339ced",
          "data": {
            "configuration": {
              "title": "There was an error fetching the user team",
              "type": "error",
              "actions": {
                "primary_button": {
                  "label": "Try again",
                  "on_click": {
                    "action": "exit",
                    "args": {
                      "exit_handle": "primary-button-exit"
                    }
                  }
                }
              }
            }
          },
          "name": "Fetch team error or timeout"
        }
      ],
      "edges": [
        {
          "source": "afa50062-ce6c-4bb6-935b-247de62ad3ab",
          "source_handle": "trigger-exit",
          "target": "56bb824e-fc7f-40b9-8f71-9cb7fef72a65",
          "target_handle": "fetch-data-target",
          "type": "edge",
          "id": "reactflow__edge-afa50062-ce6c-4bb6-935b-247de62ad3abtrigger-exit-56bb824e-fc7f-40b9-8f71-9cb7fef72a65fetch-data-target"
        },
        {
          "source": "56bb824e-fc7f-40b9-8f71-9cb7fef72a65",
          "source_handle": "success",
          "target": "a80ca1f2-e384-41b7-bd2f-bbad465c45c7",
          "target_handle": "target-1",
          "type": "edge",
          "id": "reactflow__edge-56bb824e-fc7f-40b9-8f71-9cb7fef72a65success-a80ca1f2-e384-41b7-bd2f-bbad465c45c7target-1"
        },
        {
          "source": "a80ca1f2-e384-41b7-bd2f-bbad465c45c7",
          "source_handle": "1032bfaf-39fe-4647-bde0-c47ae21d7a27",
          "target": "7b49cfa0-b5a4-4310-84d4-892bd590fbf3",
          "target_handle": "target-1",
          "type": "edge",
          "id": "reactflow__edge-a80ca1f2-e384-41b7-bd2f-bbad465c45c71032bfaf-39fe-4647-bde0-c47ae21d7a27-7b49cfa0-b5a4-4310-84d4-892bd590fbf3target-1"
        },
        {
          "source": "a80ca1f2-e384-41b7-bd2f-bbad465c45c7",
          "source_handle": "e94250b0-c937-4326-8f40-2c5606699e44",
          "target": "e5ef6ba7-510f-4032-83ee-8a447a3d5448",
          "target_handle": "target-1",
          "type": "edge",
          "id": "reactflow__edge-a80ca1f2-e384-41b7-bd2f-bbad465c45c7e94250b0-c937-4326-8f40-2c5606699e44-e5ef6ba7-510f-4032-83ee-8a447a3d5448target-1"
        },
        {
          "source": "a80ca1f2-e384-41b7-bd2f-bbad465c45c7",
          "source_handle": "exit-fallback",
          "target": "a61b58b8-d023-4638-9fc7-43e8da552b9b",
          "target_handle": "render-state-target",
          "type": "edge",
          "id": "reactflow__edge-a80ca1f2-e384-41b7-bd2f-bbad465c45c7exit-fallback-a61b58b8-d023-4638-9fc7-43e8da552b9brender-state-target"
        },
        {
          "source": "56bb824e-fc7f-40b9-8f71-9cb7fef72a65",
          "source_handle": "error",
          "target": "cac07a87-b794-4210-8ee8-3f58dd339ced",
          "target_handle": "render-state-target",
          "type": "edge",
          "id": "reactflow__edge-56bb824e-fc7f-40b9-8f71-9cb7fef72a65error-cac07a87-b794-4210-8ee8-3f58dd339cedrender-state-target"
        },
        {
          "source": "56bb824e-fc7f-40b9-8f71-9cb7fef72a65",
          "source_handle": "timeout",
          "target": "cac07a87-b794-4210-8ee8-3f58dd339ced",
          "target_handle": "render-state-target",
          "type": "edge",
          "id": "reactflow__edge-56bb824e-fc7f-40b9-8f71-9cb7fef72a65timeout-cac07a87-b794-4210-8ee8-3f58dd339cedrender-state-target"
        },
        {
          "source": "cac07a87-b794-4210-8ee8-3f58dd339ced",
          "source_handle": "primary-button-exit",
          "target": "56bb824e-fc7f-40b9-8f71-9cb7fef72a65",
          "target_handle": "fetch-data-target",
          "type": "edge",
          "id": "reactflow__edge-cac07a87-b794-4210-8ee8-3f58dd339cedprimary-button-exit-56bb824e-fc7f-40b9-8f71-9cb7fef72a65fetch-data-target"
        }
      ]
    }
  ],
  "metadata": {
    "type": "WORKSPACE_DESIGNER_CANVAS",
    "variables": [
      {
        "id": "2b13990b-4936-4634-a24b-ff3df6ede484",
        "name": "user_queue",
        "type": "CUSTOM",
        "configuration": {
          "source": "currentAutomation",
          "path": ""
        }
      },
      {
        "id": "545a3c8c-987b-4aa7-b2c6-030d4f2123a4",
        "name": "team",
        "type": "CUSTOM",
        "configuration": {
          "source": "currentAutomation",
          "path": ""
        }
      },
      {
        "id": "e8077283-19e6-4a9b-890d-c88784851a19",
        "name": "active_user_id",
        "descriptioni18n_key": "workspaceDesignerCanvas:system.variables.active_user_id",
        "type": "SYSTEM"
      },
      {
        "id": "e698bcec-4c94-404b-9aae-895e69aa28d4",
        "name": "active_user_email",
        "descriptioni18n_key": "workspaceDesignerCanvas:system.variables.active_user_email",
        "type": "SYSTEM"
      },
      {
        "id": "9207dcf1-4b4b-427b-ad8b-30d985262805",
        "name": "active_user_name",
        "descriptioni18n_key": "workspaceDesignerCanvas:system.variables.active_user_name",
        "type": "SYSTEM"
      },
      {
        "id": "b20a1272-3608-4168-ac16-8027d36f1e2e",
        "name": "contact_id",
        "descriptioni18n_key": "workspaceDesignerCanvas:system.variables.contact_id",
        "type": "SYSTEM"
      },
      {
        "id": "2869ecd5-9587-4202-979e-4aad03e2fbfc",
        "name": "interaction_id",
        "descriptioni18n_key": "workspaceDesignerCanvas:system.variables.interaction_id",
        "type": "SYSTEM"
      }
    ]
  },
  "schema_version": "1.0.0"
}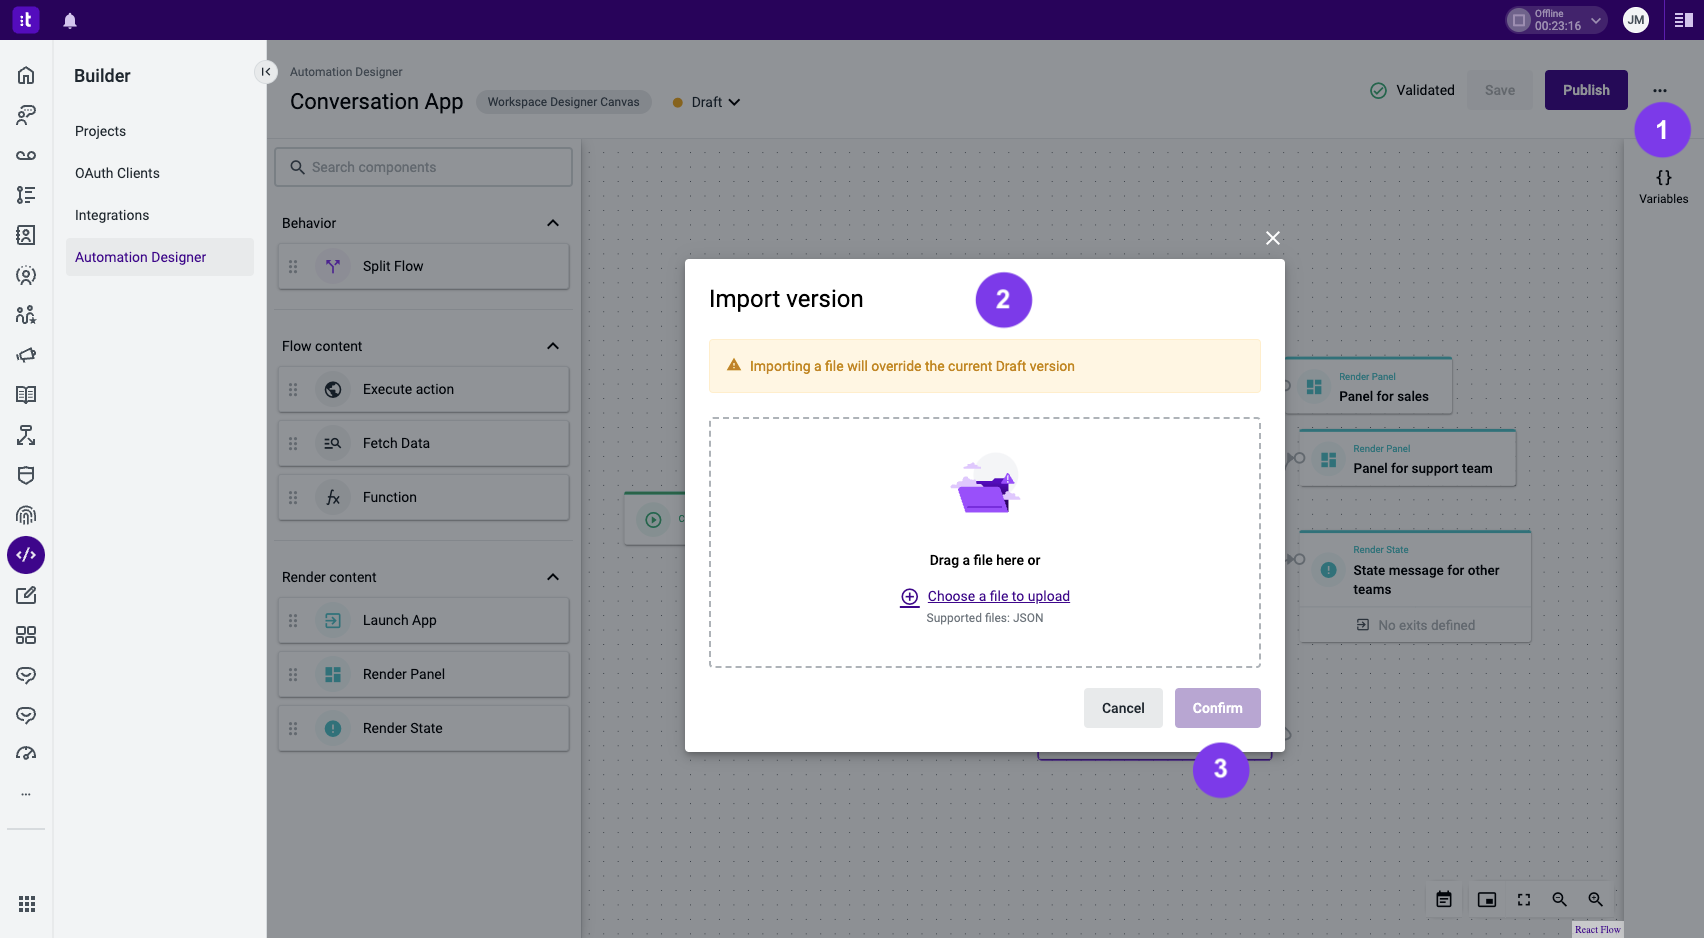
Figure 13 - Importing the canvas created automation
2 - In the canvas flow configuration, click the ellipsis (...) button (Figure 13 - 1), and then select the Import version option.
3 - A modal window will open (Figure 13 - 2). Here, you can either drag and drop the JSON file or click the Choose a file to upload button to select the generated JSON file.
4 - Click the Confirm button (Figure 13 - 3).
The canvas flow created in this tutorial will now be successfully imported.
Due to the account-specific nature of panels, you will need to edit each Render Panel component and select the appropriate panels accordingly. Refer to step 4 of this tutorial for comprehensive guidance on this matter.
Updated 6 months ago