Create a Card - Different Outcomes
Depending on defined parameters
Overview
This tutorial explains how you can use the Split Flow component, from Talkdesk Automation Designer™, in a card configuration to display different outcomes to the user, depending on certain conditions.
This blueprint also goes through the different Talkdesk Workspace Designer™ concepts, explaining how to configure and use Context variables.
The specific example described in this tutorial consists of creating an automation that will present a card with a script the agent needs to follow while on a call. This script can be displayed in Portuguese or English, depending on a series of defined parameters:
-
Scenario 1 - if the country code contains +1 (USA) or +44 (United Kingdom), the card will show a generic script in English.
-
Scenario 2 - if the country code contains +351 (Portugal) and:
- Scenario 2.1 - the phone number belongs to a group of specific numbers, and the card will show some specific information for the phone numbers with the Portuguese code country.
- Scenario 2.2 - the phone number does not correspond to the expected one, then a generic script in Portuguese will appear on the card.
-
Scenario 3 - if the country code does not match any of the previous ones, the card will show information stating that no script is available for that call.
Required Background Knowledge
So that you can make the most of this tutorial, you must understand the basic concepts of Workspace Designer (cards, panels, and canvas):
- How to create a card and a panel, and how to associate a panel to a canvas.
- How to manage variables.
Implementation Steps
1 - Create a new card
2 - Add a custom variable
3 - Use the Split Flow to define the conditions for displaying cards
4 - Use the Render View to display the cards
5 - Save and publish the card
6 - Add the card to a panel
7 - Associate the panel with a canvas
1 - Create a New Card
To start building the card that will display the iframe, first, you need to create it. You can do it by following these steps:
1 - Navigate to Workspace Designer in your account (find the Workspace Designer icon to launch the app on your Talkdesk dock - Figure 1 - 1).
2 - On the Cards tab (Figure 1 - 2), click the Create card button (Figure 1 - 3).
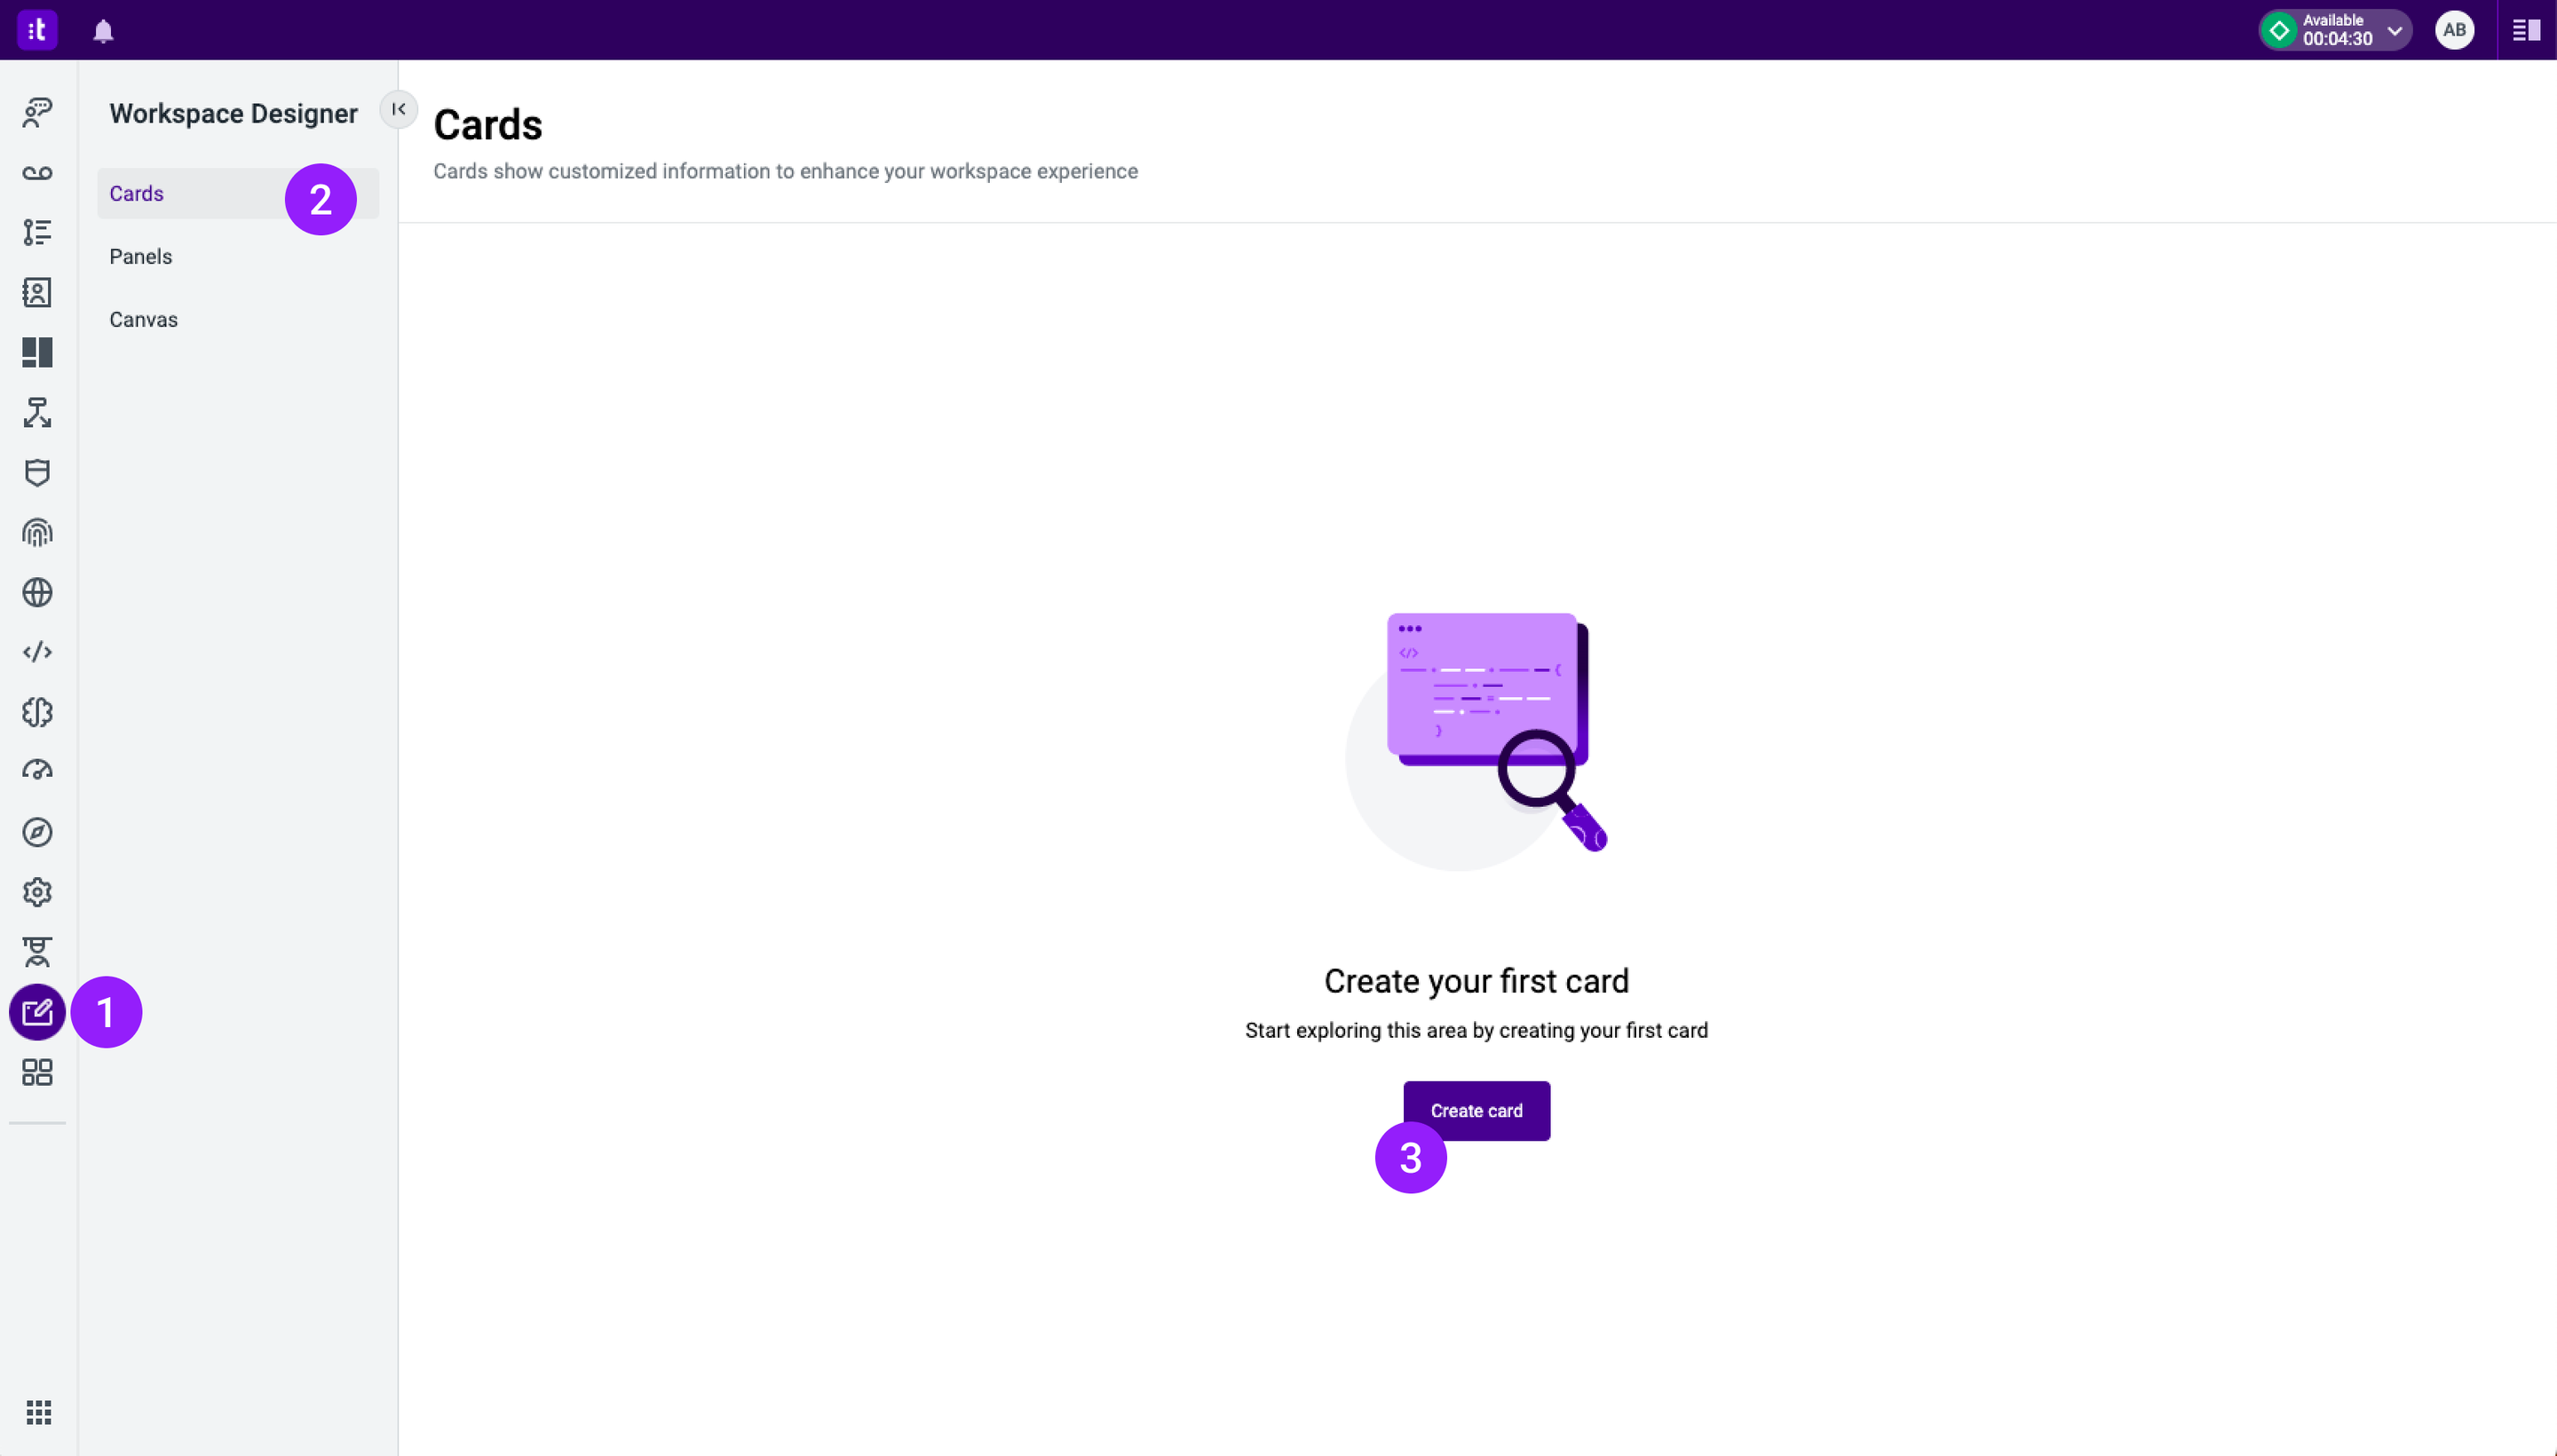
Figure 1 - Create card button in Workspace Designer
3 - A settings modal will open (Figure 2 - 1), asking for information about this new card. Write the card title (required field - Figure 2 - 2) and its description (optional field - Figure 2 - 3).
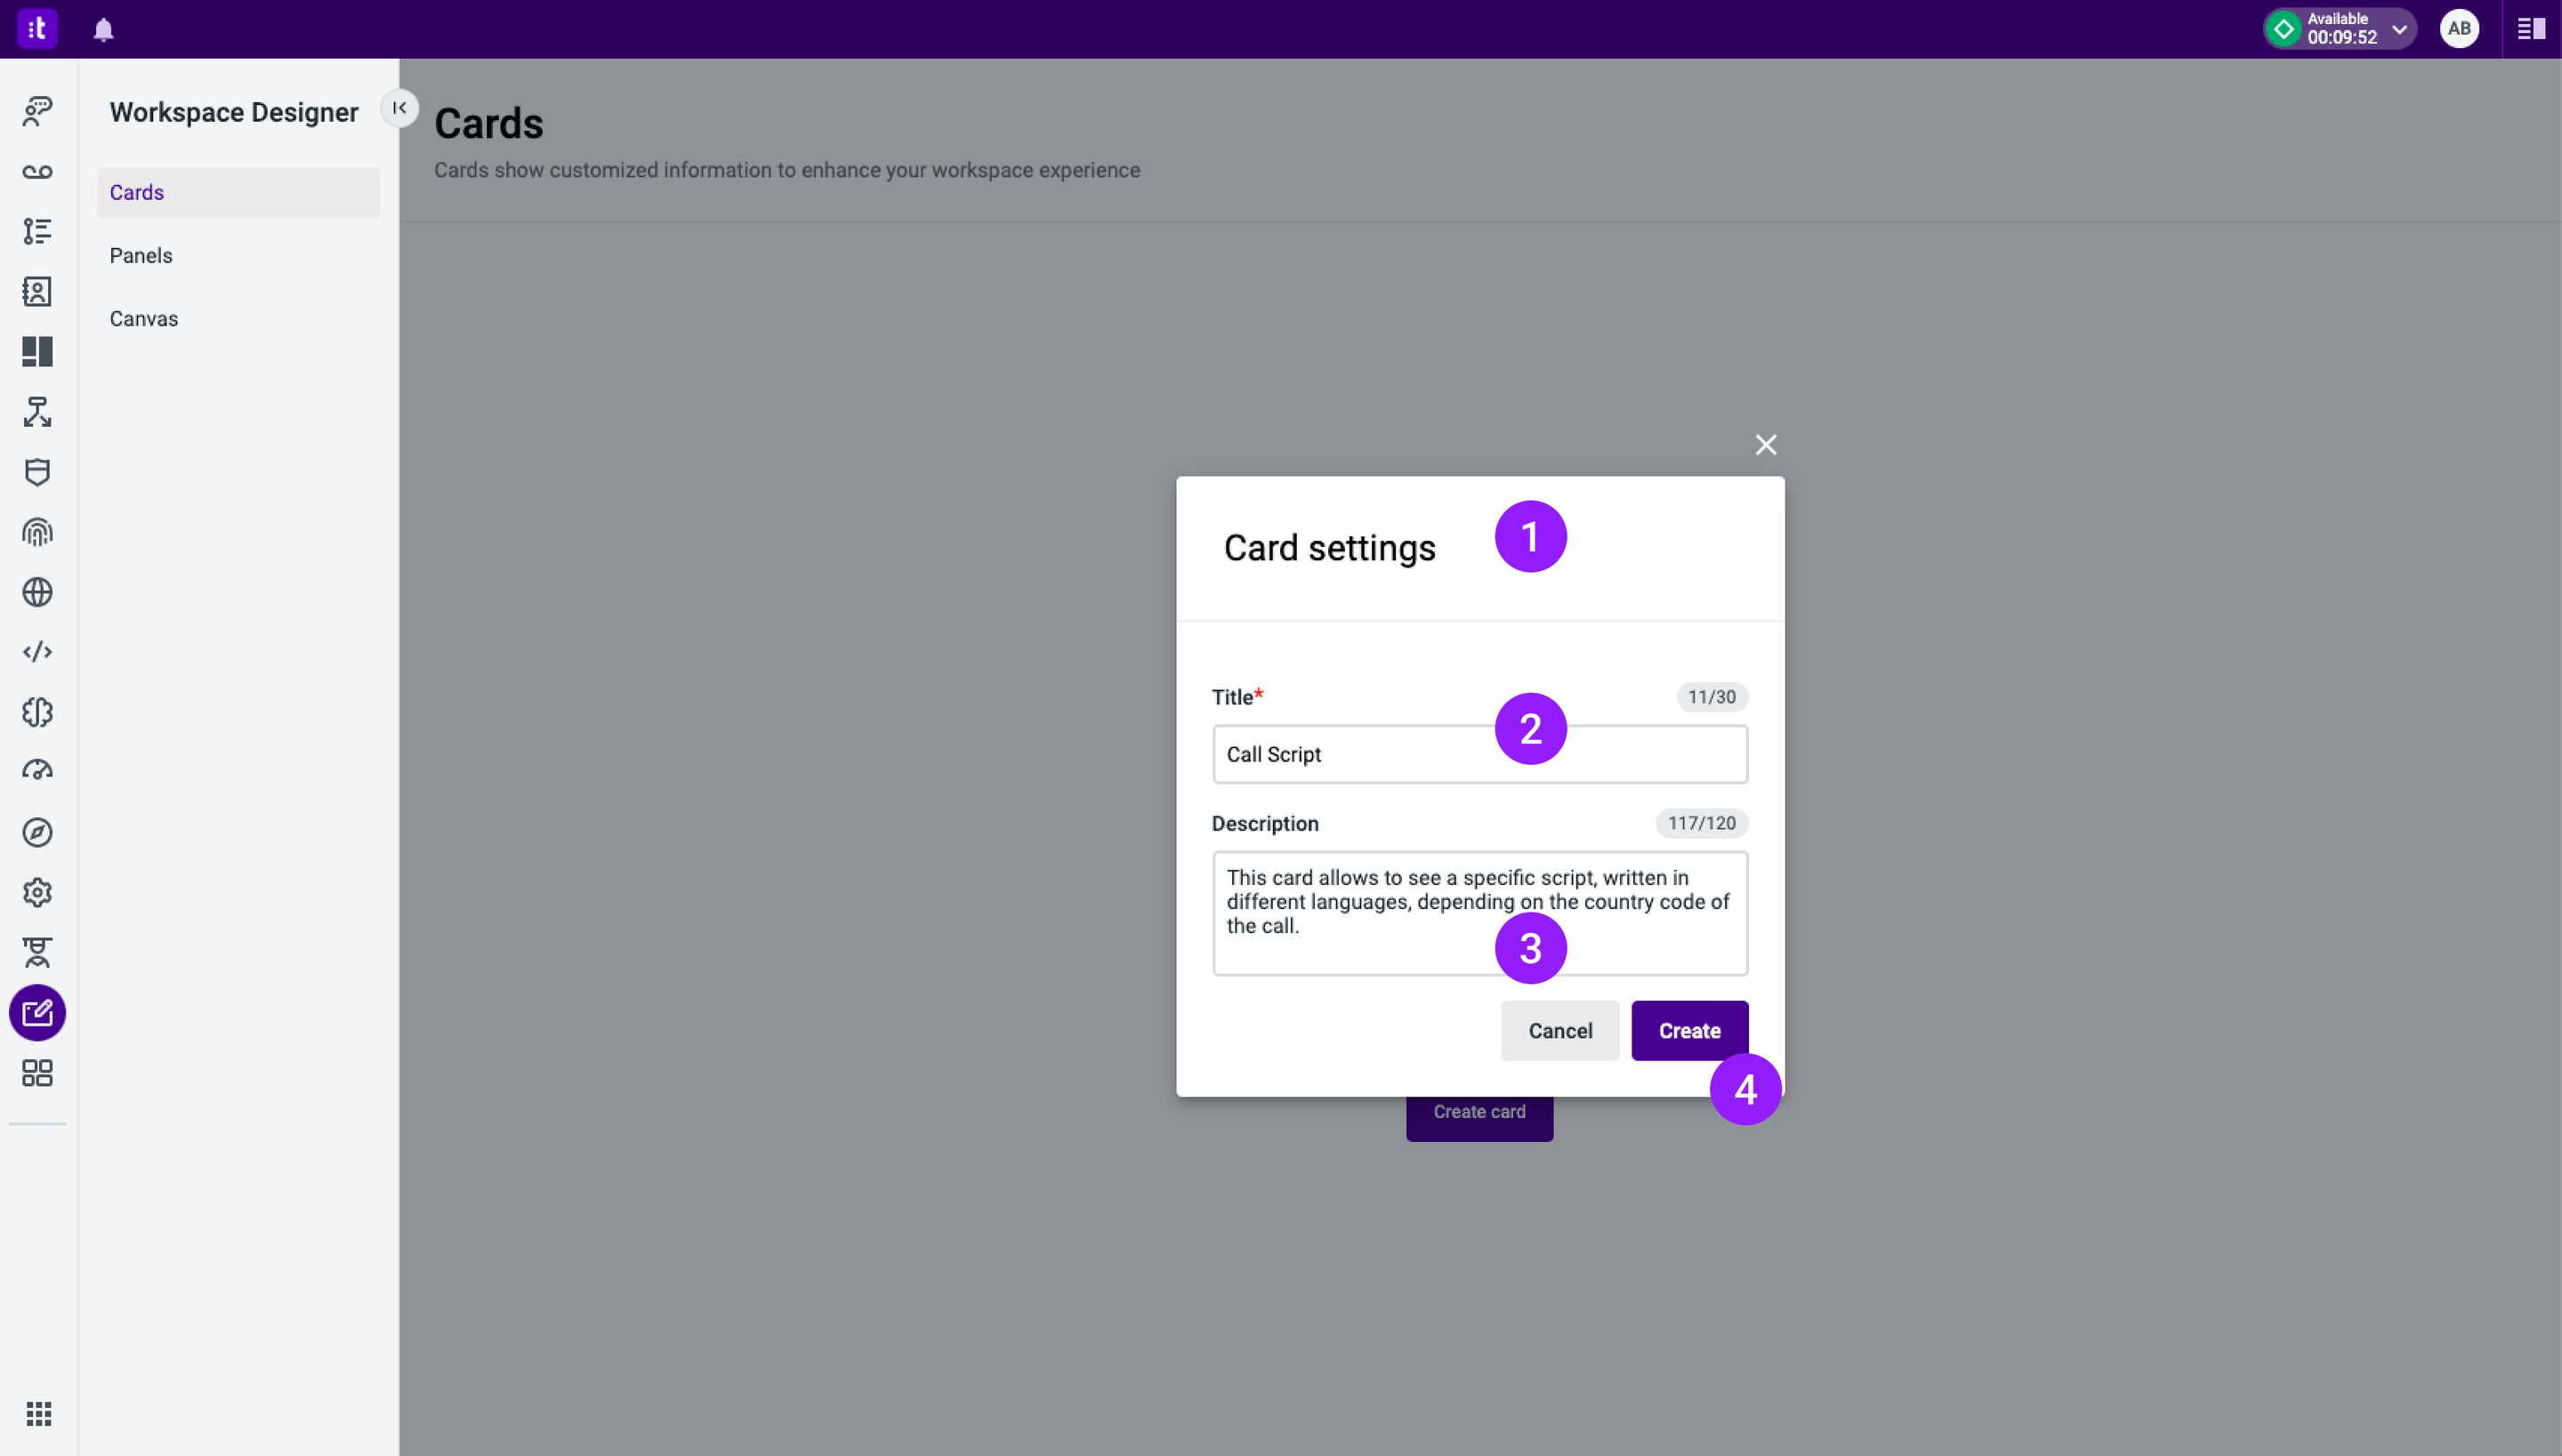
Figure 2 - Card settings modal
4 - Click the Create button (Figure 2 - 4). Then, you will be redirected to the card configuration page (Figure 3) in Automation Designer, where you will be able to detail the card’s automation.
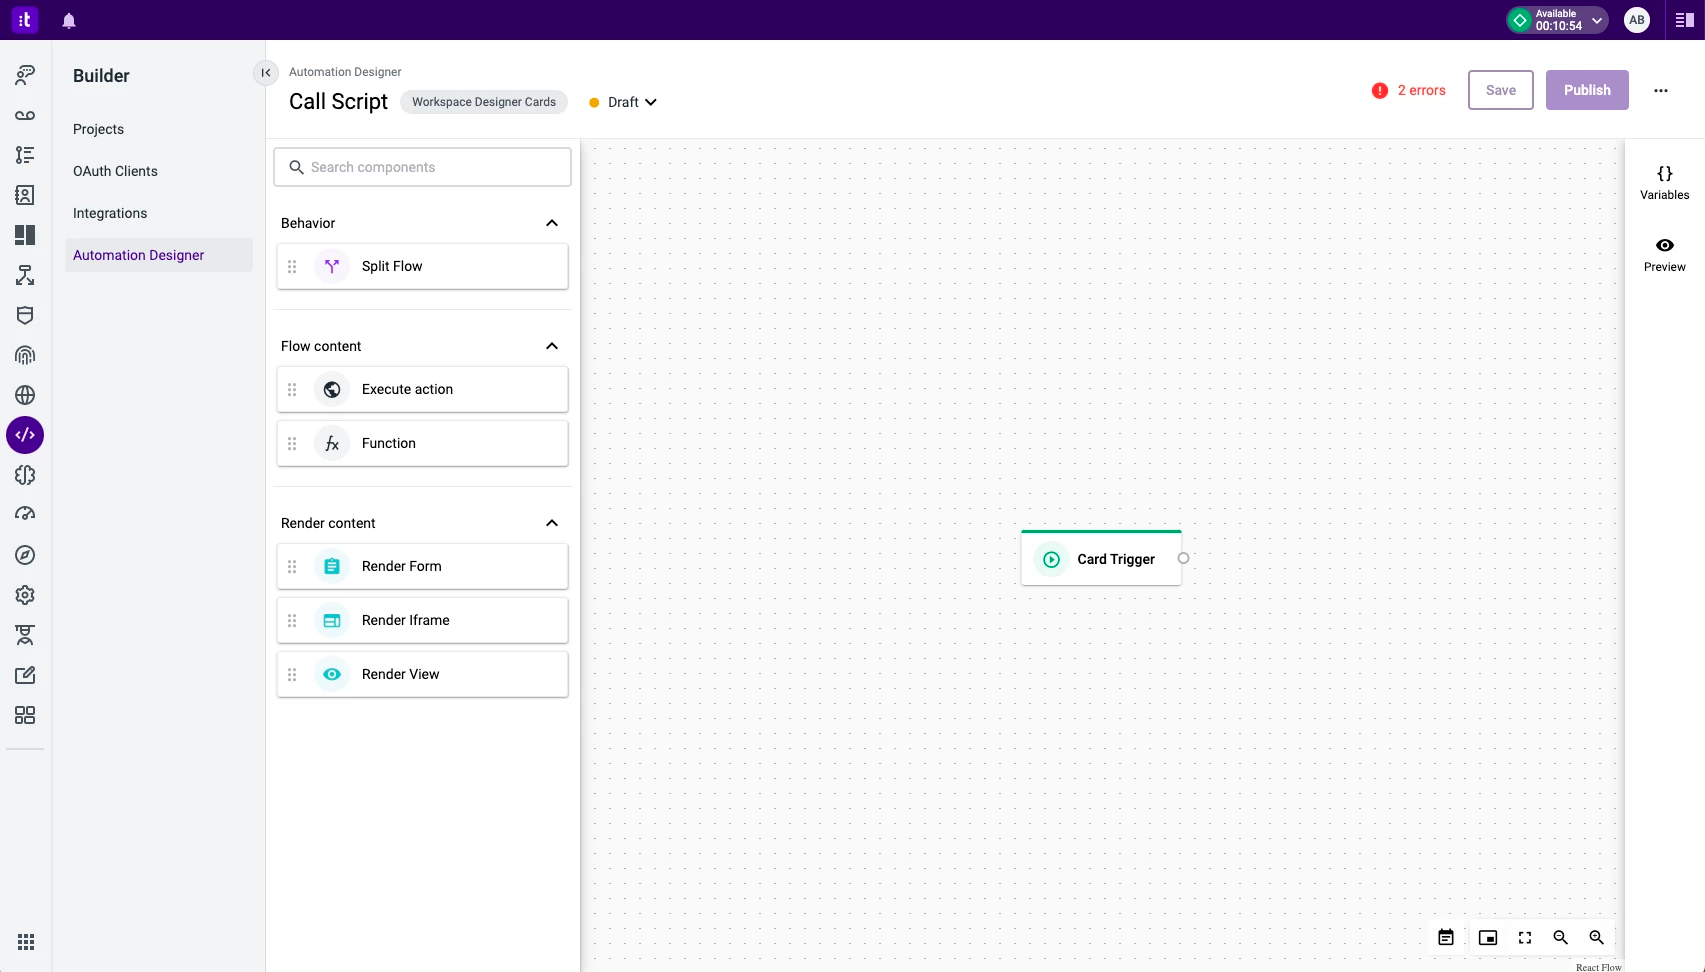
Figure 3 - Initial card automation configuration
2 - Add a Custom Variable
In this use case, we want to have different outcomes displayed on a card depending on the phone number’s country code. The goal is for the agent to be able to follow a script while on a call, which can be in Portuguese or English. To accomplish this, we need the customer’s phone number.
In this step, you will learn how to create the custom variable we will need for this use case. To create the phone_number variable, follow these steps:
1 - Click the Variables tab of the tools panel (Figure 4 - 1).
2 - Click the Custom tab (Figure 4) of the Variables side panel and then click the Add variable button (Figure 4 - 2). A modal will open (Figure 4 - center).
3 - In the modal, fill in the variable name (required field - Figure 4 - 3), select its source (required - Figure 4 - 4), and define the path (required - Figure 4 - 5). In this case, we need to get the variable through Workspace, using the active-conversation.contact_person_number path.
4 - Click the Confirm button (Figure 4 - 2). The phone_number variable is now successfully created.
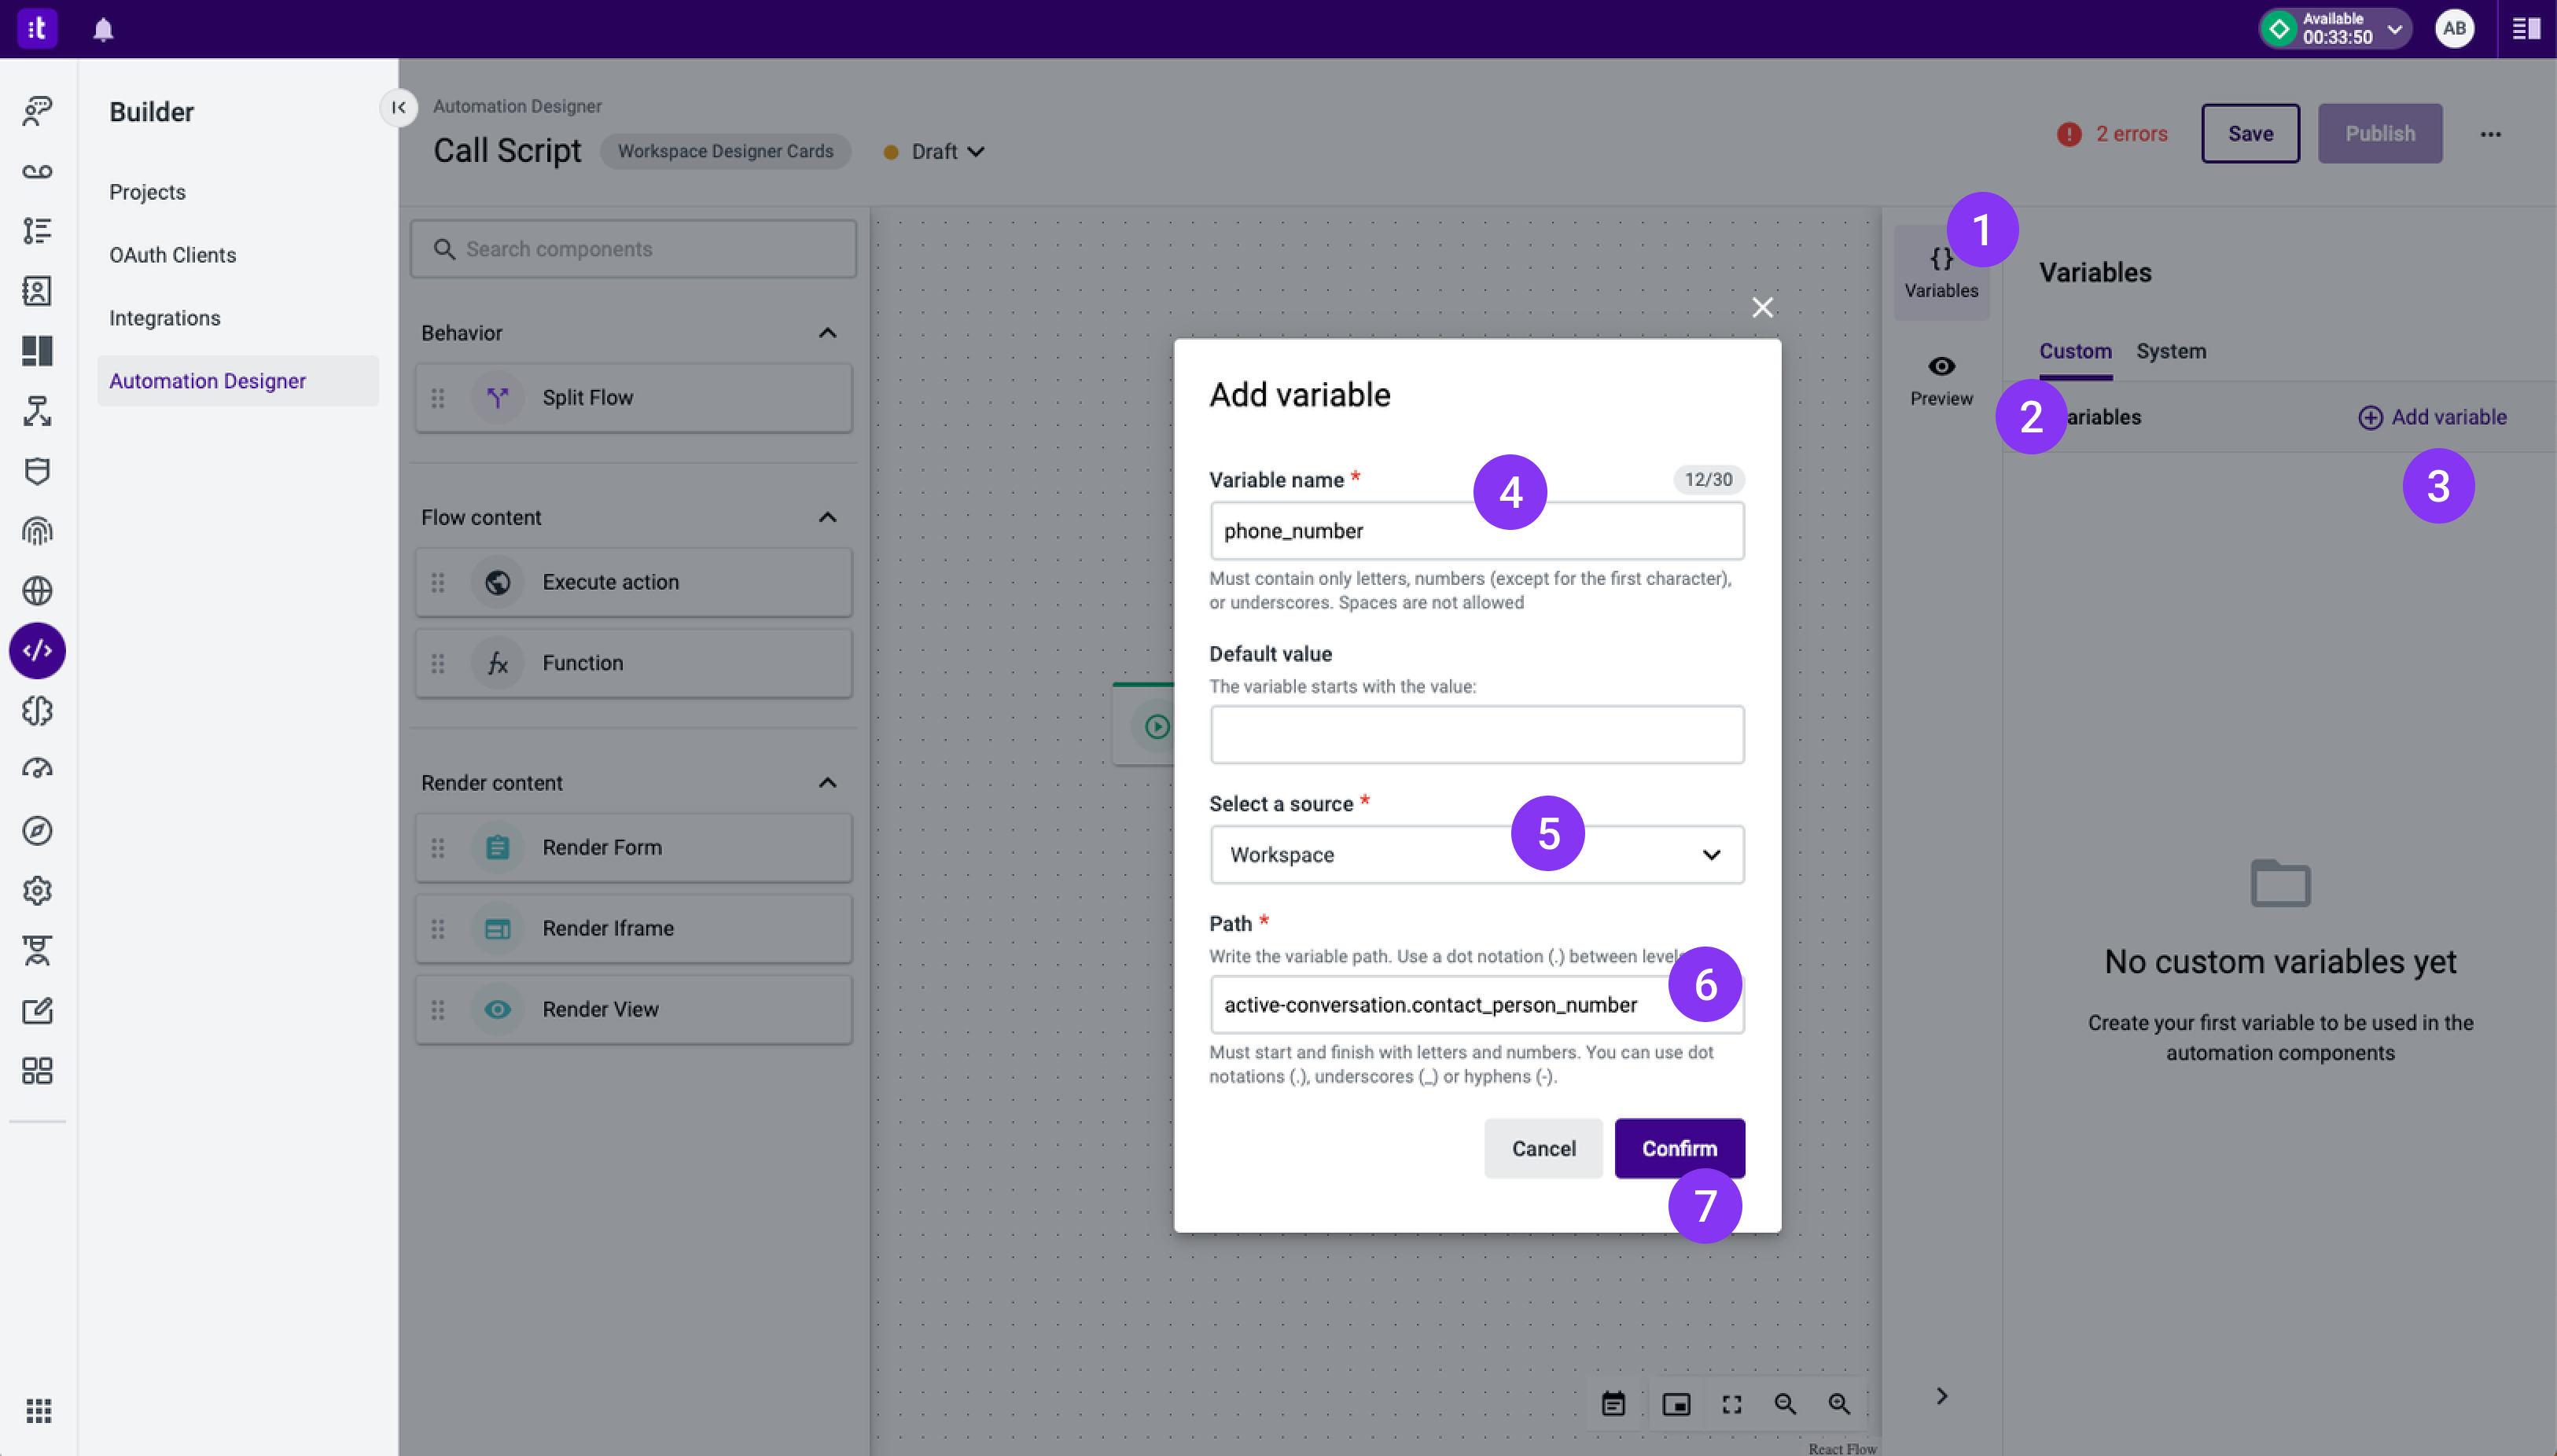
Figure 4 - Add tracking number custom variable modal
3 - Use the Split Flow to Define the Conditions for Displaying Cards
Now that you have the phone_number variable created, you can add a Split Flow component. This will allow you to create multiple conditions that will define which script will be shown to the agent during a call.
To start, you can drag a Split Flow component to the flow and connect it to the Card Trigger component (Figure 5 - 1). Afterward, by double-clicking the Split Flow componen (Figure 5 - 2), its editor panel will appear (Figure 5 - 3). Here, you can define the exits based on the specific scenarios of this use case.
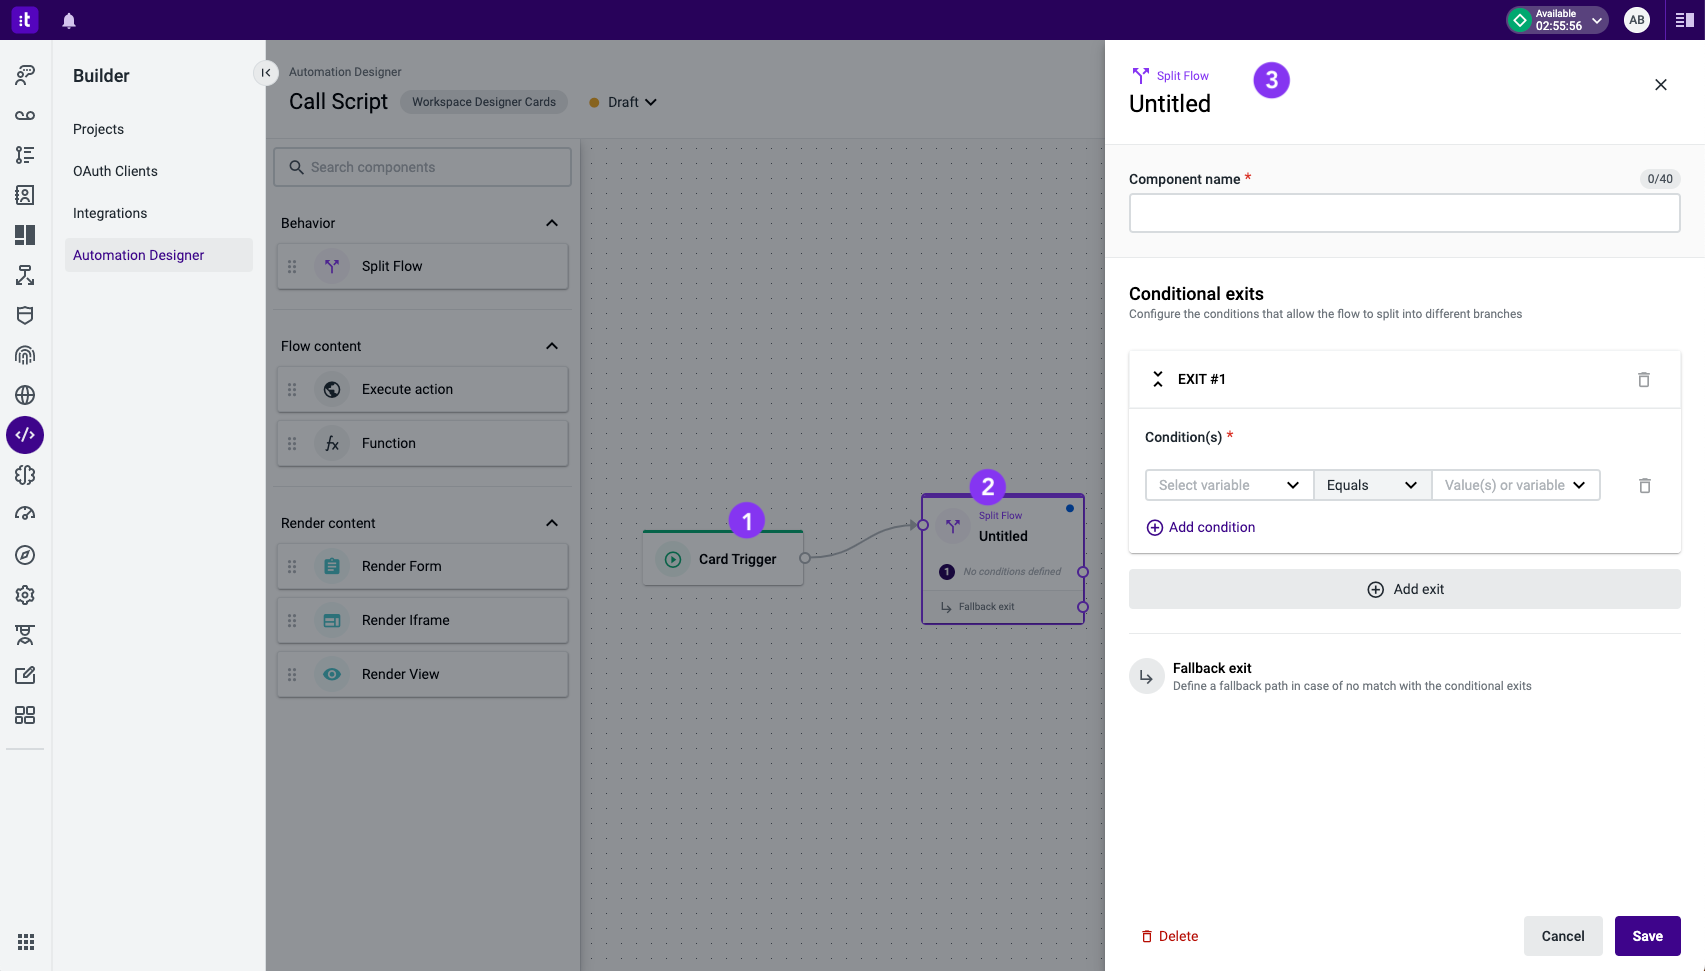
Figure 5 - Split Flow Panel Configuration
Now follow these steps (Figure 6):
1 - Insert the Component name (required field) (Figure 6 - 1).
2 - Configure the first scenario in Exit #1 (Figure 6 - right side) (if the country code contains +1 or +44):
2.1 - Select the variable phone_number in the first dropdown (Figure 6 - 2).
2.2 - Select the option Contains in the middle dropdown (Figure 6 - 3).
2.3 - Add the value +1 in the third dropdown (Figure 6 - 4).
2.3.1 - Click the third dropdown arrow (Figure 6).
2.3.2 - Click the Add value option that will appear after opening the dropdown (Figure 6).
2.3.3 - Write +1 in the value field and press Enter (Figure 6).
2.3.4 - Click the Add condition button (Figure 6 - 5) to add the second condition of this scenario.
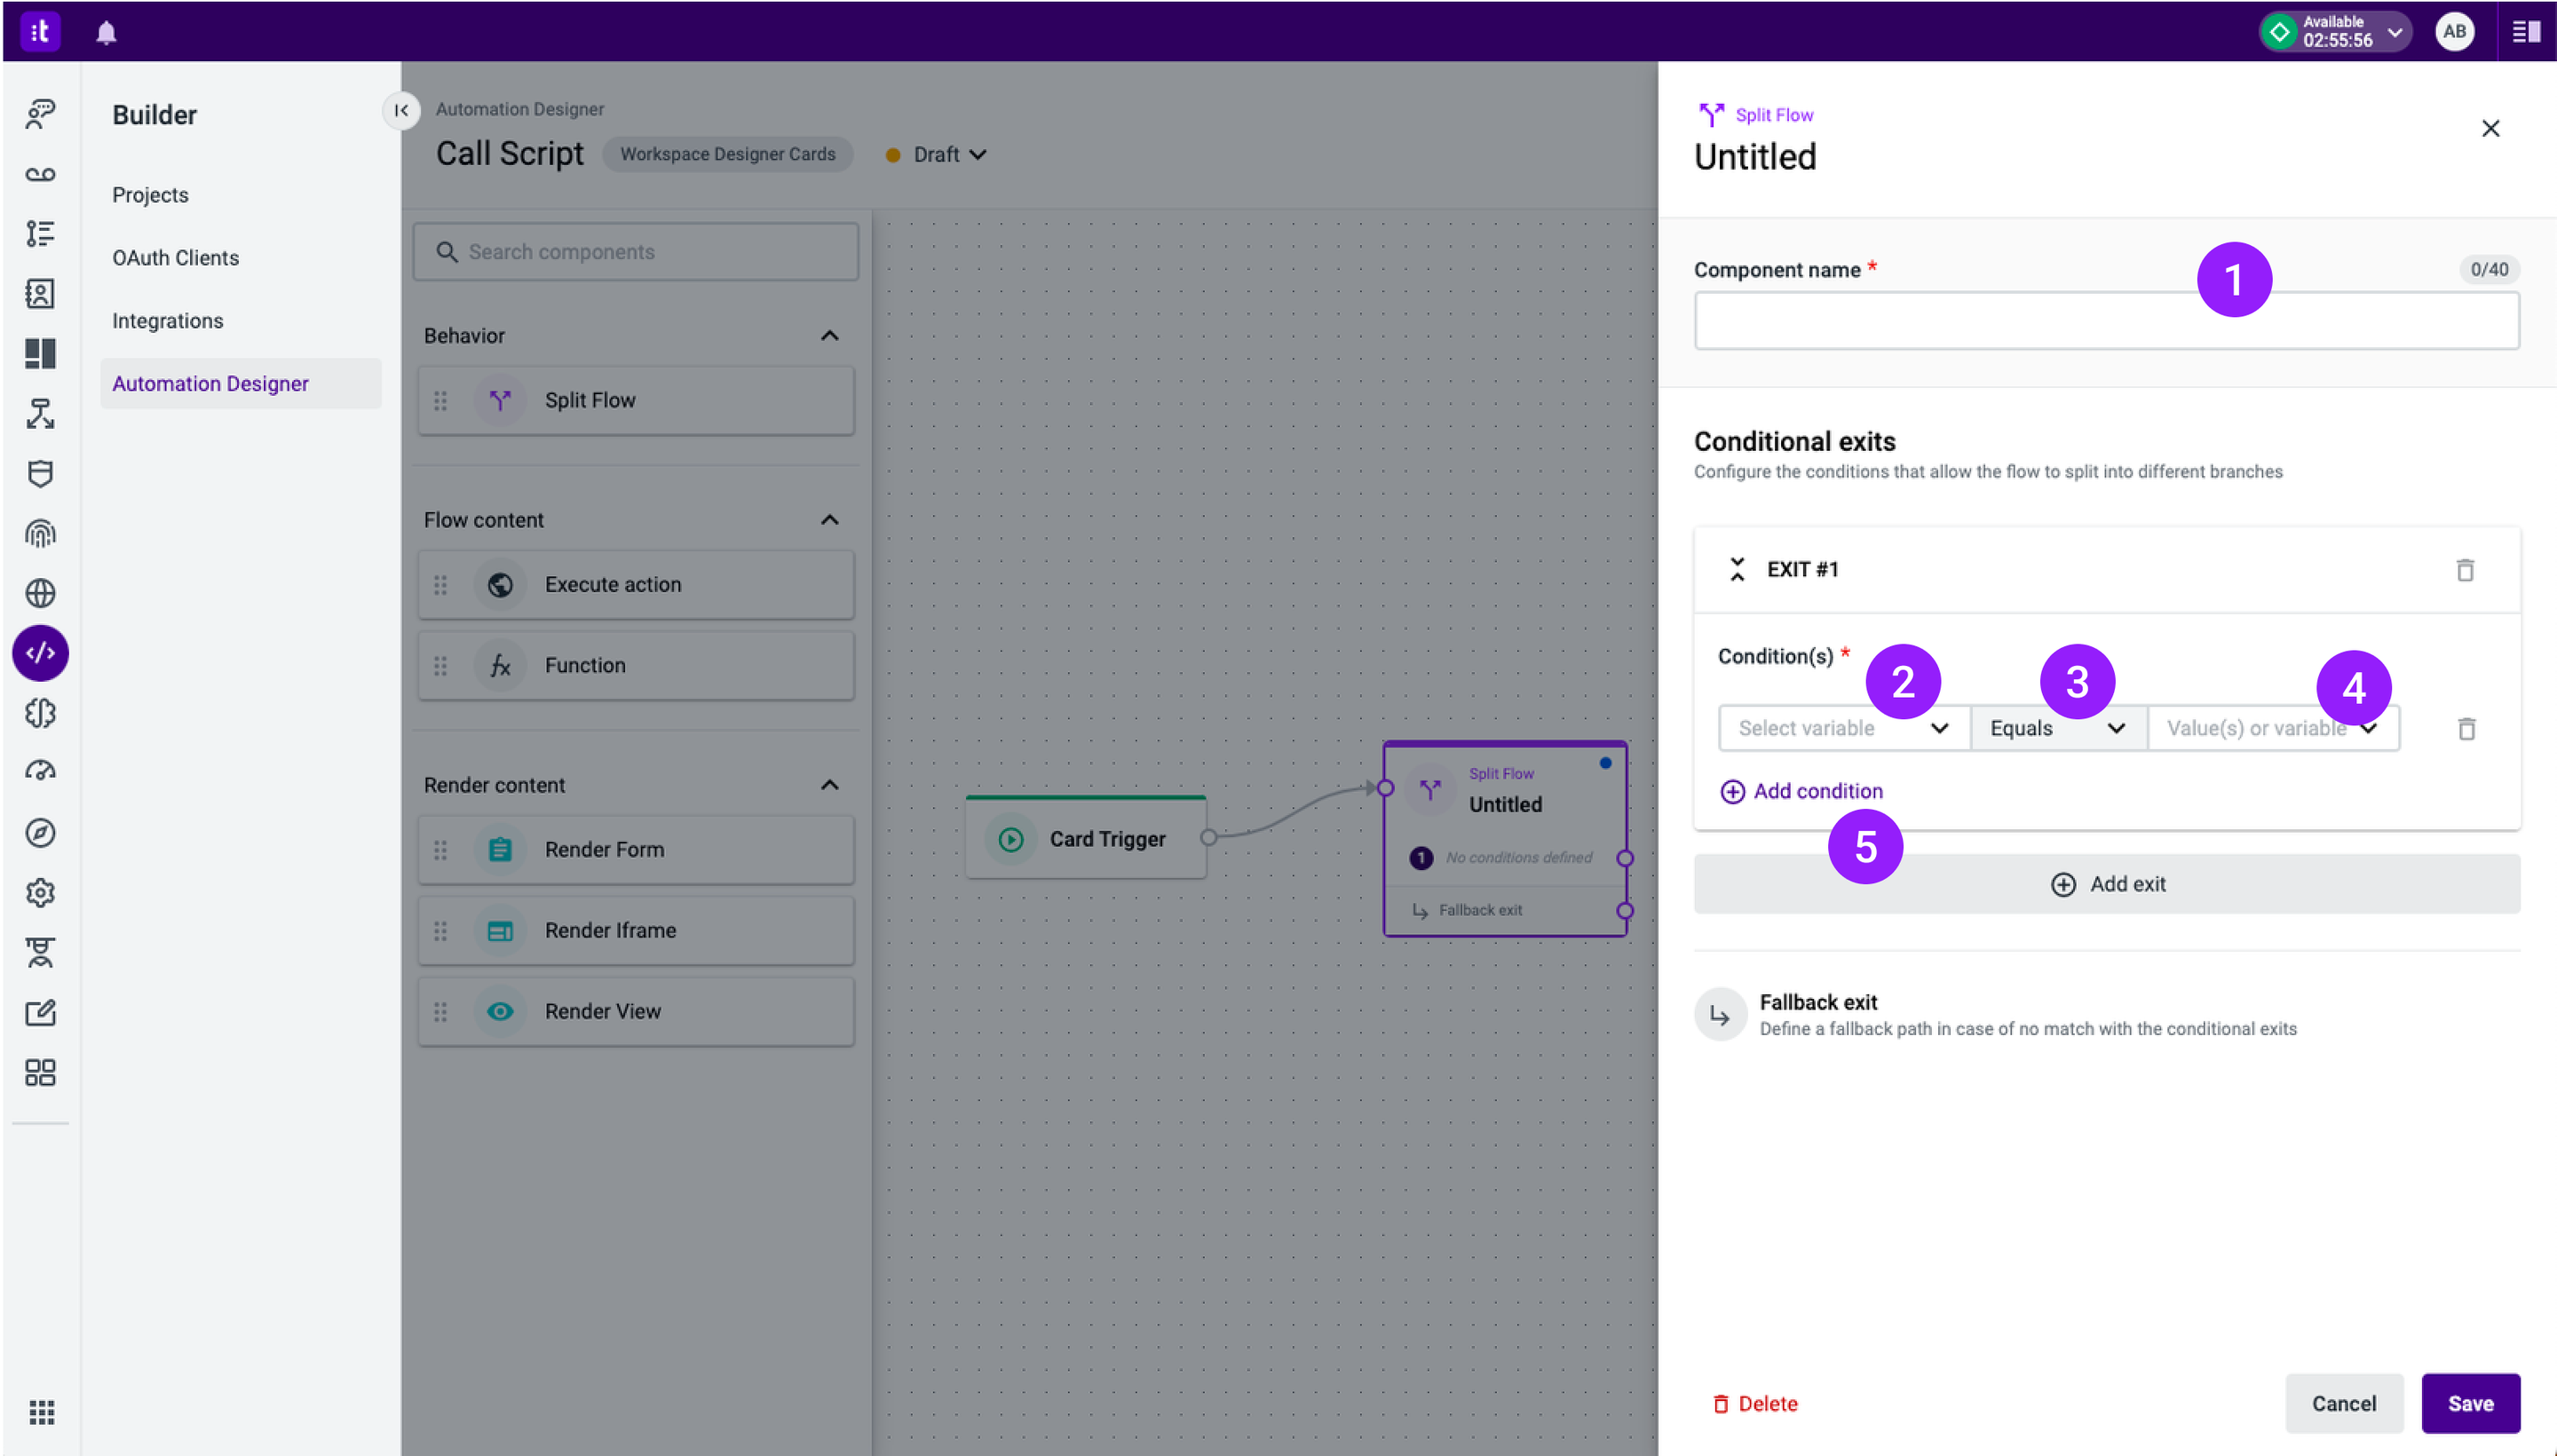
Figure 6 - Configuration of Exit #1 in the first Split Flow
2.3.5 - Change from the Matching all option (i.e. use the logical operator and in all the conditions in this exit) to Matching any option (i.e. use the logical operator or in all the conditions in this exit) (Figure 7 - 1).
2.3.6 - Select the variable phone_number in the first dropdown (Figure 7 - 2).
2.3.7 - Select the option Contains in the middle dropdown (Figure 7 - 3).
2.3.8 - Add the value +44 in the third dropdown (Figure 7 - 4).
2.3.8.1 - Click the third dropdown arrow (Figure 7).
2.3.8.2 - Click the Add value option that will appear after opening the dropdown (Figure 7).
2.3.8.3 - Write +44 in the value field and press Enter (Figure 7).
3 - Click the Add exit button (Figure 7 - 8).
4 - Configure the second scenario in Exit #2 (if the country code contains +351) (Figure 7):
4.1 - Select the variable phone_number in the first dropdown (Figure 7 - 5).
4.2 - Select the option Contains in the middle dropdown (Figure 7 - 6).
4.3 - Add the value +351 in the third dropdown (Figure 7 - 7).
4.3.1 - Click the third dropdown arrow (Figure 7 - 7).
4.3.2 - Click the Add value option (it will appear once you click the dropdown).
4.3.3 - Write +351 in the value field and press Enter (Figure 7).
5 - Click the Save button (Figure 7 - 9). You've just successfully added a Split Flow component to your card (as depicted in Figure 8, center).
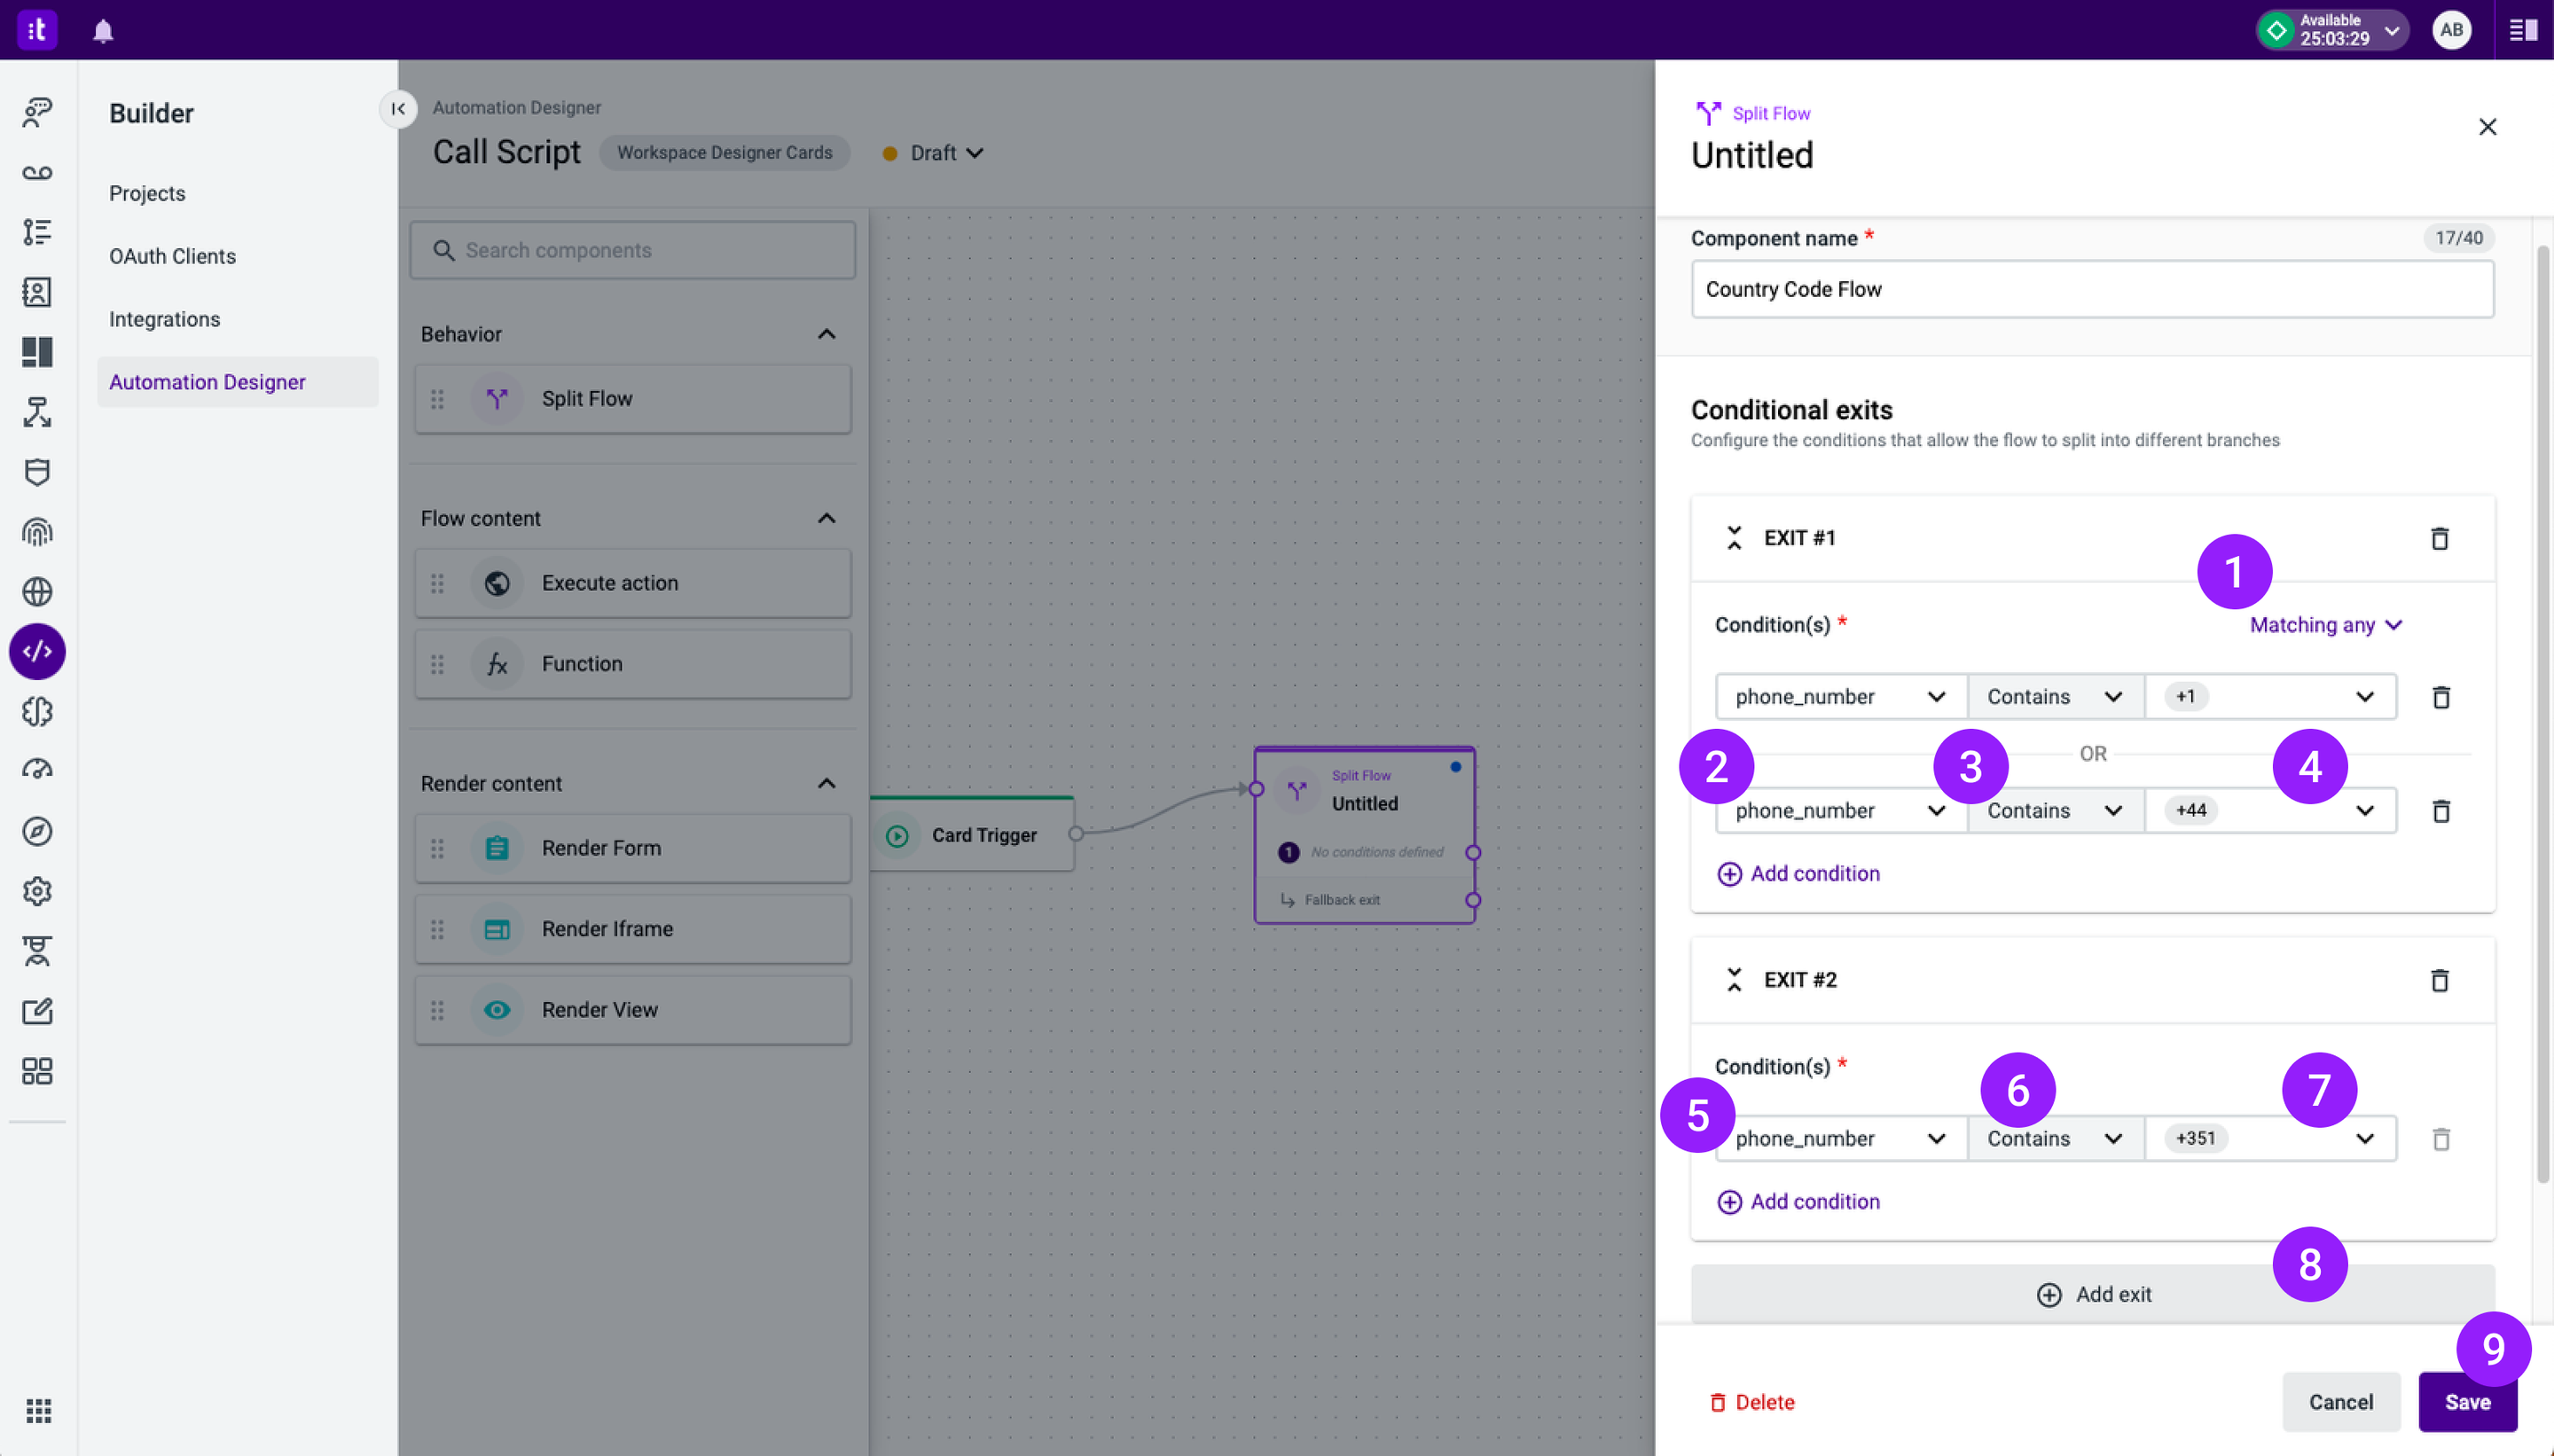
Figure 7 - Configuration of Exit #1 and Exit #2 in the first Split Flow
Scenarios 2.1 and 2.2To fulfill scenarios 2.1 and 2.2, we will need to add one more Split Flow component.
You can achieve the same outcome with just one Split Flow. We are only adding two to separate the concerns between the country code and the phone number. If you wish to configure every parameter in the same Split Flow component, just follow this logic:
Exit #1
phone_number contains +1 OR +44Exit #2
phone_number contains +351 AND phone_number equals +351914…Exit #3
phone_number contains +351 AND phone_number equals +351308…Exit 4#
phone_number contains +351
You can drag a new Split Flow component to the flow and connect it to exit #2 of the first Split Flow (phone_number contains +351). As previously done, add the Component name (Figure 8 - 1), select the variable phone_number (Figure 8 - 2), and then add the list of phone numbers you want to match (Figure 8 - 3). Once you're done, click the Save button (Figure 8 - 4).
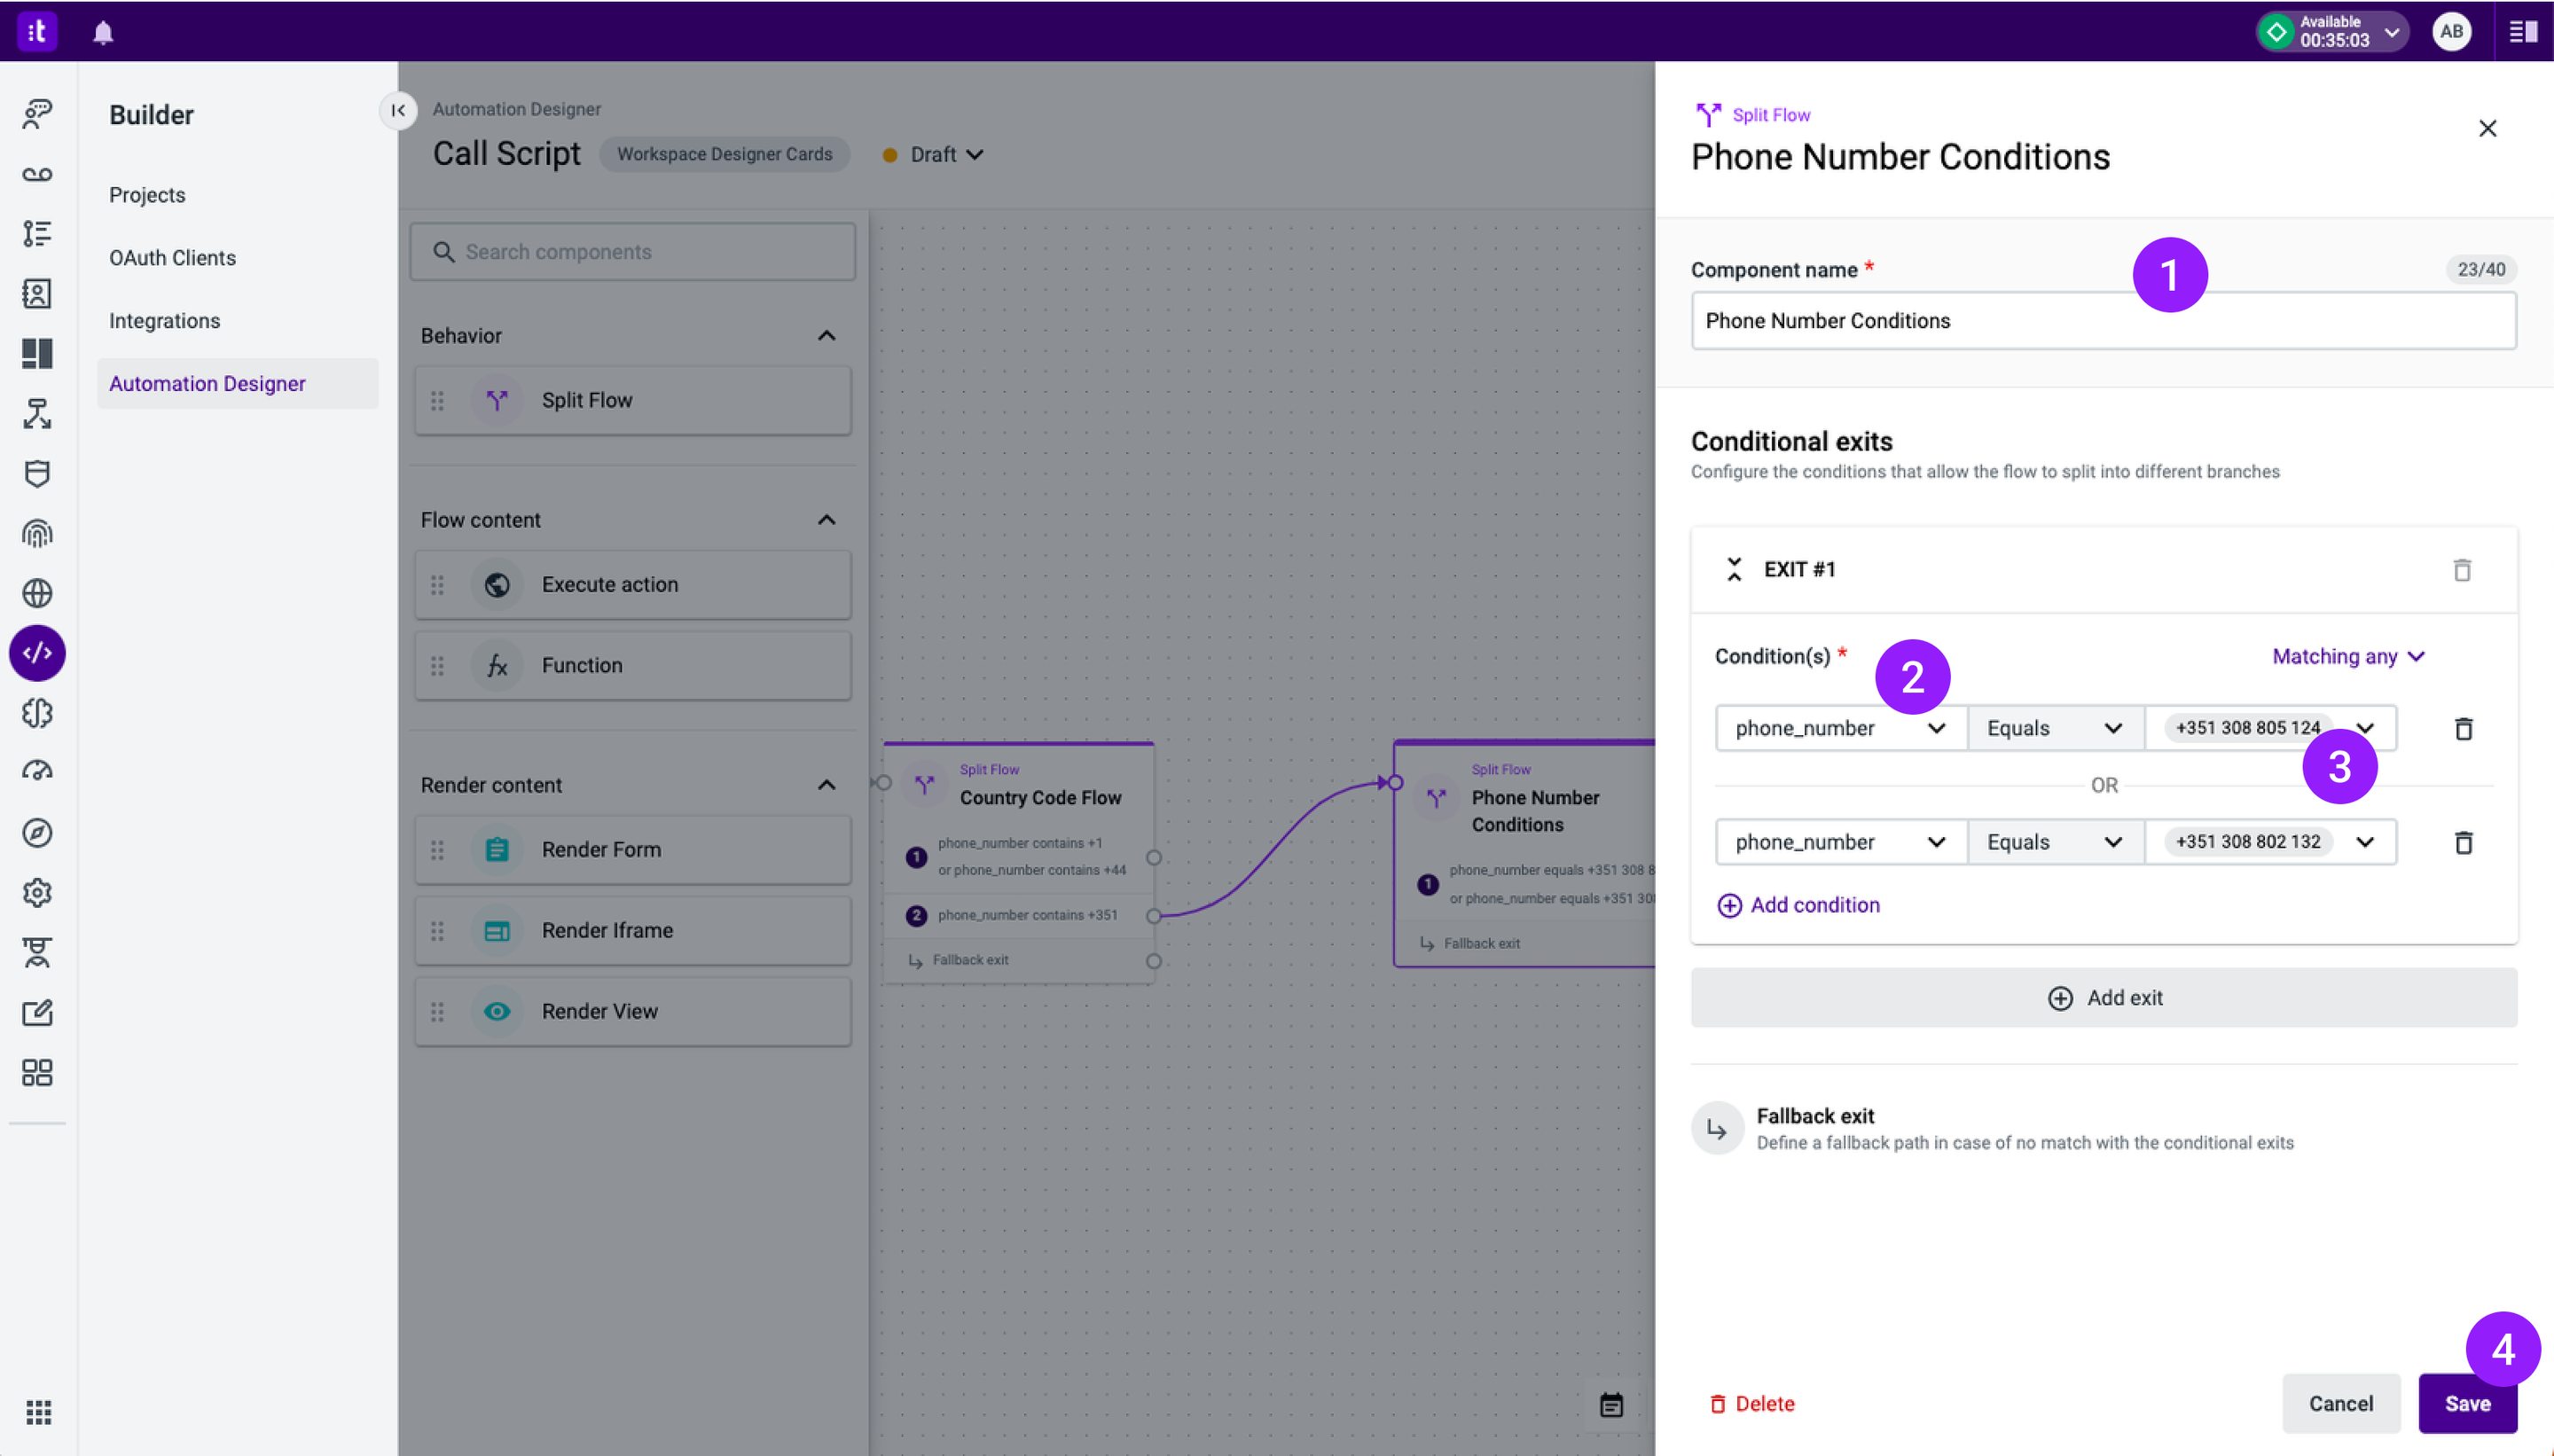
Figure 8 - Configuration of Exit #1 in the second Split Flow component
4 - Use the Render View to Display the Cards
As previously mentioned, we have a use case where the agent will see a script in a card depending on some conditions. Therefore, we need to define all four outcomes by adding the same number of Render View components to each exit of the Split Flow components:
1 - Drag a Render View component (Figure 9 - 1) and connect it to the desired exit of the Split Flow component.
2 - Open its editor side panel and add the Component name (Figure 9 - 2).
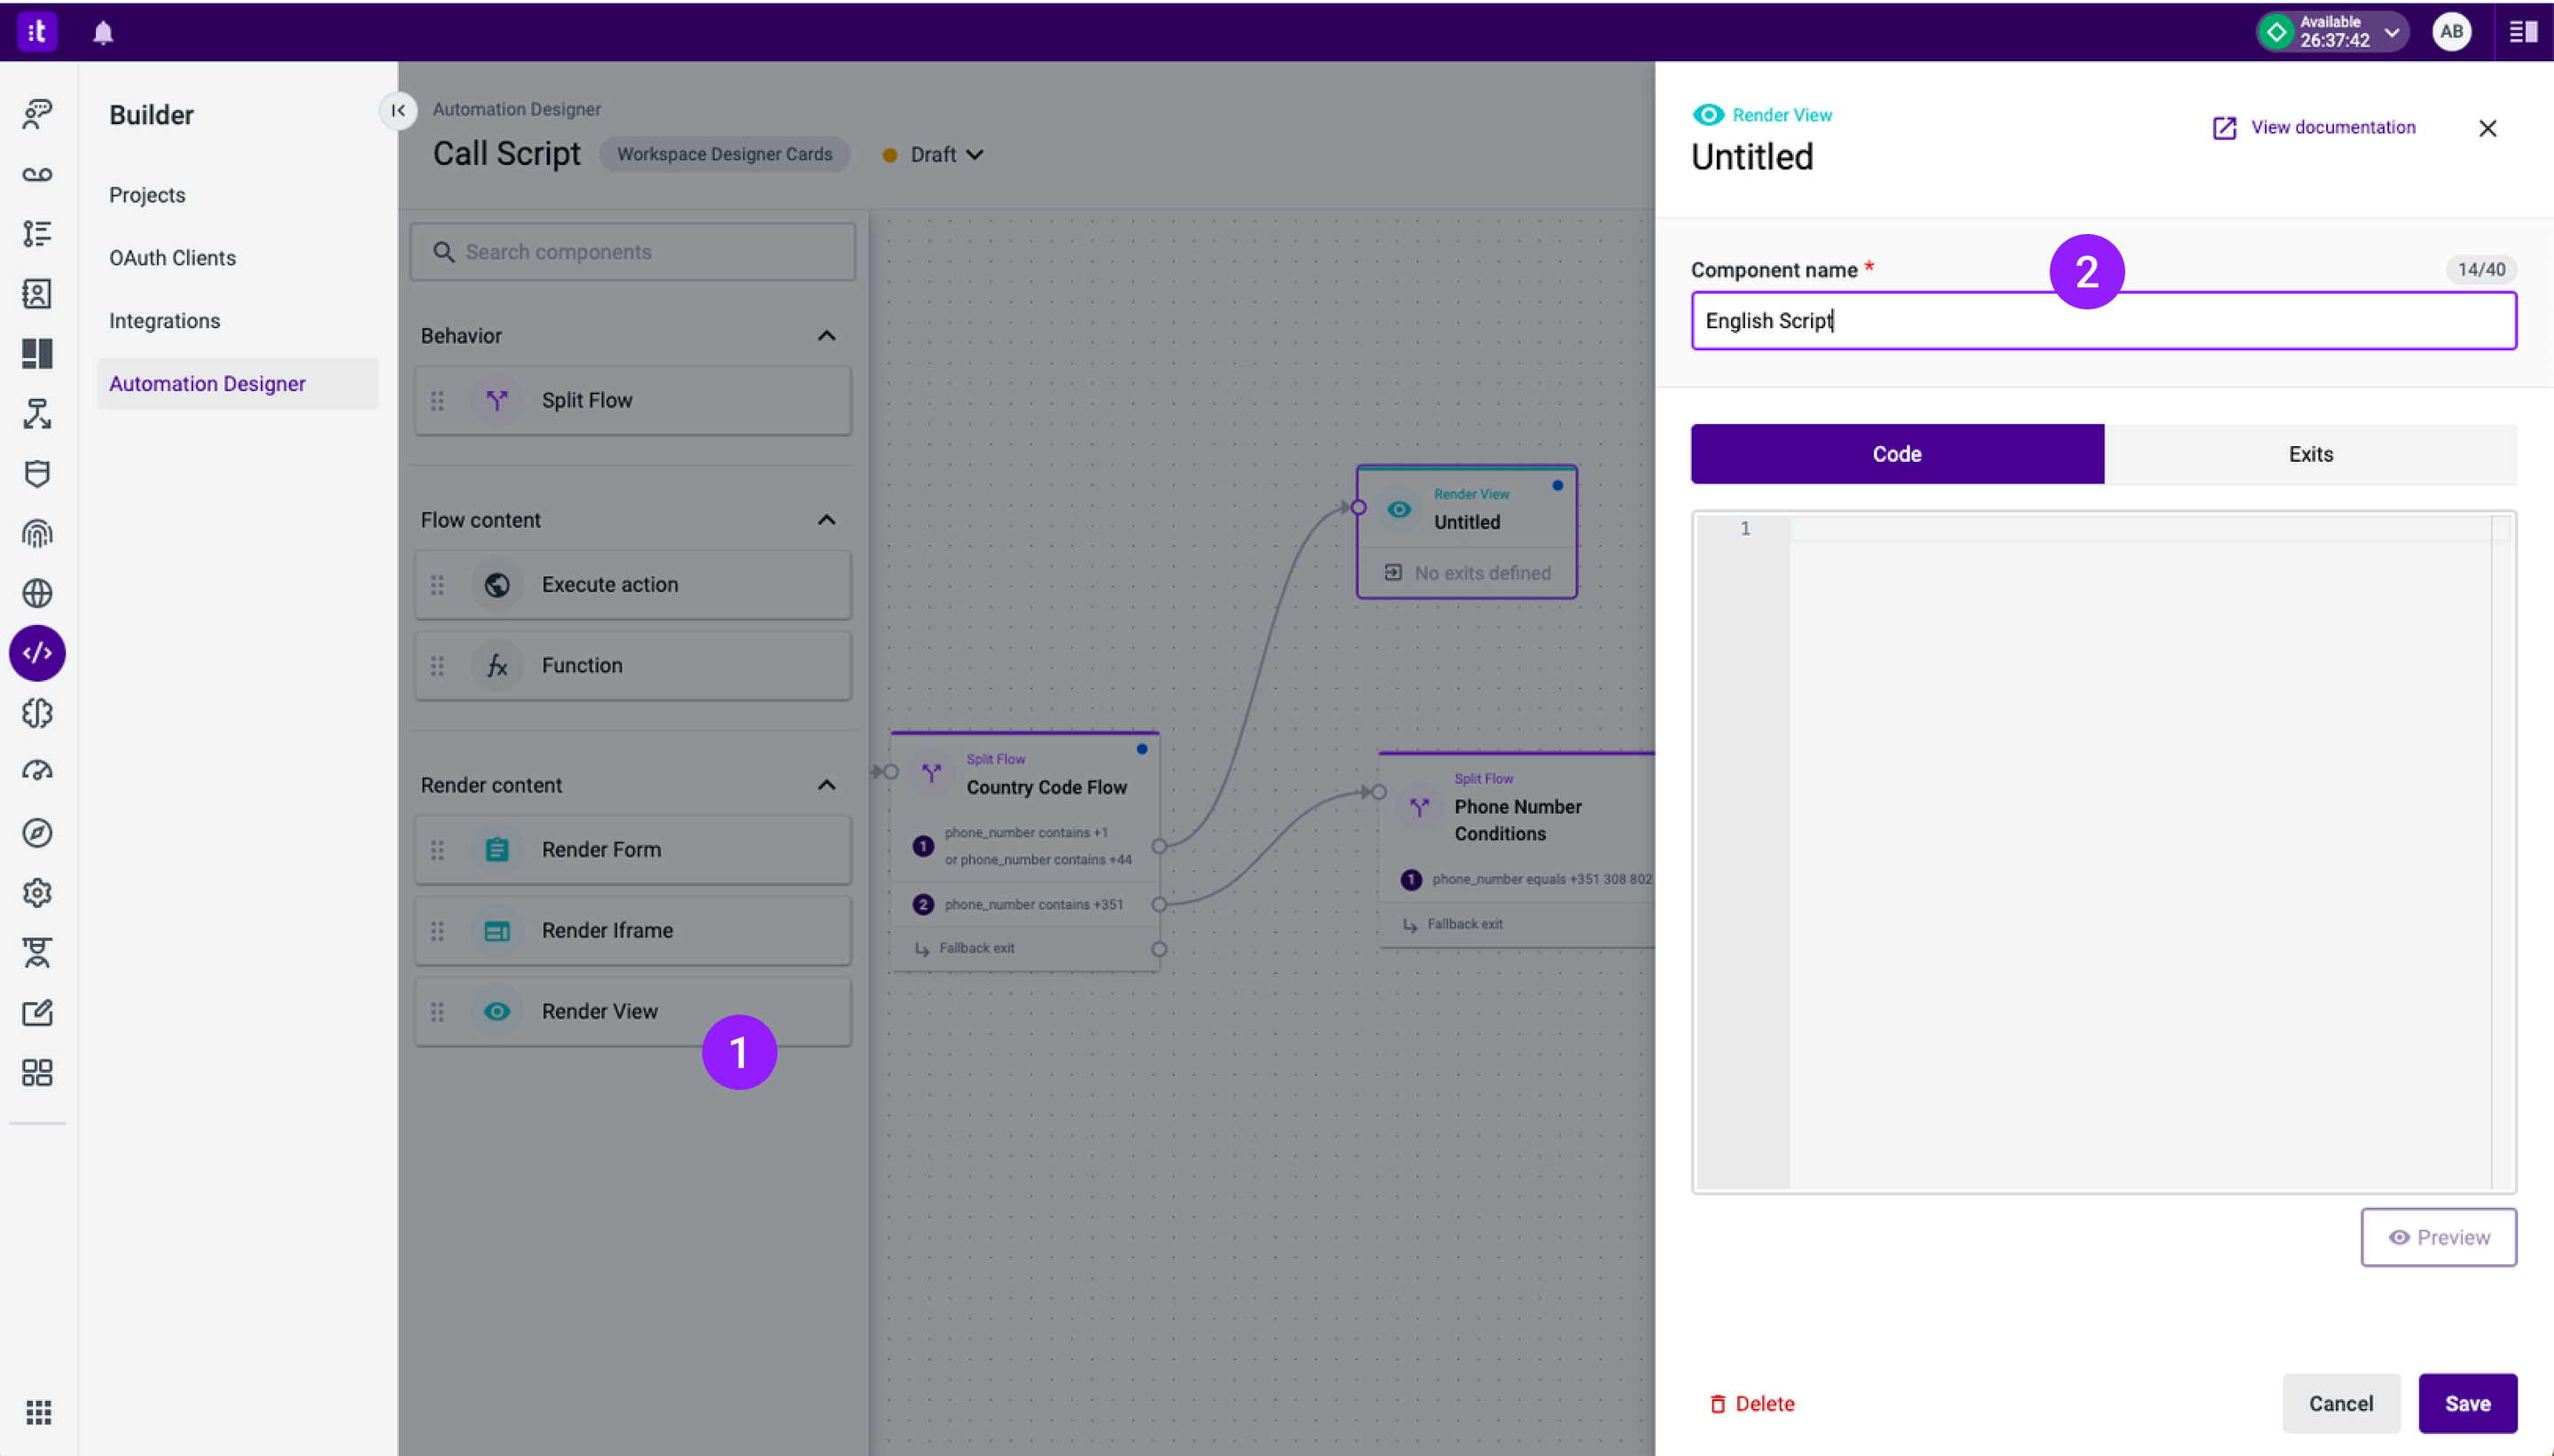
Figure 9 - Render View editor
3 - Repeat this procedure until you have all the exits of the Split Flow component connected to Render View components (Figure 10).
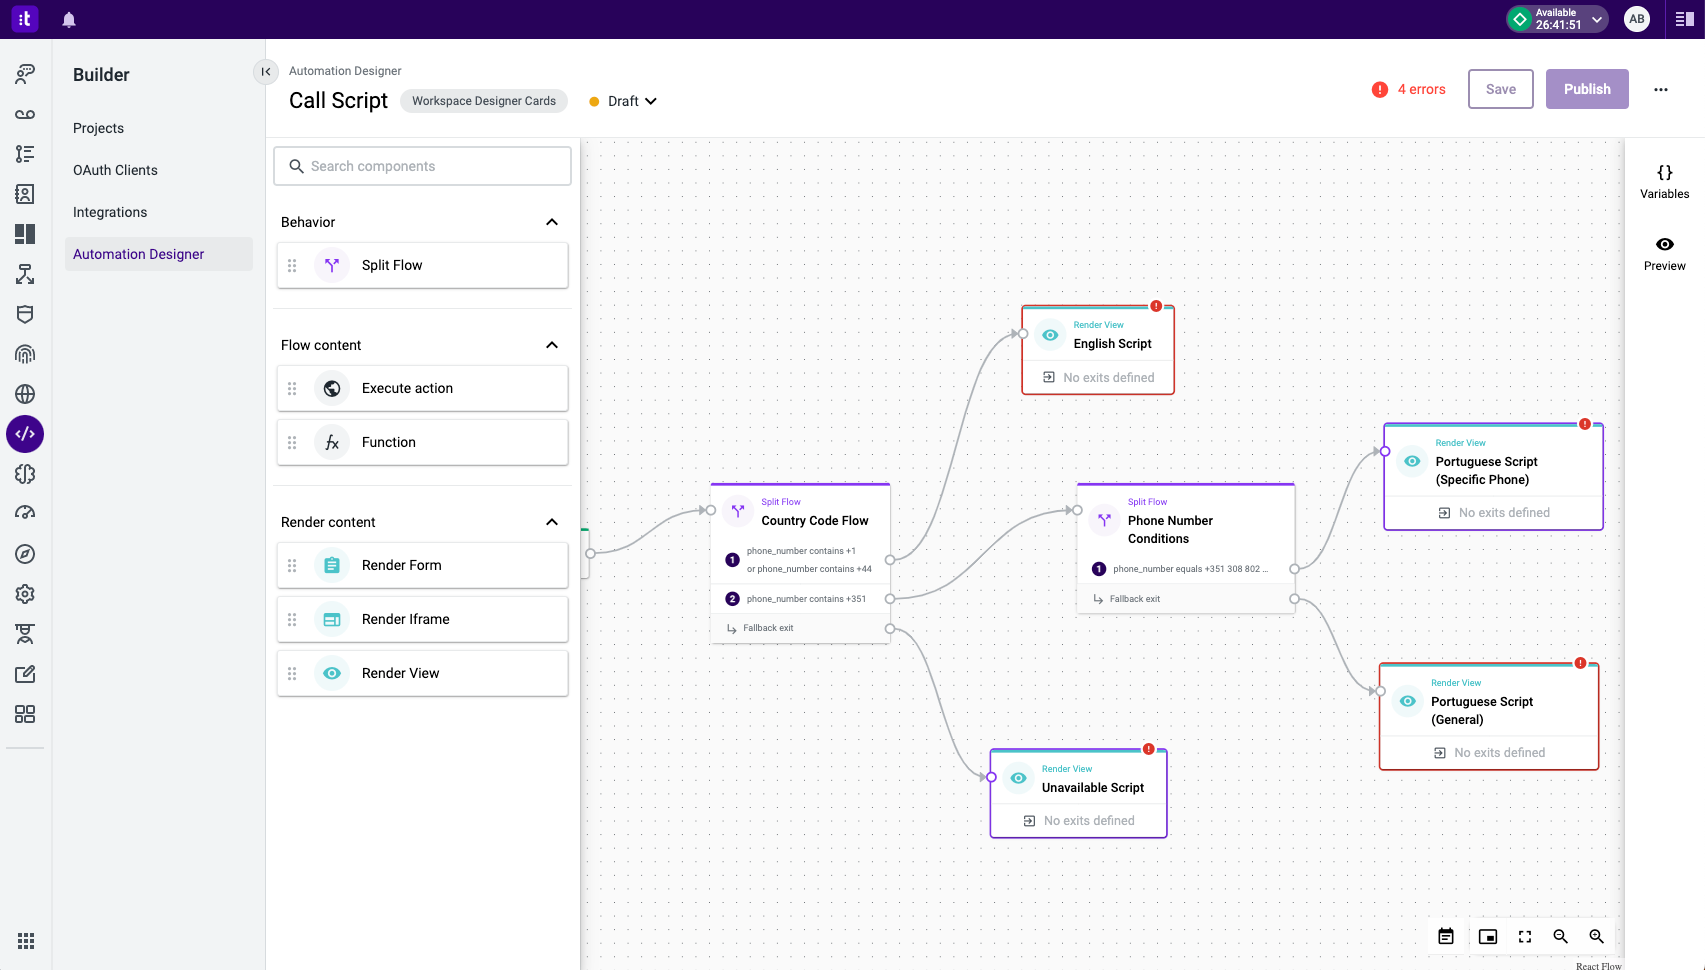
Figure 10 - Card automation flow
Configure the Render View for Scenario 1
Open the editor side panel of the Render View named English Script (Figure 11). To configure this component, you can add the HTML and JSX code to render the defined use case (Figure 11).
As you can see in the code below, we are making use of:
- Flex and Box components, which allow aligning the content of the card by using the direction, paddingTop, alignX, alignY, and gap properties.
- Heading component, which is used to display the title of the card.
- Text component, which wraps the text to maintain style consistency.
- img tag, which allows adding an image to the card.
<Flex direction="column" width="100%" height="100%">
    <Box>
        <Flex paddingTop="3" alignY="center" alignX="center" height="100%" grow>
            <img style={{width: "10%"}} src="https://t.ly/itMb"/>
            <Heading level="2">English Script</Heading>
        </Flex>
    </Box>
</Flex>
<Flex gap="3" alignX="center">
    <Flex direction="column" gap="4">
        <Box paddingTop="12">
            <Text color="#6f767d">Step 1</Text>
            <Text>Greet the customer and ask how you can help</Text>
        </Box>
        <Box>
            <Text color="#6f767d">Step 2</Text>
            <Text>Search for the information that will help solve your customer issue</Text>
        </Box>
        <Box>
            <Text color="#6f767d">Step 3</Text>
            <Text>Take notes to save information for a future interaction</Text>
        </Box>
        <Box>
            <Text color="#6f767d">Step 4</Text>
            <Text>Ask if you can help with anything else (and repeat step 2-4 if needed)</Text>
        </Box>
        <Box>
            <Text color="#6f767d">Step 5</Text>
            <Text>Thank the customer for the call and say goodbye</Text>
        </Box>
    </Flex>
</Flex>
Figure 11 - Render View code editor for English Script component
You can also use the Card Preview feature to visualize your card during the configuration process.
Configure the Render View for Scenario 2.1
Open the editor side panel of the Render View named Portuguese Script (Specific Phone) (Figure 12). One of the differences in this configuration is the use of the variable phone_number, which you get by using the Context.getVariable("phone_number") method.
<Flex paddingTop="3" alignY="center" alignX="center" height="100%" grow>
    <img style={{width: "40px"}} src="https://t.ly/muhH"/>
    <Heading level="2">Script de Opinião</Heading>
    <img style={{width: "40px"}} src="https://t.ly/muhH"/>
</Flex>
<Flex gap="3" alignX="center">
    <Flex direction="column" gap="4">
        <Box paddingTop="12">
            <Text color="#6f767d">Número de telefone: </Text>
            <Text>{Context.getVariable("phone_number")}</Text>
        </Box>
        <Box>
            <Text color="#6f767d">Passo 1</Text>
            <Text>Cumprimenta o cliente e explica que o motivo da chamada é obter opinião sobre o nosso serviço</Text>
        </Box>
        <Box>
            <Text color="#6f767d">Passo 2</Text>
            <Text>Questiona se o motivo da chamada anterior ficou resolvido</Text>
        </Box>
        <Box>
            <Text color="#6f767d">Passo 3</Text>
            <Text>Questiona se o/a agente que atendeu a chamada foi útil na resolução do problema</Text>
        </Box>
        <Box>
            <Text color="#6f767d">Passo 4</Text>
            <Text>Agradece ao cliente pela chamada e despede-te</Text>
        </Box>
    </Flex>
</Flex> component.png")
Figure 12 - Render View code editor for the Portuguese Script component
Configure the Render View for Scenario 2.2
Open the editor side panel of the Render View named Portuguese Script (General) (Figure 13). The configuration will be similar to Scenario 1, except the text will be translated into Portuguese (Figure 13).
<Flex paddingTop="3" alignY="center" alignX="center" height="100%" grow>
    <img style={{width: "8%"}} src="https://t.ly/6hAB"/>
    <Heading level="2">Script Português</Heading>
</Flex>
<Flex gap="3" alignX="center">
    <Flex direction="column" gap="4">
        <Box paddingTop="12">
            <Text color="#6f767d">Passo 1</Text>
            <Text>Cumprimenta o cliente e pergunta como podes ajudar</Text>
        </Box>
        <Box>
            <Text color="#6f767d">Passo 2</Text>
            <Text>Procura informação que possa ajudar a resolver o problema do cliente</Text>
        </Box>
        <Box>
            <Text color="#6f767d">Passo 3</Text>
            <Text>Tira notas para guardar informação para futuras interações</Text>
        </Box>
        <Box>
            <Text color="#6f767d">Passo 4</Text>
            <Text>Pergunta se podes ajudar com mais alguma dúvida (e repete os passos 2-4 se necessário)</Text>
        </Box>
        <Box>
            <Text color="#6f767d">Passo 5</Text>
            <Text>Agradece ao cliente pela chamada e despede-te</Text>
        </Box>
    </Flex>
</Flex> component.png")
Figure 13 - Render View code editor for the Portuguese Script (General) component
Configure the Render View for Scenario 3
Open the editor side panel of the Render View named Unavailable Script (Figure 14). As you can see in the code below, this is a much simpler case when compared to Scenario 1, but it uses almost all the same components and tags.
<Box padding="3" width="100%">
    <Flex direction="column" paddingTop="3" alignY="center" alignX="center" height="100%" grow>
        <img style={{ width: "200px" }} src="https://prd-cdn-talkdesk.talkdesk.com/cdn-assets/latest/talkdesk/product/empty_states/error_generic.svg"></img>
        <Heading level="3">There is no available script for this call</Heading>
    </Flex>
</Box>
Figure 14 - Render View code editor for the Unavailable Script component
5 - Save and Publish the Card
Once the configuration is complete, you need to save and publish the automation and, therefore, the card, using the respective buttons in the automation header (Figure 15 - 1, 2).
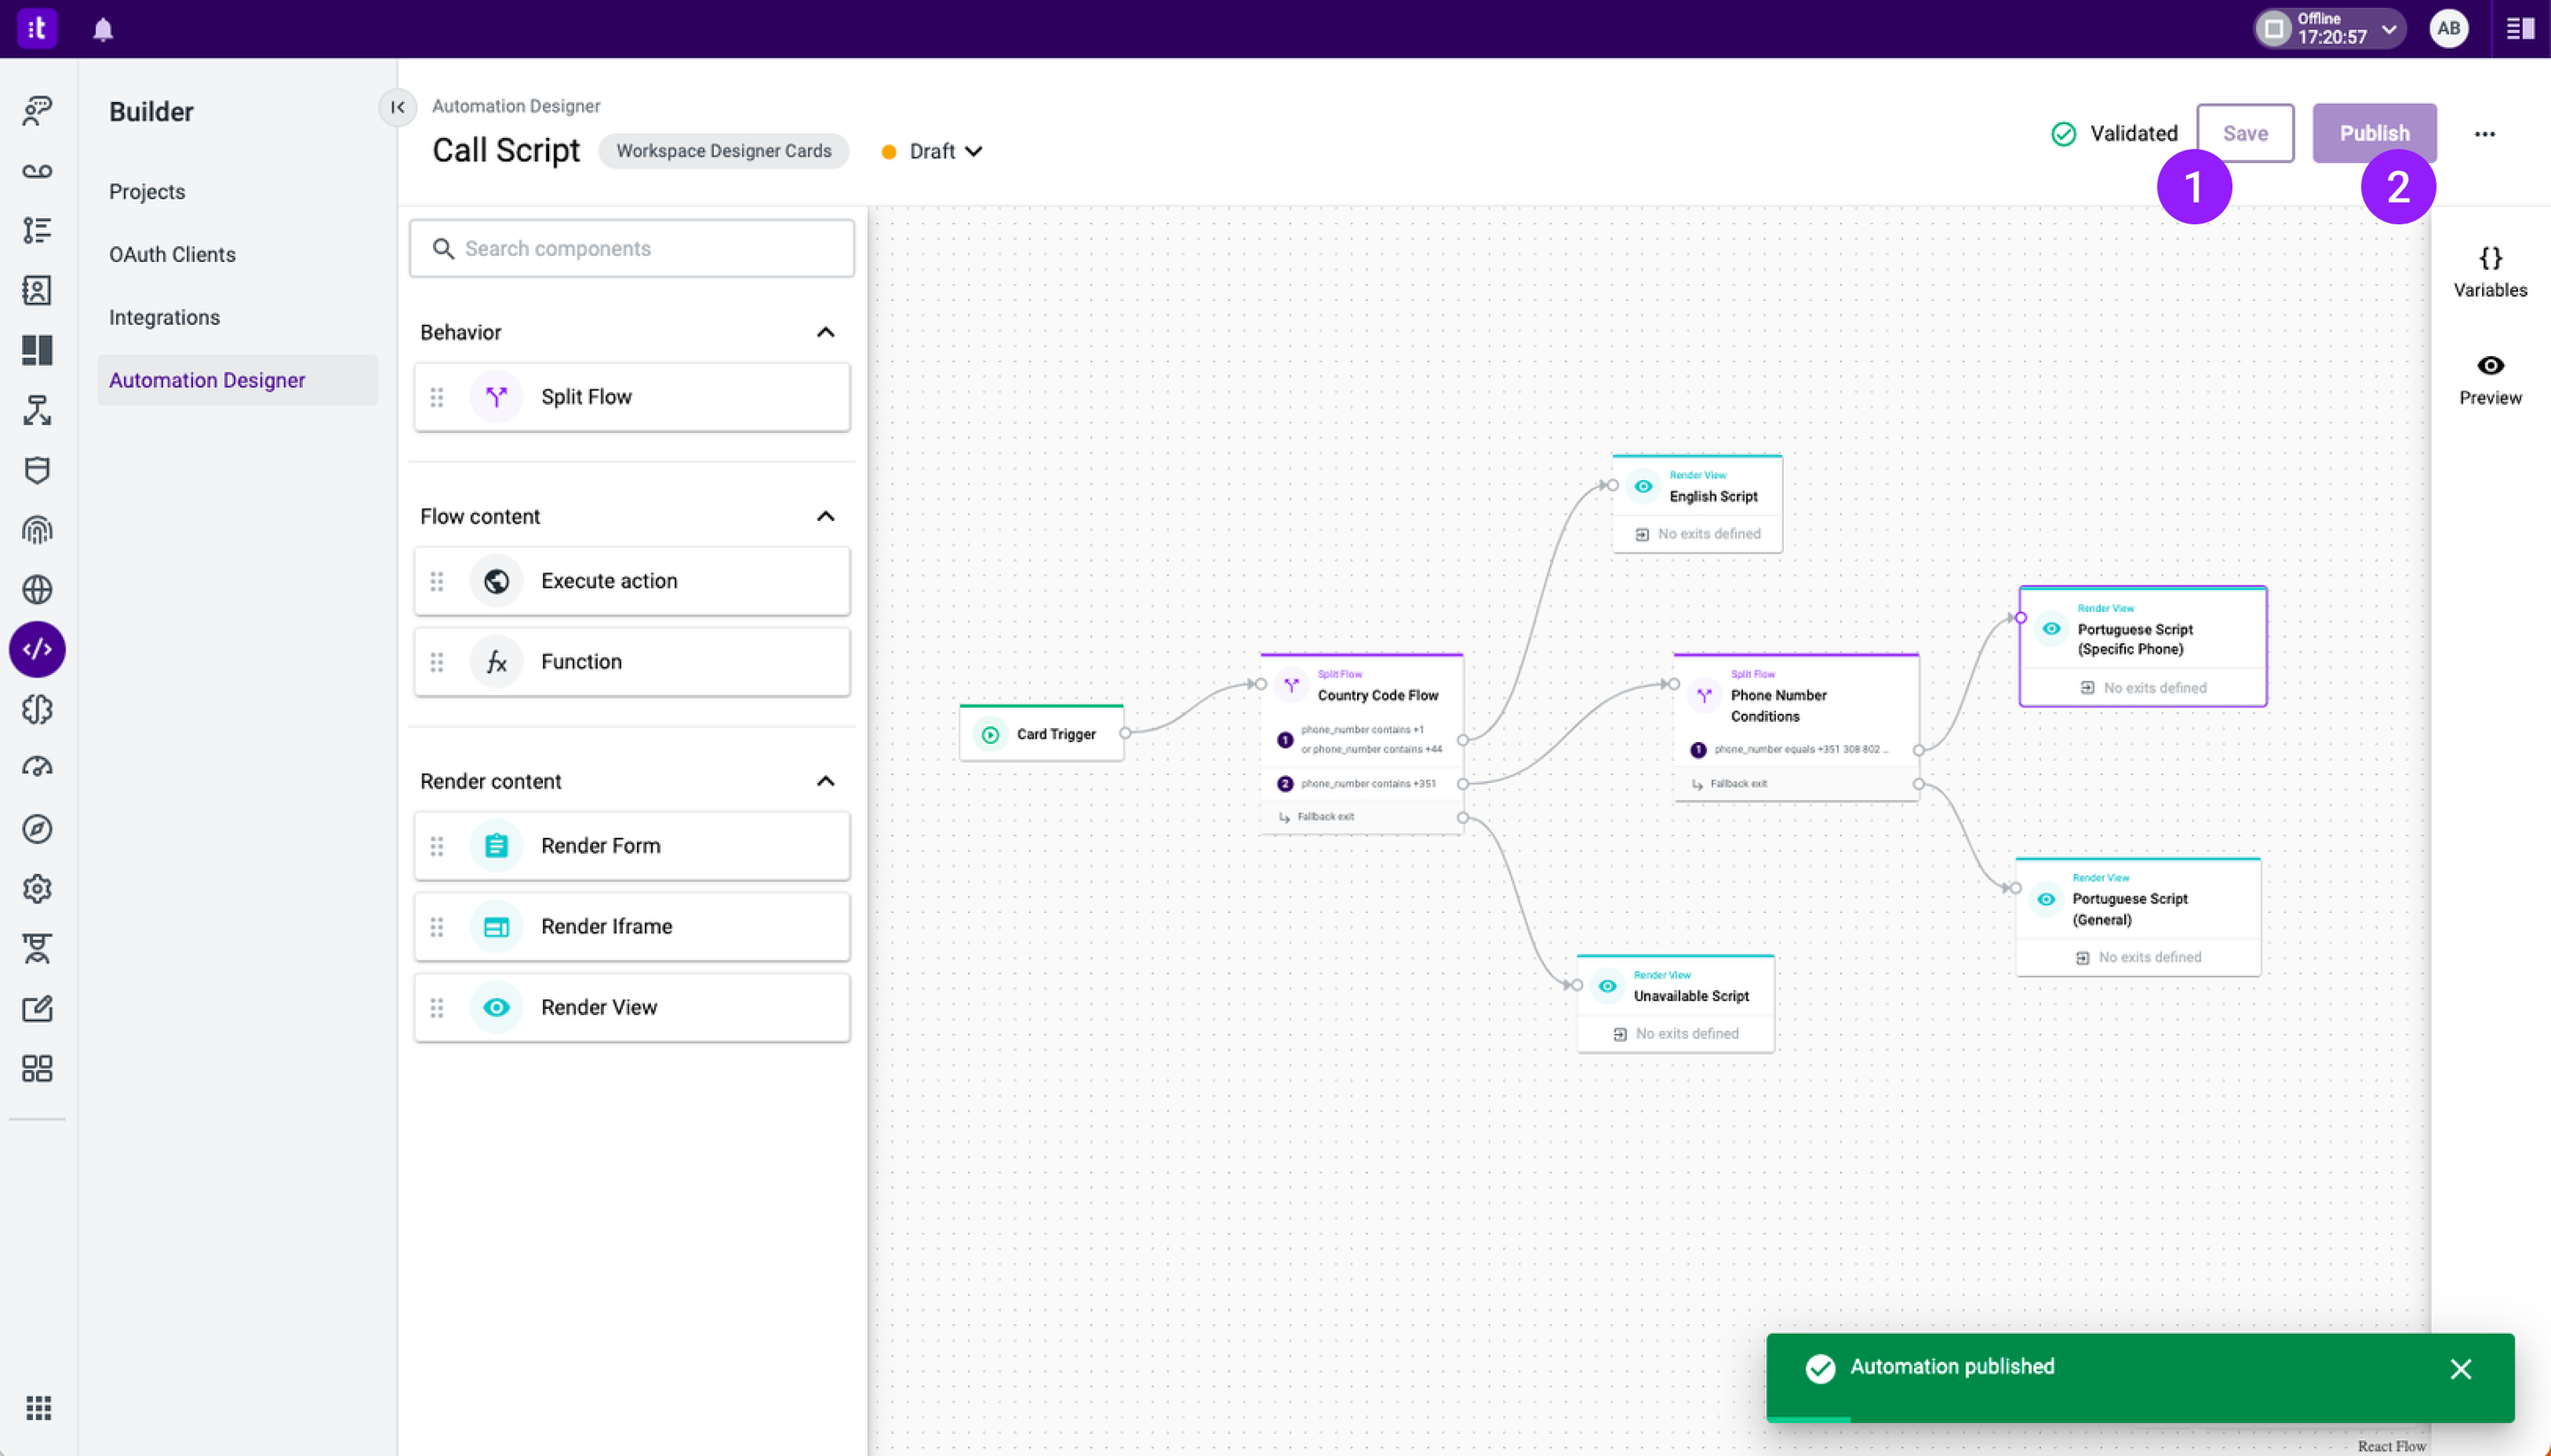
Figure 15 - Publish the automation/card
6 - Add the Card to a Panel
Now, you can add your card to a panel. First, you need to go back to Workspace Designer and ensure that you have a panel.
Once you have a panel of your choosing, click the Add card button (Figure 16 - 1). A side panel with your list of cards will appear and you can add the created card to the panel (Figure 16 - 2).
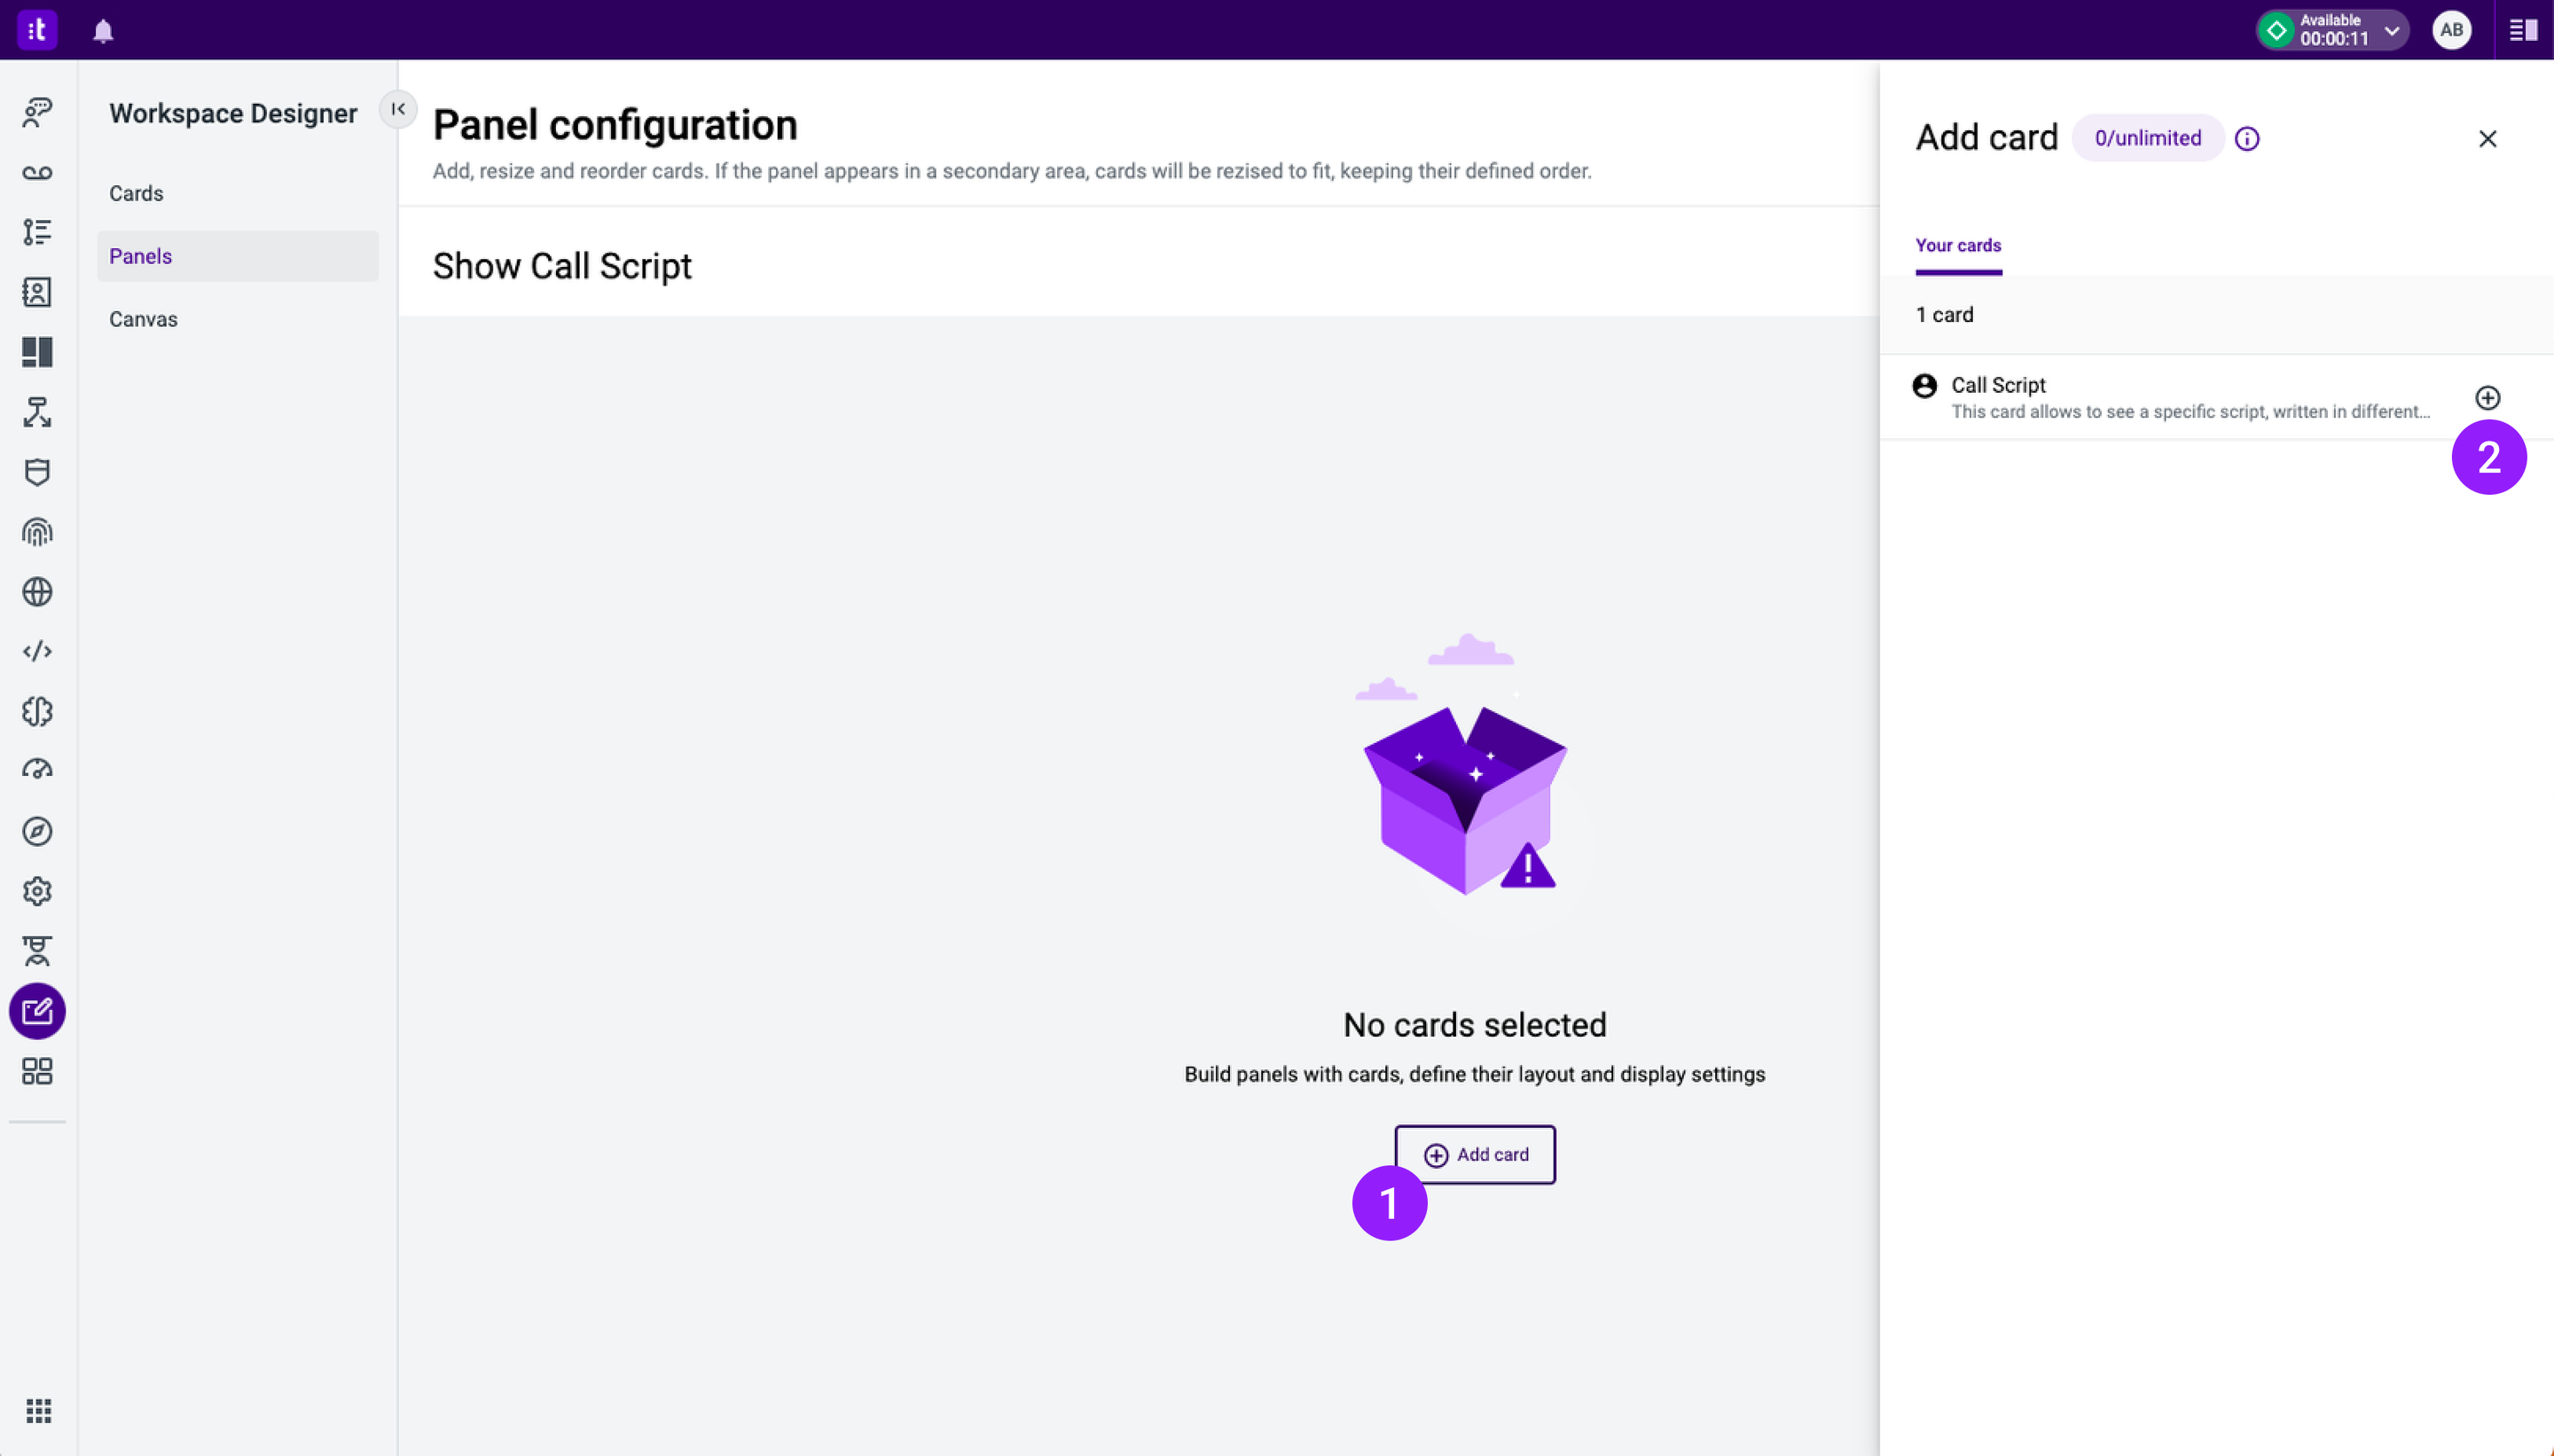
Figure 16 - Panel configuration
The card is then added to the panel, as you can see in Figure 17. In this case, what is being shown is the Unavailable Script outcome because we do not have the variable phone number (which is being retrieved through the Workspace context during a call).

Figure 17 - Call Script card in a panel
Keep in mind that to test this card, you need to make a real call to get the other outcomes based on the phone number.
The card in Figure 17 can be resized. See here more about customizing the display settings.
7 - Associate the Panel with a Canvas
The final step is to associate the panel with a canvas.
In this case, since we want to display a script to the agent during a call, we will add the panel to the Conversation App canvas (Figure 18).

Figure 18 - Associating a panel to the Conversation App canvas
Import this Automation
You can import the card automation created in this tutorial:
1 - Create a JSON file with the code below.
{
"id":"3defe026-a136-4d98-9935-2553839162e9",
"name":"Call Script",
"type":"WORKSPACE_DESIGNER_CARDS",
"publish_state":"DEPLOYED",
"last_updated":"Fri Mar 24 2023 12:18:51 GMT+0000 (Western European Standard Time)",
"last_published":"Fri Mar 24 2023 12:18:52 GMT+0000 (Western European Standard Time)",
"content":[
{
"id":"706af39e-e87a-40b2-a097-d864315a2e81",
"name":"",
"creation_index":1,
"nodes":[
{
"id":"6f5ab4ae-7629-447b-b567-68664884eda8",
"type":"card-trigger",
"position":{
"x":50,
"y":50
},
"data":{}
},
{
"id":"28186be8-4ab9-4c6f-af52-5246958d089f",
"type":"split-flow",
"namespace":"common",
"position":{
"x":750,
"y":0
},
"data":{
"configuration":{
"exits":[
{
"identifier":"94a1b11c-139d-411f-b51b-d1f7284a09b2",
"matching":"OR",
"conditions":[
{
"identifier":"f870b62a-aa19-4d3c-8eae-14e2f8138cf3",
"entry_operand":"fe89c1b2-cd4d-470b-8e89-c045bd158aa9",
"operator":"EQUALS",
"compare_operand":{
"is_variable":false,
"values":[
{
"text":"+351 308 802 132"
}
]
}
},
{
"identifier":"afcaf6b1-0739-488e-9836-63d53879d32a",
"entry_operand":"fe89c1b2-cd4d-470b-8e89-c045bd158aa9",
"operator":"EQUALS",
"compare_operand":{
"is_variable":false,
"values":[
{
"text":"+351 308 805 124"
}
]
}
}
]
}
]
}
},
"name":"Phone Number Conditions"
},
{
"id":"07c41519-5ad0-408e-ad24-1d42c69696fe",
"type":"split-flow",
"namespace":"common",
"position":{
"x":345,
"y":0
},
"data":{
"configuration":{
"exits":[
{
"identifier":"dce311d7-fb04-42a1-bd7f-19001c9d6162",
"matching":"OR",
"conditions":[
{
"identifier":"b466307b-5433-4cf0-9089-05c2fa2c0aa2",
"entry_operand":"fe89c1b2-cd4d-470b-8e89-c045bd158aa9",
"operator":"CONTAINS",
"compare_operand":{
"is_variable":false,
"values":[
{
"text":"+1"
}
]
}
},
{
"identifier":"36b08bde-09d6-43d6-8532-e3d8b60eba49",
"entry_operand":"fe89c1b2-cd4d-470b-8e89-c045bd158aa9",
"operator":"CONTAINS",
"compare_operand":{
"is_variable":false,
"values":[
{
"text":"+44"
}
]
}
}
]
},
{
"identifier":"e3e2284b-ffcc-4130-84f3-d58de8512a20",
"matching":"AND",
"conditions":[
{
"identifier":"baca71cd-ba57-460f-bd17-b6b28f020b36",
"entry_operand":"fe89c1b2-cd4d-470b-8e89-c045bd158aa9",
"operator":"CONTAINS",
"compare_operand":{
"is_variable":false,
"values":[
{
"text":"+351"
}
]
}
}
]
}
]
}
},
"name":"Country Code Flow"
},
{
"id":"d9f91201-3fae-4879-891e-130f2a59b668",
"type":"render-view",
"namespace":"workspace_designer_cards",
"position":{
"x":690,
"y":-195
},
"data":{
"configuration":{
"code":"<Flex paddingTop=\"3\" alignY=\"center\" alignX=\"center\" height=\"100%\" grow>\n <img style={{width: \"10%\"}} src=\"https://t.ly/itMb\"/>\n <Heading level=\"2\">English Script</Heading>\n</Flex>\n<Flex gap=\"3\" alignX=\"center\">\n <Flex direction=\"column\" gap=\"4\">\n <Box paddingTop=\"12\">\n <Text color=\"#6f767d\">Step 1</Text>\n <Text>Greet the customer and ask how you can help</Text>\n </Box>\n <Box>\n <Text color=\"#6f767d\">Step 2</Text>\n <Text>Search for the information that will help solve your customer issue</Text>\n </Box>\n <Box>\n <Text color=\"#6f767d\">Step 3</Text>\n <Text>Take notes to save information for a future interaction</Text>\n </Box>\n <Box>\n <Text color=\"#6f767d\">Step 4</Text>\n <Text>Ask if you can help with anything else (and repeat step 2-4 if needed)</Text>\n </Box>\n <Box>\n <Text color=\"#6f767d\">Step 5</Text>\n <Text>Thank the customer for the call and say goodbye</Text>\n </Box>\n </Flex>\n</Flex>",
"compiled_code":"PQKgxA+hAKCqBKBRKJgCh4FMCGBjALgHS4BOO+miANpgLaYB2+AFFnkQGInYDm9TAGgAEDAK5Uqw0JBgJkEVGwLEy2CtTqMWHGgA9hAbzRChAB2wATCwEsGPACoB7UwC4hAIgDM7gcaHYqax4GAE03d1wtTBIfPwCghgANcMimaNiTAAtMIMz8cIBGAAYigFIMoR4SRwB3N3wSUUw0AF8pcCg4JBRgJSJSckoafhZ3a1oeHyEjEwBnfABPGjcZkyEa6wt8TMKy9z82v1mSXHC8-FNZl2BgIioF4Gt8AFkAI32WgEp2mS75RRwygGaiGmiYzAAEjgbHZDH4aAA3TBUcIAJg+wnciDsgVmmSEAGVSNZTPh3J9vkJpJ05D0+ipBhoRswdJh9NM-DxsK4PN5fCZ4sFkh5UhQYq0fjTugpeoD+qp1MMtCy9HCTDYyARrI4GClHFRRLQGBUuTz3AAWDFUjqyaUA9gMkFM5UAIUc7NW5istgczkK6Il1t+tJl9OBirBLHsbPwaqEuH1jhI4TAADYAGYAdlTmYsVvcBIopiEBXJktt-1lDvDoOZ0d0sZE4kkHgA4mRMPghNtMPHRPNHPQSP4GBZ-LMANZCTK1IQLRyiePYBjT5GmcmU6kVulyx0R5lu9liCTlv476sK2vK+uN1YJqhJlMZ7O5-OFzDF9Gbm1n0O7mvOuCN7CMeLYFjgJz4umSbdtkQi2NBJC0Go2ortsajrNYEirlQxazPqSJzguw64P2+CDtE8GzLMTQbqeIb2kCl6ASwh4gc29F2lWTGMkqQExnG96Ph4aZZjmeaBgWRZCN437BlxYbMXxUYCU2J4ePY2ATr2DCOBQszdo4QizNghEIUmyH4KhQiIf4NmiPgohkPBaTcFqOp0UGUqVopvGRswbFqS2W6-ox8p+XWql3omyYic+4lvtJlpyd5548U6ynMMBQWYgAgpO8HpkRi64MuOHFhs2wjgs2w+kIyKzL2zDLmOZCmOQxnSaiAC05qFSImCYBYQ2fJ5IUMdx4UZf5gWgZxPn-kp-nZdFD6xe4okvhJbQeO+xYAKxll525-heEXXqpc0aZky5Tj2fYDkONkwfdpXYS1xnYAslSOI4FivAsmAbhSnwANxAA",
"exits":[
]
}
},
"name":"English Script"
},
{
"id":"868288a6-d781-42d9-974b-0ee7cc751a59",
"type":"render-view",
"position":{
"x":655,
"y":295
},
"data":{
"configuration":{
"code":"<Box padding=\"3\" width=\"100%\">\n <Flex direction=\"column\" paddingTop=\"3\" alignY=\"center\" alignX=\"center\" height=\"100%\" grow>\n <img style={{ width: \"200px\" }} src=\"https://prd-cdn-talkdesk.talkdesk.com/cdn-assets/latest/talkdesk/product/empty_states/error_generic.svg\"></img>\n <Heading level=\"3\">There is no available script for this call</Heading>\n </Flex>\n</Box>\n",
"compiled_code":"PQKgxA+hAKCqBKBRKJgCh4FMCGBjALgHS4BOO+miANpgLaYB2+AFFnkQGInYDm9TAGgAEDAK5Uqw0JBgJkEVGwLEy2CtTqMWAIQD2AD2EBvNEKEAHbABMrASwY8AXEIBEAZhcDTQgO62r+AAWzi4AjAAM4QCkLmgAvlLgUHBIKMBKRKTklDT8LBw0hkImZnZkBLa6DCG4ulSitAye3pY29jwAKrrmIR5eZthUtjwMAJo1WpgkzQNDIwAaE0xTM0KBmMOB+CER0as8JLo+zvgkopjxiTIp8oo4yllqOZpMzC62tDyexd4AzvgATxozhKZl8-iCIQATJFzPpYmYEn8SLgQlt8OZfo5gMBzCQrABaXBWBgE-CDADWVkwvwphHJVCpNLptVowGJpOwv1+mHwv2AVCe-2ADKZtNxhysogIwDo5kBEH+QtlJEOJAgPEYU1suEIvwAbl94gBKK7JORpDIqbIaPLMAASODsDmM3ho+swVF6sQSrg66zIQlsvxEuiE2H12FsgoARjQhL9SLZ5UIAGa6EhCILBoS4QZUFzGovGgDcQA",
"exits":[
]
}
},
"name":"Unavailable Script"
},
{
"id":"3bcd8707-5347-4d85-a540-3511e1ffe1aa",
"type":"render-view",
"position":{
"x":1090,
"y":-65
},
"data":{
"configuration":{
"code":"<Flex paddingTop=\"3\" alignY=\"center\" alignX=\"center\" height=\"100%\" grow>\n <img style={{width: \"40px\"}} src=\"https://t.ly/muhH\"/>\n <Heading level=\"2\">Script de Opinião</Heading>\n <img style={{width: \"40px\"}} src=\"https://t.ly/muhH\"/>\n</Flex>\n<Flex gap=\"3\" alignX=\"center\">\n <Flex direction=\"column\" gap=\"4\">\n <Box paddingTop=\"12\">\n <Text color=\"#6f767d\">Número de telefone: </Text>\n <Text>{Context.getVariable(\"phone_number\")}</Text>\n </Box>\n <Box>\n <Text color=\"#6f767d\">Passo 1</Text>\n <Text>Cumprimenta o cliente e explica que o motivo da chamada é obter opinião sobre o nosso serviço</Text>\n </Box>\n <Box>\n <Text color=\"#6f767d\">Passo 2</Text>\n <Text>Questiona se o motivo da chamada anterior ficou resolvido</Text>\n </Box>\n <Box>\n <Text color=\"#6f767d\">Passo 3</Text>\n <Text>Questiona se o/a agente que atendeu a chamada foi útil na resolução do problema</Text>\n </Box>\n <Box>\n <Text color=\"#6f767d\">Passo 4</Text>\n <Text>Agradece ao cliente pela chamada e despede-te</Text>\n </Box>\n </Flex>\n</Flex>",
"compiled_code":"PQKgxA+hAKCqBKBRKJgCh4FMCGBjALgHS4BOO+miANpgLaYB2+AFFnkQGInYDm9TAGgAEDAK5Uqw0JBgJkEVGwLEy2CtTqMWHGgA9hAbzRChAB2wATCwEsGPACoB7UwC4hAIgDM7gcaHYqax4GAE03d1wtTBIfPwCghgANcMimaNiTAAtMIMz8cIBGAAYigFIMoR4SRwB3N3wSUUw0AF8pcCg4JBRgJSJSckoafhZ3a1oeHyEjEwBnfABPGjcZkyEa6wt8TPCAFiLTXXc-Nr9ZklxwvPxTWZdgYCIqBeBaUUyACWOWgEp2mS68kUOGUAzUQ00TGYHxwNjshj8NAAbpgqOEAEzfYTuADKpGspnwQgsmCEAHlTLZrAAdXSITyOdx-ITSTpyHp9FSDDQjZhjCZTVbzJaYFZ+EwbLY7Dz7Q7HEynOYXK74G53B5PF5vT7fH7M1myboKXog-qqdTDLTMHSYfTTPw8bCuDzeXwmeLBZIeVIUGKtf5so3A9hc8E8q02u2rGxkAjWRwMFKOKiiWgMCqO53uXZYlkdQ1Ak0hsEWyEsABCjijfnMVlsDmchUx-rzAPZxs5JYhvPstvwCJMuGTjhI4TAADYAGYAdnH04sufcADlaRwAIL0arE0kUGiThOijz6-OAjmm0Olnt94RiCTCADCCYouiIPEw+AAatgSNZsAAjGg+VMTIDwgMRaD-dI9WPNsgyLUFzW7K1KztW9JFbQNC07RDwyhXsXwHIQhyoEcxynWd50XaBsFmWZHCEAomQDAsz2LHDLTw68RHEdD3HvVNTB-EZsCEejcECKIhFJW1TECXARIARyaUShFoRx8GsJF6IsETcEybBaEsETaUQABOUS-19UTKQYGk6QZIQ6L-MgVIYRxaPo2ZoiROzEGnRk9WY08O3PLtcIrKsbx4oL22DBDuQ4lh8P7e1B2HUcPAnGc5wXFt3GojyhExGDMNY+Kw0S5hkqiu8PAARSaeZ4wYESvJUtSNK04ldP0wydP8NIfxHIRJ2sIdRCEMg6KoHyLACkqWJCtiErLZgUJq9CDWCuKzRWq8CNSoj0rI7LKLygq6KEbwFu2+Ddoq1bqu42r3AazAmoTVrSUcYARN4SSlNJcEGBJCaeoMoyRscawhFXNcNKoEQRKm5NRBM6cTIcuazGqAC6GwJkbtiu6LyQqF1uezaT2J7C9qtJ7VmI0jMvInKqJoy6cyJuDaYe-aUrQ7E1yqSxMEifwxIktIzFRcG+pE0kSVmUxMBJABaChCeggBuIA",
"exits":[
]
}
},
"name":"Portuguese Script (Specific Phone)"
},
{
"id":"201771aa-eab3-49af-9744-b69b18aa7ee9",
"type":"render-view",
"position":{
"x":1085,
"y":200
},
"data":{
"configuration":{
"code":"<Flex paddingTop=\"3\" alignY=\"center\" alignX=\"center\" height=\"100%\" grow>\n <img style={{width: \"8%\"}} src=\"https://t.ly/6hAB\"/>\n <Heading level=\"2\">Script Português</Heading>\n</Flex>\n<Flex gap=\"3\" alignX=\"center\">\n <Flex direction=\"column\" gap=\"4\">\n <Box paddingTop=\"12\">\n <Text color=\"#6f767d\">Passo 1</Text>\n <Text>Cumprimenta o cliente e pergunta como podes ajudar</Text>\n </Box>\n <Box>\n <Text color=\"#6f767d\">Passo 2</Text>\n <Text>Procura informação que possa ajudar a resolver o problema do cliente</Text>\n </Box>\n <Box>\n <Text color=\"#6f767d\">Passo 3</Text>\n <Text>Tira notas para guardar informação para futuras interações</Text>\n </Box>\n <Box>\n <Text color=\"#6f767d\">Passo 4</Text>\n <Text>Pergunta se podes ajudar com mais alguma dúvida (e repete os passos 2-4 se necessário)</Text>\n </Box>\n <Box>\n <Text color=\"#6f767d\">Passo 5</Text>\n <Text>Agradece ao cliente pela chamada e despede-te</Text>\n </Box>\n </Flex>\n</Flex>",
"compiled_code":"PQKgxA+hAKCqBKBRKJgCh4FMCGBjALgHS4BOO+miANpgLaYB2+AFFnkQGInYDm9TAGgAEDAK5Uqw0JBgJkEVGwLEy2CtTqMWHGgA9hAbzRChAB2wATCwEsGPACoB7UwC4hAIgDM7gcaHYqax4GAE03d1wtTBIfPwCghgANcMimaNiTAAtMIMz8cIBGAAYigFIMoR4SRwB3N3wSUUw0AF8pcCg4JBRgJSJSckoafhZ3a1oeHyEjEwBnfABPGjcZkyEa6wt8TPCADnK-Nr9ZklxwvPxTWZdgYCIqBeAANkyAQQAhd1aASnaZLvkihwygGaiGmiYzAAEjgbHZDH4aAA3TBUcIAJi+bQ8AGVSNZTPghNBHCR8KIeKIADq6RCvWbub6-ITSTpyHp9FSDDQjZg6TD6aZ+HjYVweby+EzxYLJDypCgxVp-NndBS9YH9VTqYZaPl6BEmGxkAjWRwMFKOKiiWgMCoisXuAAsWOVslVQPYXLBPN170cgtW5istgczkKmKVLI6bsB6s9oO1EJY9gF+ANQlwltJ4TATwAZgB2J4FiwujzQbCzWaOIQFRmugEcjVexO8lO6NMicSSDwAYWtphI4y02CENdwgSiQkwZmilKYo8ztBrpkcFkws38ACtRBZsDEmQ32WrOQnwby-YKxBIj+64yCtefde3O6tM1Rsx5c4Xi6XI+4KyrGtMWZVkYybeNHx9SEX2Ea8ewA6pcFEbghFsPNSVobAaUQAscM8GsAEcmjMRwq1HbAdz3Eh-CEMhqyoFEaJXaoACNhlHCxx0nNJGVA6NGxPZsz2glhLzg7tb1jU8oJ1GDU3Td9P3cb8ixLMsAMrashG8fj-mPD0H25OTkwUrsbw8exrFQhhHHwSszH3UdKX3ai0IYDCSCwnC8NpAjHNQvNRHJbhN1sBVsNpXyOAAVg3PipIgozvRM5hxPMnswMEwzNWMpNmFgoUTCUkgc3zNS-2xTSgKEZ09JVaThNk-LCvg4QALnUQFyEWYZ1XddN0o3d9wzRxaCELDrEGqhKSwoQLBpDhXiRTZR2YGcyFMTAKDHTdzCAzd0QAWkdHqZwYTBIirHCCiHRxvgSqN9LvGS8ovf0JIsrKDPvXKUpasy3yzUqv3K38NMA7SYvrJ6GqSv7W2fMy2o8V4qksS6Z2wbjrCnLaqEXTJsCwvdp3mjctvXI6KD4plvgAbiAA",
"exits":[
]
}
},
"name":"Portuguese Script (General)"
}
],
"edges":[
{
"id":"reactflow__edge-6f5ab4ae-7629-447b-b567-68664884eda8trigger-exit-07c41519-5ad0-408e-ad24-1d42c69696fetarget-1",
"source":"6f5ab4ae-7629-447b-b567-68664884eda8",
"target":"07c41519-5ad0-408e-ad24-1d42c69696fe",
"source_handle":"trigger-exit",
"target_handle":"target-1",
"type":"edge"
},
{
"id":"reactflow__edge-07c41519-5ad0-408e-ad24-1d42c69696fee3e2284b-ffcc-4130-84f3-d58de8512a20-28186be8-4ab9-4c6f-af52-5246958d089ftarget-1",
"source":"07c41519-5ad0-408e-ad24-1d42c69696fe",
"target":"28186be8-4ab9-4c6f-af52-5246958d089f",
"source_handle":"e3e2284b-ffcc-4130-84f3-d58de8512a20",
"target_handle":"target-1",
"type":"edge"
},
{
"id":"reactflow__edge-07c41519-5ad0-408e-ad24-1d42c69696fedce311d7-fb04-42a1-bd7f-19001c9d6162-d9f91201-3fae-4879-891e-130f2a59b668render-view-target",
"source":"07c41519-5ad0-408e-ad24-1d42c69696fe",
"target":"d9f91201-3fae-4879-891e-130f2a59b668",
"source_handle":"dce311d7-fb04-42a1-bd7f-19001c9d6162",
"target_handle":"render-view-target",
"type":"edge"
},
{
"id":"reactflow__edge-07c41519-5ad0-408e-ad24-1d42c69696feexit-fallback-868288a6-d781-42d9-974b-0ee7cc751a59render-view-target",
"source":"07c41519-5ad0-408e-ad24-1d42c69696fe",
"target":"868288a6-d781-42d9-974b-0ee7cc751a59",
"source_handle":"exit-fallback",
"target_handle":"render-view-target",
"type":"edge"
},
{
"id":"reactflow__edge-28186be8-4ab9-4c6f-af52-5246958d089f94a1b11c-139d-411f-b51b-d1f7284a09b2-3bcd8707-5347-4d85-a540-3511e1ffe1aarender-view-target",
"source":"28186be8-4ab9-4c6f-af52-5246958d089f",
"target":"3bcd8707-5347-4d85-a540-3511e1ffe1aa",
"source_handle":"94a1b11c-139d-411f-b51b-d1f7284a09b2",
"target_handle":"render-view-target",
"type":"edge"
},
{
"id":"reactflow__edge-28186be8-4ab9-4c6f-af52-5246958d089fexit-fallback-201771aa-eab3-49af-9744-b69b18aa7ee9render-view-target",
"source":"28186be8-4ab9-4c6f-af52-5246958d089f",
"target":"201771aa-eab3-49af-9744-b69b18aa7ee9",
"source_handle":"exit-fallback",
"target_handle":"render-view-target",
"type":"edge"
}
]
}
],
"metadata":{
"type":"WORKSPACE_DESIGNER_CARDS",
"variables":[
{
"id":"fe89c1b2-cd4d-470b-8e89-c045bd158aa9",
"name":"phone_number",
"configuration":{
"source":"workspace",
"path":"active-conversation.contact_person_number"
},
"type":"CUSTOM"
},
{
"id":"80dfab71-0264-4a67-a460-a5150d8f744c",
"name":"active_user_id",
"descriptioni18n_key":"workspaceDesignerCards:system.variables.active_user_id",
"type":"SYSTEM"
},
{
"id":"c09d303b-4fb6-4038-806e-317e0938669f",
"name":"active_user_email",
"descriptioni18n_key":"workspaceDesignerCards:system.variables.active_user_email",
"type":"SYSTEM"
}
]
},
"schema_version":"1.0.0"
}2 - In the card automation configuration, click the ... and then select the Import version option (Figure 19 - 1).
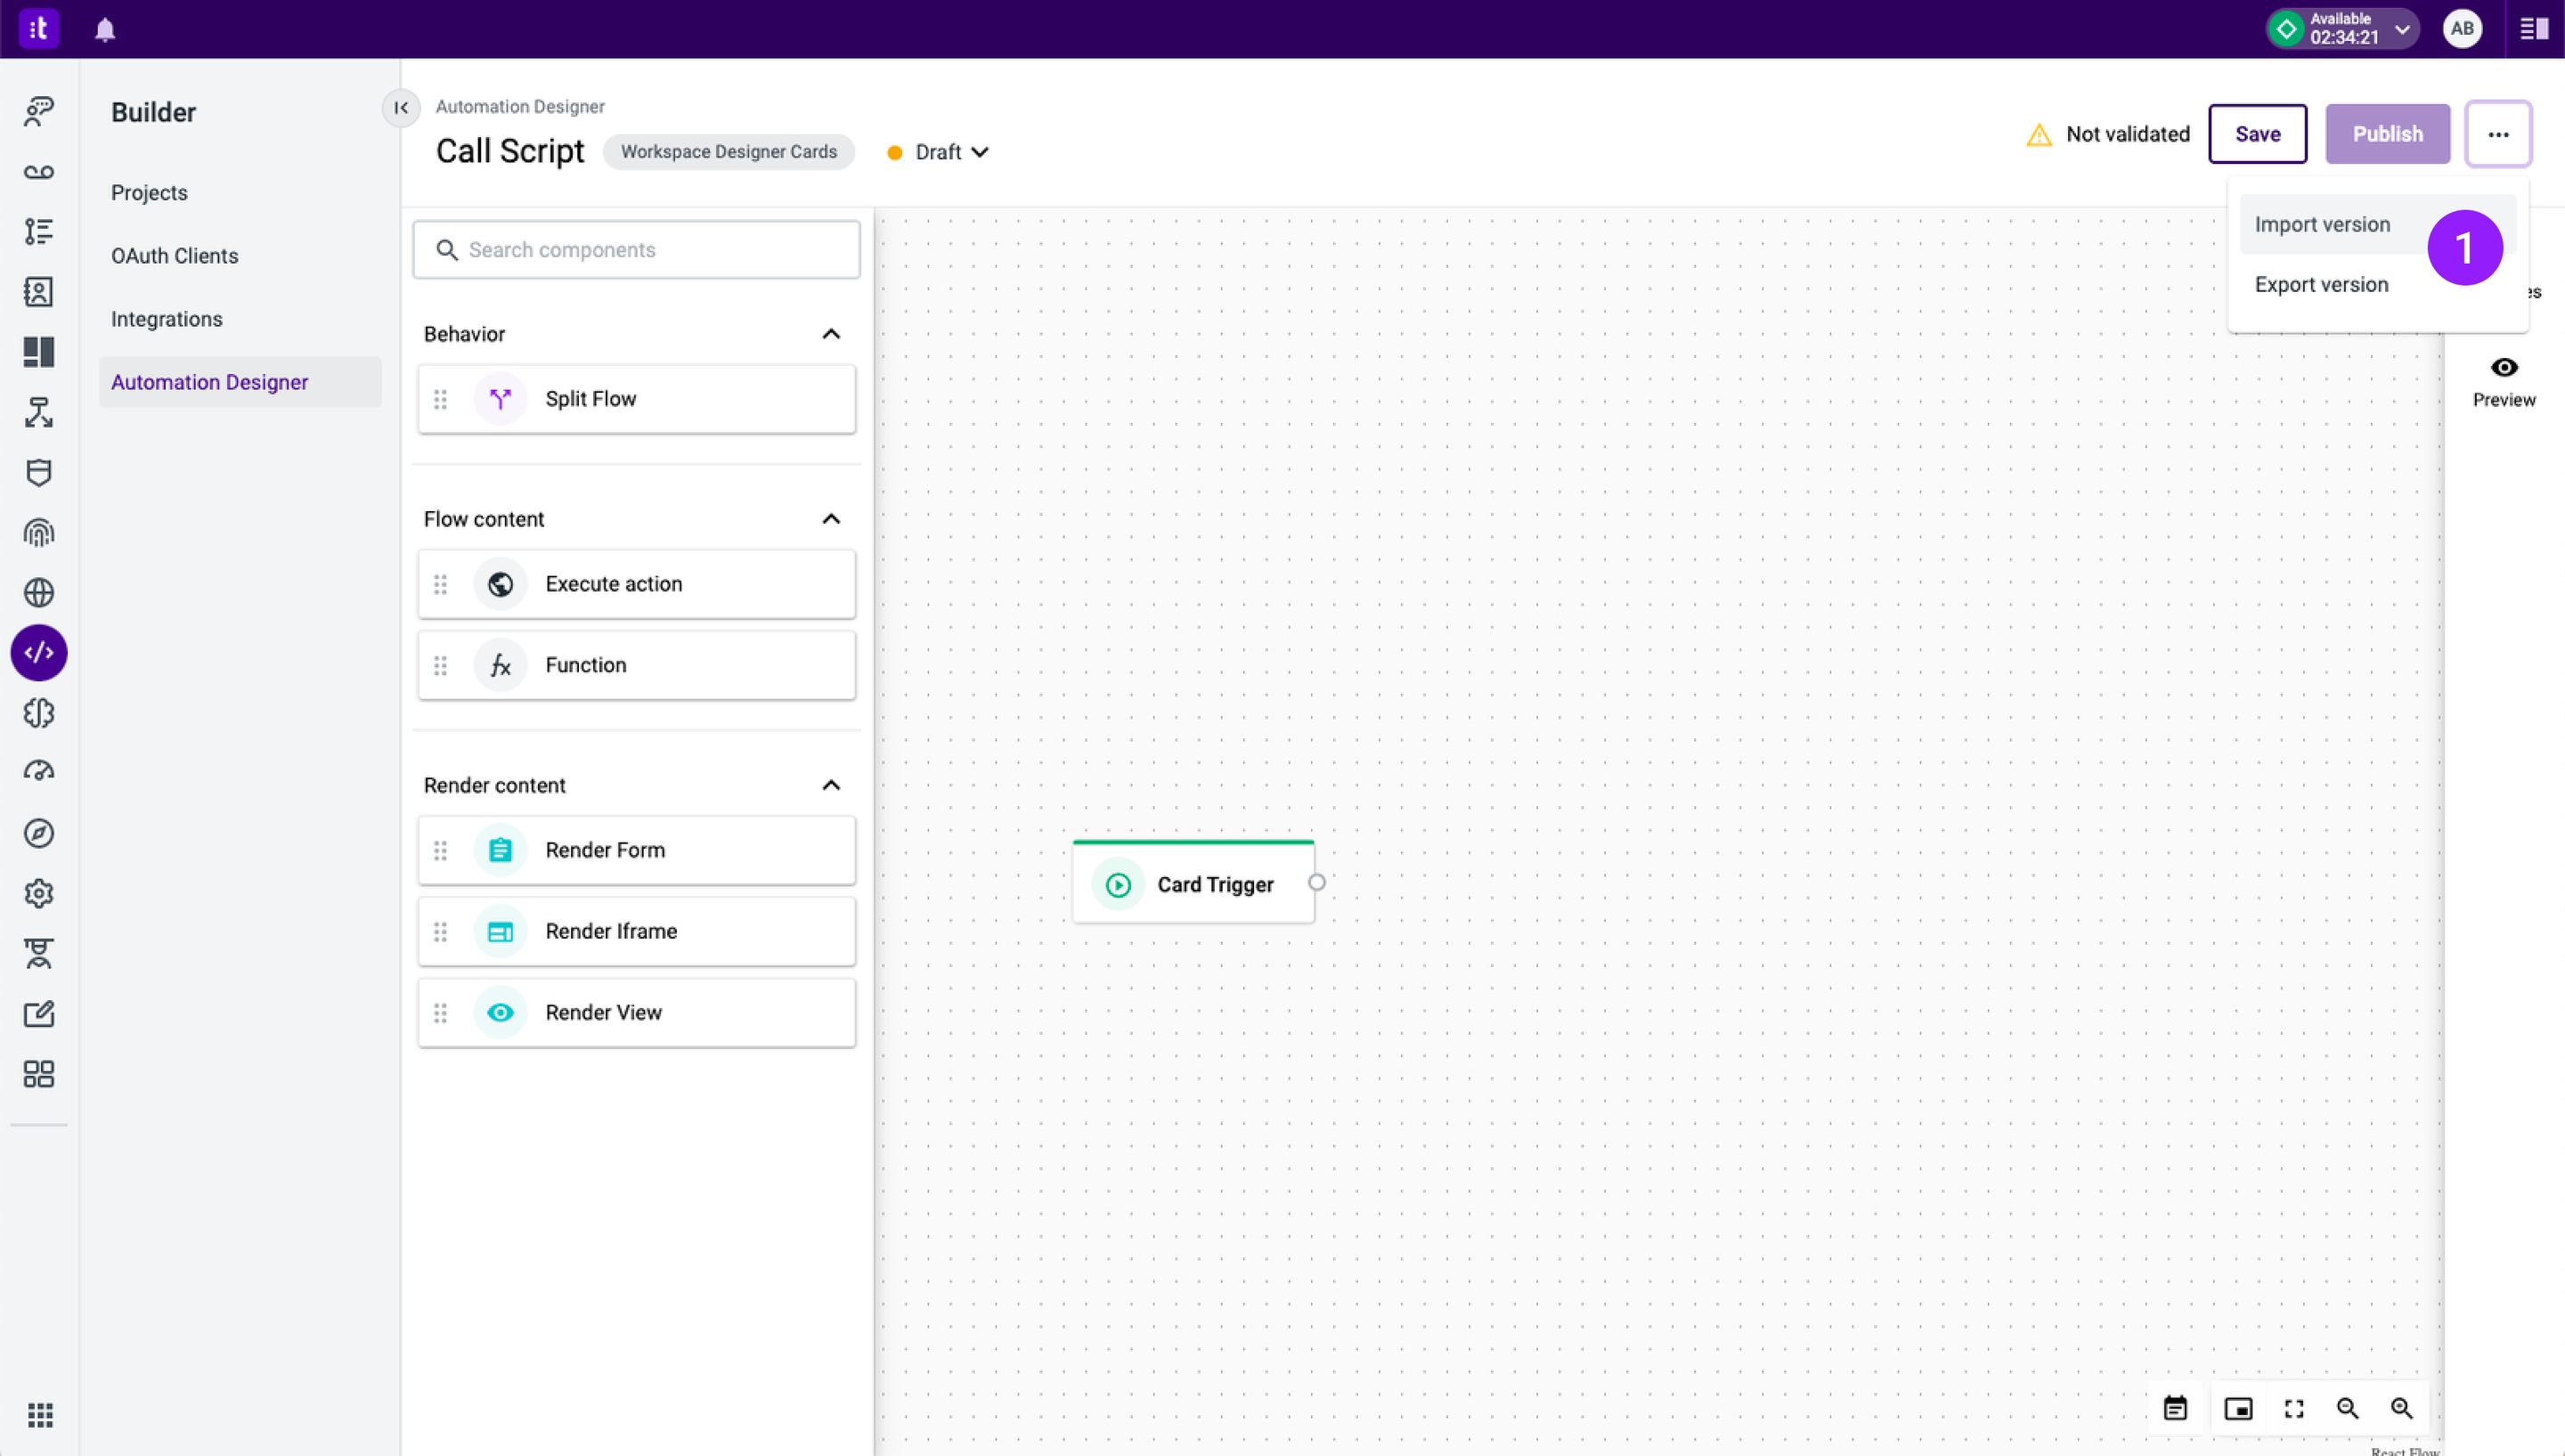
Figure 19 - Import version option
3 - A modal will open (Figure 20). There, insert the JSON file and click the Confirm button (Figure 20 - 1).
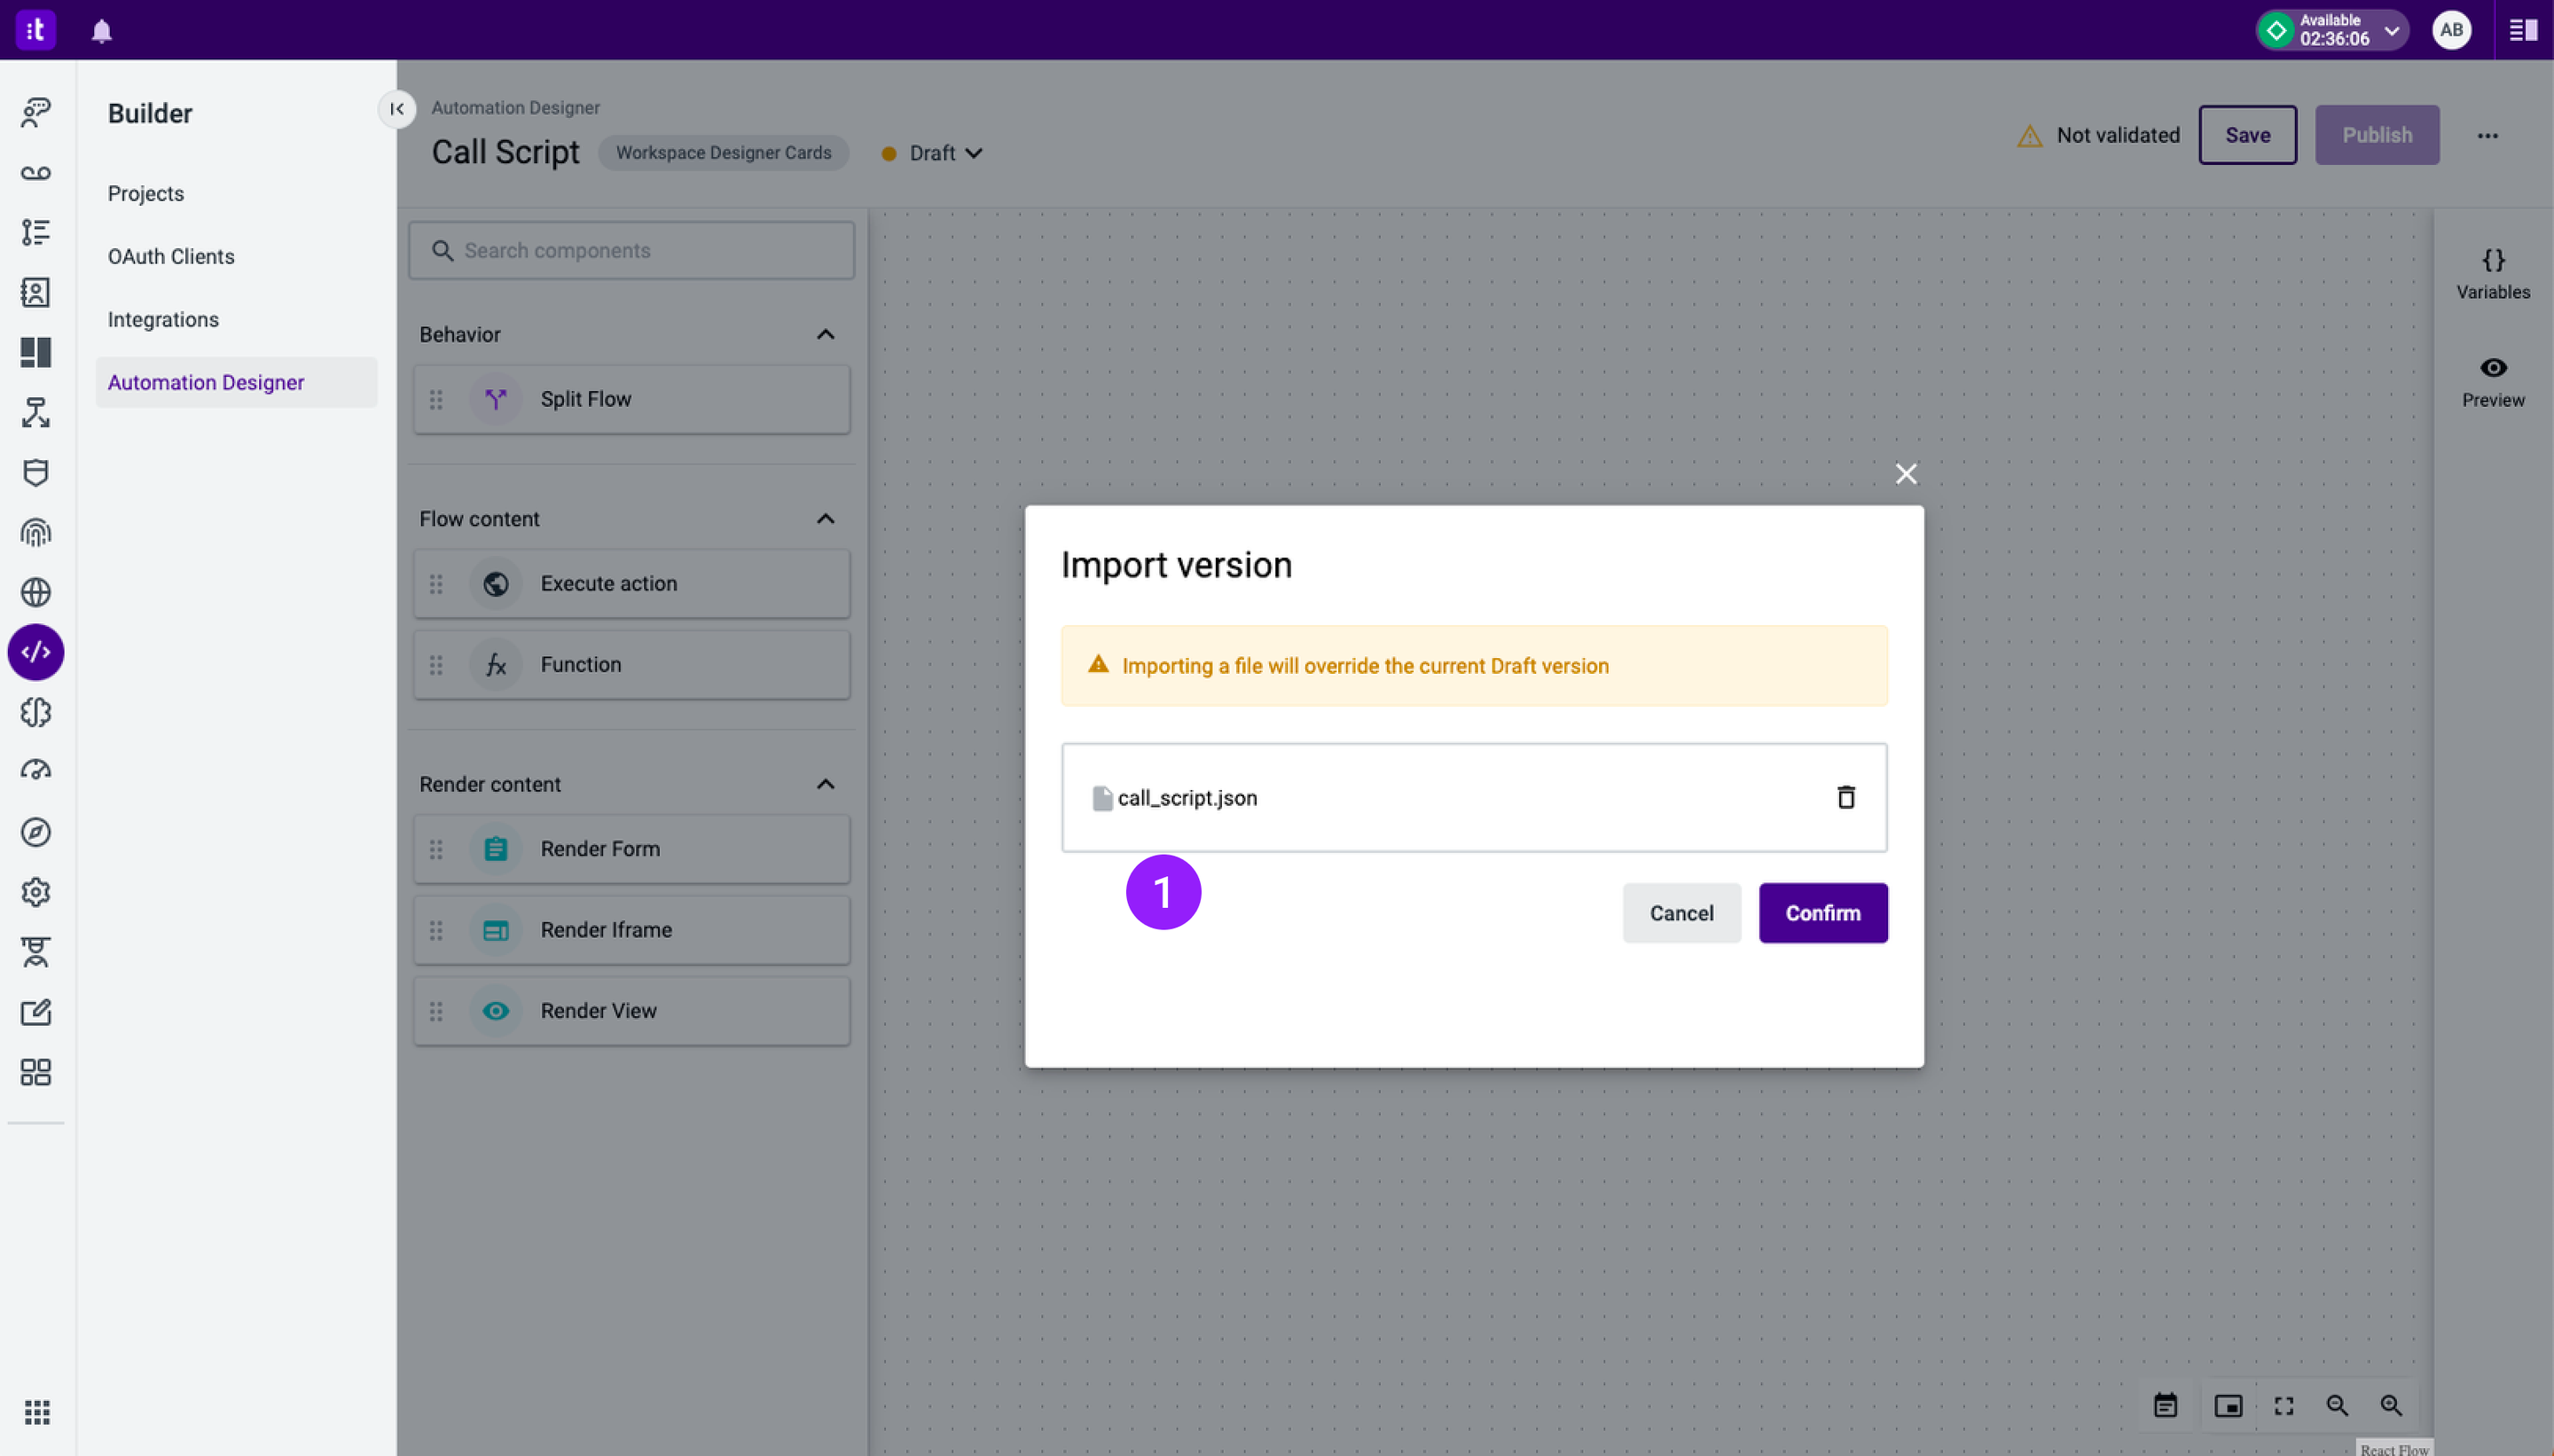
Figure 20 - Import version modal
4 - The automation's version (which consists of the card flow created in this tutorial) is then successfully imported, as shown in Figure 21.

Figure 21 - Automation with imported version
Additional Resources
- Variables
- Render View
- Cards, Panels, and Canvas
TroubleshootingIf you have questions or technical issues, please open a ticket using this form.
Updated 6 months ago