Trigger a Salesforce Flow
Overview
Talkdesk provides an out-of-the-box Salesforce Connection that covers a multitude of use cases.
Salesforce, however, provides many other capabilities that are not targeted by this integration. For these cases, you may want to build a custom integration with Salesforce using Talkdesk Connections™ that allows you, for example, to trigger Salesforce lightning flows.
Required Background Knowledge
- A Salesforce account/instance.
- An auto launched Salesforce Flow (for the use case presented in this tutorial; you can always use the learnings here regarding how to set up a Salesforce Connection to access any other Salesforce API).
- Because OAuth2 Authentication Code Flow doesn’t currently work in Talkdesk Workspace, make sure the Talkdesk user that is setting up the Connection does not open Workspace by default. If you are currently on Talkdesk Workspace, go to Admin > Agents, click the relevant user, find the login part on Talkdesk Workspace section, then enable the option Activate Talkdesk Workspace as the default login experience, and click Save (Figure 1 - right corner, bottom).

Figure 1 - Login on Talkdesk Workspace
Implementation Steps
1 - Create the Salesforce connected app
2 - Create a Salesforce Connection
3 - Create an Action to trigger a Salesforce flow
4 - Create an automation to trigger a Salesforce flow
1 - Create a New Salesforce Connected App
The Salesforce Connected app allows you to obtain credentials to build an integration from another system with Salesforce. You’ll be able to use these credentials to create the Connection in the step 2 of this page. Let's start!
1 - Login to your Salesforce account.
2 - Create a New Connected App (via Build > Create > Apps - Figure 2 - left corner, bottom).
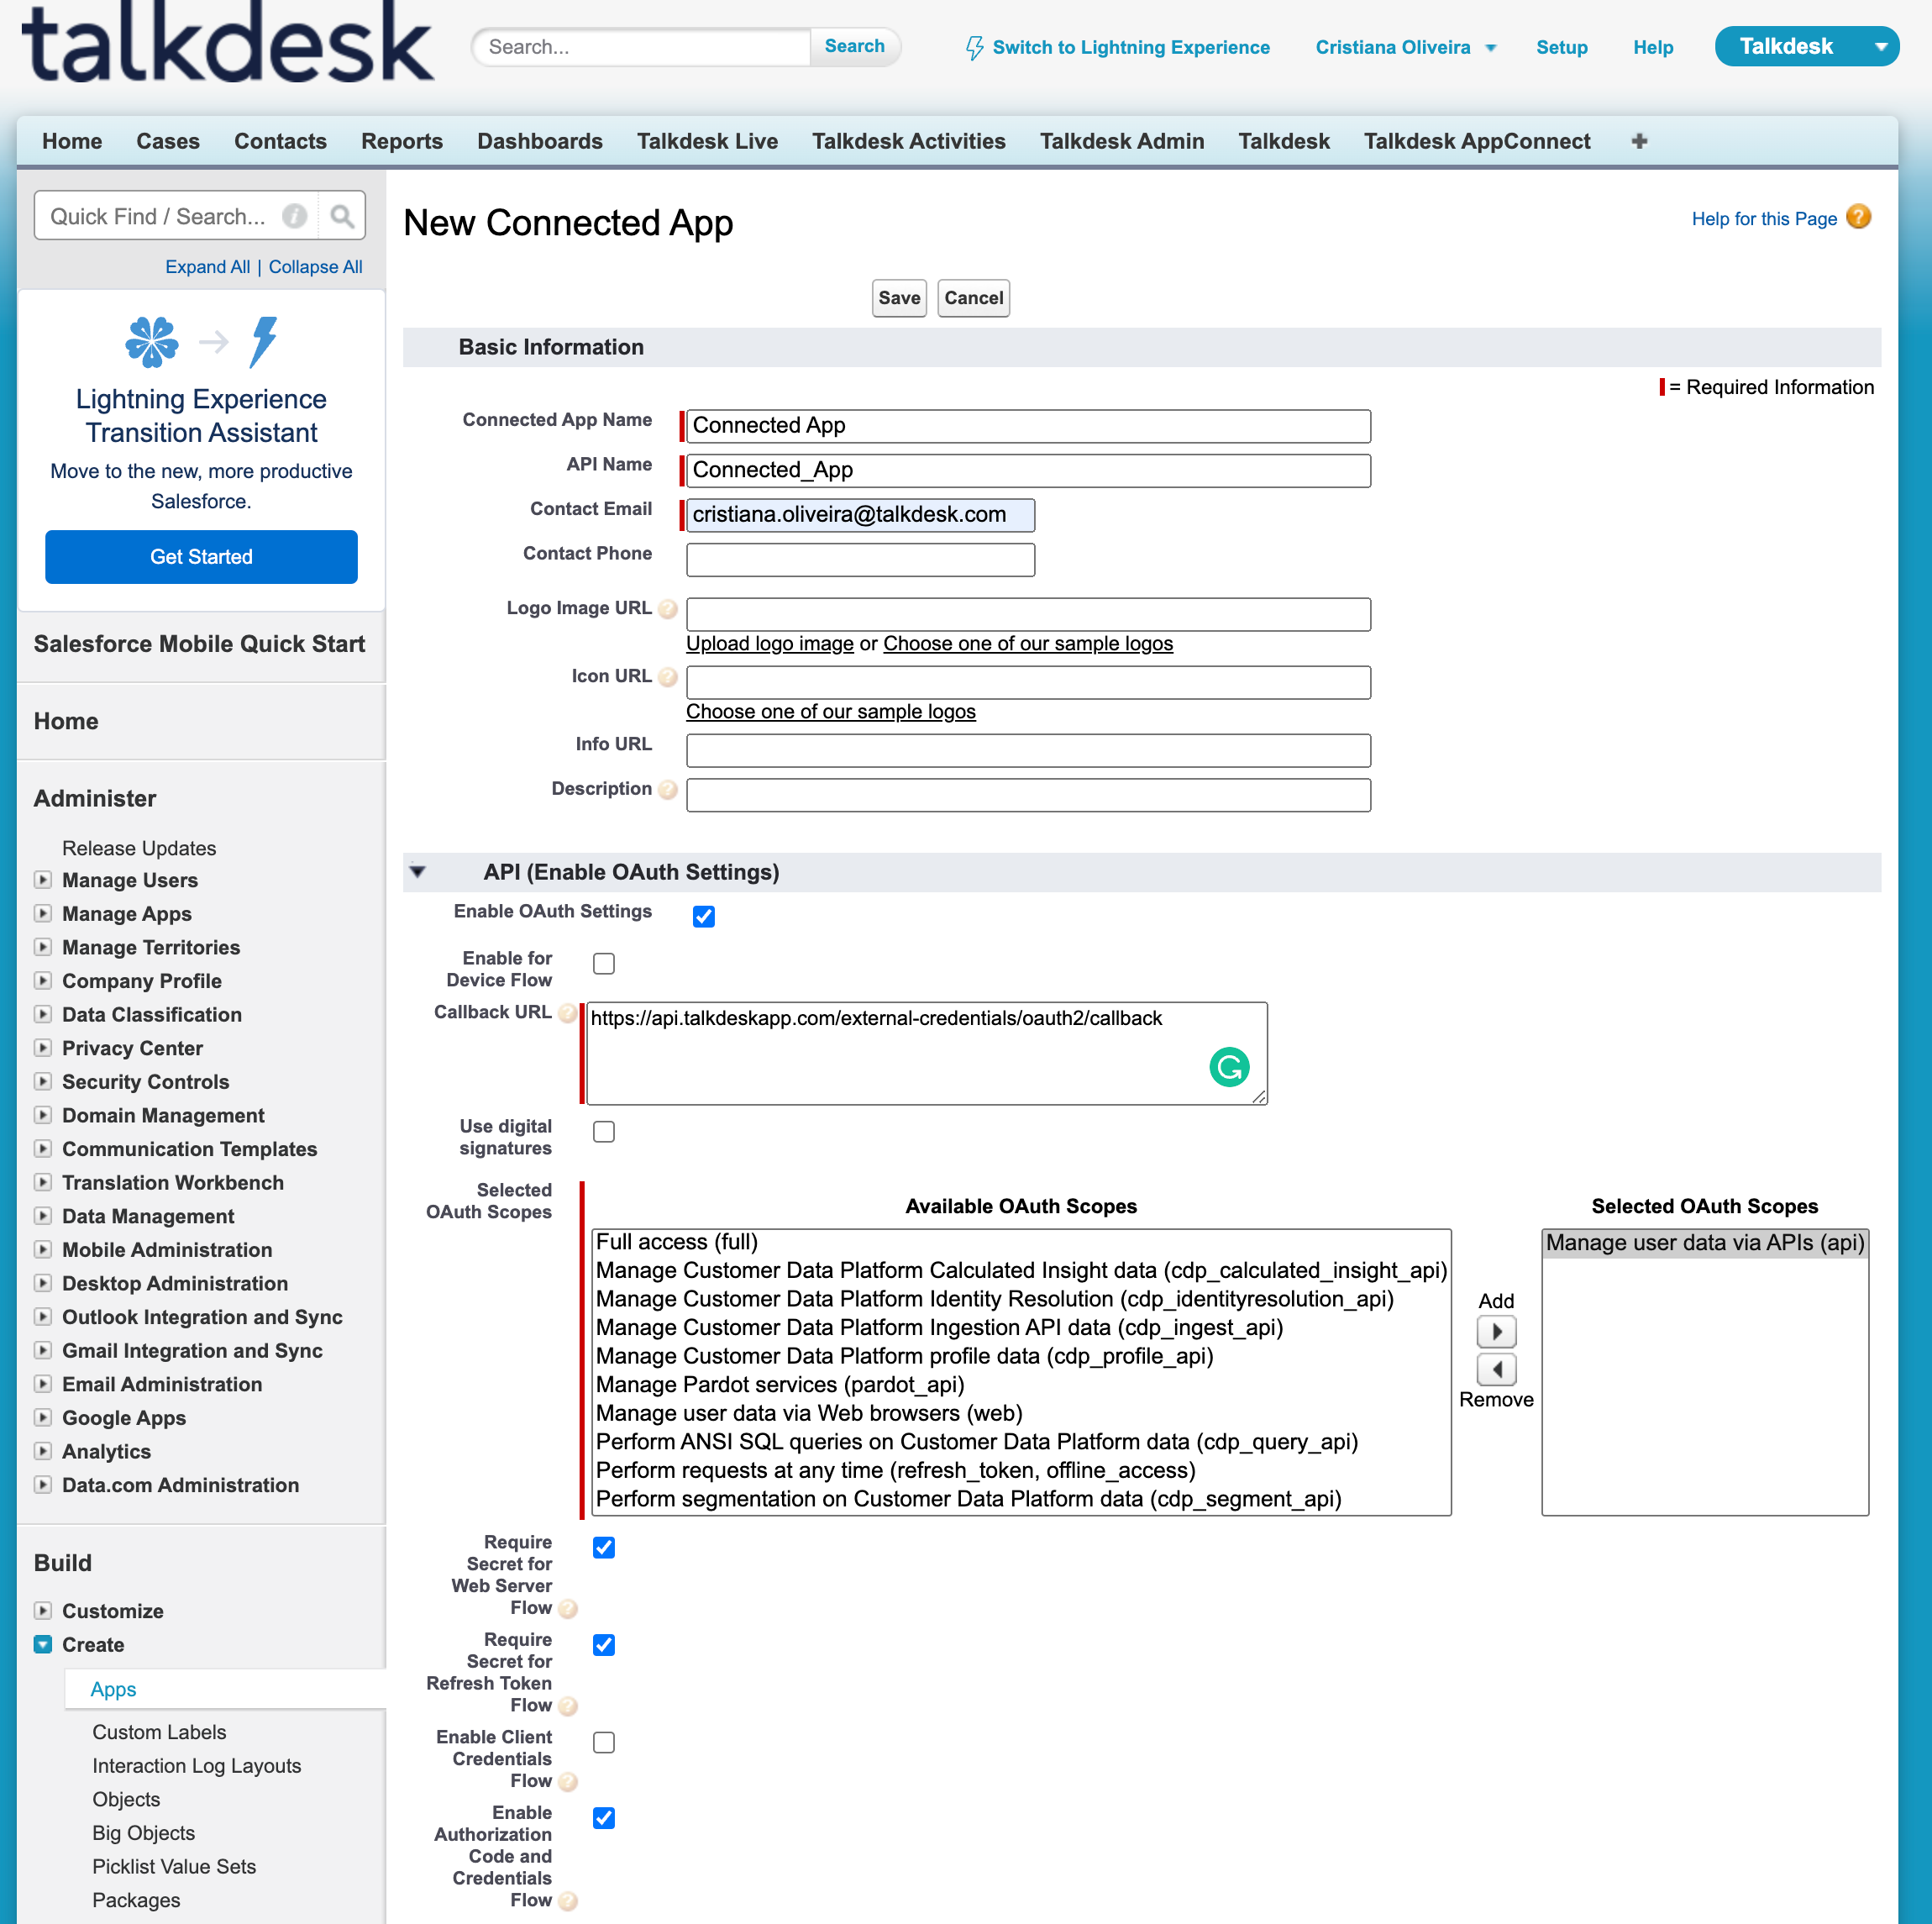
Figure 2 - Creating a new Salesforce Connected app
3 - Add a Connected App Name, API Name and Contact Email (Figure 2 - top).
4 - Under API (Enable OAuth Settings), check the box for Enable OAuth Settings (Figure 2 - center).
5 - On the Callback URL, add the Talkdesk callback URL according to the region of the Talkdesk instance you are setting up your Connection at (Figure 2 - center). The Talkdesk URLs are:
- USA:
https://api.talkdeskapp.com/external-credentials/oauth2/callback - Europe:
https://api.talkdeskapp.eu/external-credentials/oauth2/callback - Canada:
https://api.talkdeskappca.com/external-credentials/oauth2/callback
6 - Save the app configuration (Figure 2 - Save button, top).
After saving the settings, you have to wait a bit for them to be effective.
2 - Create a Salesforce Connection
After creating the Salesforce Connected App, the second step is to go to your Talkdesk instance, and create a Connection, using the Salesforce Connected App credentials. First, make sure you are logged in to your Talkdesk account.
1 - Go to Admin > Integrations and click the Add integration button (Figure 3 - top right corner).
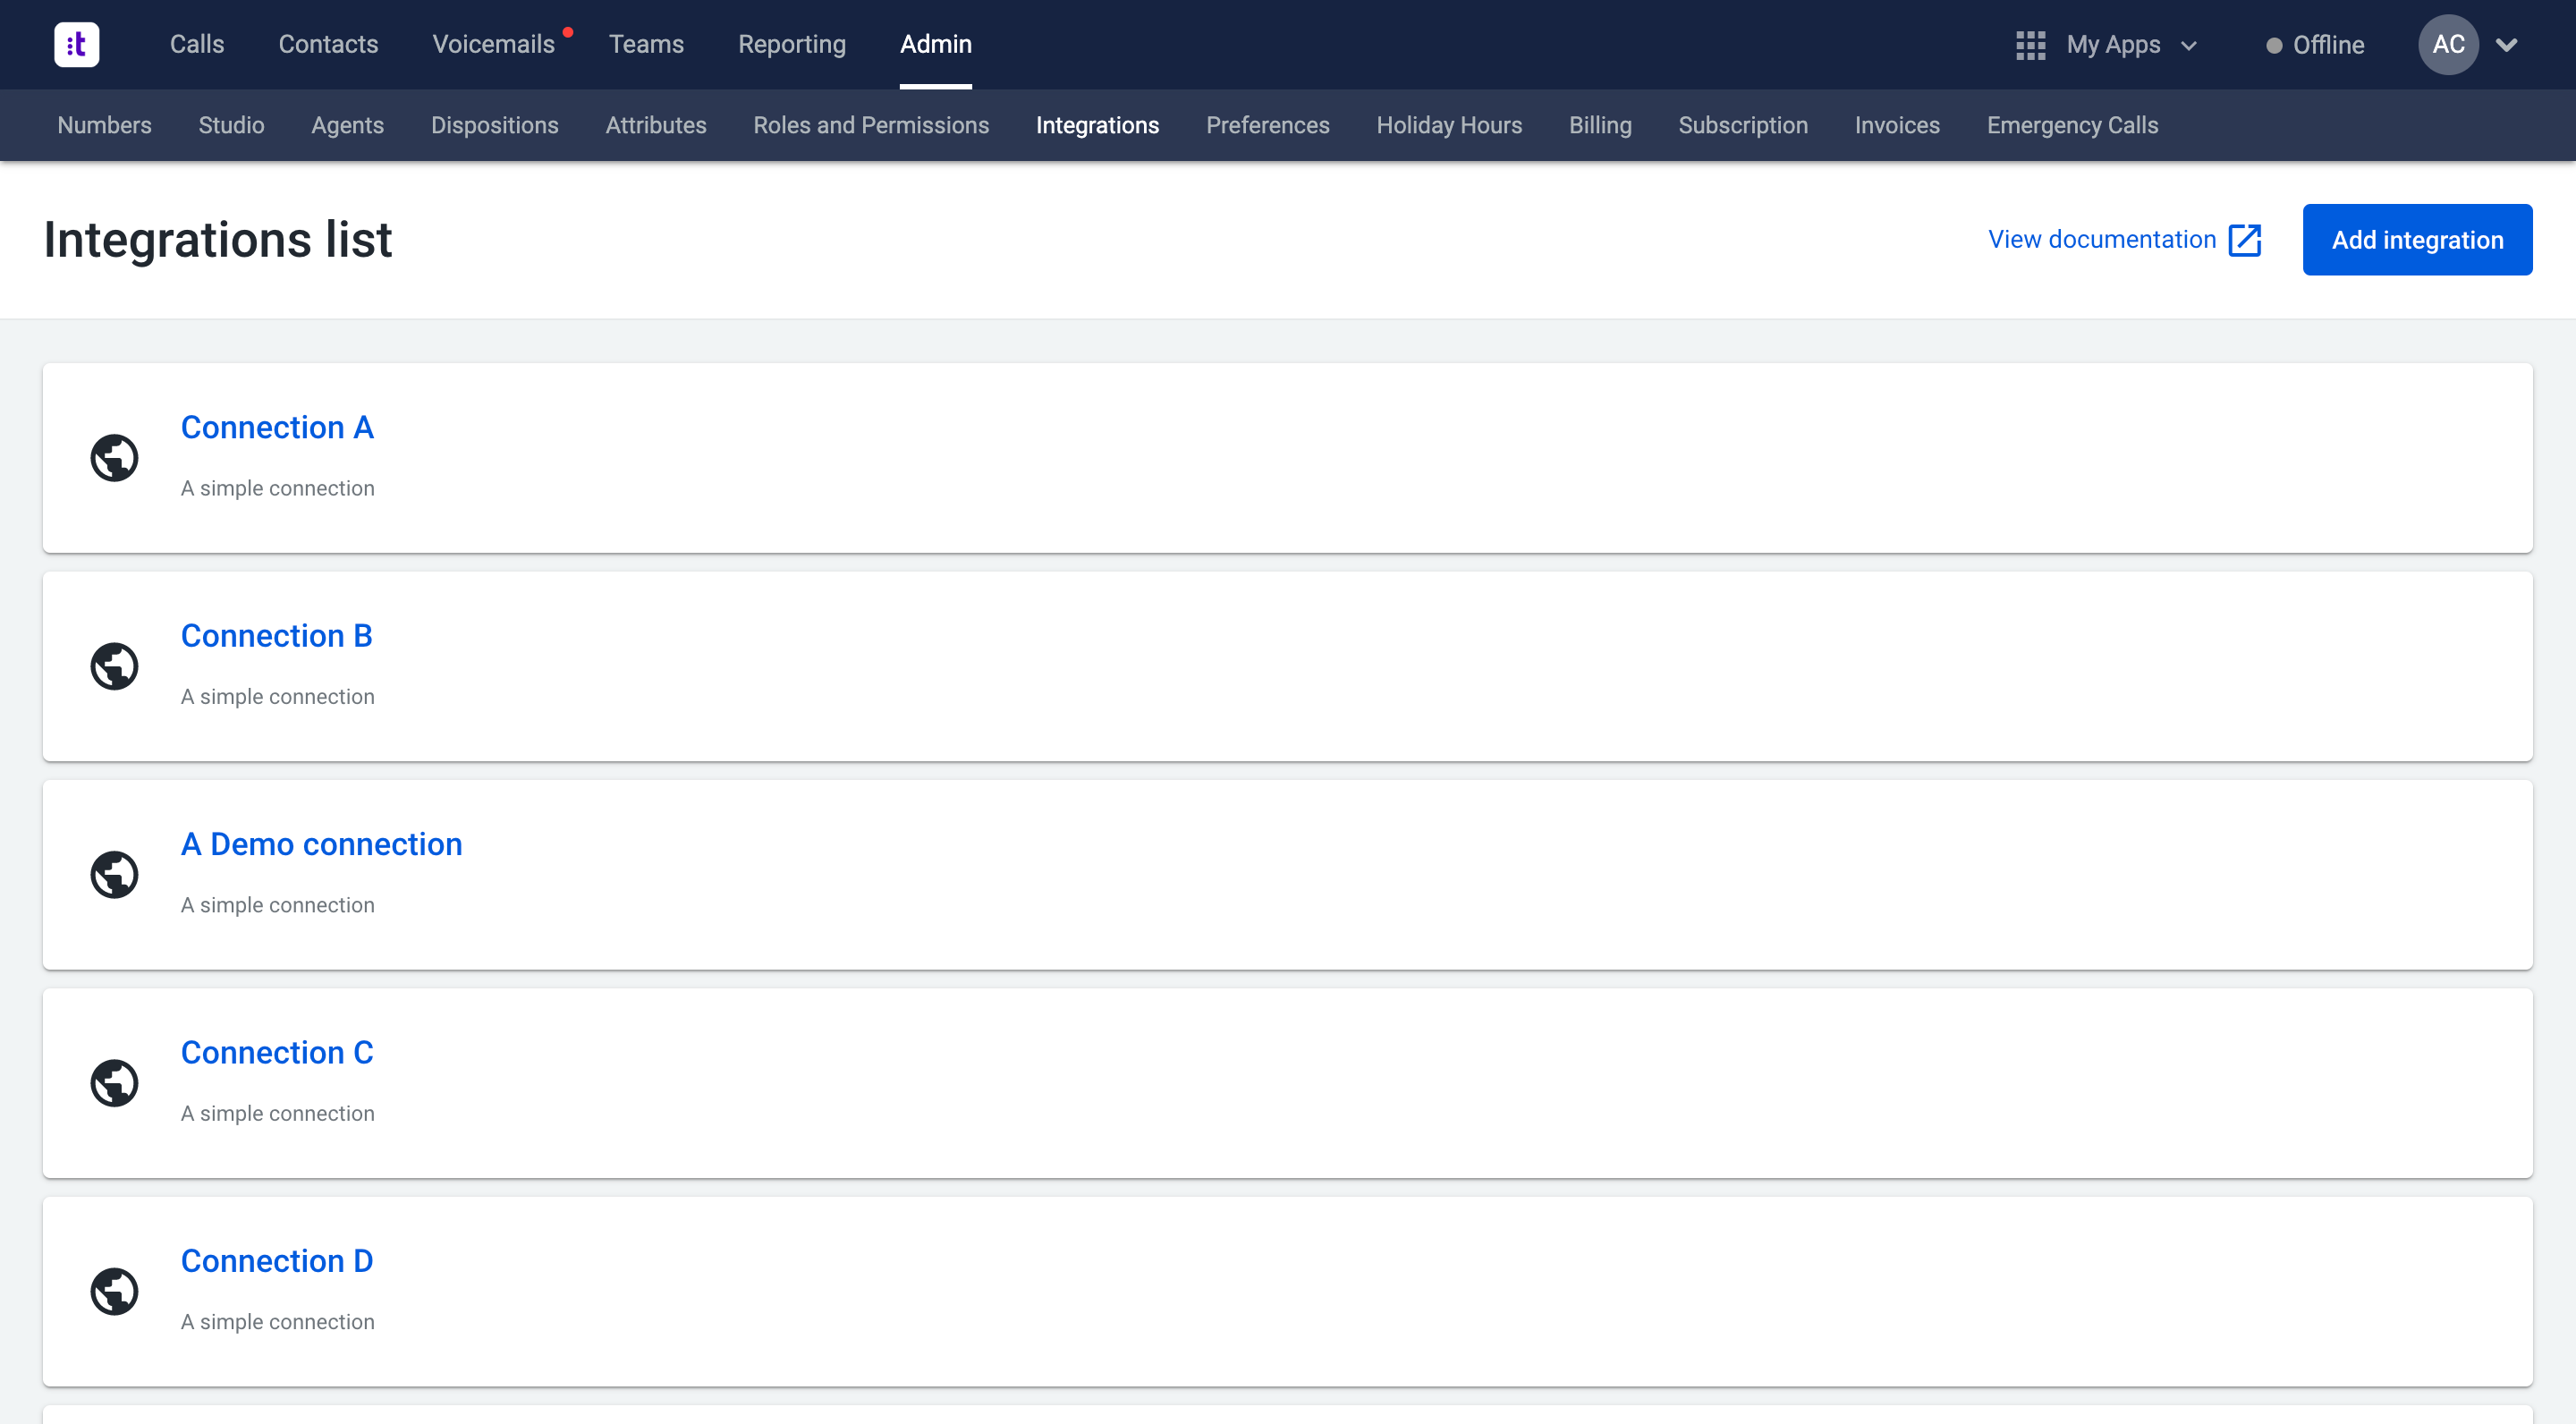
Figure 3 - Creating a connection
2 - Go to Custom Integration – Powered by CONNECTIONS, and click the Add Integration button (Figure 4 - center).
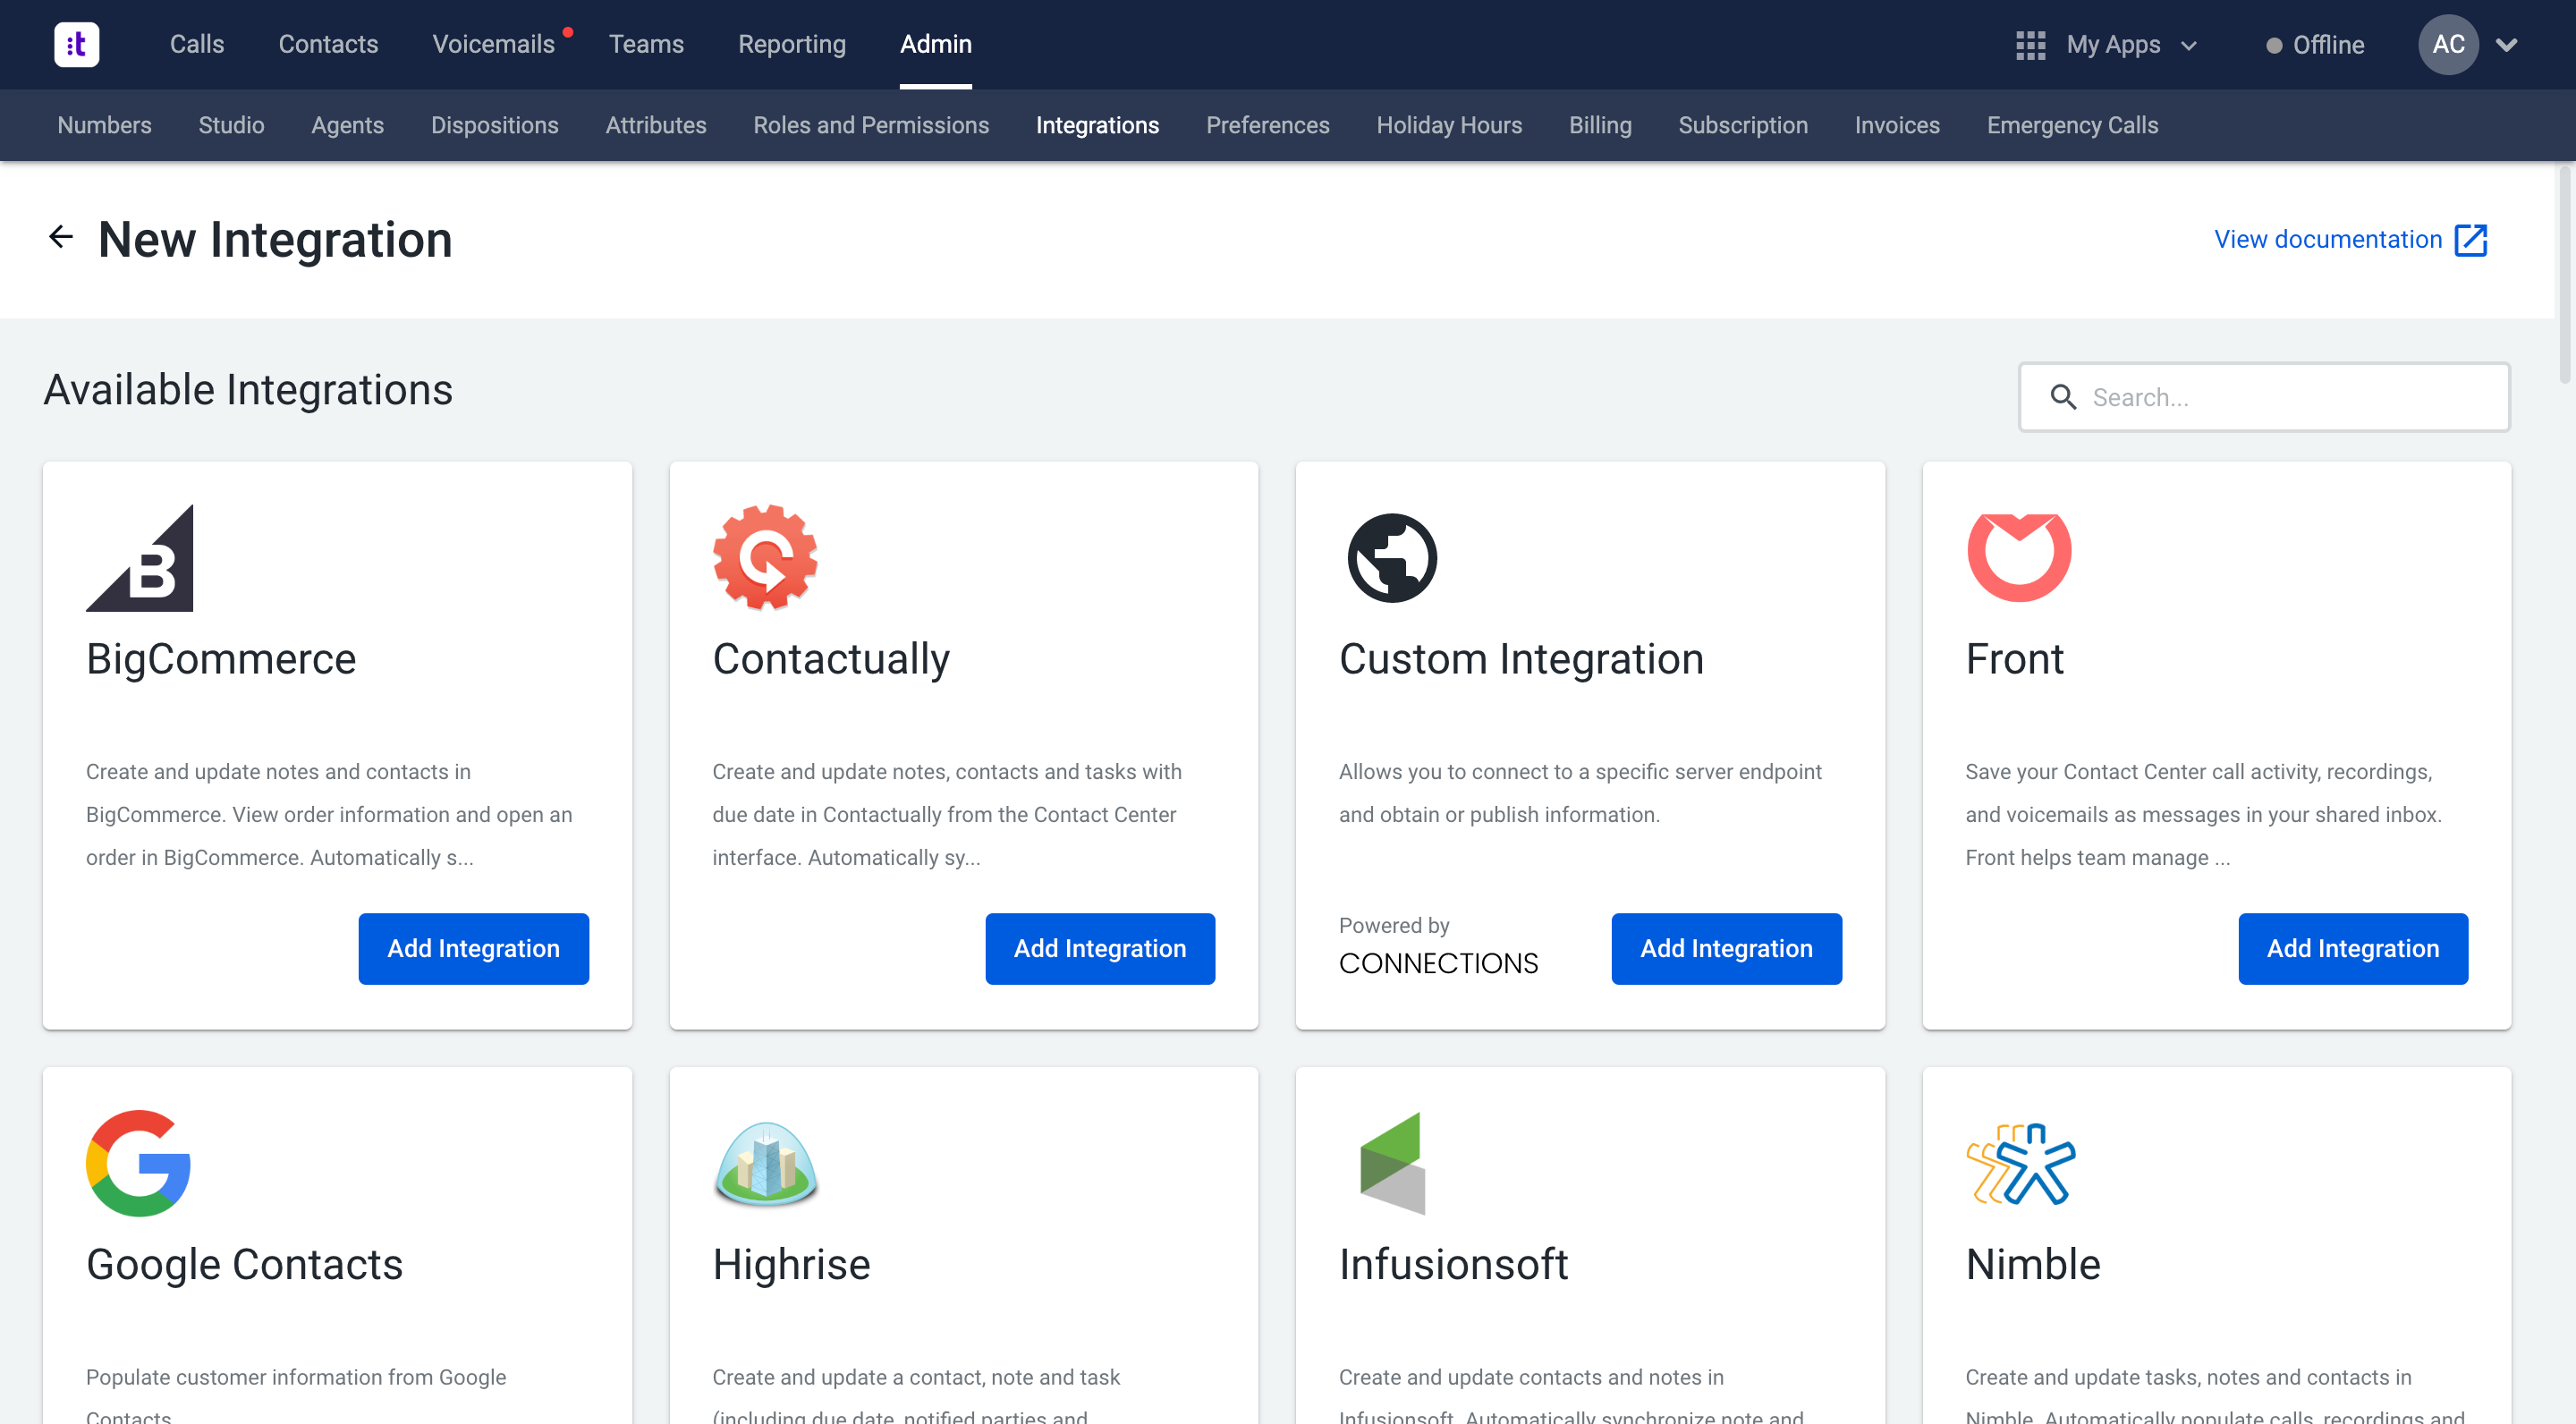
Figure 4 - Add Integration
3 - Provide a Name and Description for this new integration (Figure 5 - left side).
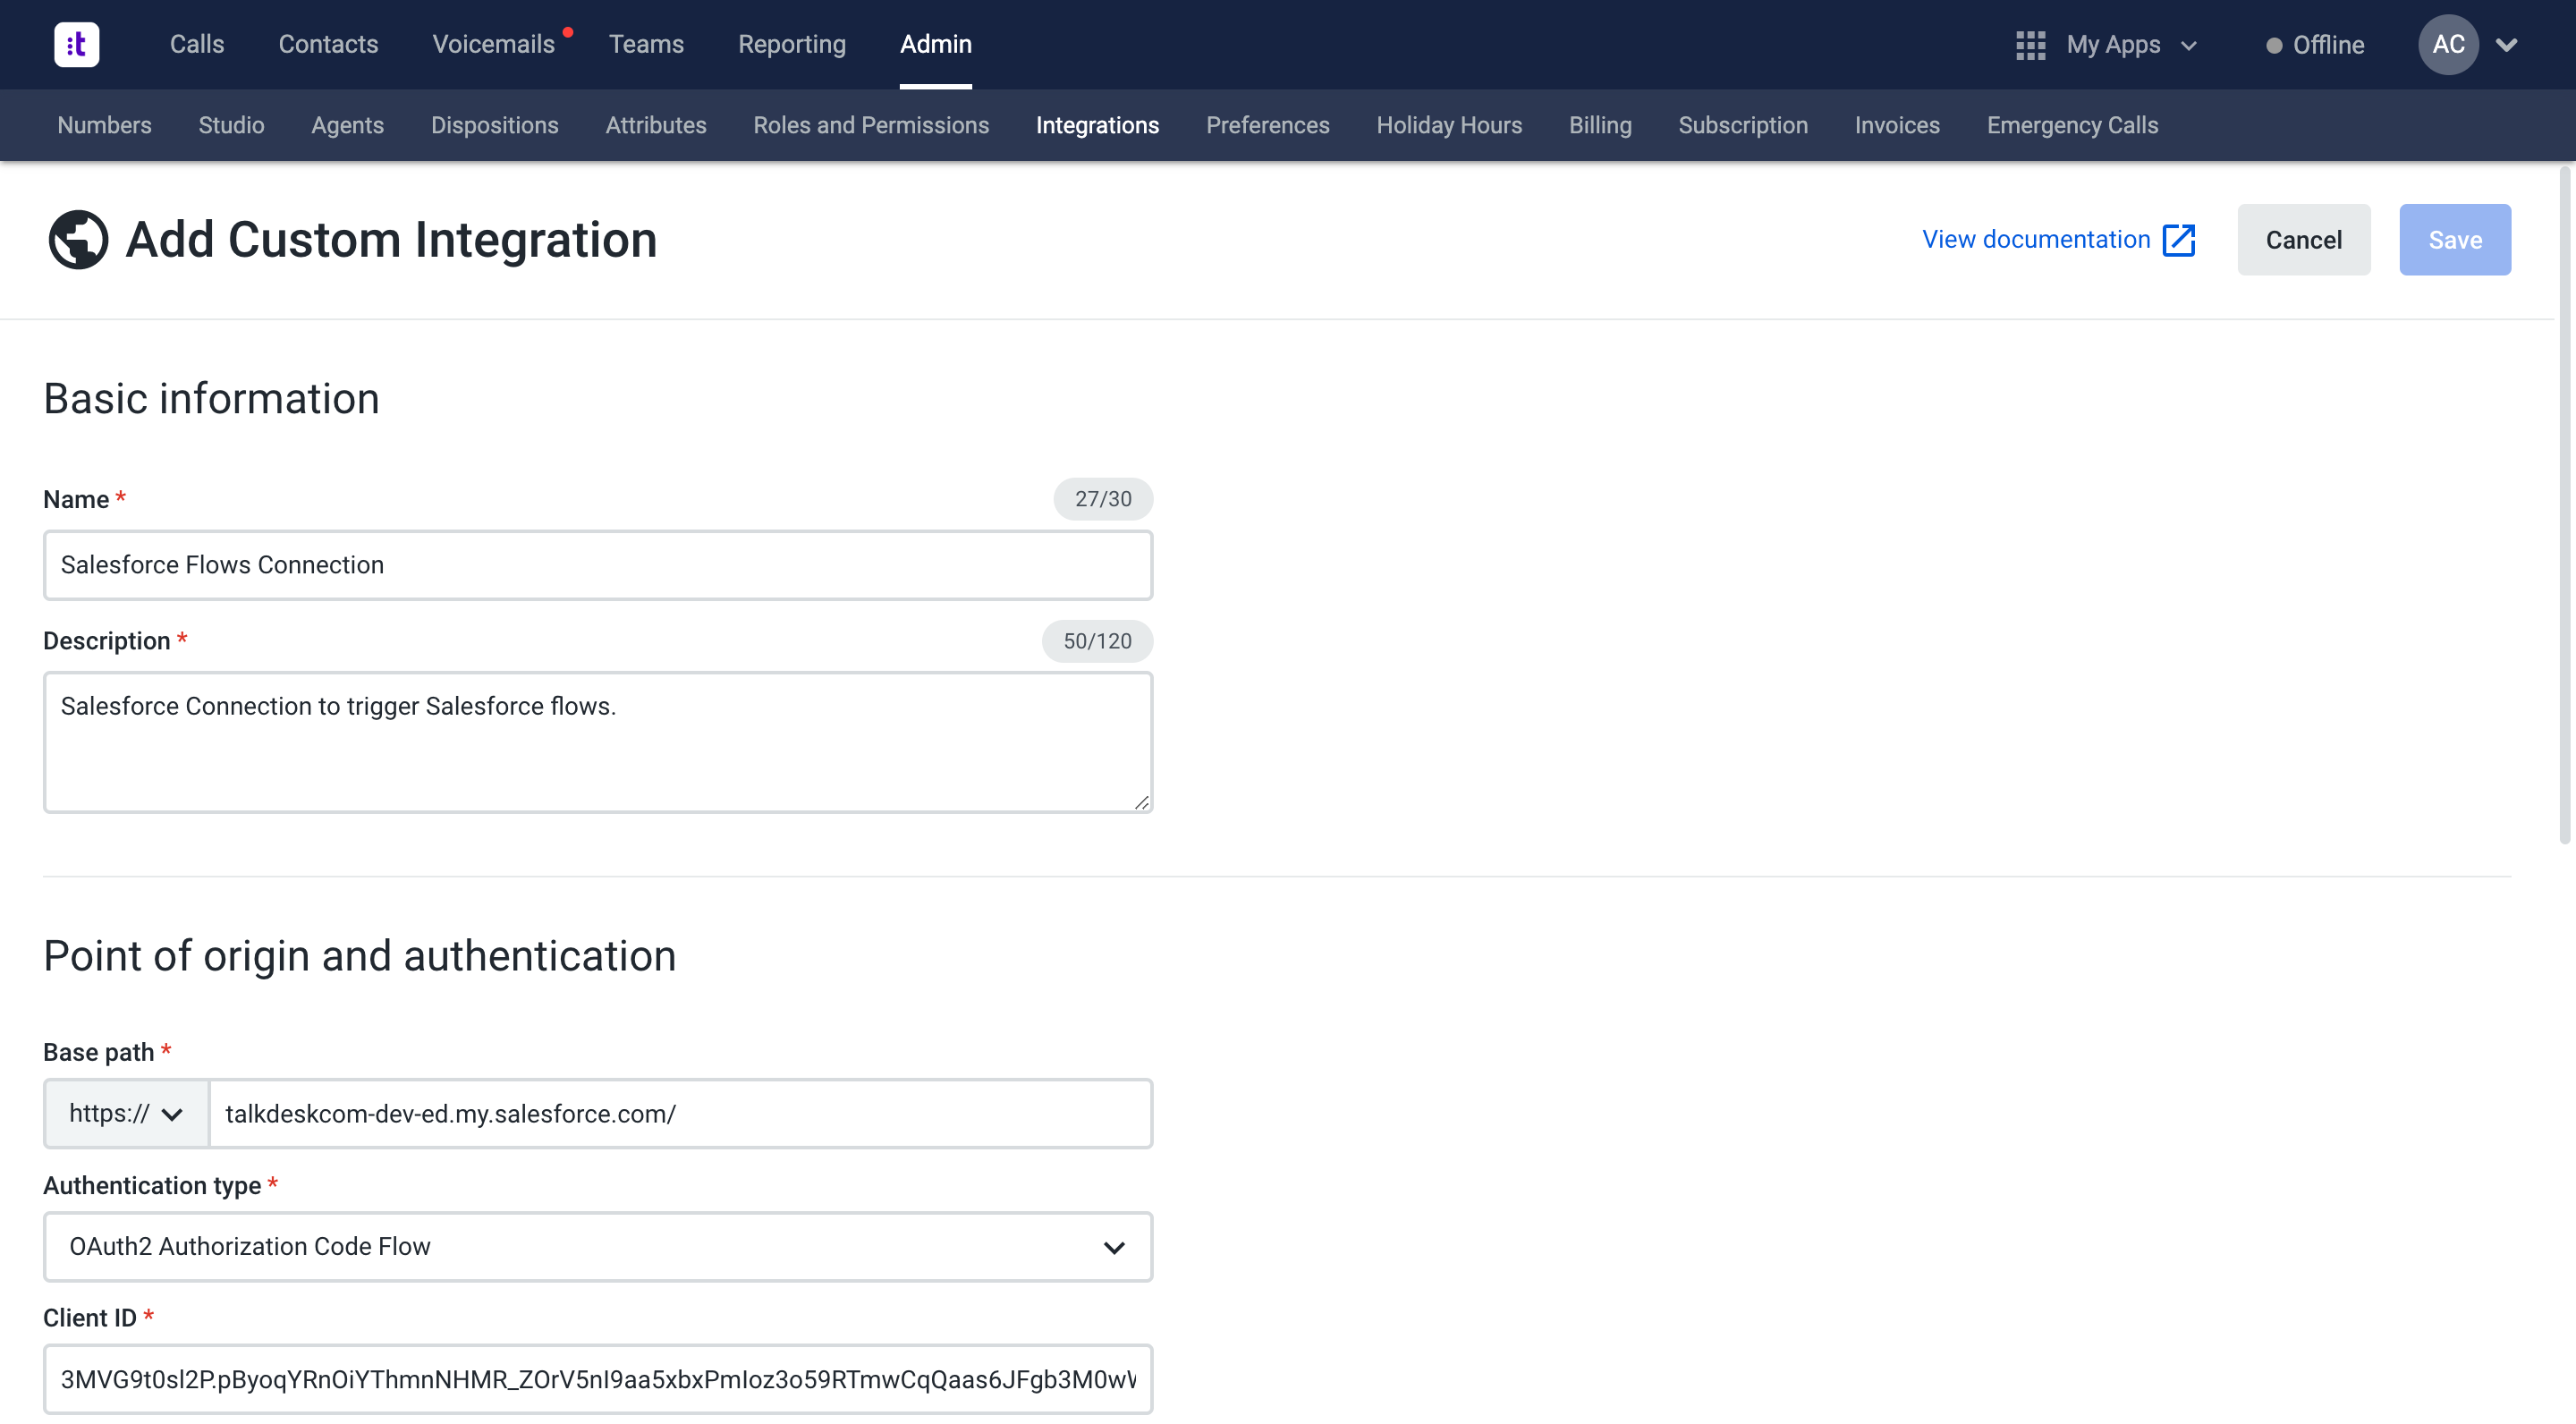
Figure 5 - Adding a name and description
4 - Fill the Base path field with the URL of your Salesforce instance (e.g.: https://login.my.salesforce.com) (Figure 5 - left corner, bottom).
5 - Click the Authentication type dropdown, and then select the OAuth2 Authorization Code Flow option (Figure 5 - bottom).
6 - Go back to your Connected Salesforce app settings within Salesforce and click Manage Consumer details (Figure 6 - center).
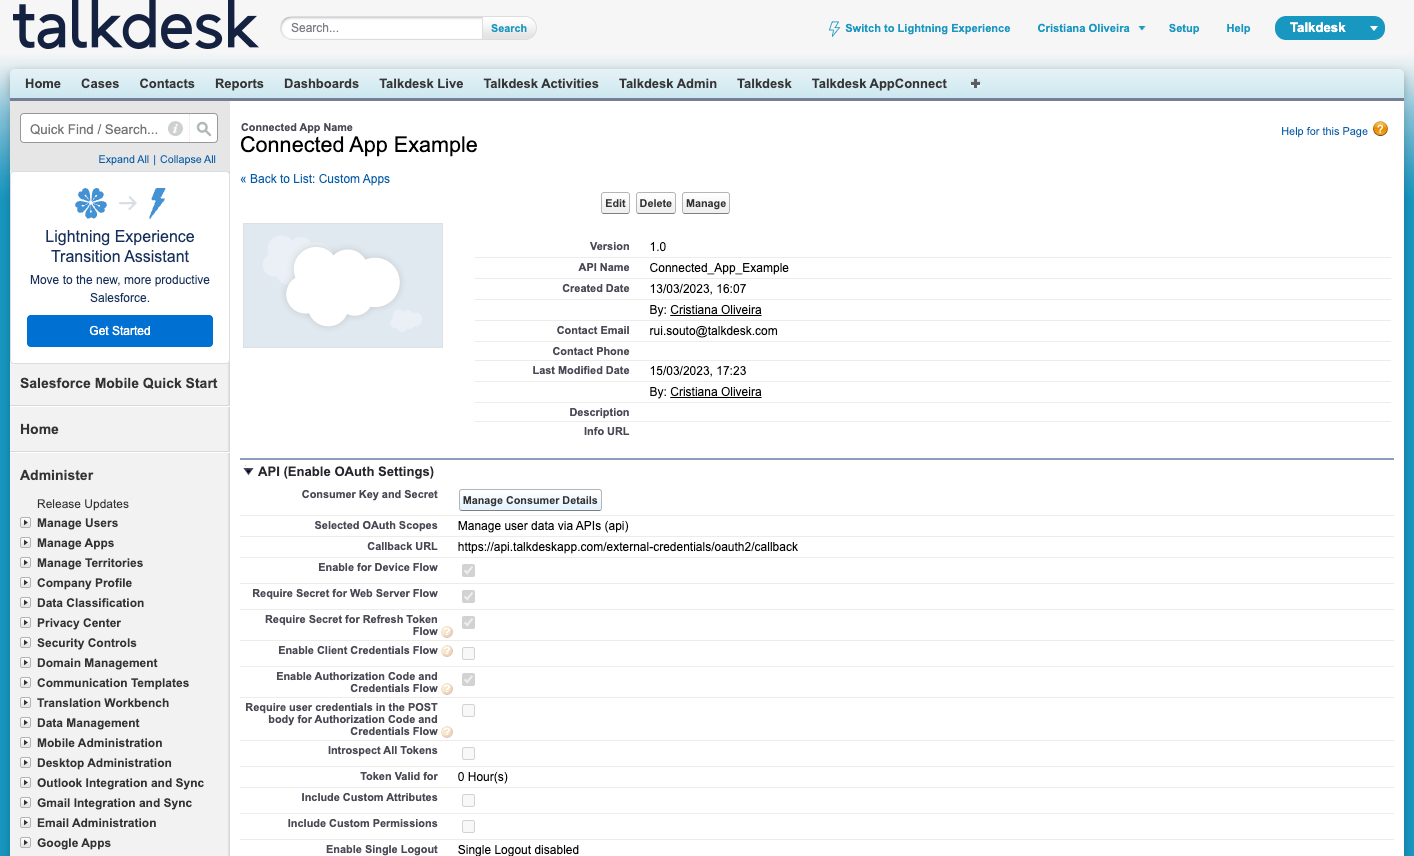
Figure 6 - Manage Consumer details
7 - Salesforce will ask you to verify your identity. Insert the Verification Code and click Verify (Figure 7).
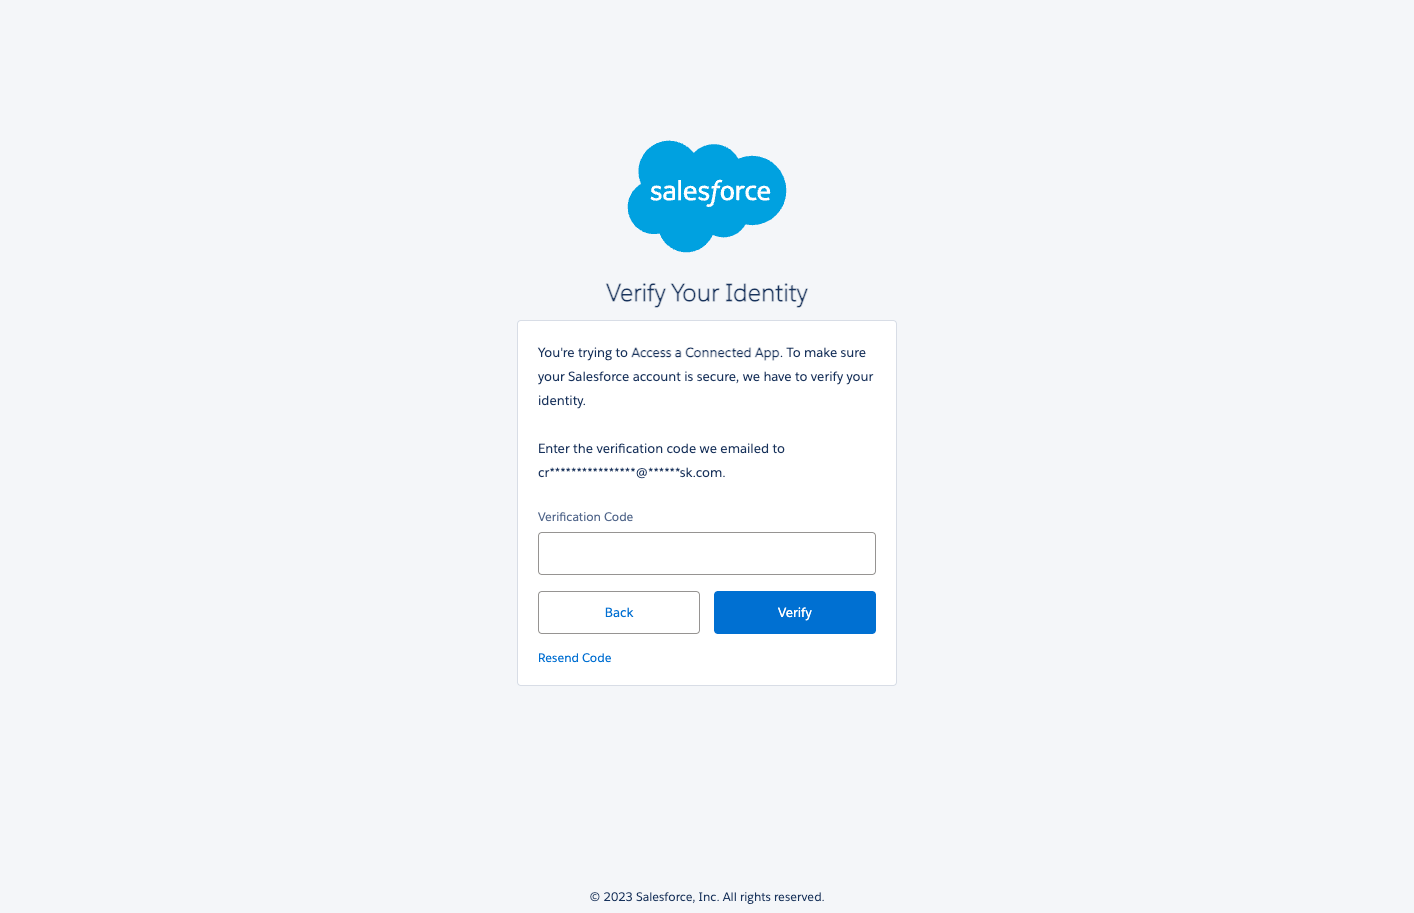
Figure 7 - Salesforce verify
8 - Once your code is verified, you will be redirected to a page containing your credentials. Copy the Consumer Key (Figure 8 - top).
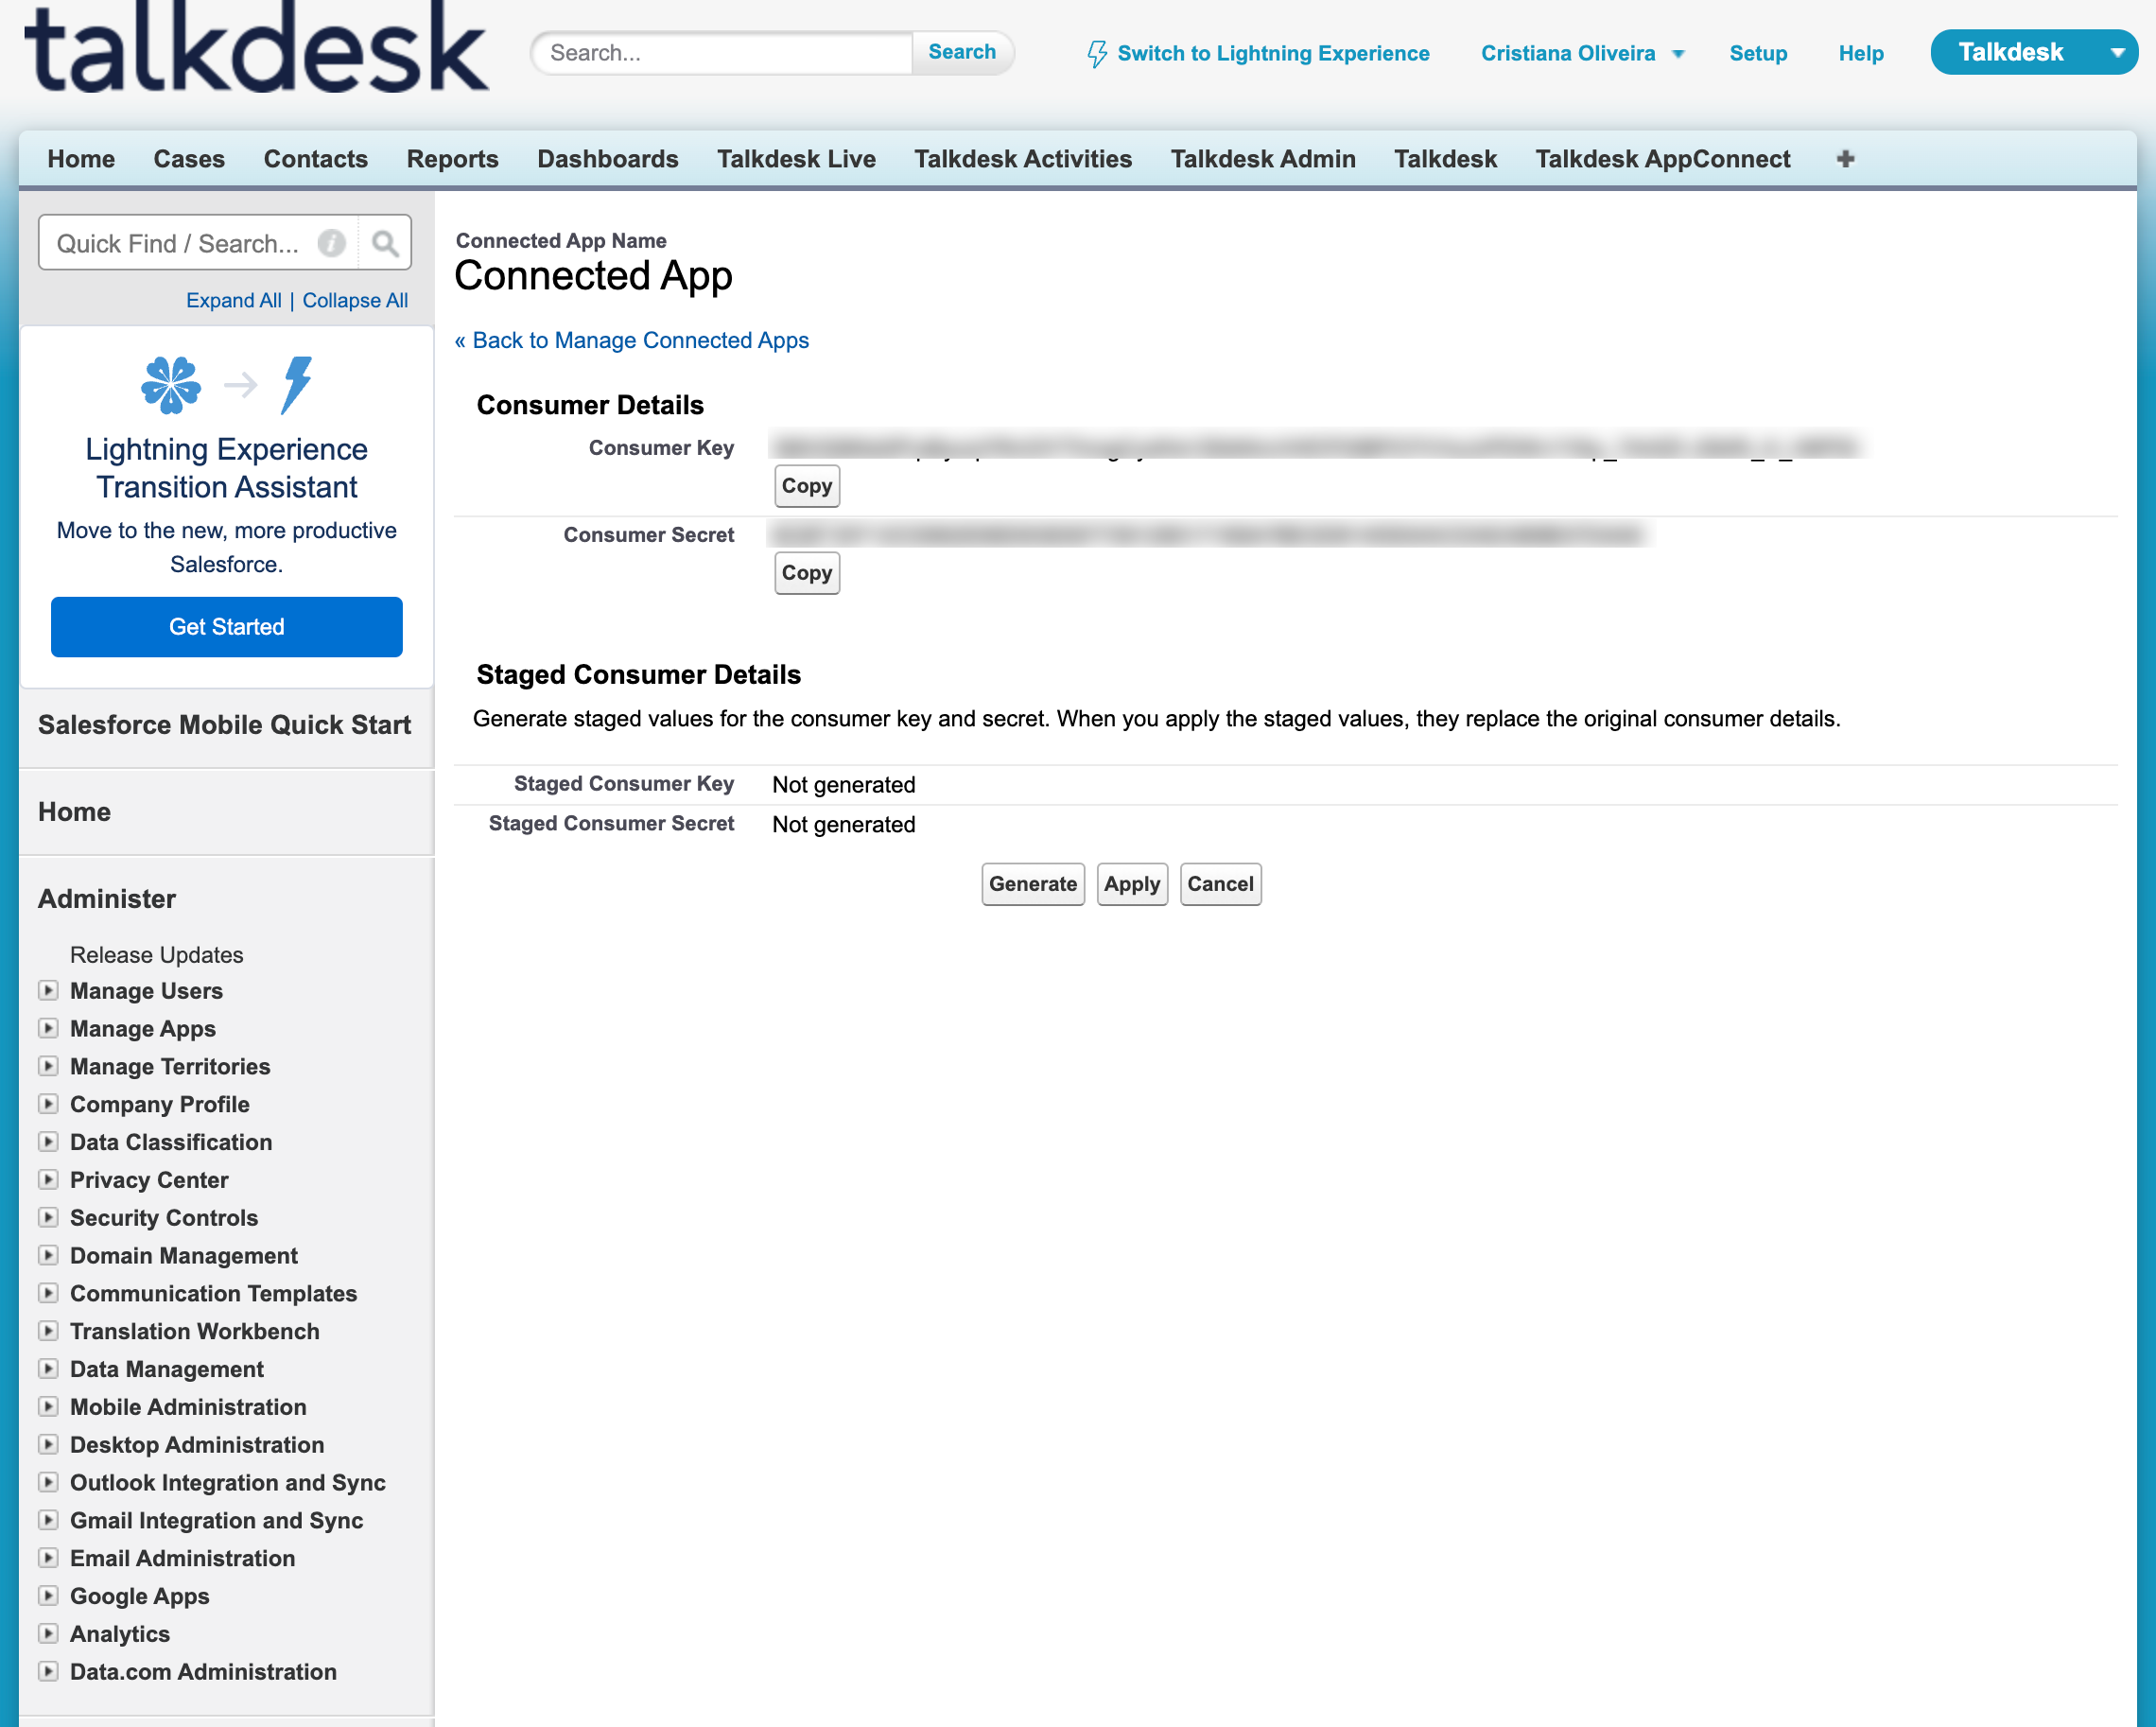
8 - Salesforce consumer details
9 - Go back to your Talkdesk instance, and use the Consumer Key for the Client ID field of the Connection (Figure 9 - top).
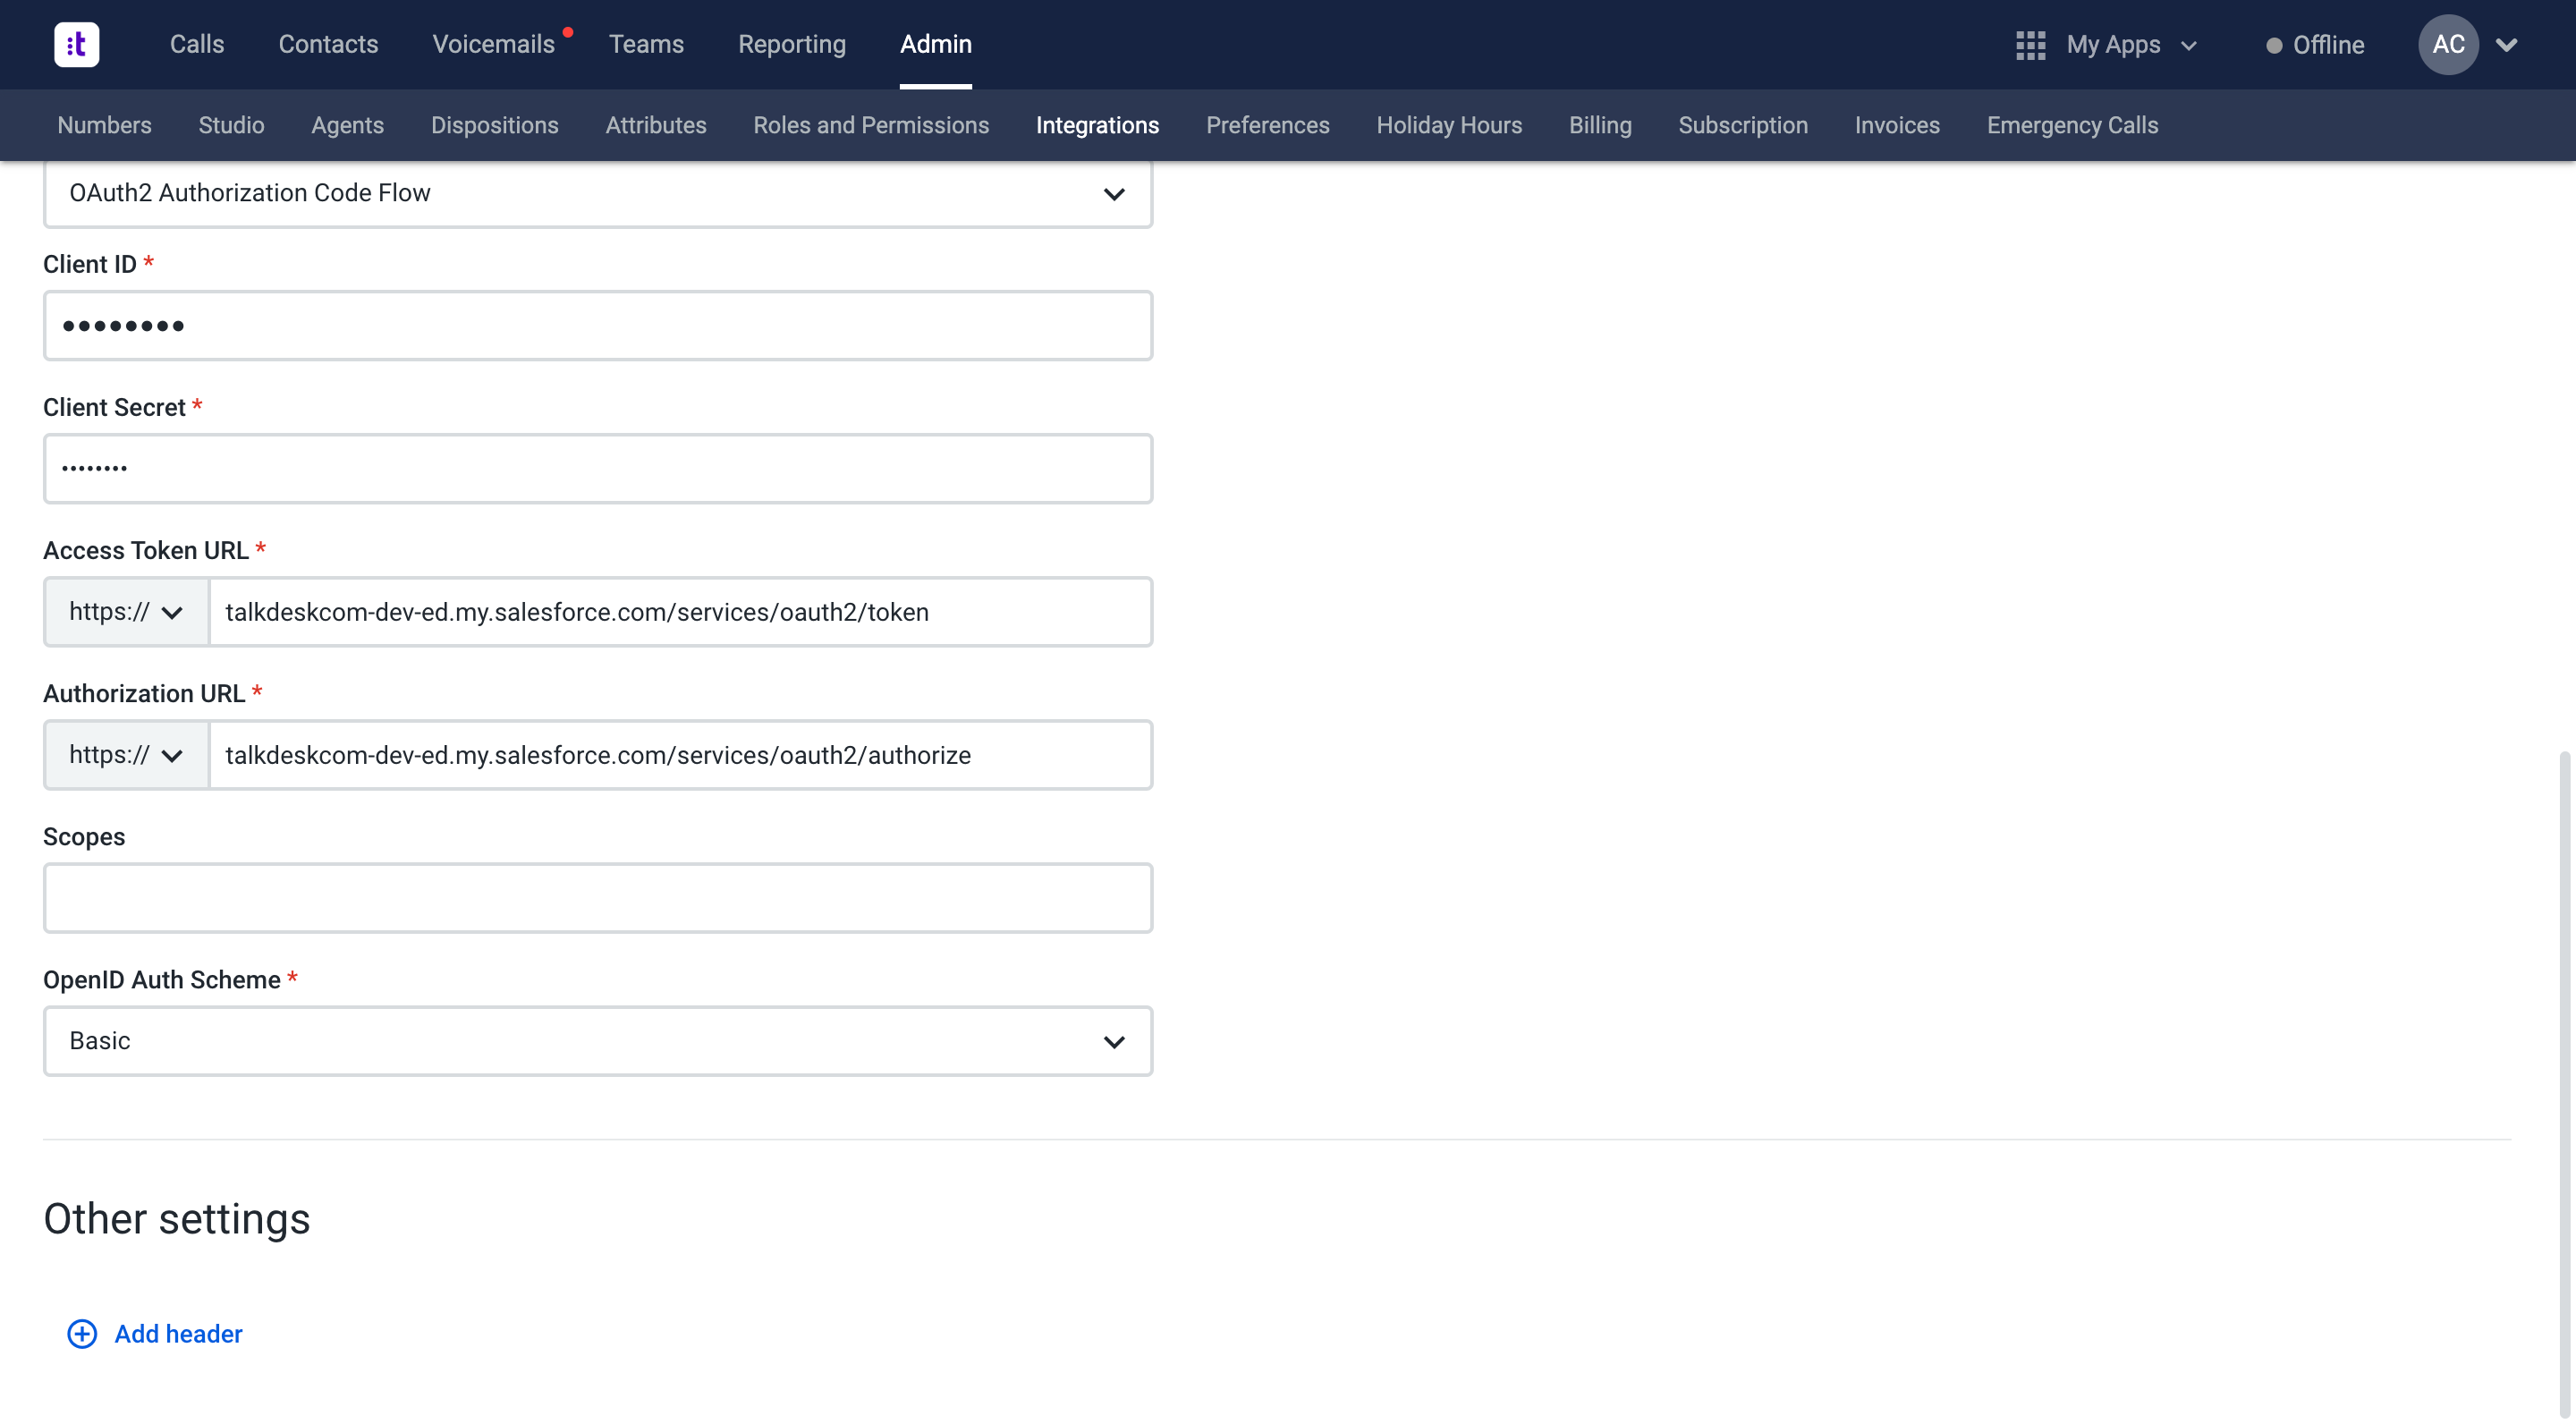
Figure 9 - Adding the Client Secret value
10 - Again, going back to Salesforce, copy the Consumer Secret (Figure 8 - top).
11 - Fill the Access Token URL and Authorization URL fields (Figure 9 - center) as specified by Salesforce:
- Access Token URL:
https://login.salesforce.com/services/oauth2/token - Authorization URL:
https://login.salesforce.com/services/oauth2/authorize
ScopesFor the example in this tutorial (triggering a Salesforce Flow), no scopes are necessary. However, don’t forget to add them if the Salesforce APIs you want to use are scoped.
3 - Create an Action to Trigger a Salesforce Flow
In this use case, we’ll be creating an Action to trigger a Salesforce Flow.
To do this, we’ll go back to our Connection, and we will open the Actions tab and add a new Action that connects to the Salesforce endpoint for triggering flows. Let's start.
1 - On your Talkdesk instance, go to Admin > Integrations (Figure 10).
2 - Open the Salesforce Connection you created in step 2 of this page.
3 - Open the Actions tab (Figure 10 - left side).
4 - Click the Add action button (Figure 10 - right side).
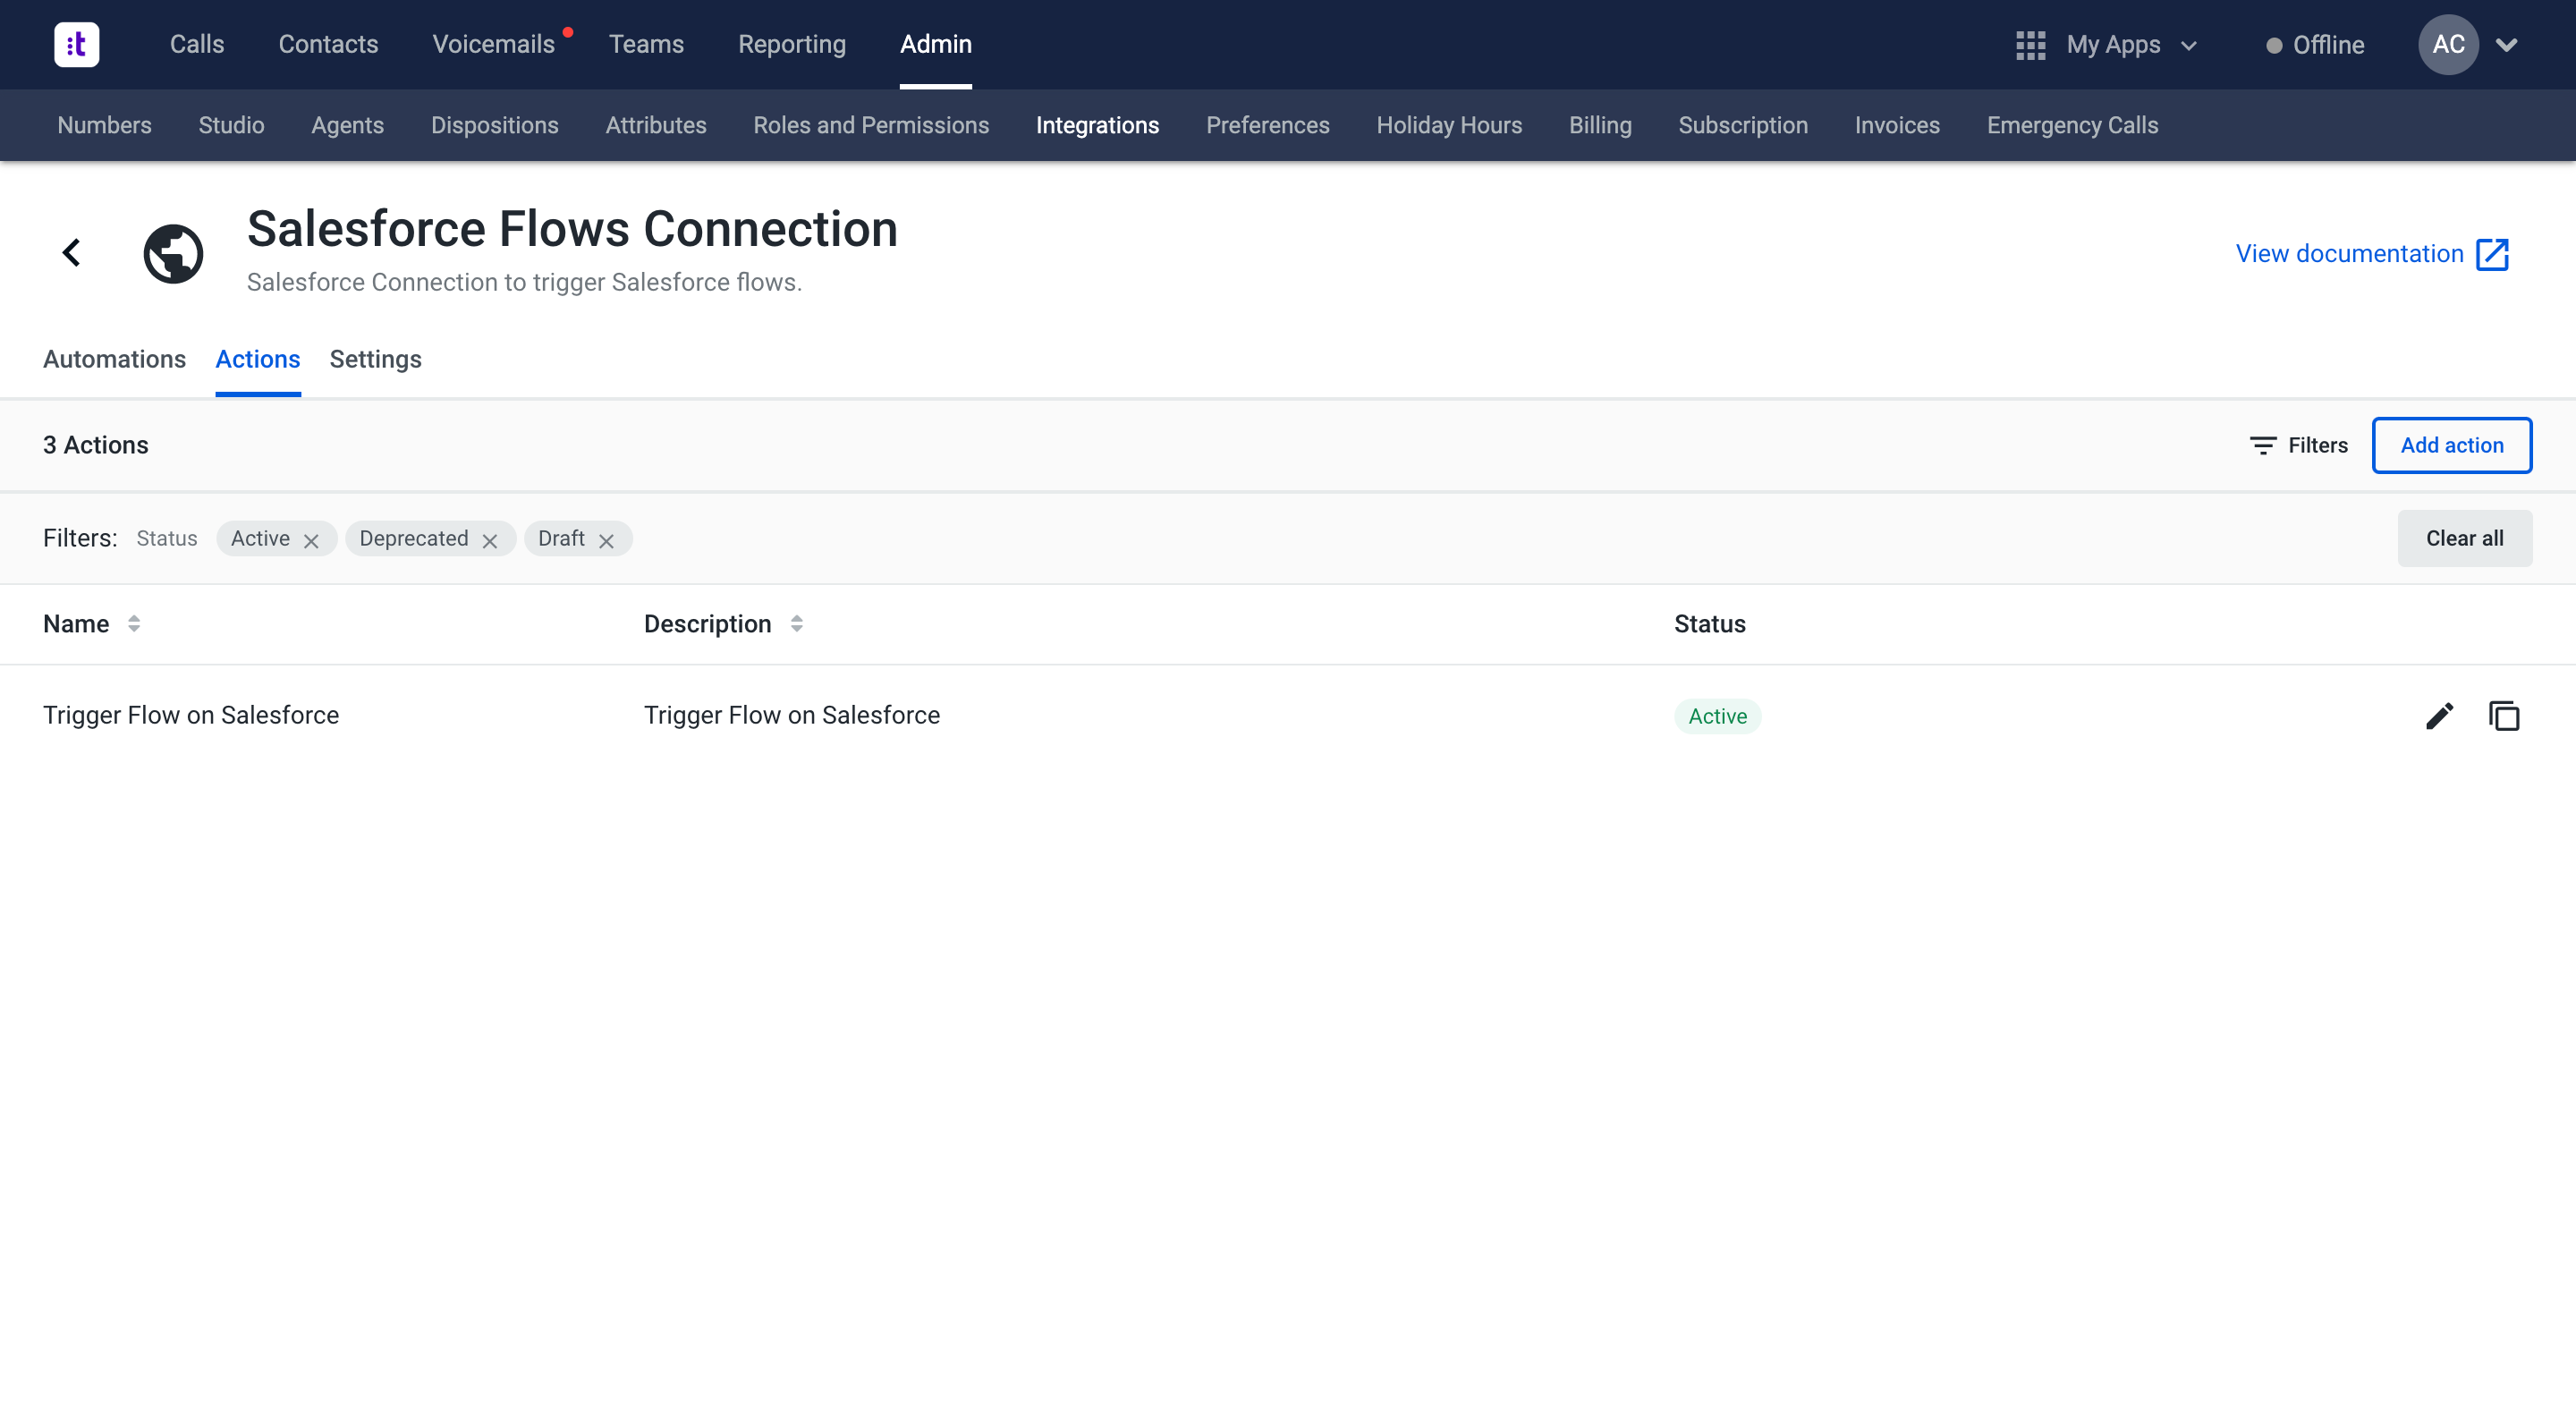
Figure 10 - Actions tab
6 - Click the pencil button (Figure 10 - right side) to edit the Name and Description of the Action.
7 - Provide a Display Name for the parameter flow_name and make sure that its Parameter type is String (Figure 11 - bottom)
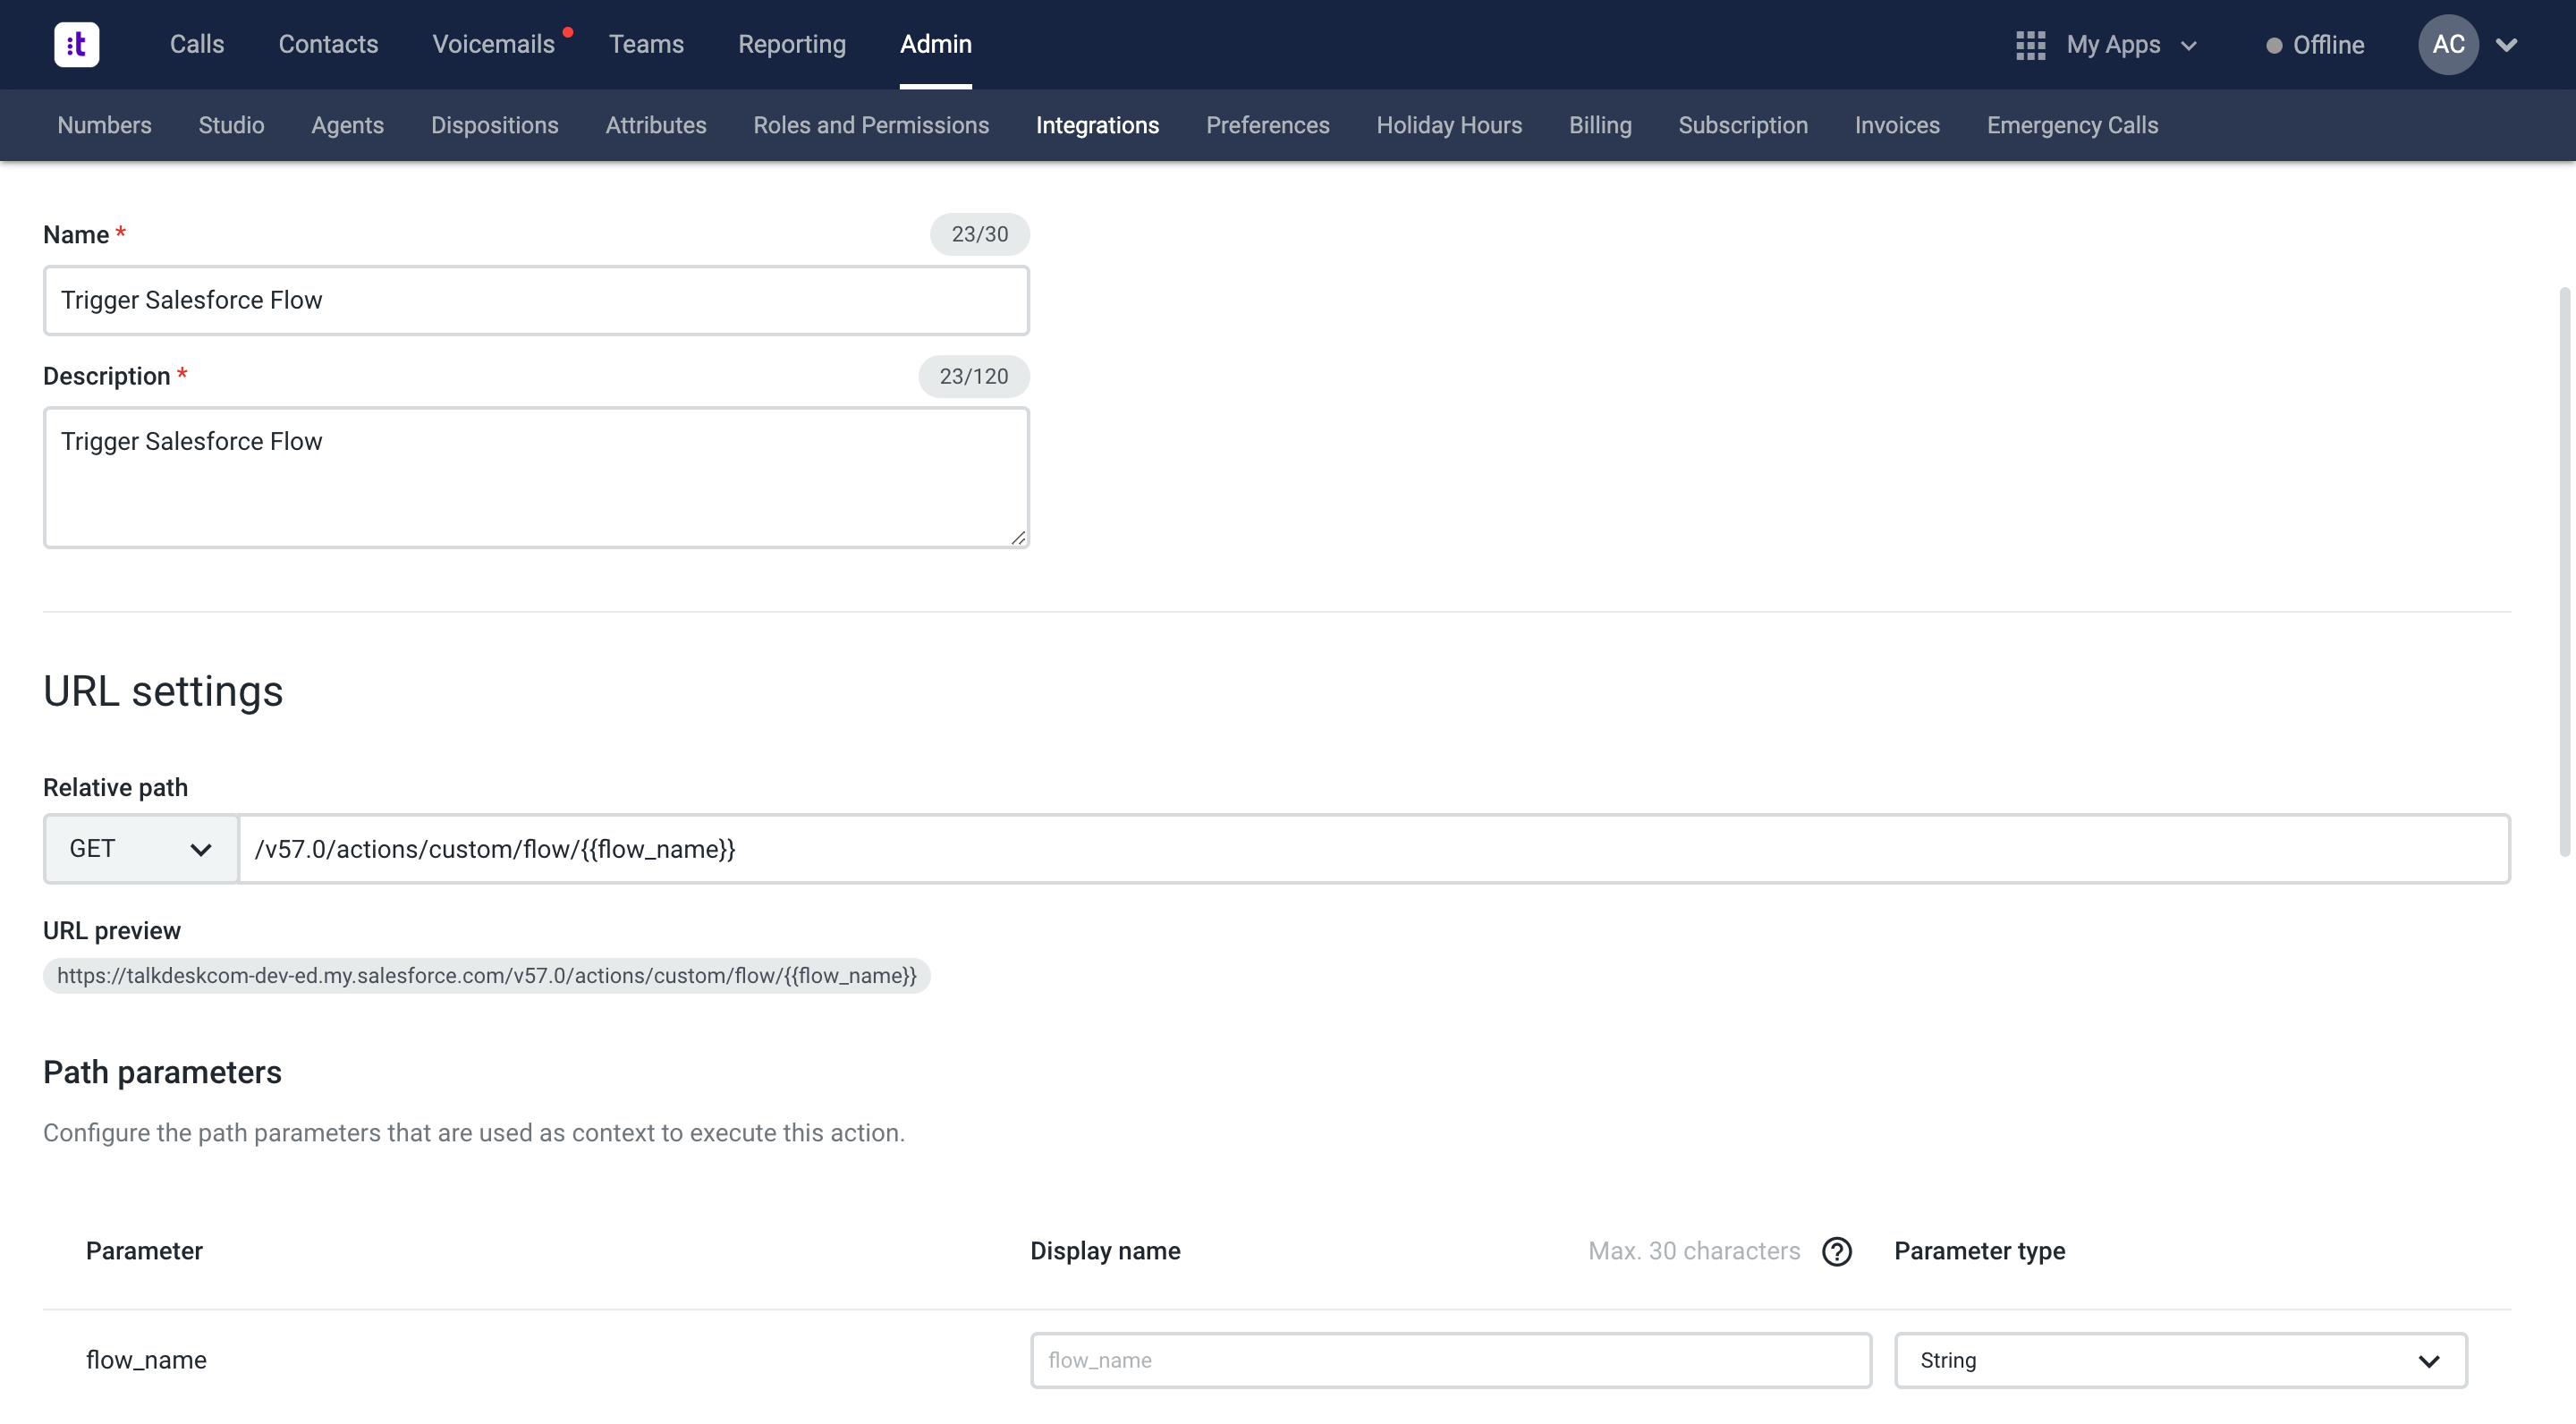
Figure 11 - URL settings
8 - In the Input JSON schema of the action, make sure you account for any input variables your flow may have. In our case, we set up the flow to have as input the Agent Name, resulting in the following JSON schema.
{
  "$schema": "http://json-schema.org/draft-07/schema#",
  "type": "object",
  "properties": {
    "inputs": {
      "title": "inputs",
      "type": "array",
      "items": [
        {
          "type": "object",
          "properties": {
            "AgentName": {
              "title": "agent_name",
              "type": "string"
            }
          },
          "required": [
            "AgentName"
          ]
        }
      ]
    }
  },
  "required": [
    "inputs"
  ],
  "additionalProperties": false
}
If you have output variables, make sure you set it up in your Output JSON schema (Figure 12 - left side). In our use case, the flow does not have any output variables, so we left this part empty.
You may want to set up a timeout different from the default. We’ve left the Action with the default timeout of 10 seconds (Figure 12 - left corner, bottom).
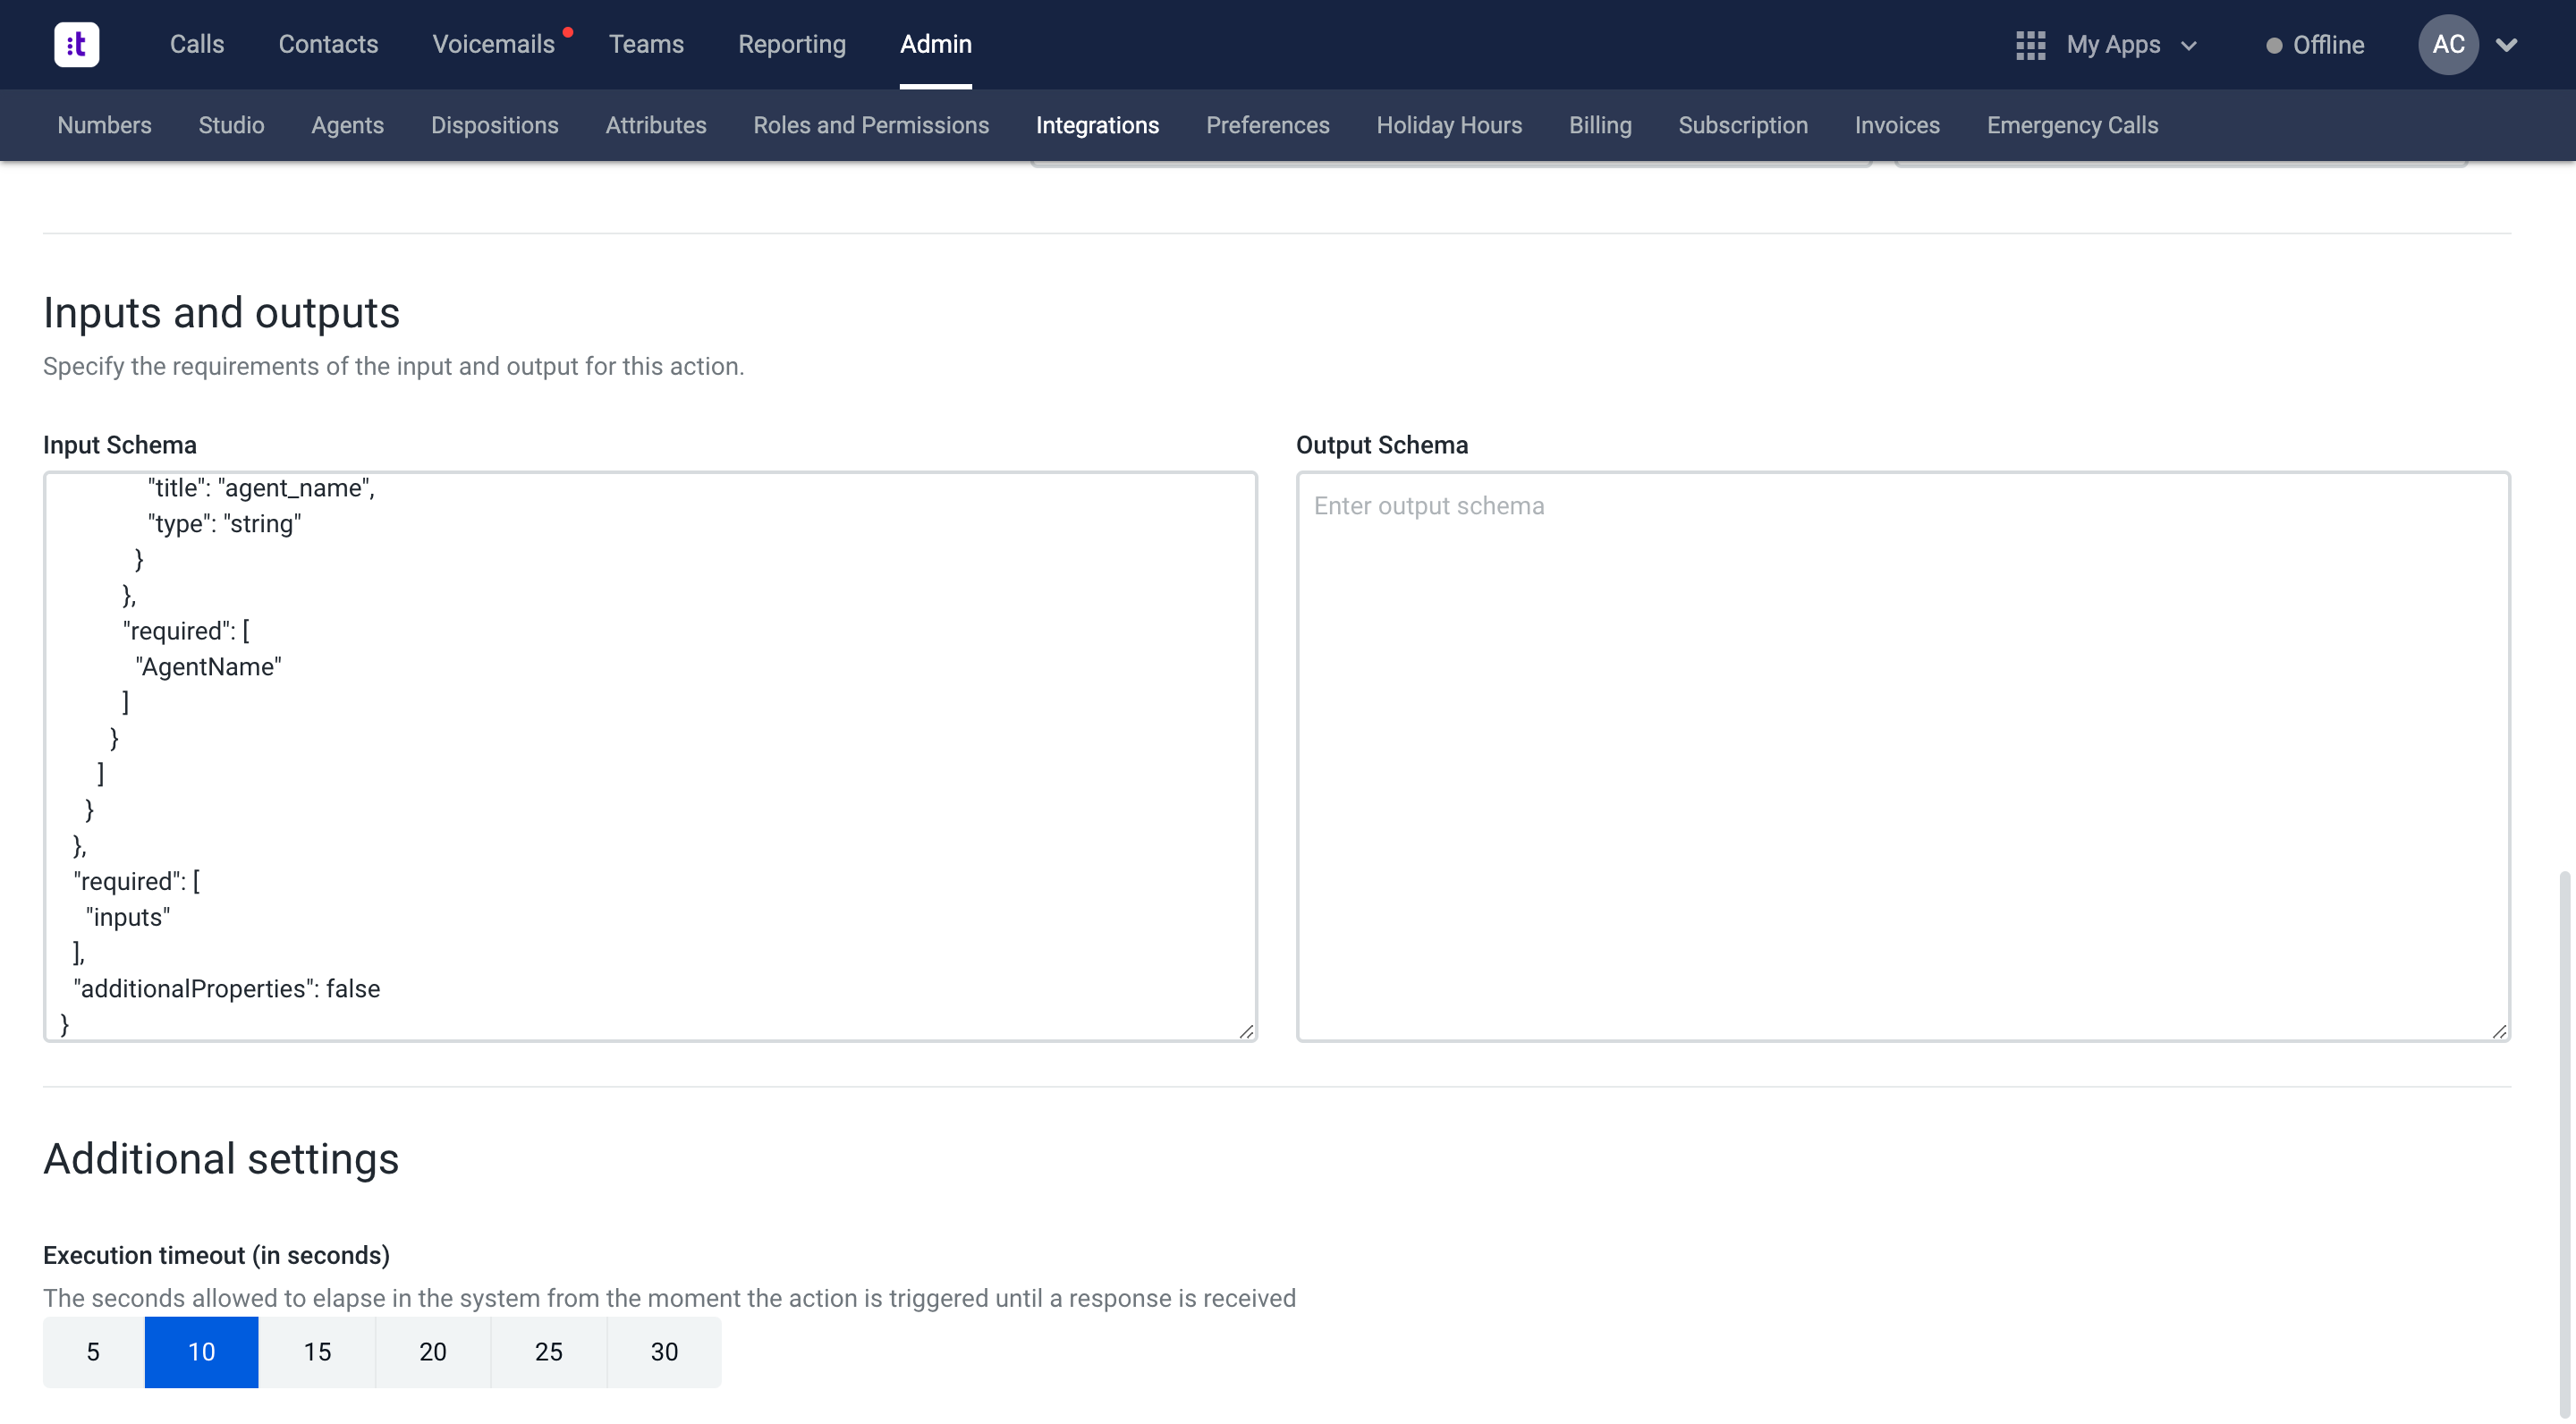
Figure 12 - Action Timeout
9 - Save your action as a Draft (Figure 13 - top left corner).
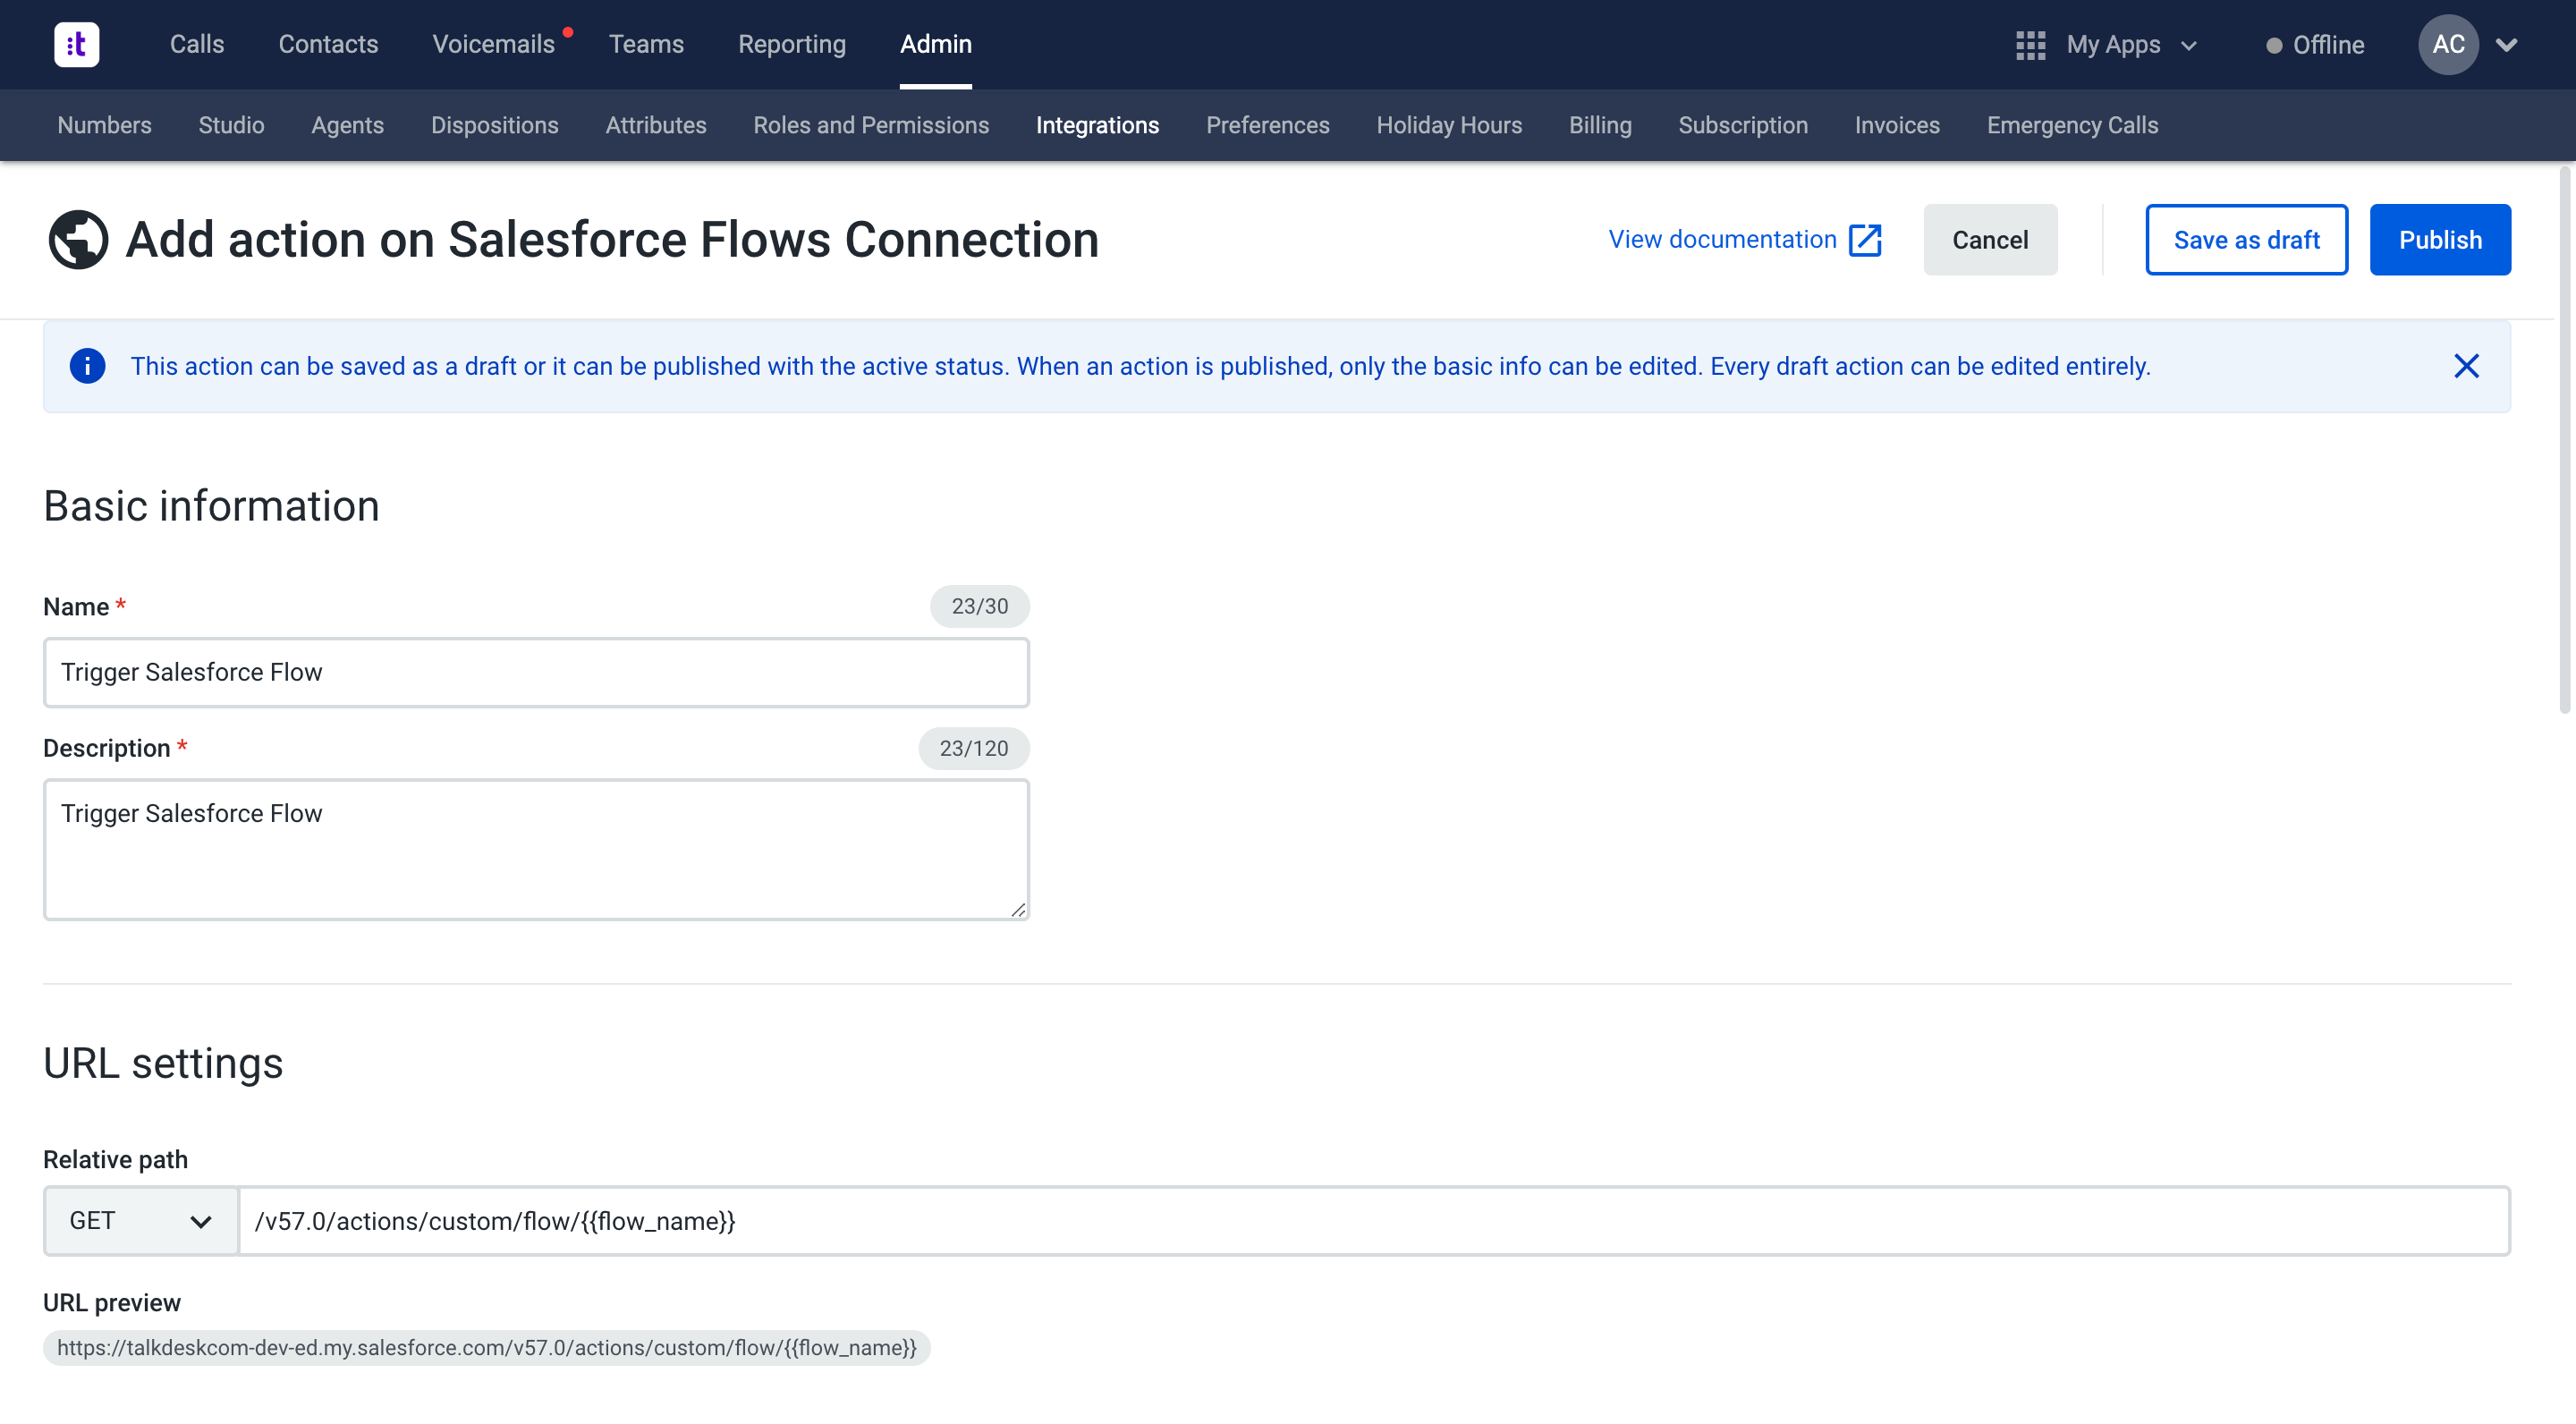
Figure 13 - Saving the action
10 - Go back to the Actions tab and test your Action (Figure 14 - top right corner).
11 - Given that everything works as expected, you can now publish your Action by clicking the Publish button (Figure 14 - top right corner).
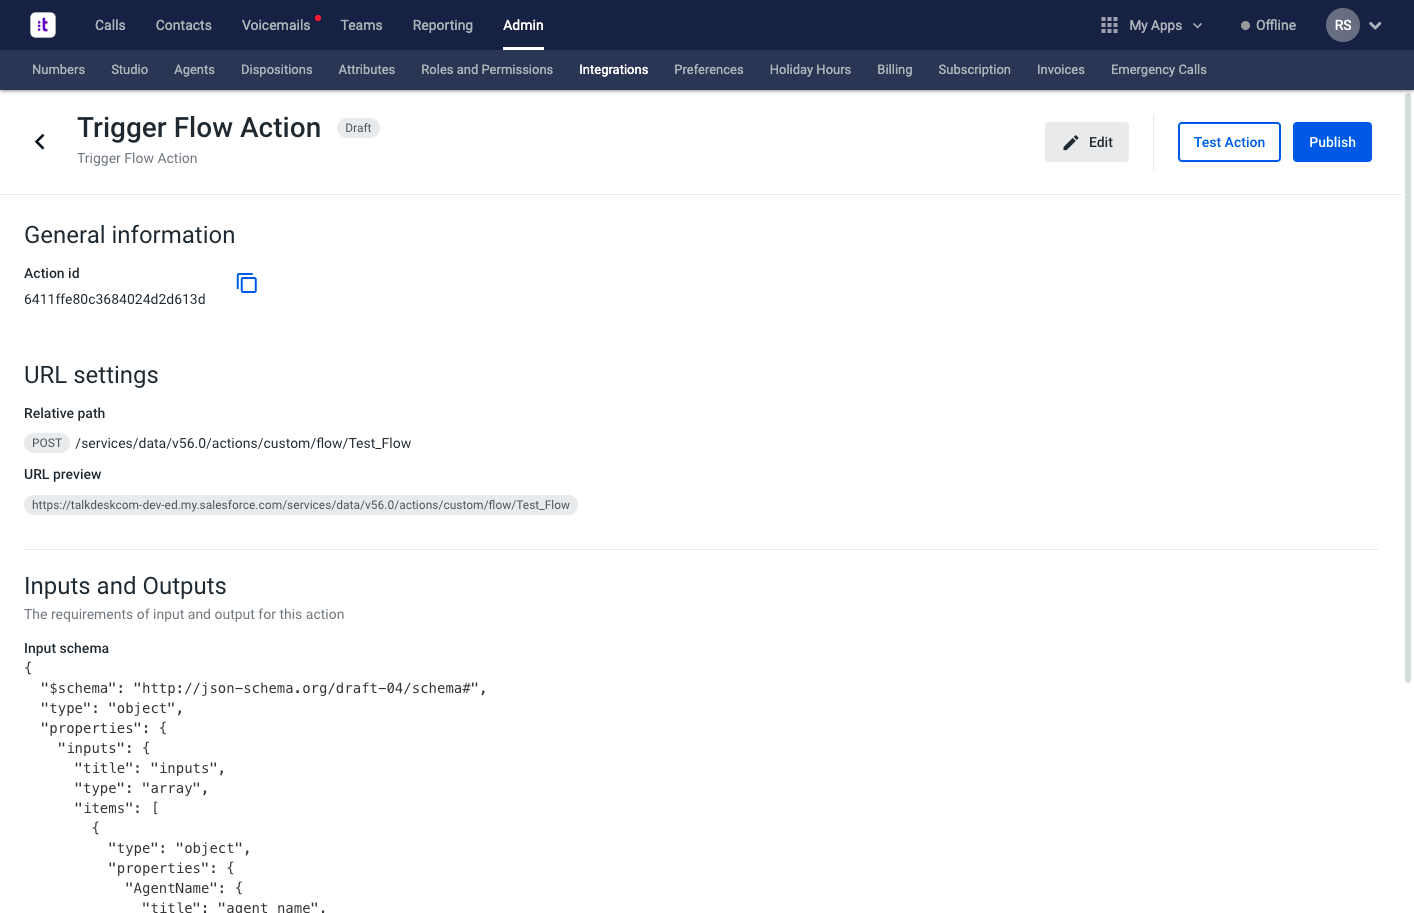
Figure 14 - Publishing an action
4 - Create an Automation to Trigger a Salesforce Flow
We will now create an Automation to trigger a Salesforce Flow. To do this, we’ll go back to our Connection, open the Automations tab and call the Action that we’ve created in step 3 of this page, when a given Talkdesk event happens (in this case, when the agent status changes).
1 - On your Talkdesk instance, go to Admin > Integrations.
2 - Open the Salesforce Connection you created in step 2.
3 - Open the Automations tab (Figure 15 - top left corner) and the click the Create Automation button (Figure 15 - bottom center).
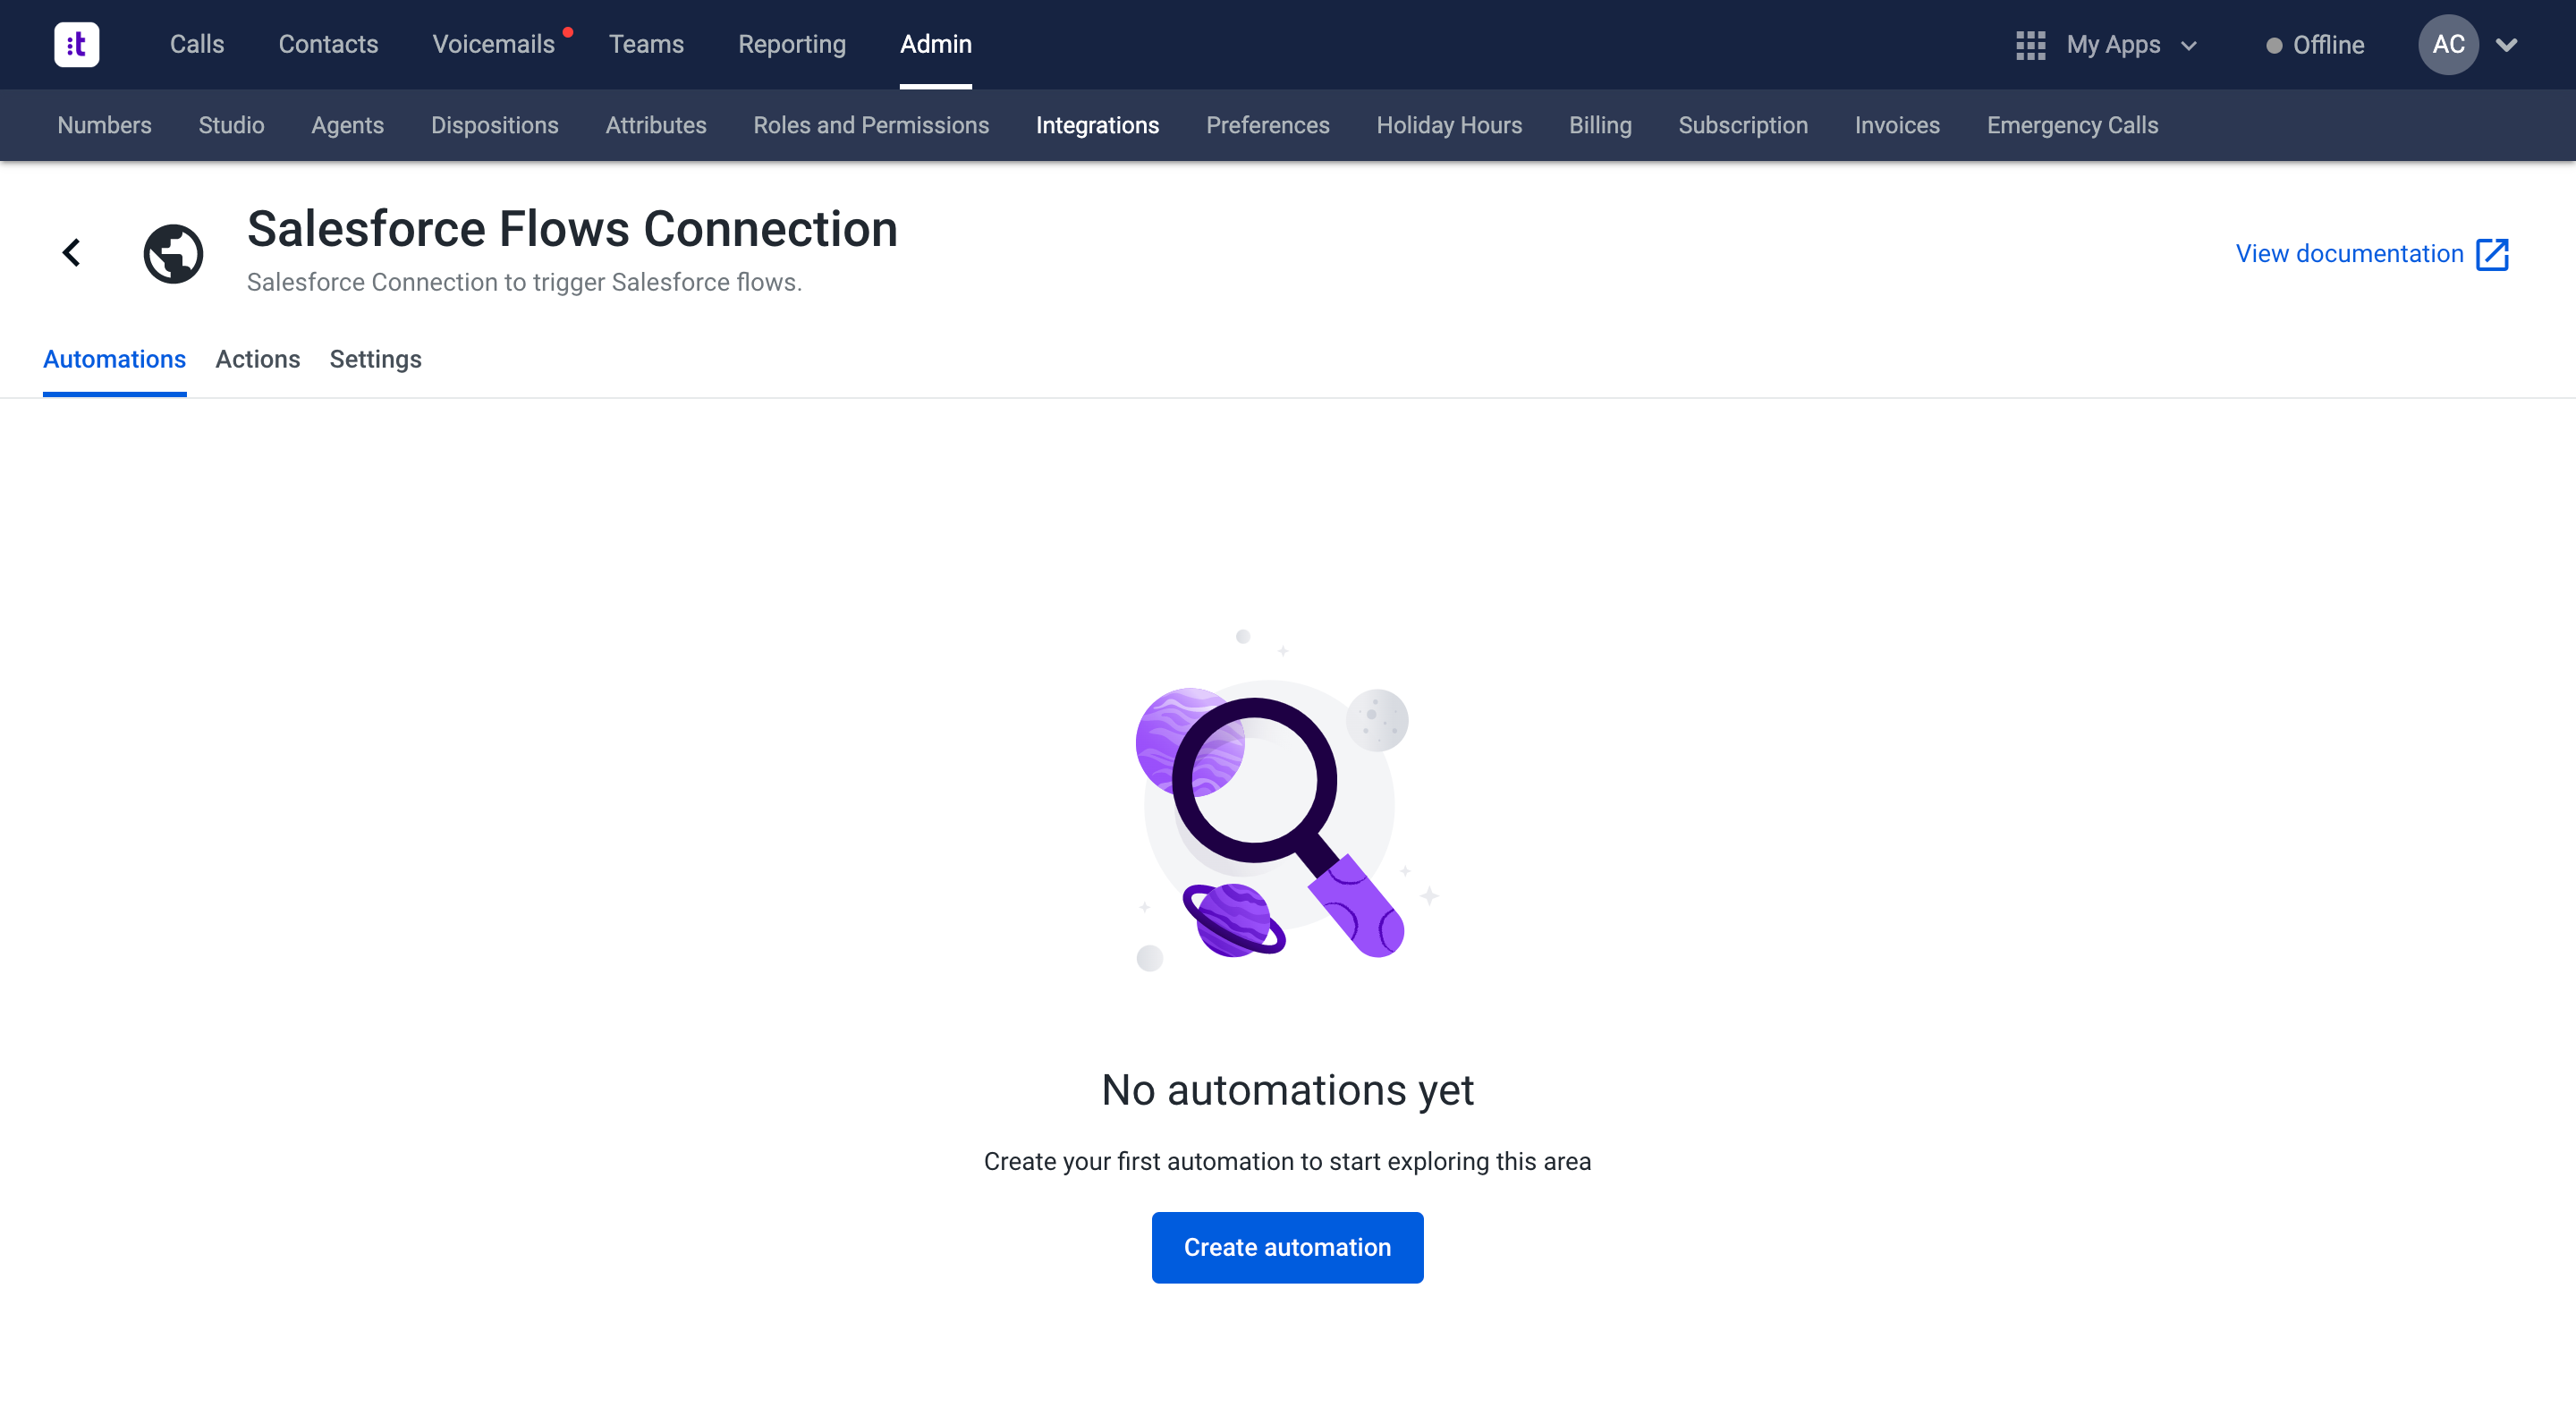
Figure 15 - Automations tab
4 - Add the Automation name (Figure 16 - left side).
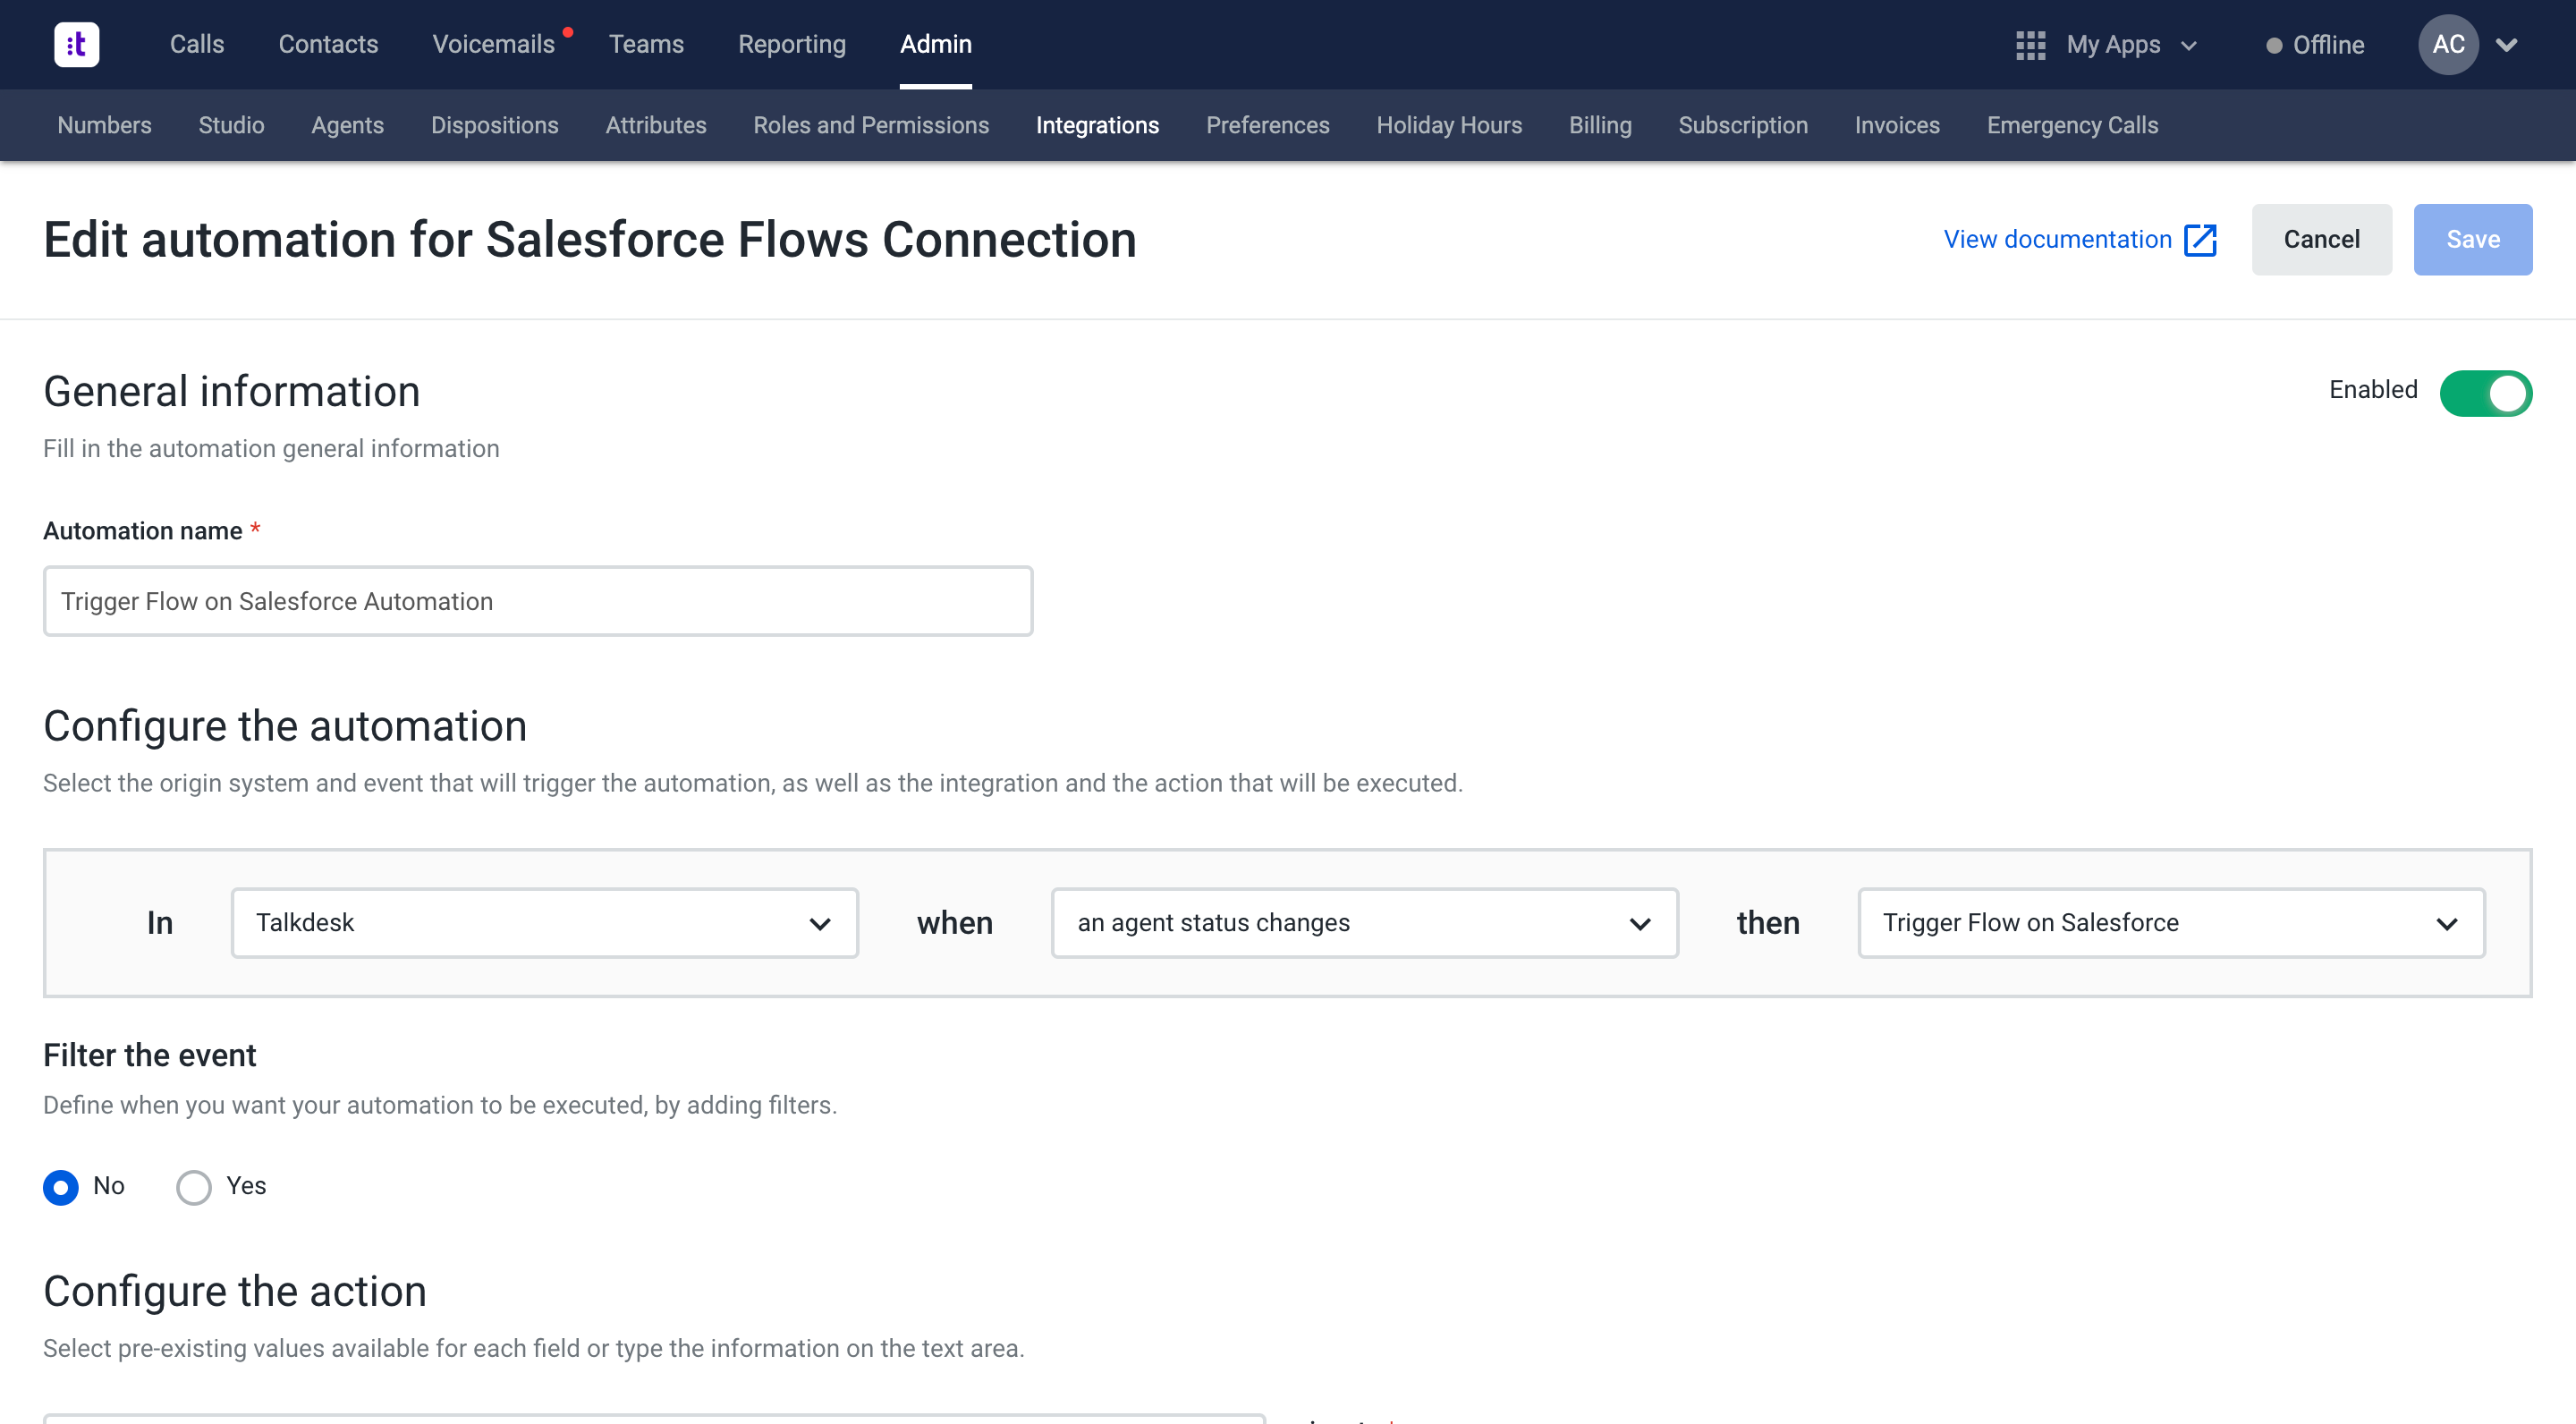
Figure 16 - Editing an automation
In our use case, we’ll trigger the Salesforce flow when an agent status changes.
5 - Fill the parameter of the Flow Name with the name of your Salesforce flow (Figure 17 - right side).
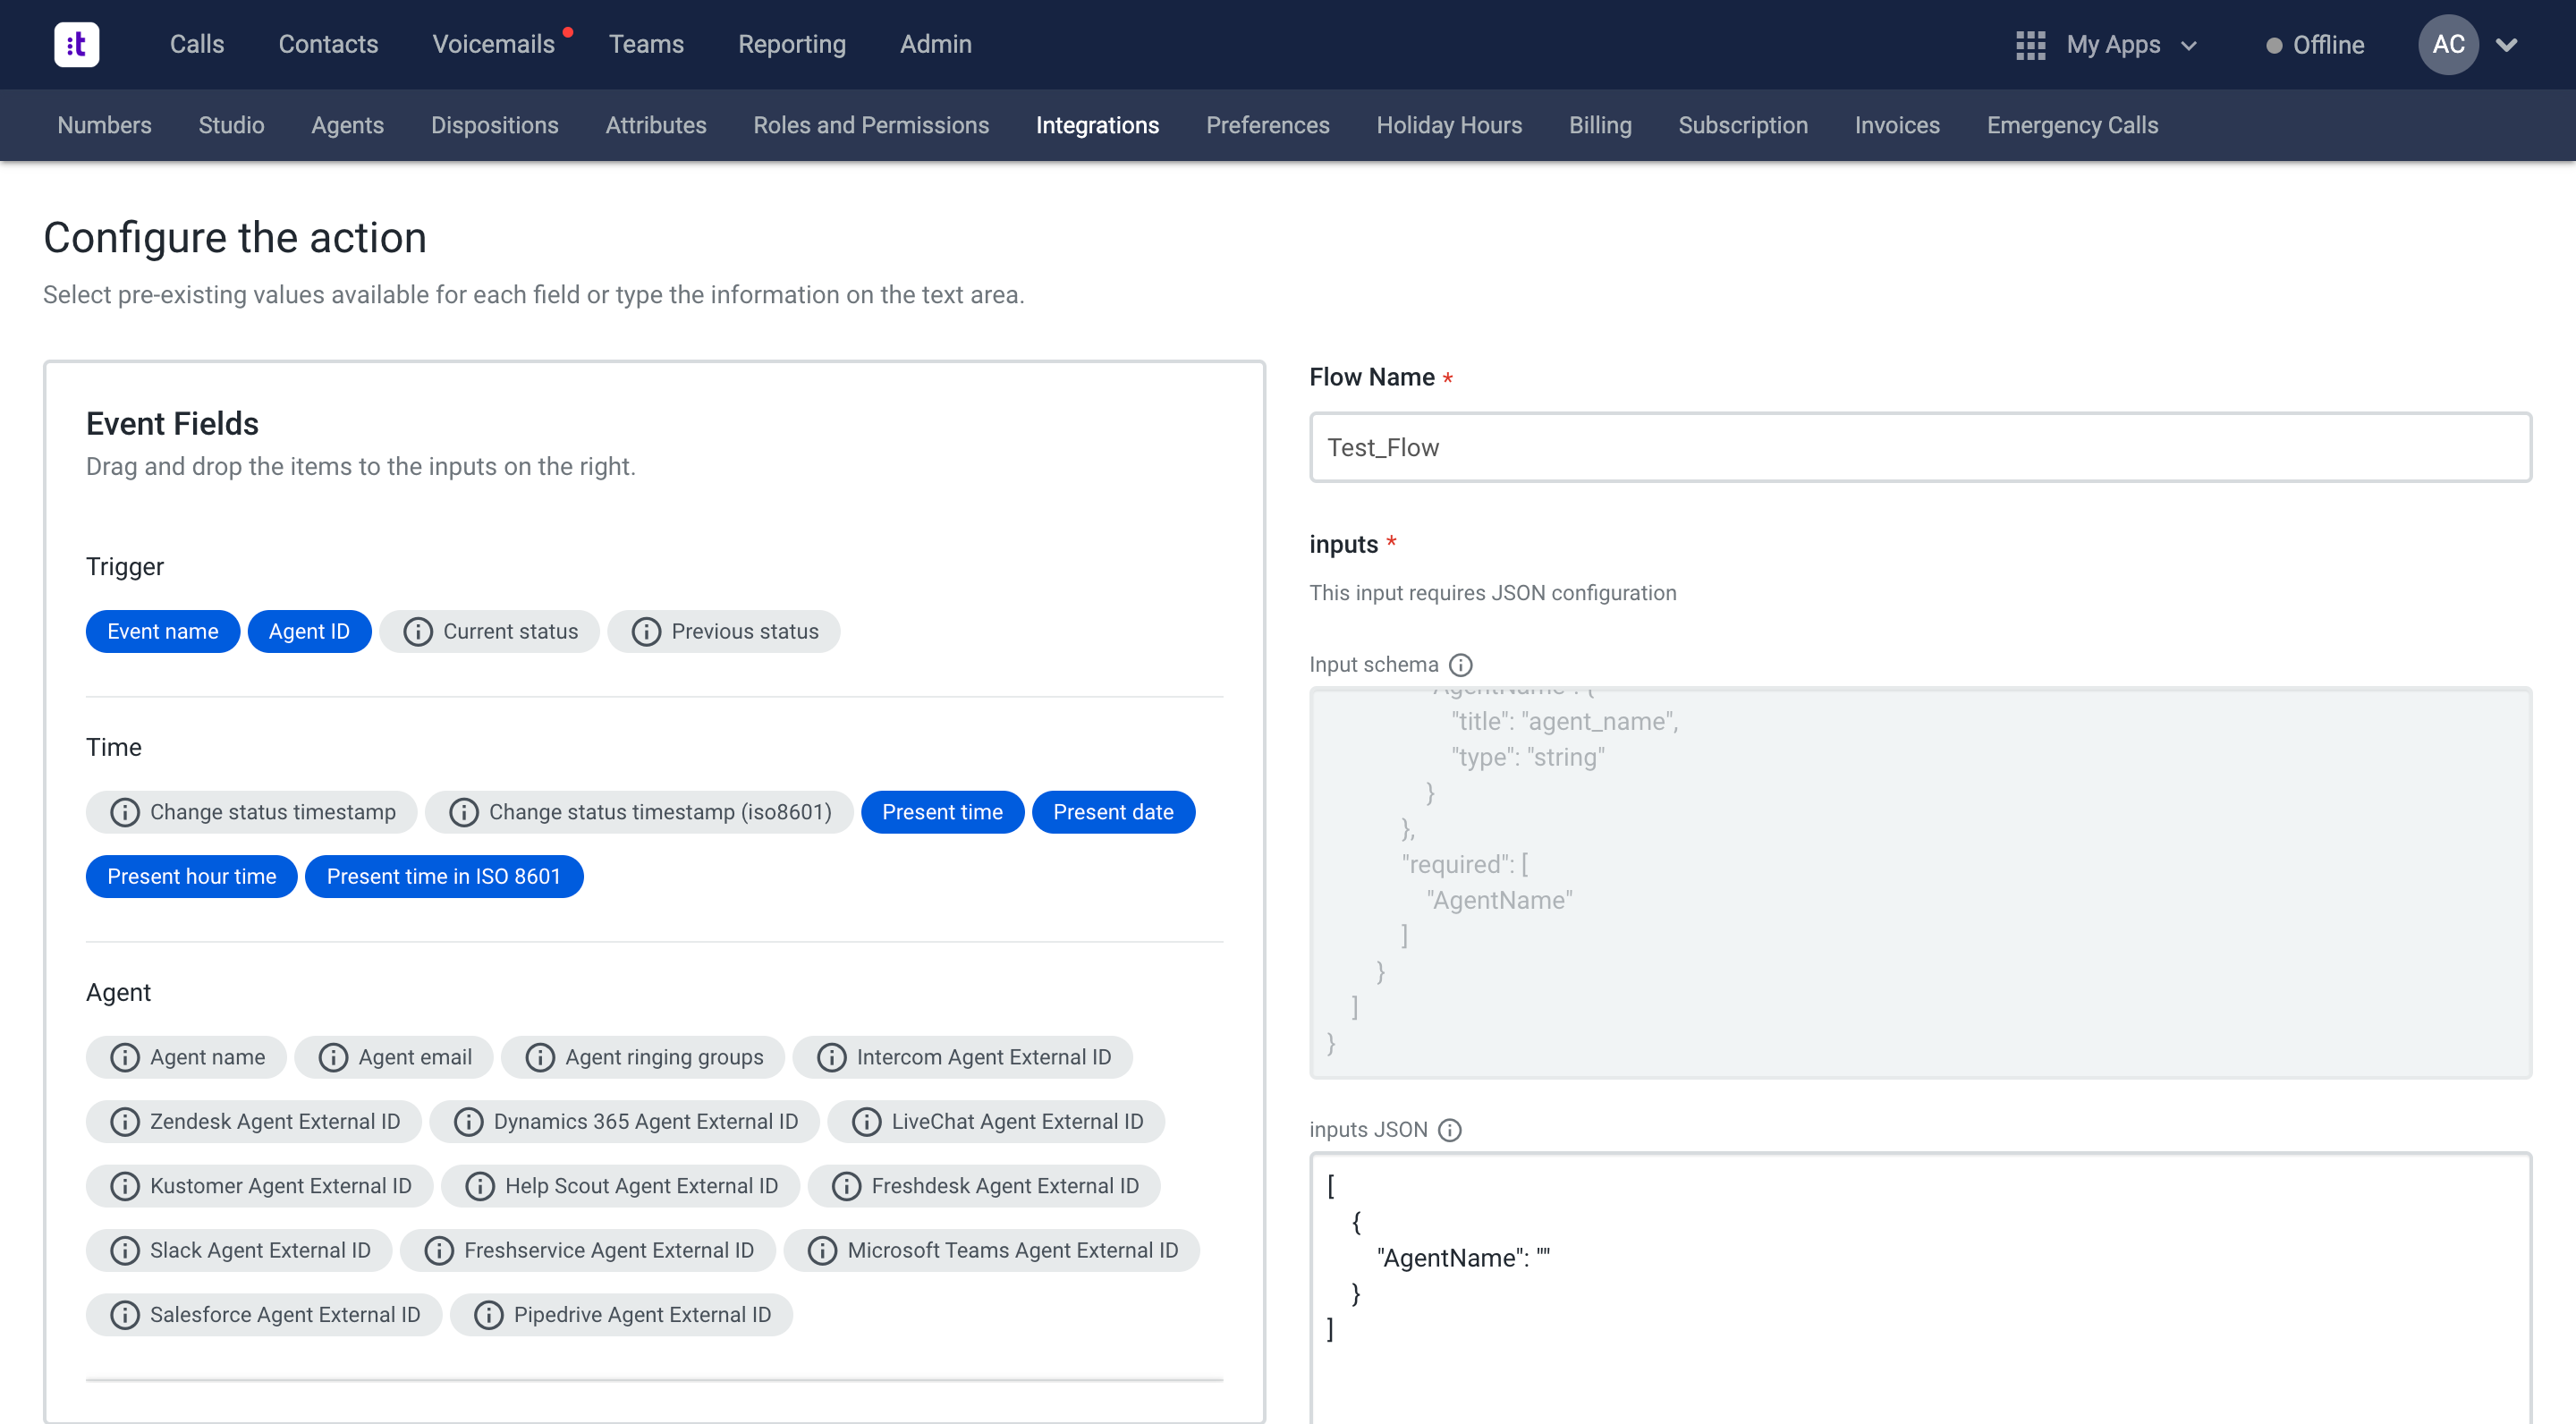
Figure 17 - Configuring the action
6 - Under Inputs (Figure 18 - right side), click Configure.
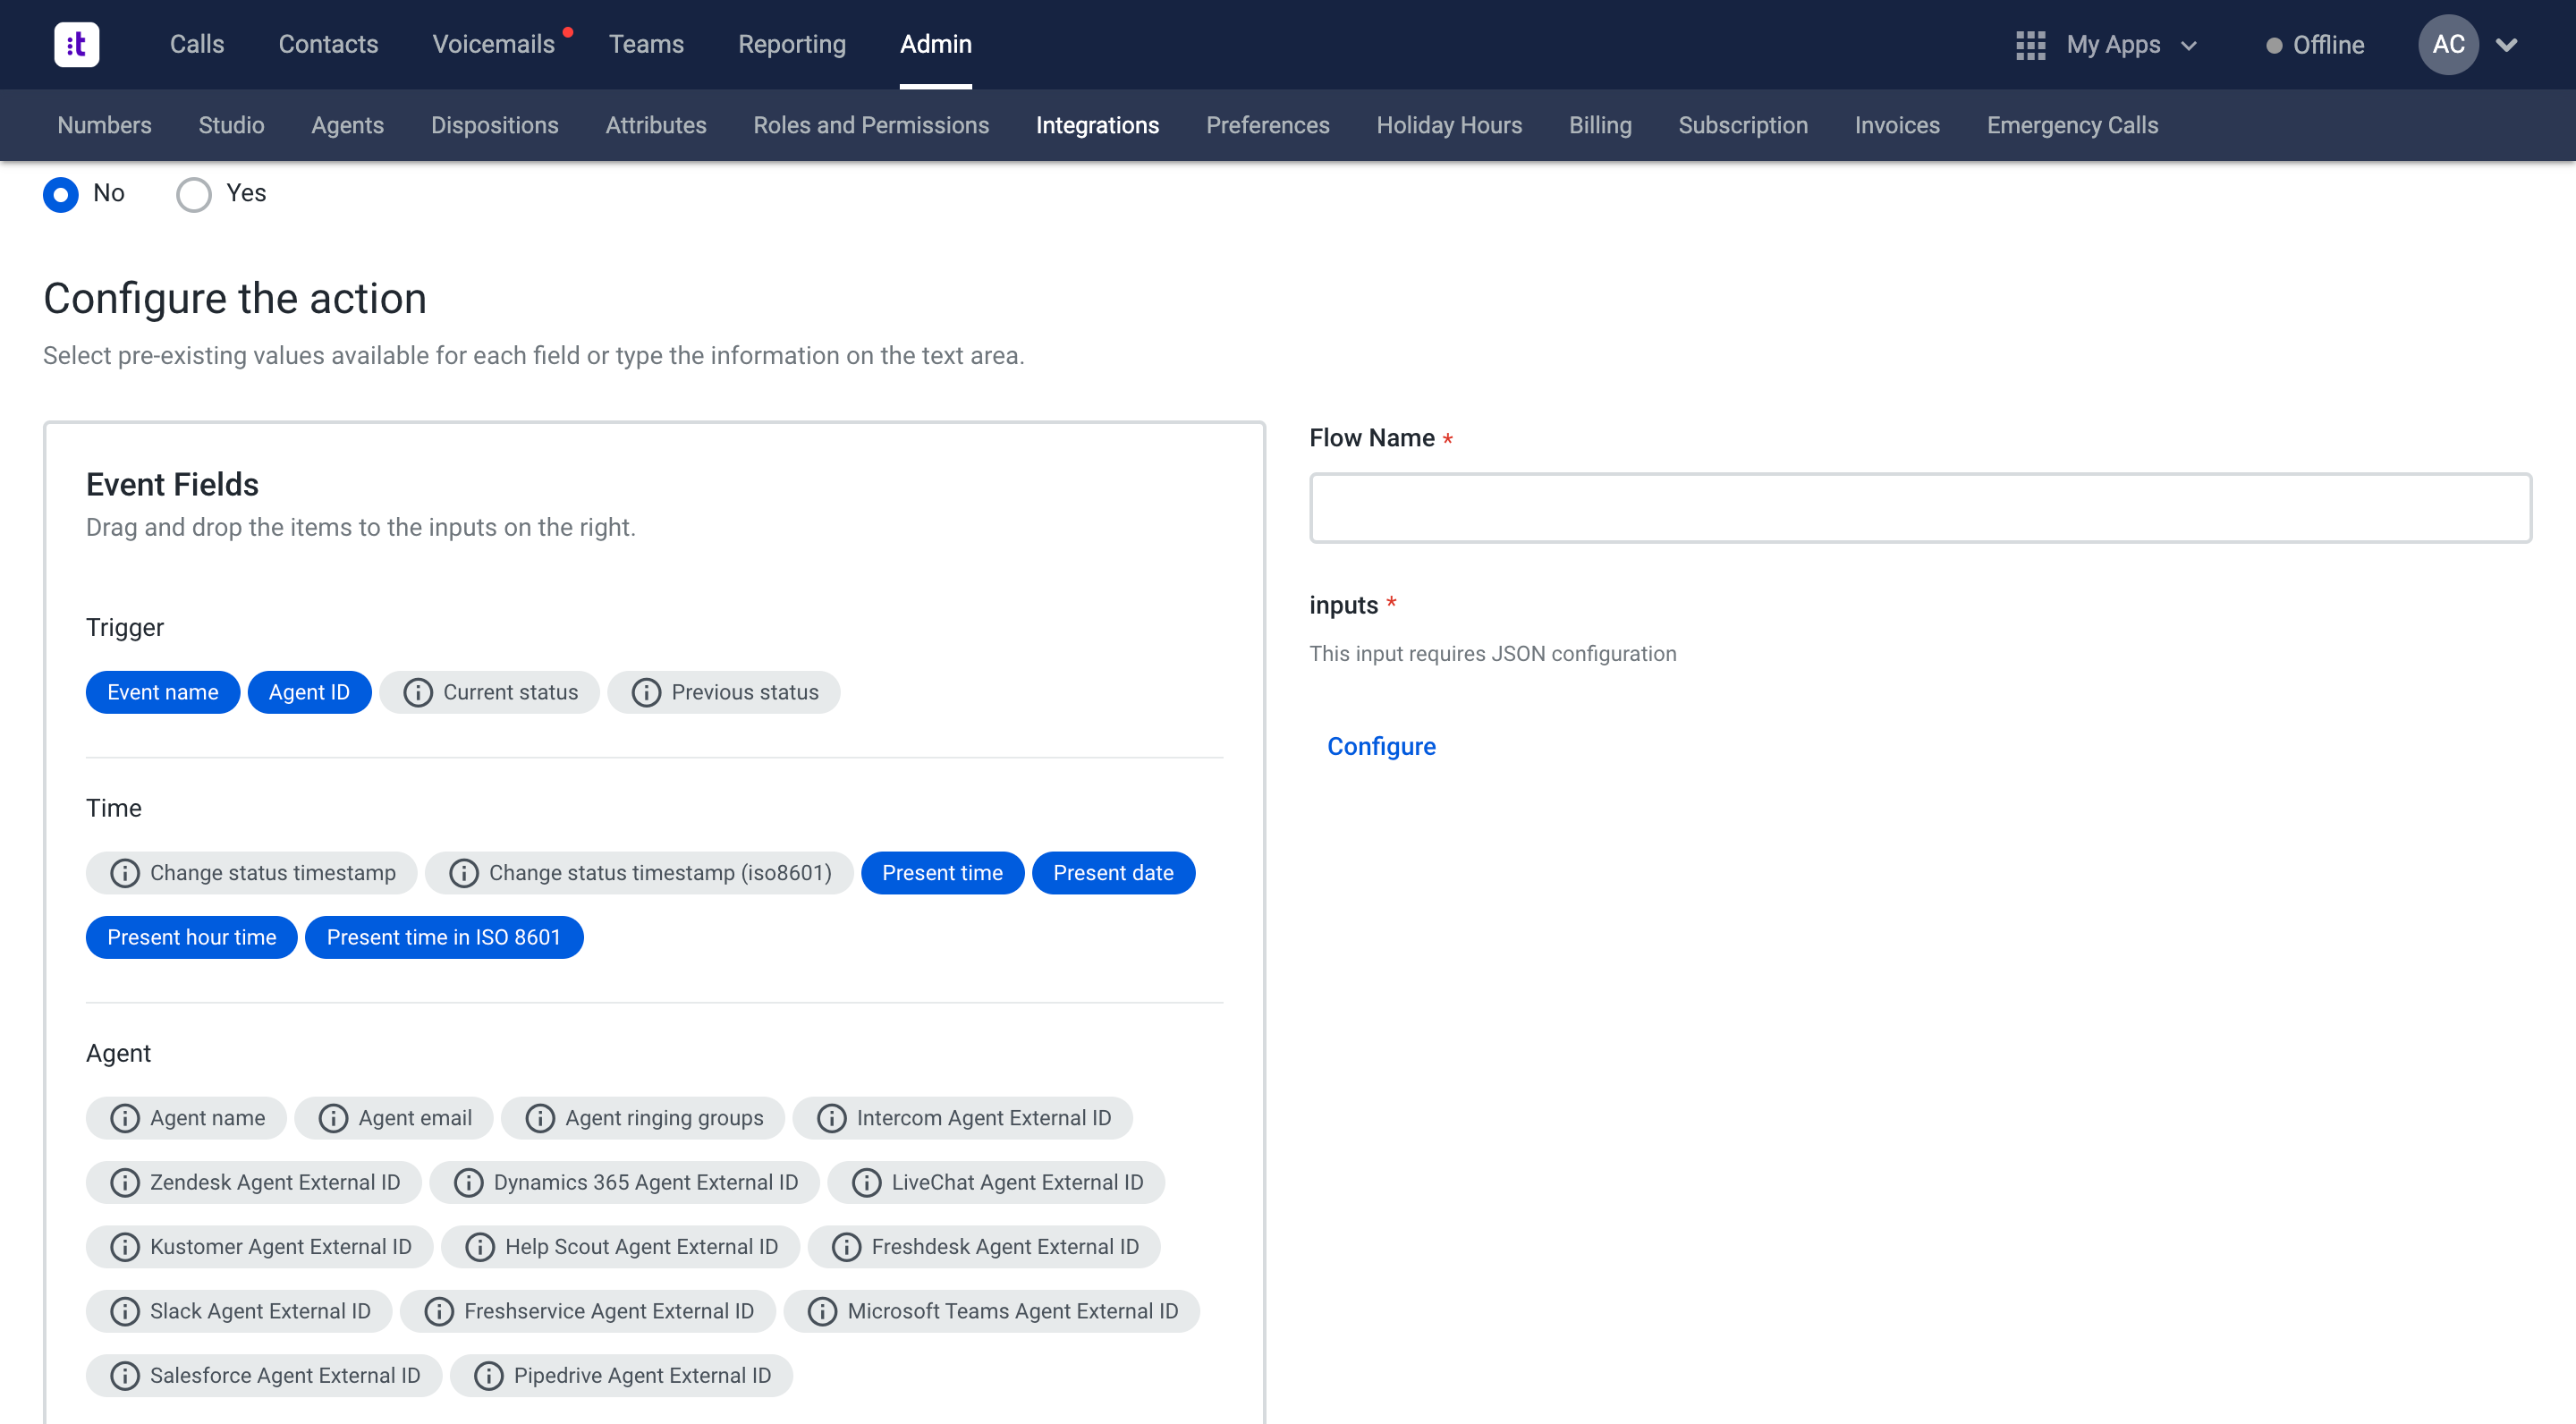
Figure 18 - Configuring the action
7 - Add the following JSON to send the event’s agent name to your flow:
[
  {
    "AgentName": "{{agent.name}}"
  }
]
To add the variable to the JSON, you can also drag the Agent name from the Agent Event fields on the left (Figure 18).
8 - Click Done (Figure 19 - right corner, bottom).
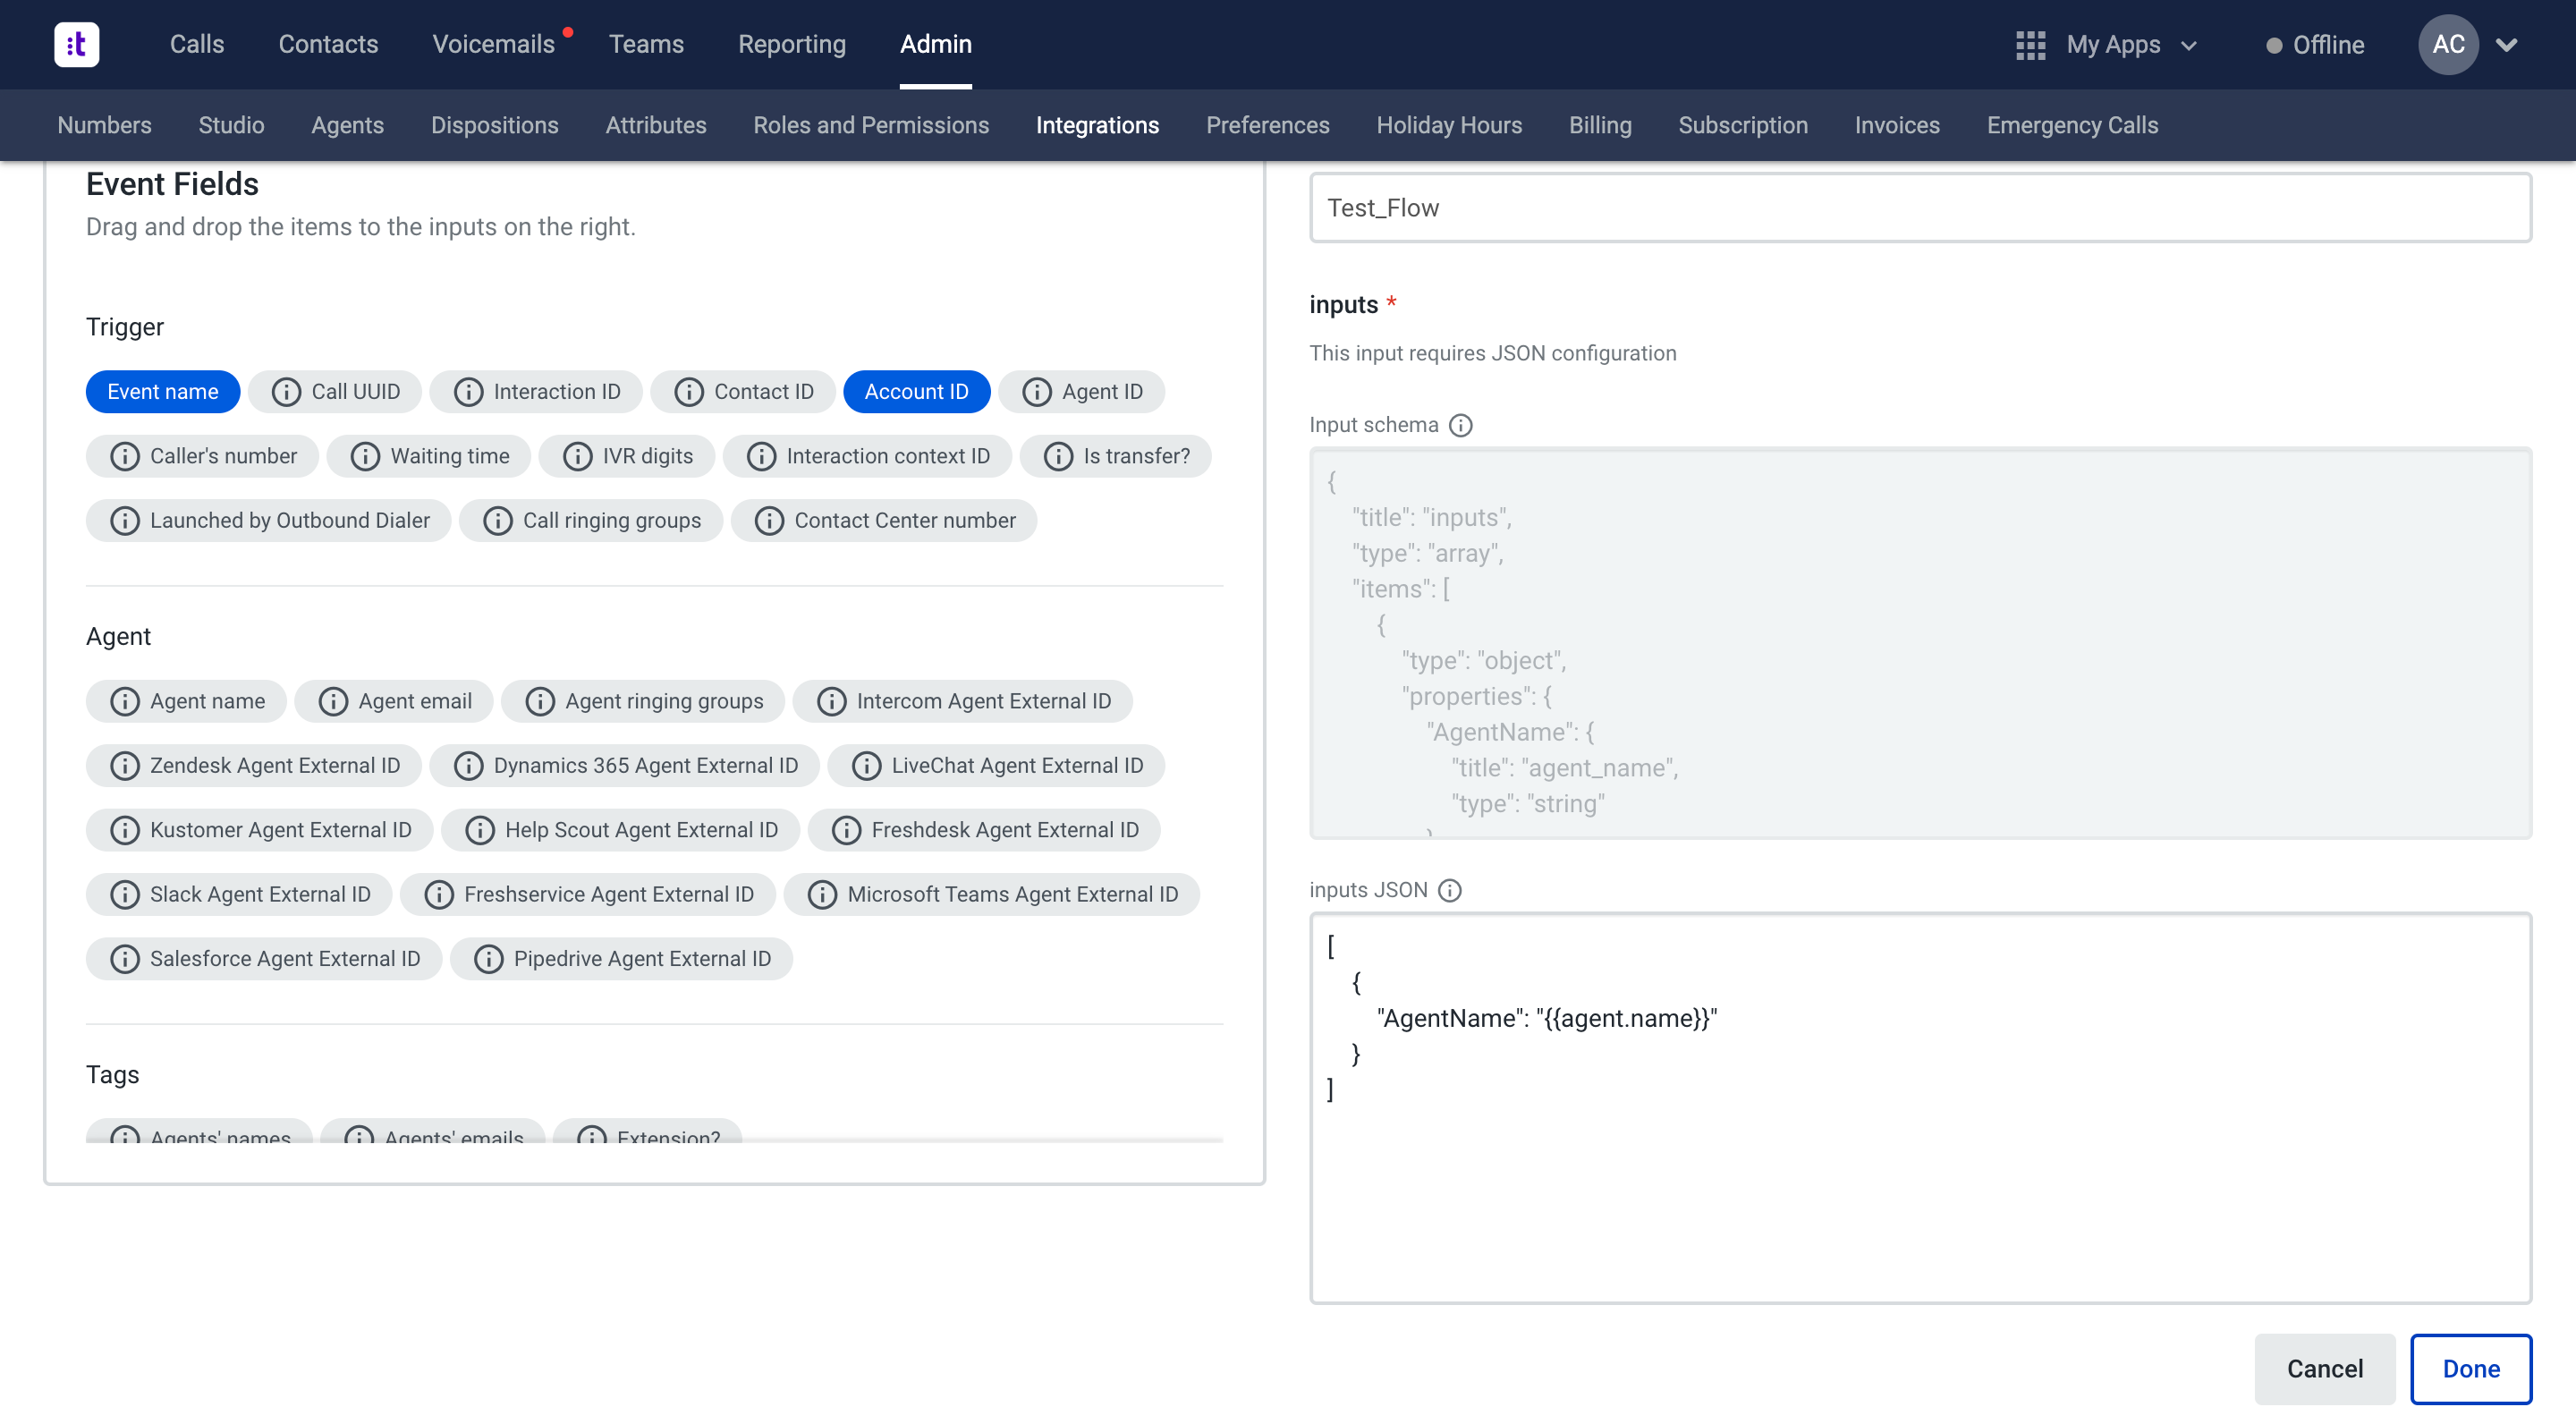
Figure 19 - Automation done
9 - Save your automation (Figure 20 - top right corner).
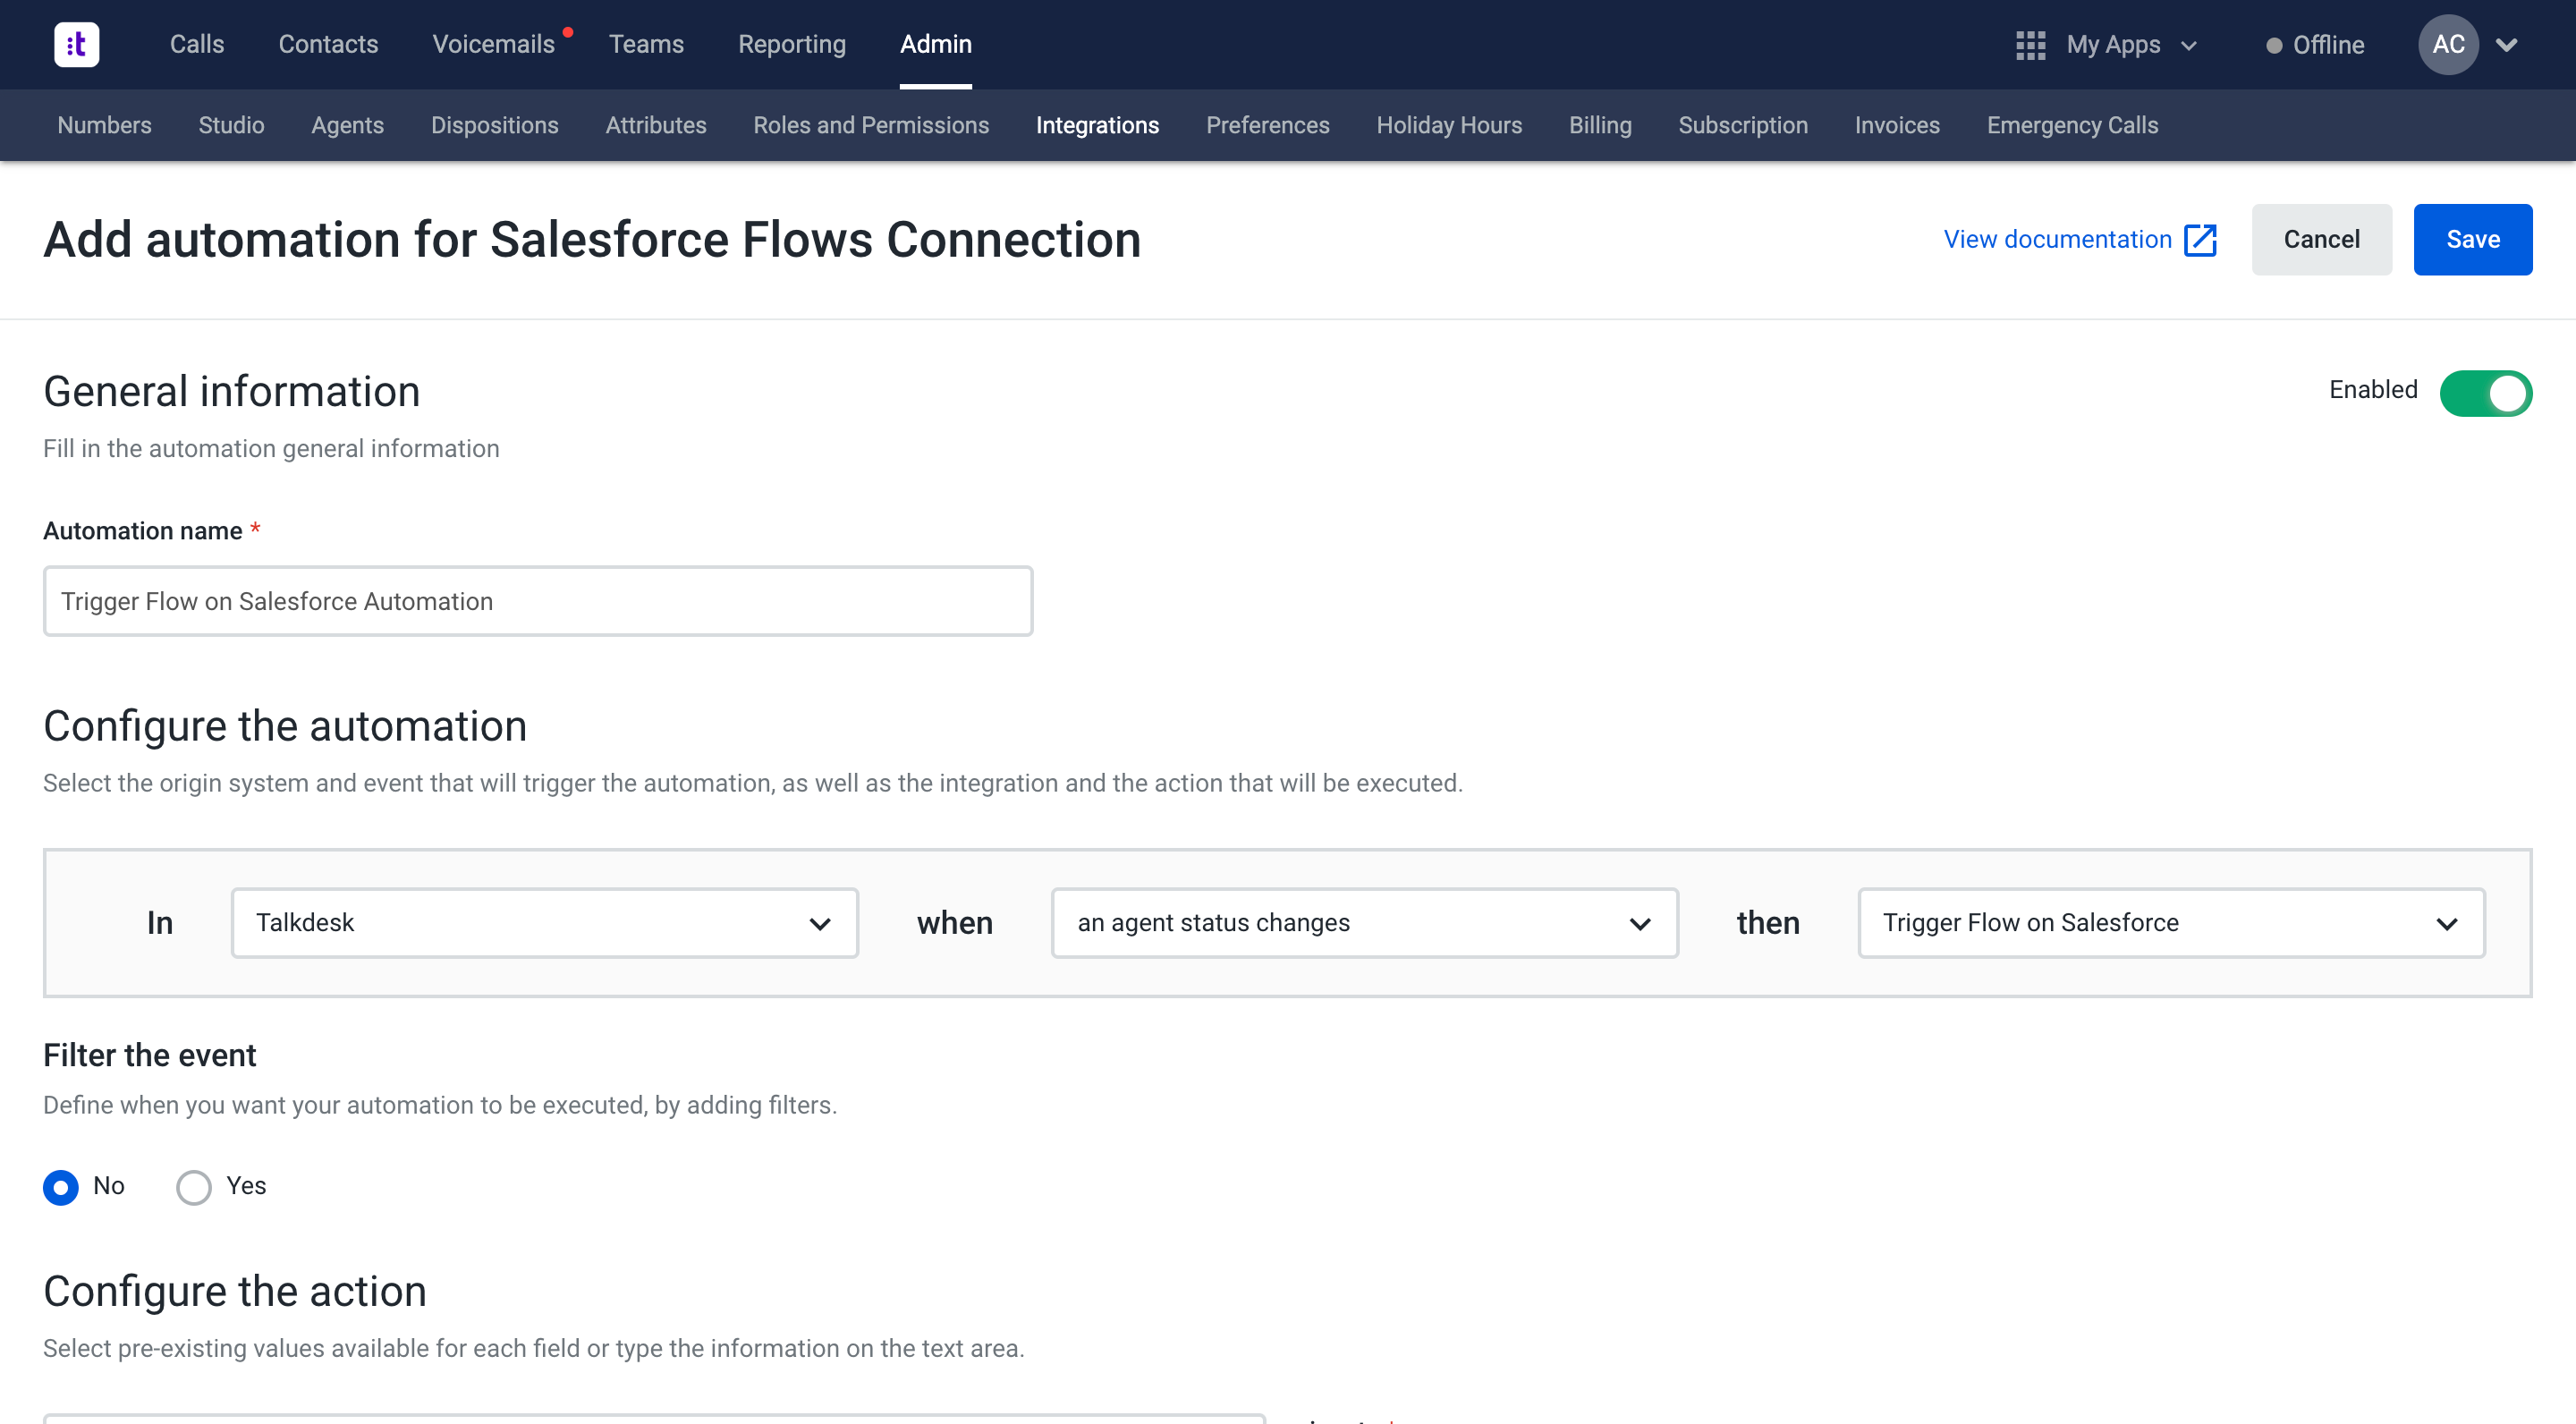
Figure 20 - Saving the automation
10 - Ensure that your automation status is enabled (Figure 21 - center).
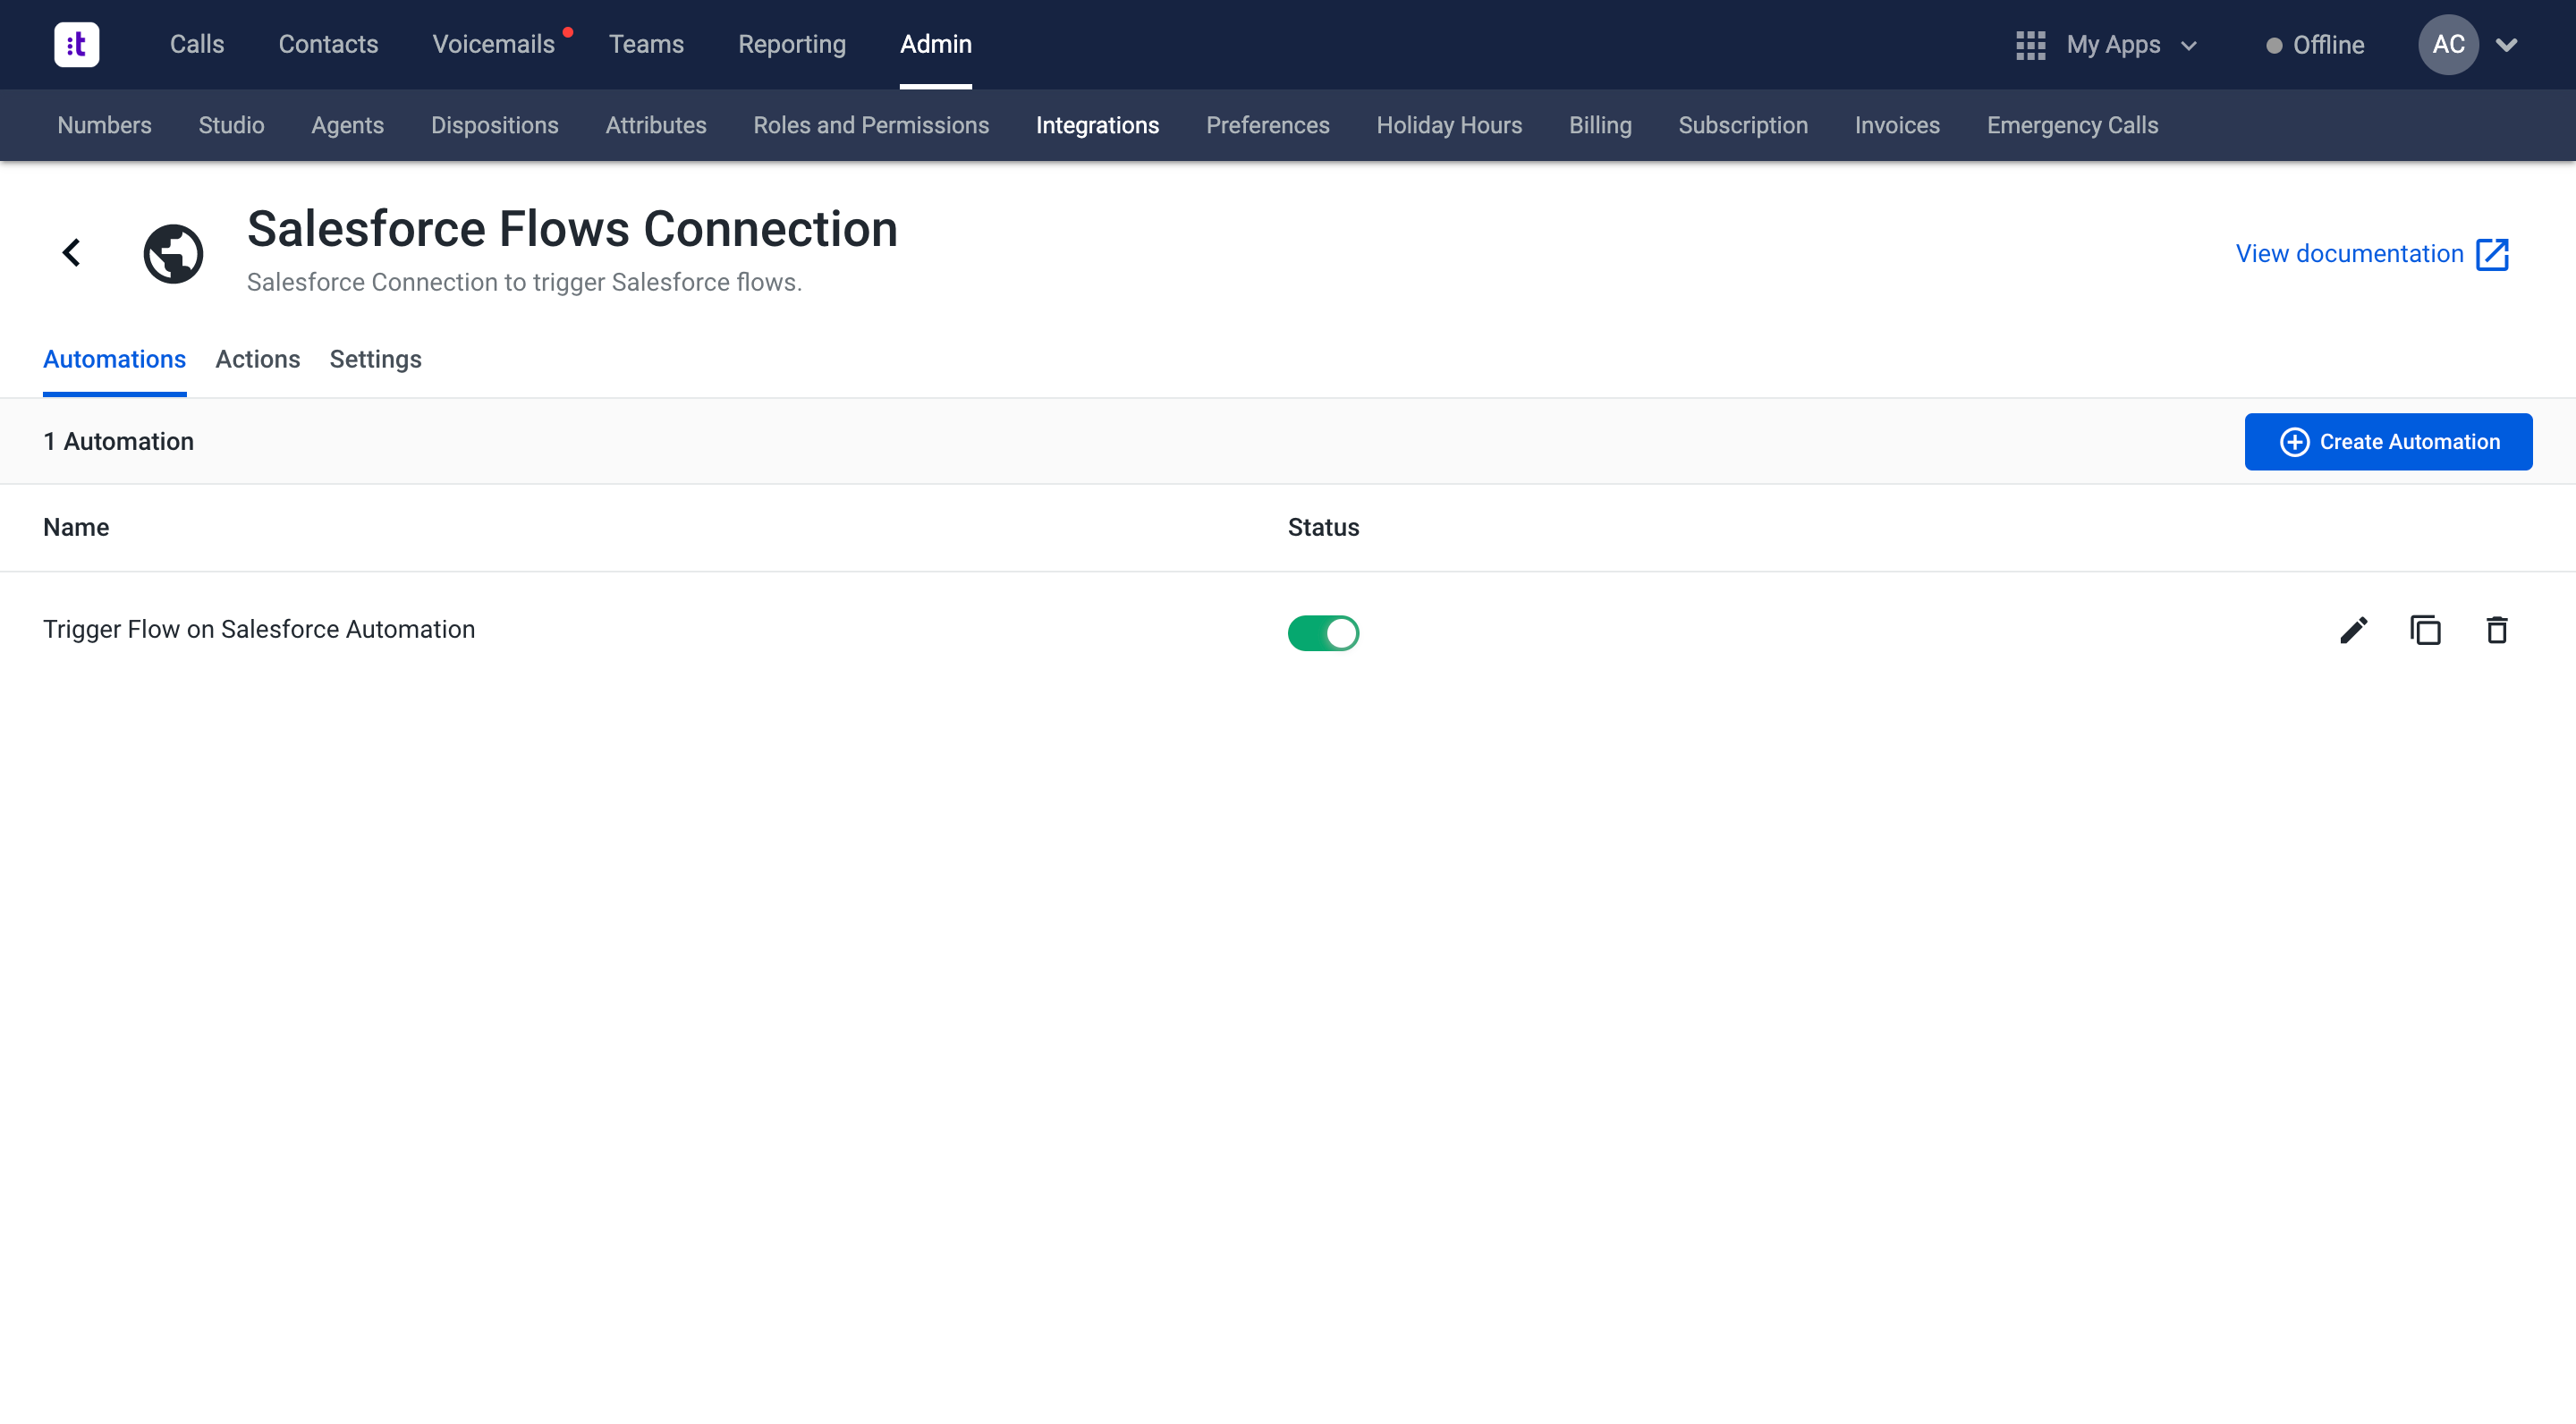
Figure 21 - Enabling automation status
You’ll now be calling a Salesforce flow every time a given agent status changes, for example, to keep a list within Salesforce of the agents that were active on a given day.
You can adapt this example to pass other variables and trigger the flow upon different Talkdesk events.
Additional Resources
- Salesforce flow documentation
- Salesforce Connected App documentation
- Talkdesk Connections
- OAuth2 Authorization Code Flow
- Talkdesk Knowledge Base: Creating a Connection, Creating an Action, Creating an Automation
TroubleshootingIf you have questions or technical issues, please open a ticket using this form.
Updated about 1 month ago