Migrating from Chat Widget v1 to v2
Migration Steps
Step 1: Duplicate the touchpoint in Chat touchpoint admin page
The Chat Widget styles will not be entirely cloned to the new touchpoint. You can either customize the styles in the Customization tab or copy the old styles to the new snippet code to apply them.
Step 2: Deploy the snippet code to a testing website
Step 3: Verify the Chat Widget in the testing website
If you encounter any issues while migrating from v1 to v2, please refer to the differences and troubleshooting sections below. If these do not resolve your problem, please contact us for further assistance.
CSP and Firewall configuration differences
We got different CSP rules due to the different approaches of rendering chat widget in v1 and v2. v1 is based on Dom element render, all the network requests are fetching directly in the top window of chat widget, but in v2, the real chat widget is loaded through an iframe window, some requests such as getting credentials from TD will be requested in the iframe window but not in the top window, so the CSP tool will not intercept those requests in the iframe window. Based on that, in v2, we only need to add the rules for the host that exposed in the top window.
For v1, the rules should be as in:
Chat widget (V1) | Content Security Policy (CSP)
For V2, the rules should be as in:
Chat widget V2 | Content-Security-Policy-(CSP)
Method/Event differences
Methods differences
Open chat widget
For v1, we’re using the open method mounted in the webchat.selfHostedApp object:
webchat.selfHostedApp.open()For v2, we’re using the open method in the webchat object:
webchat.open()Close chat widget
For v1, we’re using the close method mounted in the webchat.selfHostedApp object:
webchat.selfHostedApp.close()For v2, we’re using the close method in the webchat object:
webchat.close()Set the default value of the Initial Screen Form
For v1, we’re using the setCustomFieldDefaultValues method to set default values for the Initial screen form, but in v2, this method is deprecated and replaced by the method setContextParam.
setCustomFieldDefaultValues is not supported in v2, please use the setContextParam instead.
Events differences
When Chat is opened
For v1, we’re using the onOpen event:
webchat.onOpen = function () {
  // Some things you want todo after chat is opened
}
For v2, we’re using the onOpenWebchat event:
webchat.onOpenWebchat = function () {
  // Some things you want todo after chat is opened
}
Troubleshooting
-
Customizing the loading while initializing chat widget
We don’t support to customize the loading behavior when initializing chat widget, but if you’re trying to implement it by some hack, such as manually mount your own loading component to the chat widget root UI, it works. But it should be mentioned here that this approach is only taking effect on v1, it doesn’t work on v2, because for v2, we’re using different way to load the chat widget, we have wrapped the root UI of chat widget with the iframe element, so necessary changes should be made if you still need to add the loading component in v2. The best way is to ask help from us, we’ll try to provide the capability as possible as we can. -
Manually send Autopilot’s message
Chat widget can be customized as you want except some fixed features, such as the Autopilot’s messaging sending feature, as it is integrated into the chat widget. The feature has not migrated to v2, so if you need to manually send Autopilot’s messages, you should open a ticket to us, we’ll try to provide the capability as soon as possible.
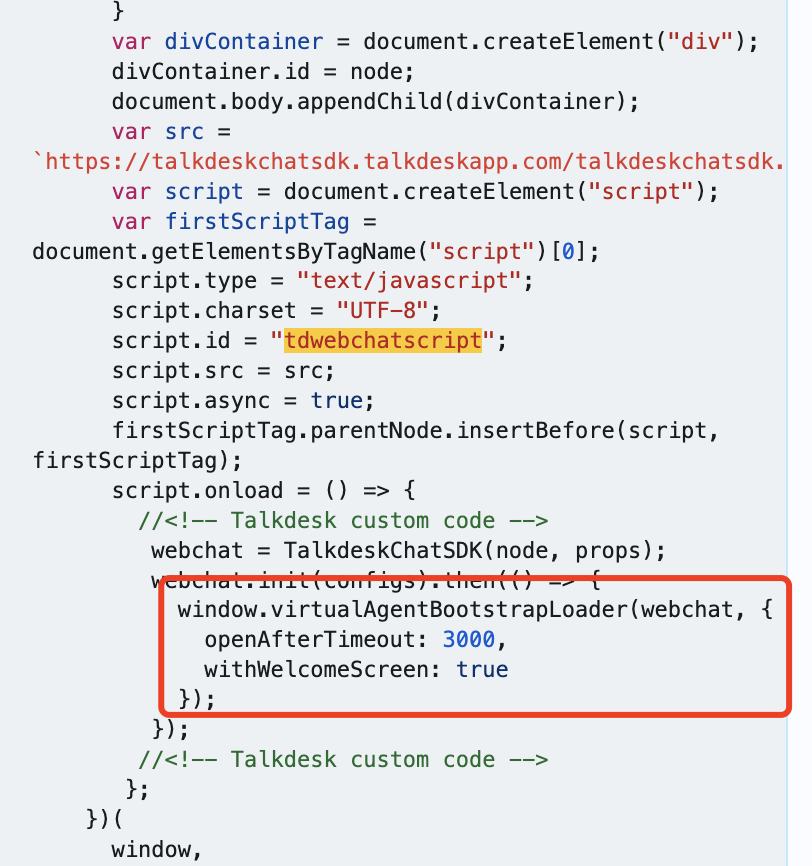
Integrating the approach of manually sending Autopilot’s message provided in v1, will not take effect in v2 because the window.virtualAgentBootstrapLoader is not supported in v2, so you must remove the approach from the website to keep chat widget working well after the migration.
- Do not manually modify the chat widget domain in the snippet code.
In the snippet code the chat widget is dynamically loaded through script tag, the src indicates the address to load the chat widget js bubble. In v1, it should be https://talkdeskchatsdk.talkdeskapp.com/talkdeskchatsdk.js but in v2, it should be https://talkdeskchatsdk.talkdeskapp.com/v2/talkdeskchatsdk.js, there is a version v2 inside the address. We don’t recommend to manually modify the version into the address, this will lead to unpredictable errors to chat widget. The best way to use chat widget is still to create the touchpoint and use the corresponding snippet code in the touchpoint to load your chat widget.
<!-- Start of Talkdesk Code -->
    <script>
      var webchat;
      (function(window, document, node, props, configs) {
        if (window.TalkdeskChatSDK) {
          console.error("TalkdeskChatSDK already included");
          return;
        }
        var divContainer = document.createElement("div");
        divContainer.id = node;
        document.body.appendChild(divContainer);
        var src = "https://talkdeskchatsdk.talkdeskapp.com/v2/talkdeskchatsdk.js";
        var script = document.createElement("script");
        var firstScriptTag = document.getElementsByTagName("script")[0];
        script.type = "text/javascript";
        script.charset = "UTF-8";
        script.id = "tdwebchatscript";
        script.src = src;
        script.async = true;
        firstScriptTag.parentNode.insertBefore(script, firstScriptTag);
        script.onload = function() {
          webchat = TalkdeskChatSDK(node, props);
          webchat.init(configs);
        };
      })(
        window,
        document,
        "tdWebchat",
        { touchpointId: "<customer touchpointId>", accountId: "", region: "<customer td region>" },
        { enableEmoji: true, enableAttachments: true, enableValidation: true, enableResponsiveLayout: true }
      );
    </script>
<!-- End of Talkdesk Code -->- Problems occurs without setting rules for CSP
We need to be careful when adding a new request in the chat widget, the customer will use CSP tool to scan the requests' to avoid from being attacked, so if you plan to add a new request that is not associated with current hosts in the chat widget, please must inform the customer to add the new hosts into their CSP whitelist to keep the chat widget working well in their website.
Updated 6 months ago