Sync Talkdesk Agents
Overview
The Agent Sync process aims to connect Talkdesk users and their counterparts in integrated systems. When an automation linked to an agent is triggered, you can use the external ID to initiate actions specific to the user in the integrated system.
To sync Talkdesk agents with external systems like CMSs, follow these steps:
1 - Set up a connection and define actions to retrieve user information from the external system.
2 - Trigger this action and use the resulting response to fuel the Agent Sync process. Agent Sync utilizes user emails to identify matching users between Talkdesk and the external system. Note that the action response may not have the exact structure expected by Agent Sync.
3 - Map the response to ensure proper parsing. You may also need to trigger the action multiple times, especially if the external system's API uses pagination, as not all users will appear in the initial batch.
Connection Flows automates these steps daily, ensuring Talkdesk and the external system stay synchronized, even as new users are added.
Required Background Knowledge
1 - Talkdesk agents. This blueprint is designed to help you map existing Talkdesk Agents with their corresponding IDs in an external system, referred to as their External ID. To make this process work, you'll need to have more than one Talkdesk Agent. If you're unsure how to create Talkdesk Agents, you can find instructions here.
2 - API for integration. In this example, a Mock API that was created using Postman Mock Server is utilized. Instructions on how to replicate this Mock API can be found here. This API offers the following endpoints:
users/formatted– returns a list of users and emails in the exact format required by Talkdesk.users/not-formatted– provides a list of users and emails, but with slightly different keys. This demonstrates how Connection Flows can adapt data to enable Agent Sync.users/{USERID}/punch-clock– allows for time clock punching for a specific user. To use this endpoint, you'll need the User ID defined by the Time Punching integration itself.
3 - Integration powered by Talkdesk Connections™. Once you have your Mock API set up, follow these steps to create a Connection and the corresponding actions, as detailed here.
4 - Automation that utilizes the External ID. In this example, the goal is to track the hours an agent is logged in. To achieve this, you'll need an automation that uses the External ID (synchronized via Connection Flows) to "punch the clock" whenever an agent logs in or out. Instructions on creating such an automation and using the External ID can be found here.
Implementation Steps
2 - Create a variable to hold the page number.
3 - Initialize the page variable.
4 - Get the users to utilize the Execute Action component.
5 - Synchronize agents.
6 - Test your automation.
7 - Iterate through the flow pages.
8 - Decide whether to iterate to a new page or stop.
9 - Test your automation.
10 - Update the Get Users component to retrieve non formatted users.
11 - Map the non-formatted users to formatted users.
12 - Test your automation.
Sync Talkdesk Agents with External Systems - Example

Figure 1 - Create a Connection Flow
2 - Create a variable to hold the page number
2.1 - Open the Variables sidebar (Figure 2 - 1).

Figure 2 - Variables sidebar
2.2 - Click the Add variable button (Figure 3 -1). A modal will open (Figure 3 - 2). Enter the variable name (mandatory field; Figure 3 - 3) and click the Confirm button (Figure 3 - 4) to add the variable.
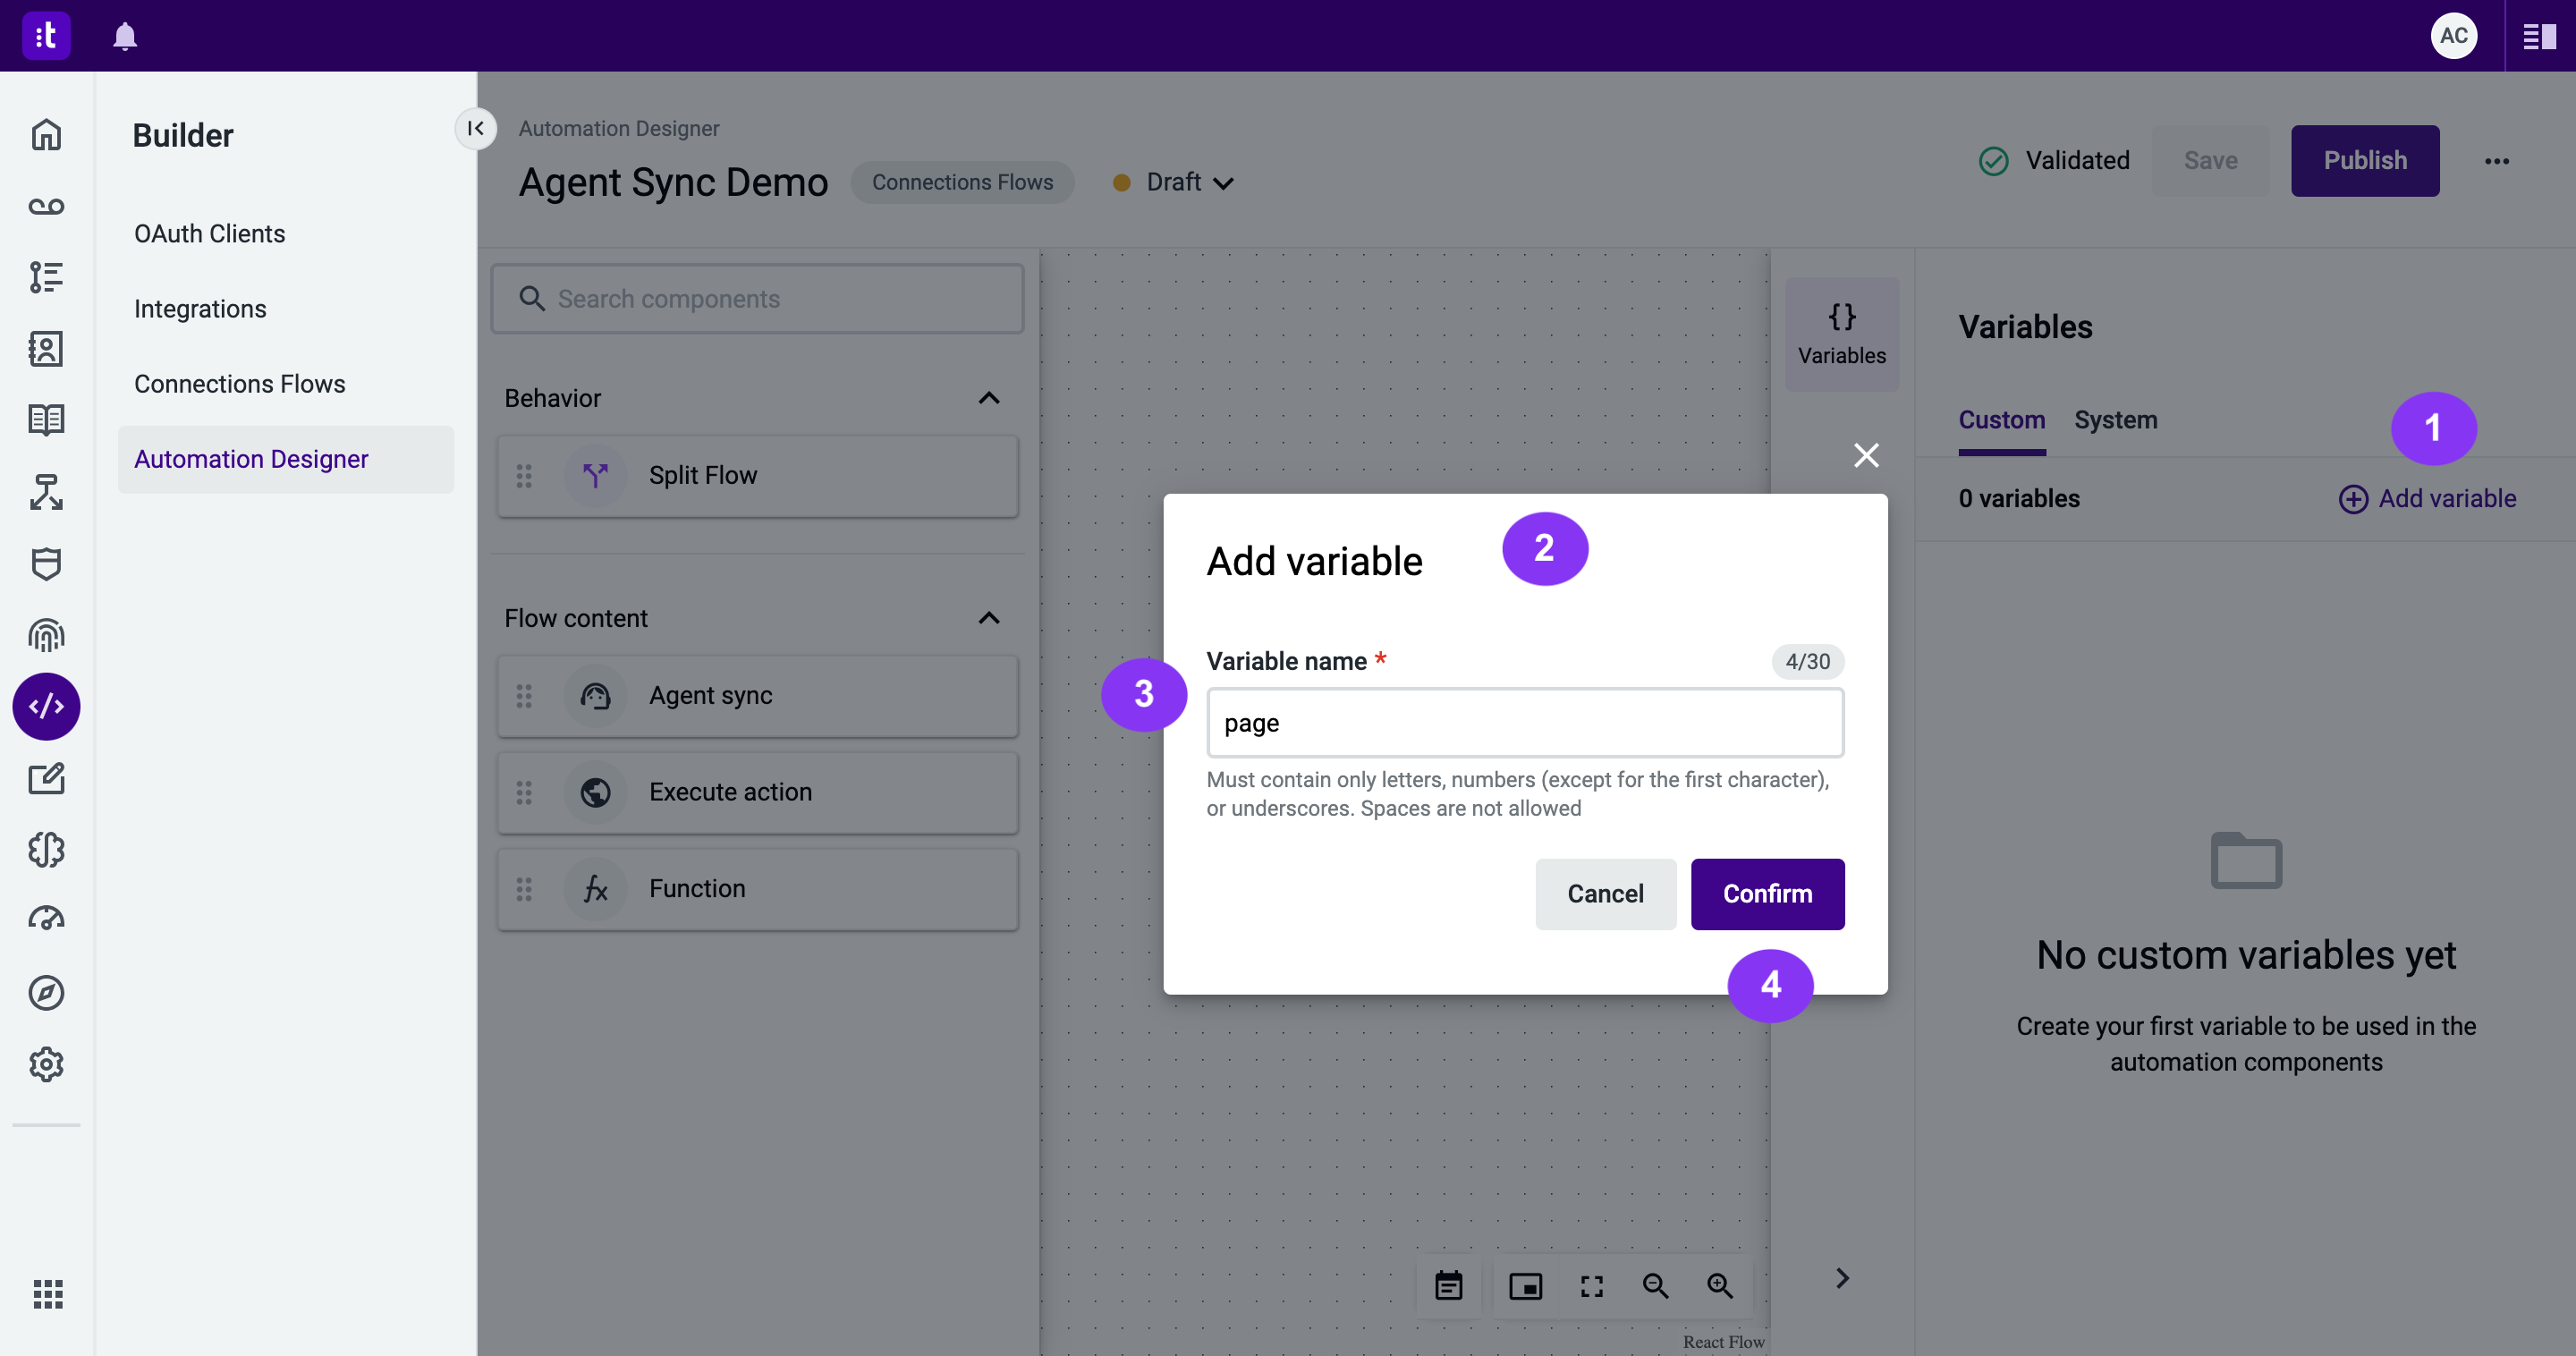
Figure 3 - Add a variable
3 - Initialize the page variable
3.1 - Drag the Function component from the Flow content menu (Figure 4 - 1) to initialize the page variable. Connect the trigger to the newly added Function (Figure 4 - 2).
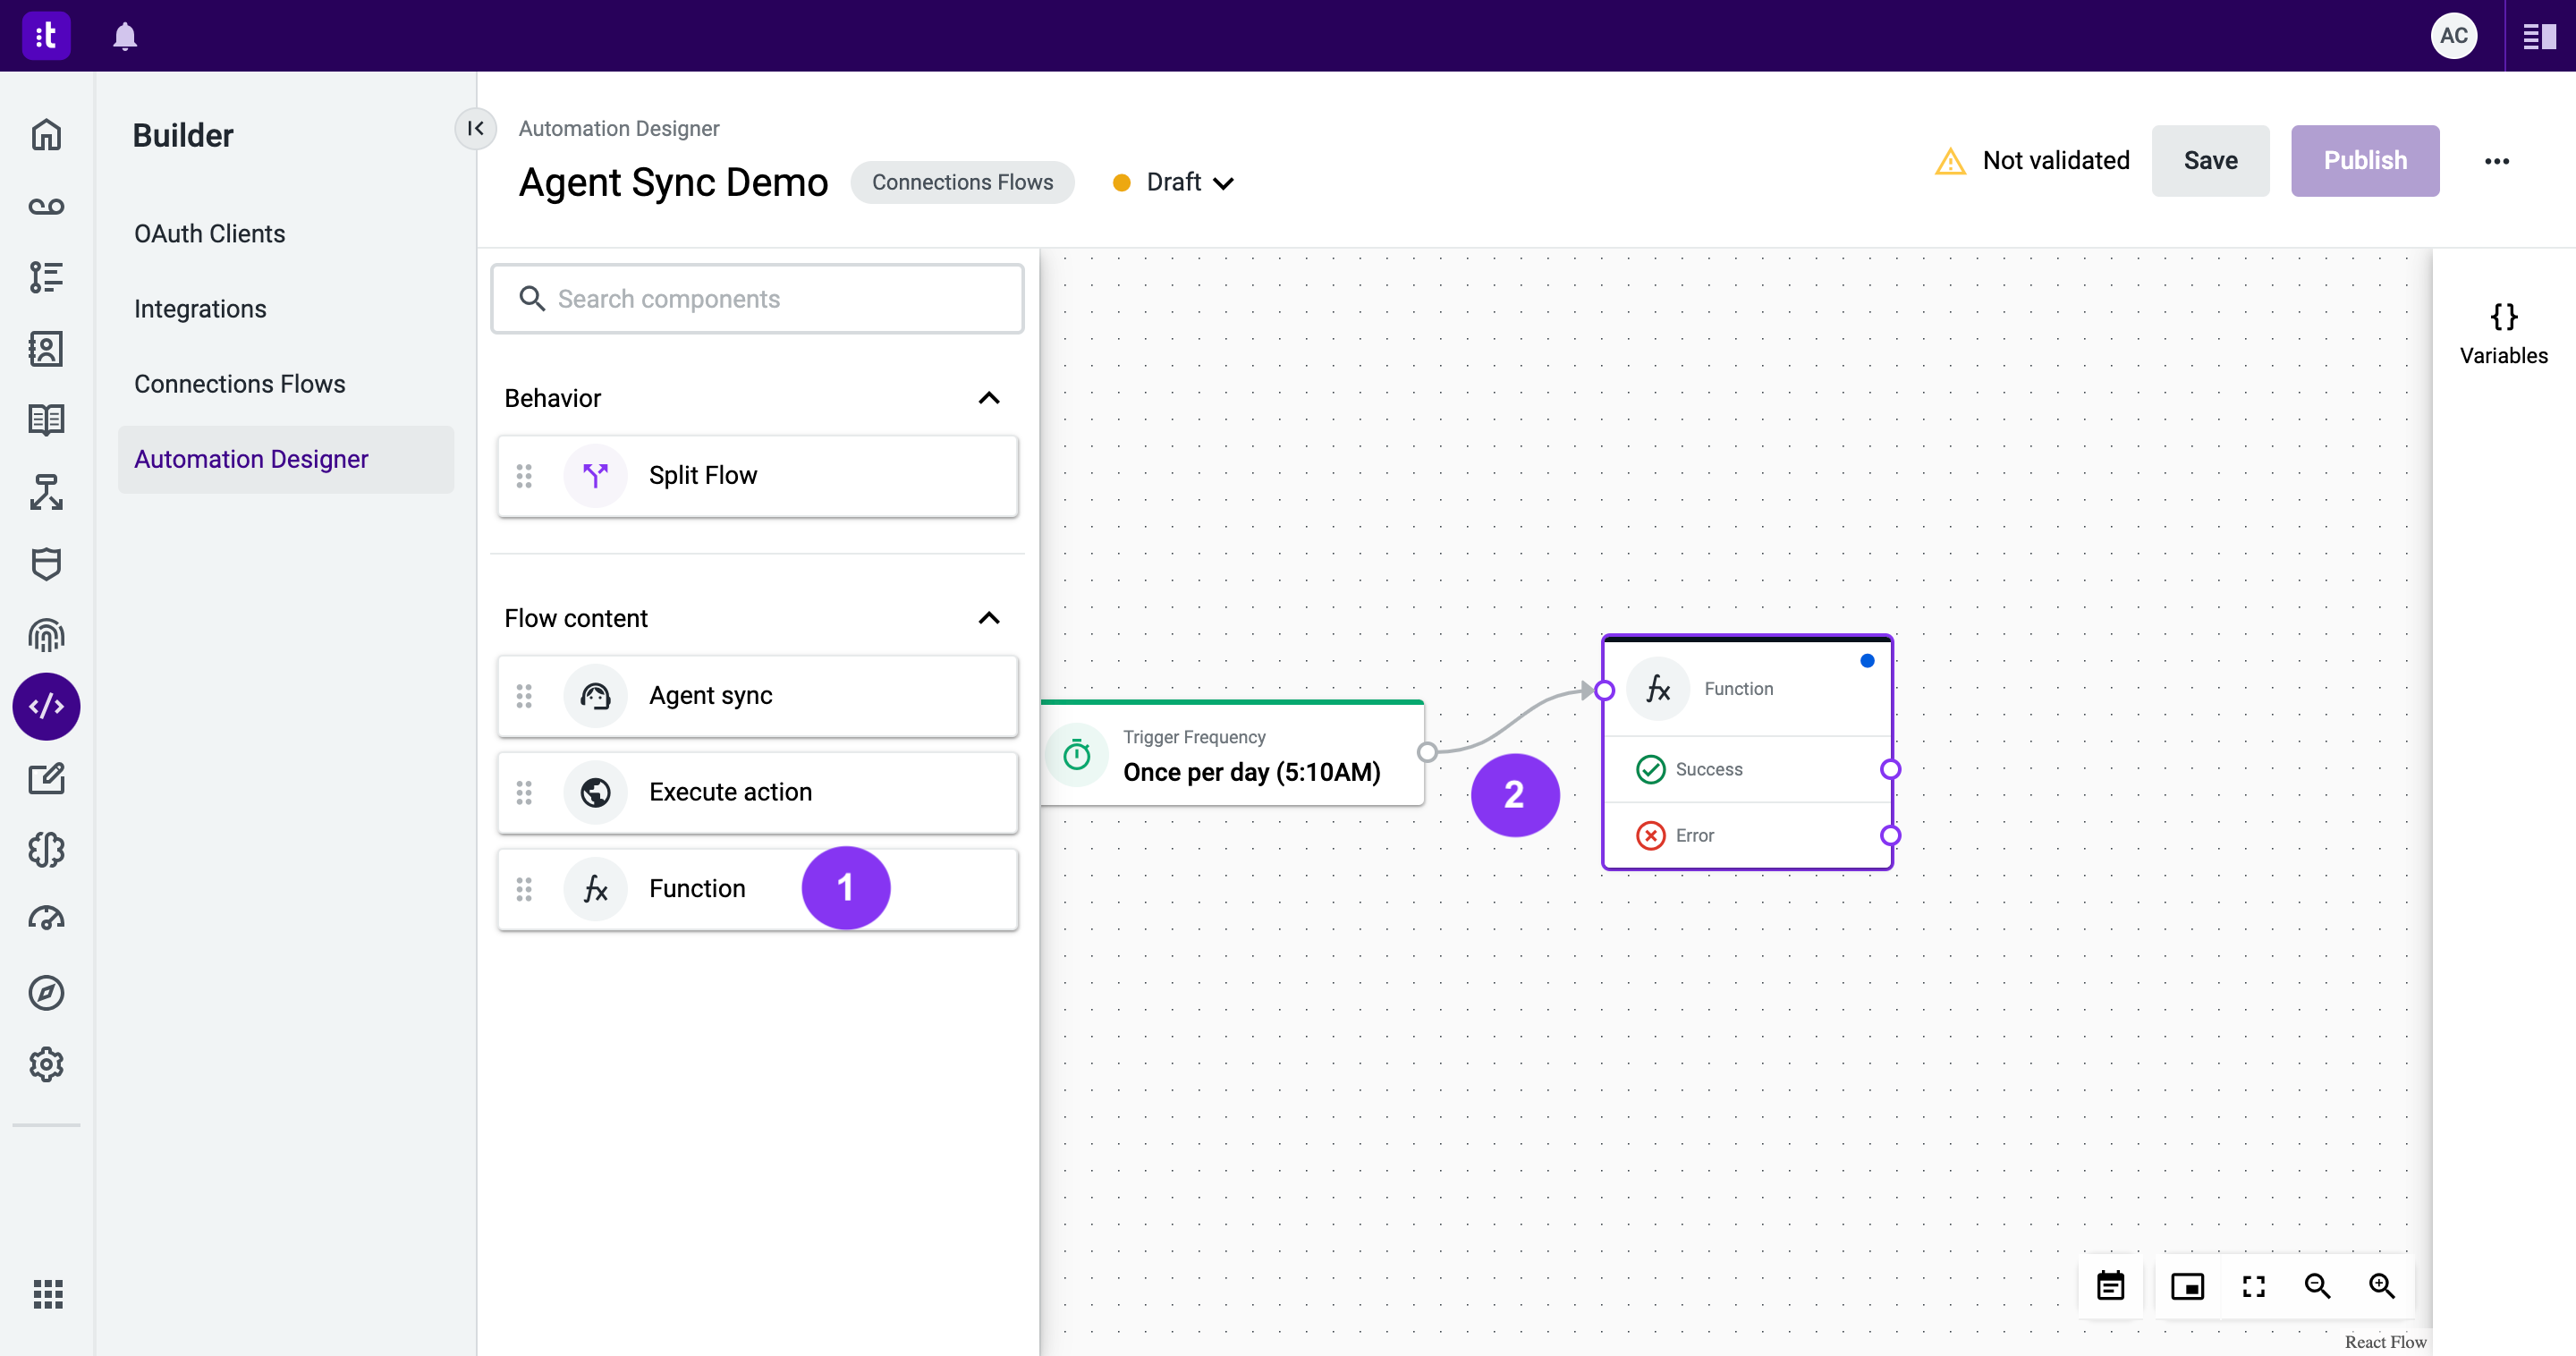
Figure 4 - Drag the Function component
3.2 - Double-click the Function component to open its configuration panel (Figure 5 - 1).
3.3 - Provide the component name (required field; Figure 5 - 2) and insert the following code to the Function field (required field; Figure 5 - 3) to initialize the page variable:
Context.setVariable("page", 1)3.4 - After completing the configuration, click Save (Figure 5 - 4).
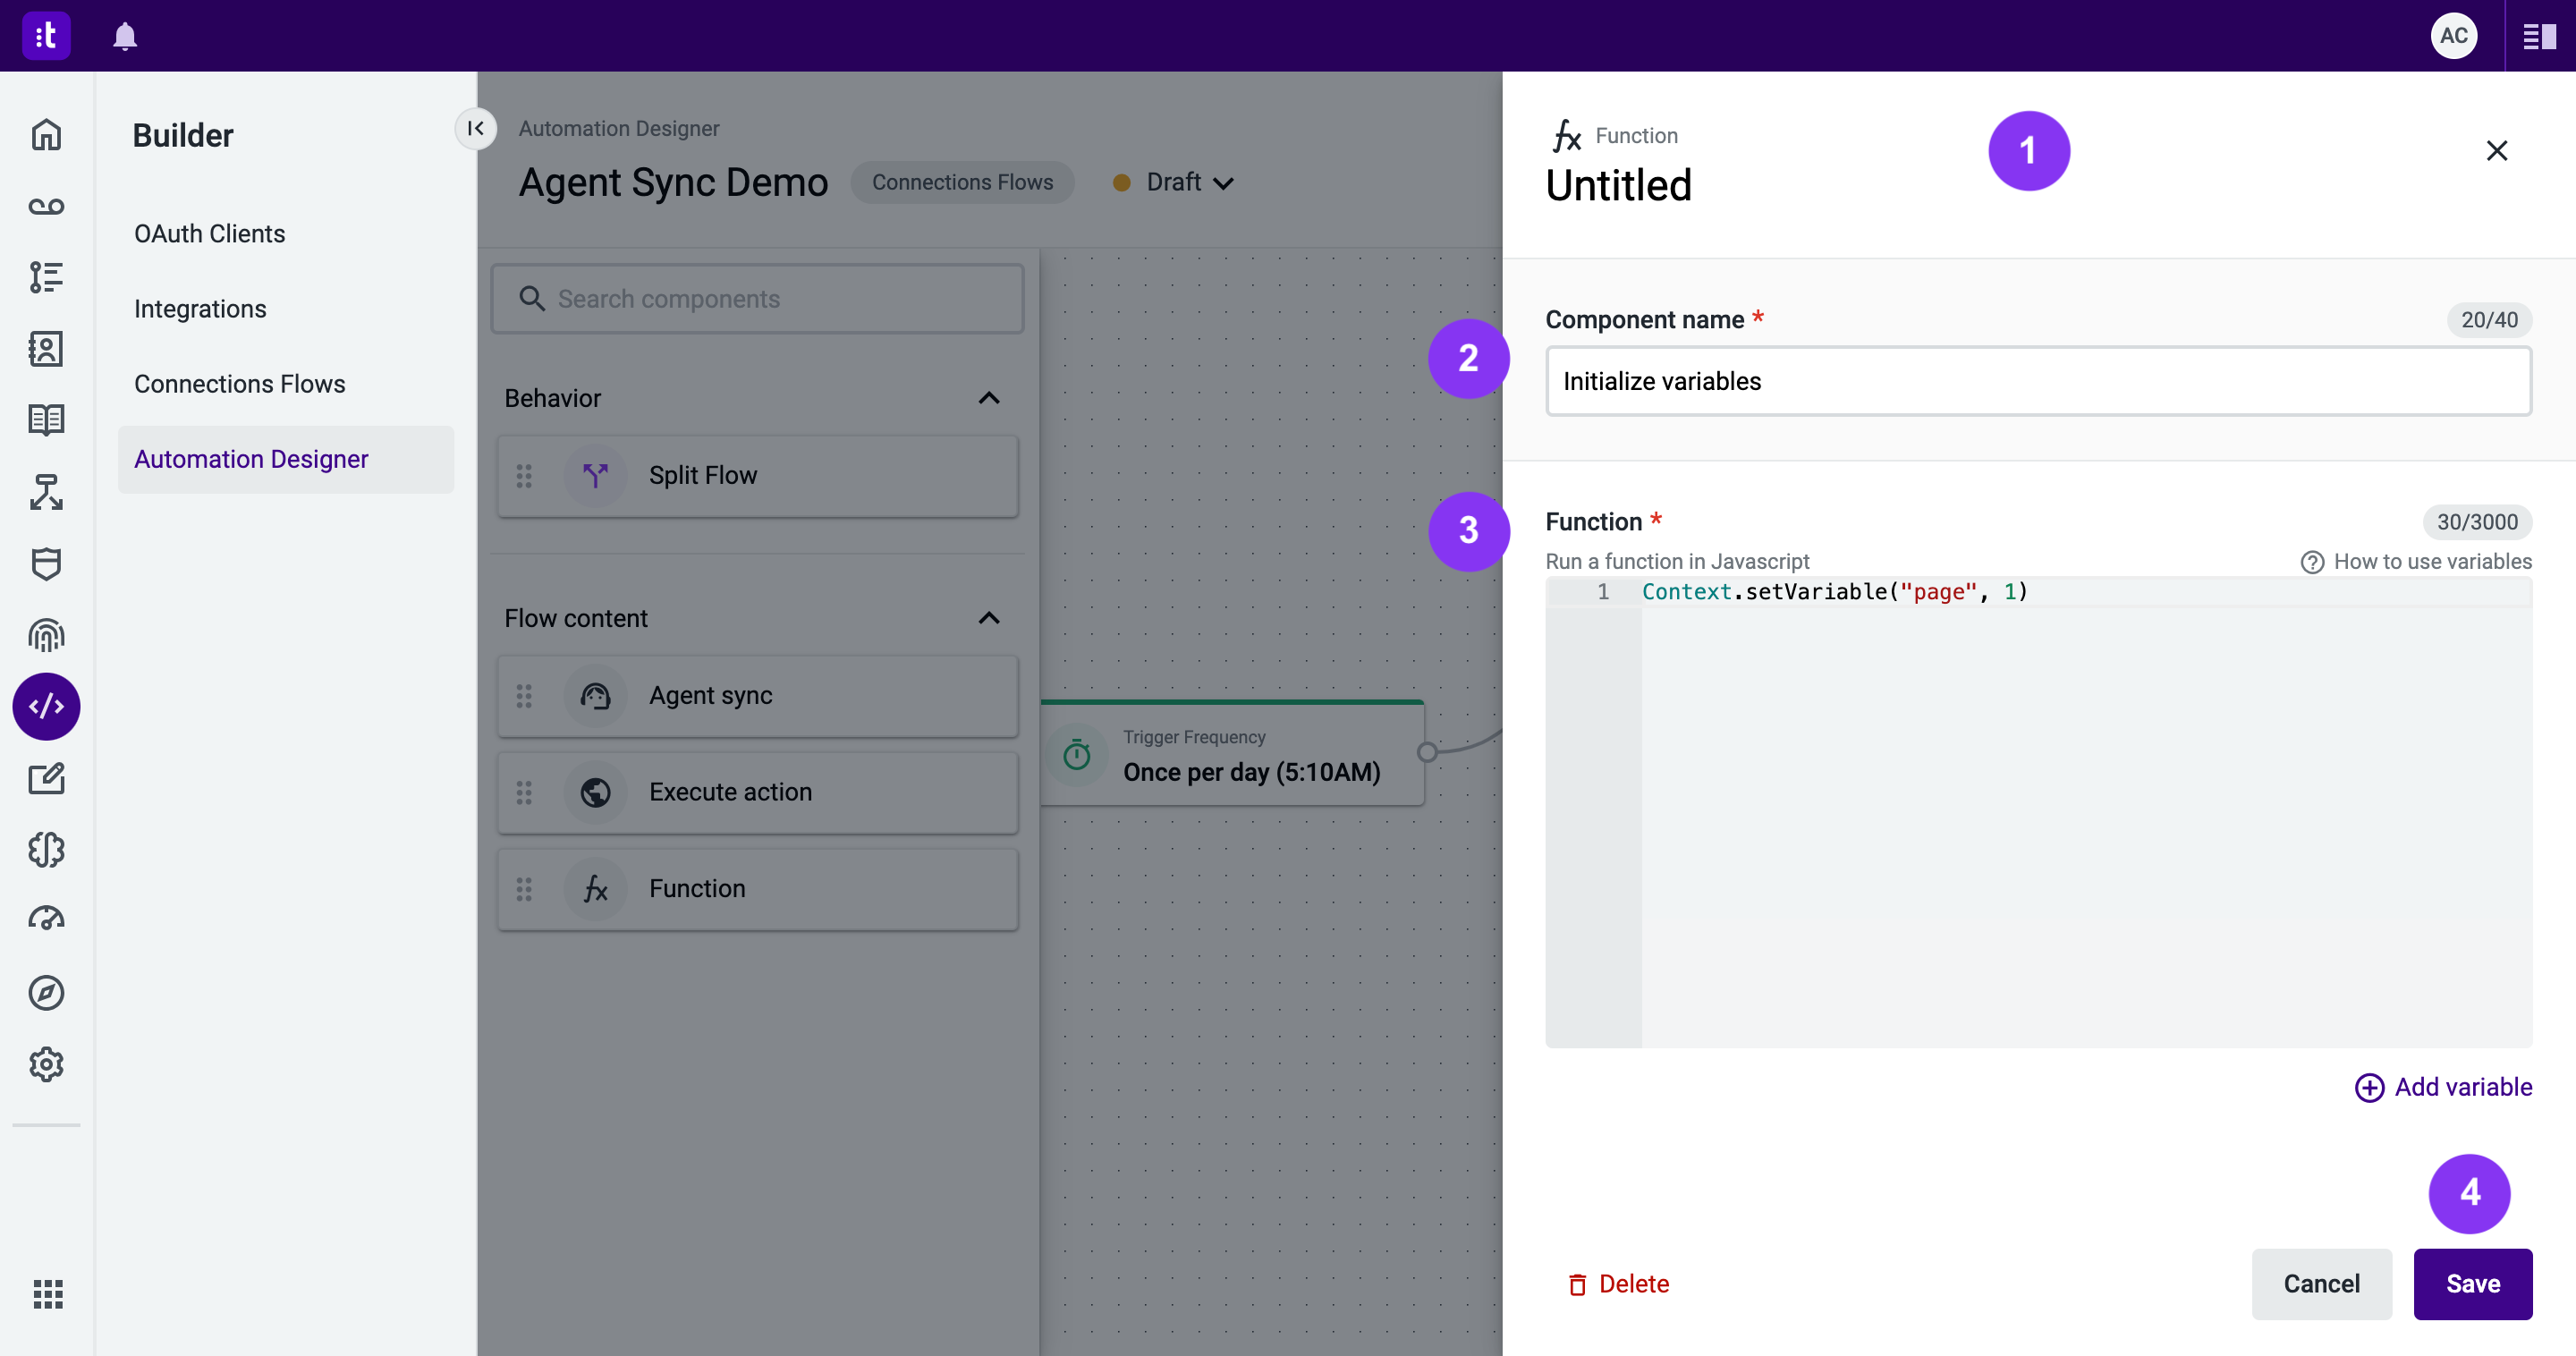
Figure 5 - Function component configuration
4 - Get the users to utilize the Execute Action component
4.1 - Drag and drop the Execute Action component from the Flow content menu (Figure 6 - 1).
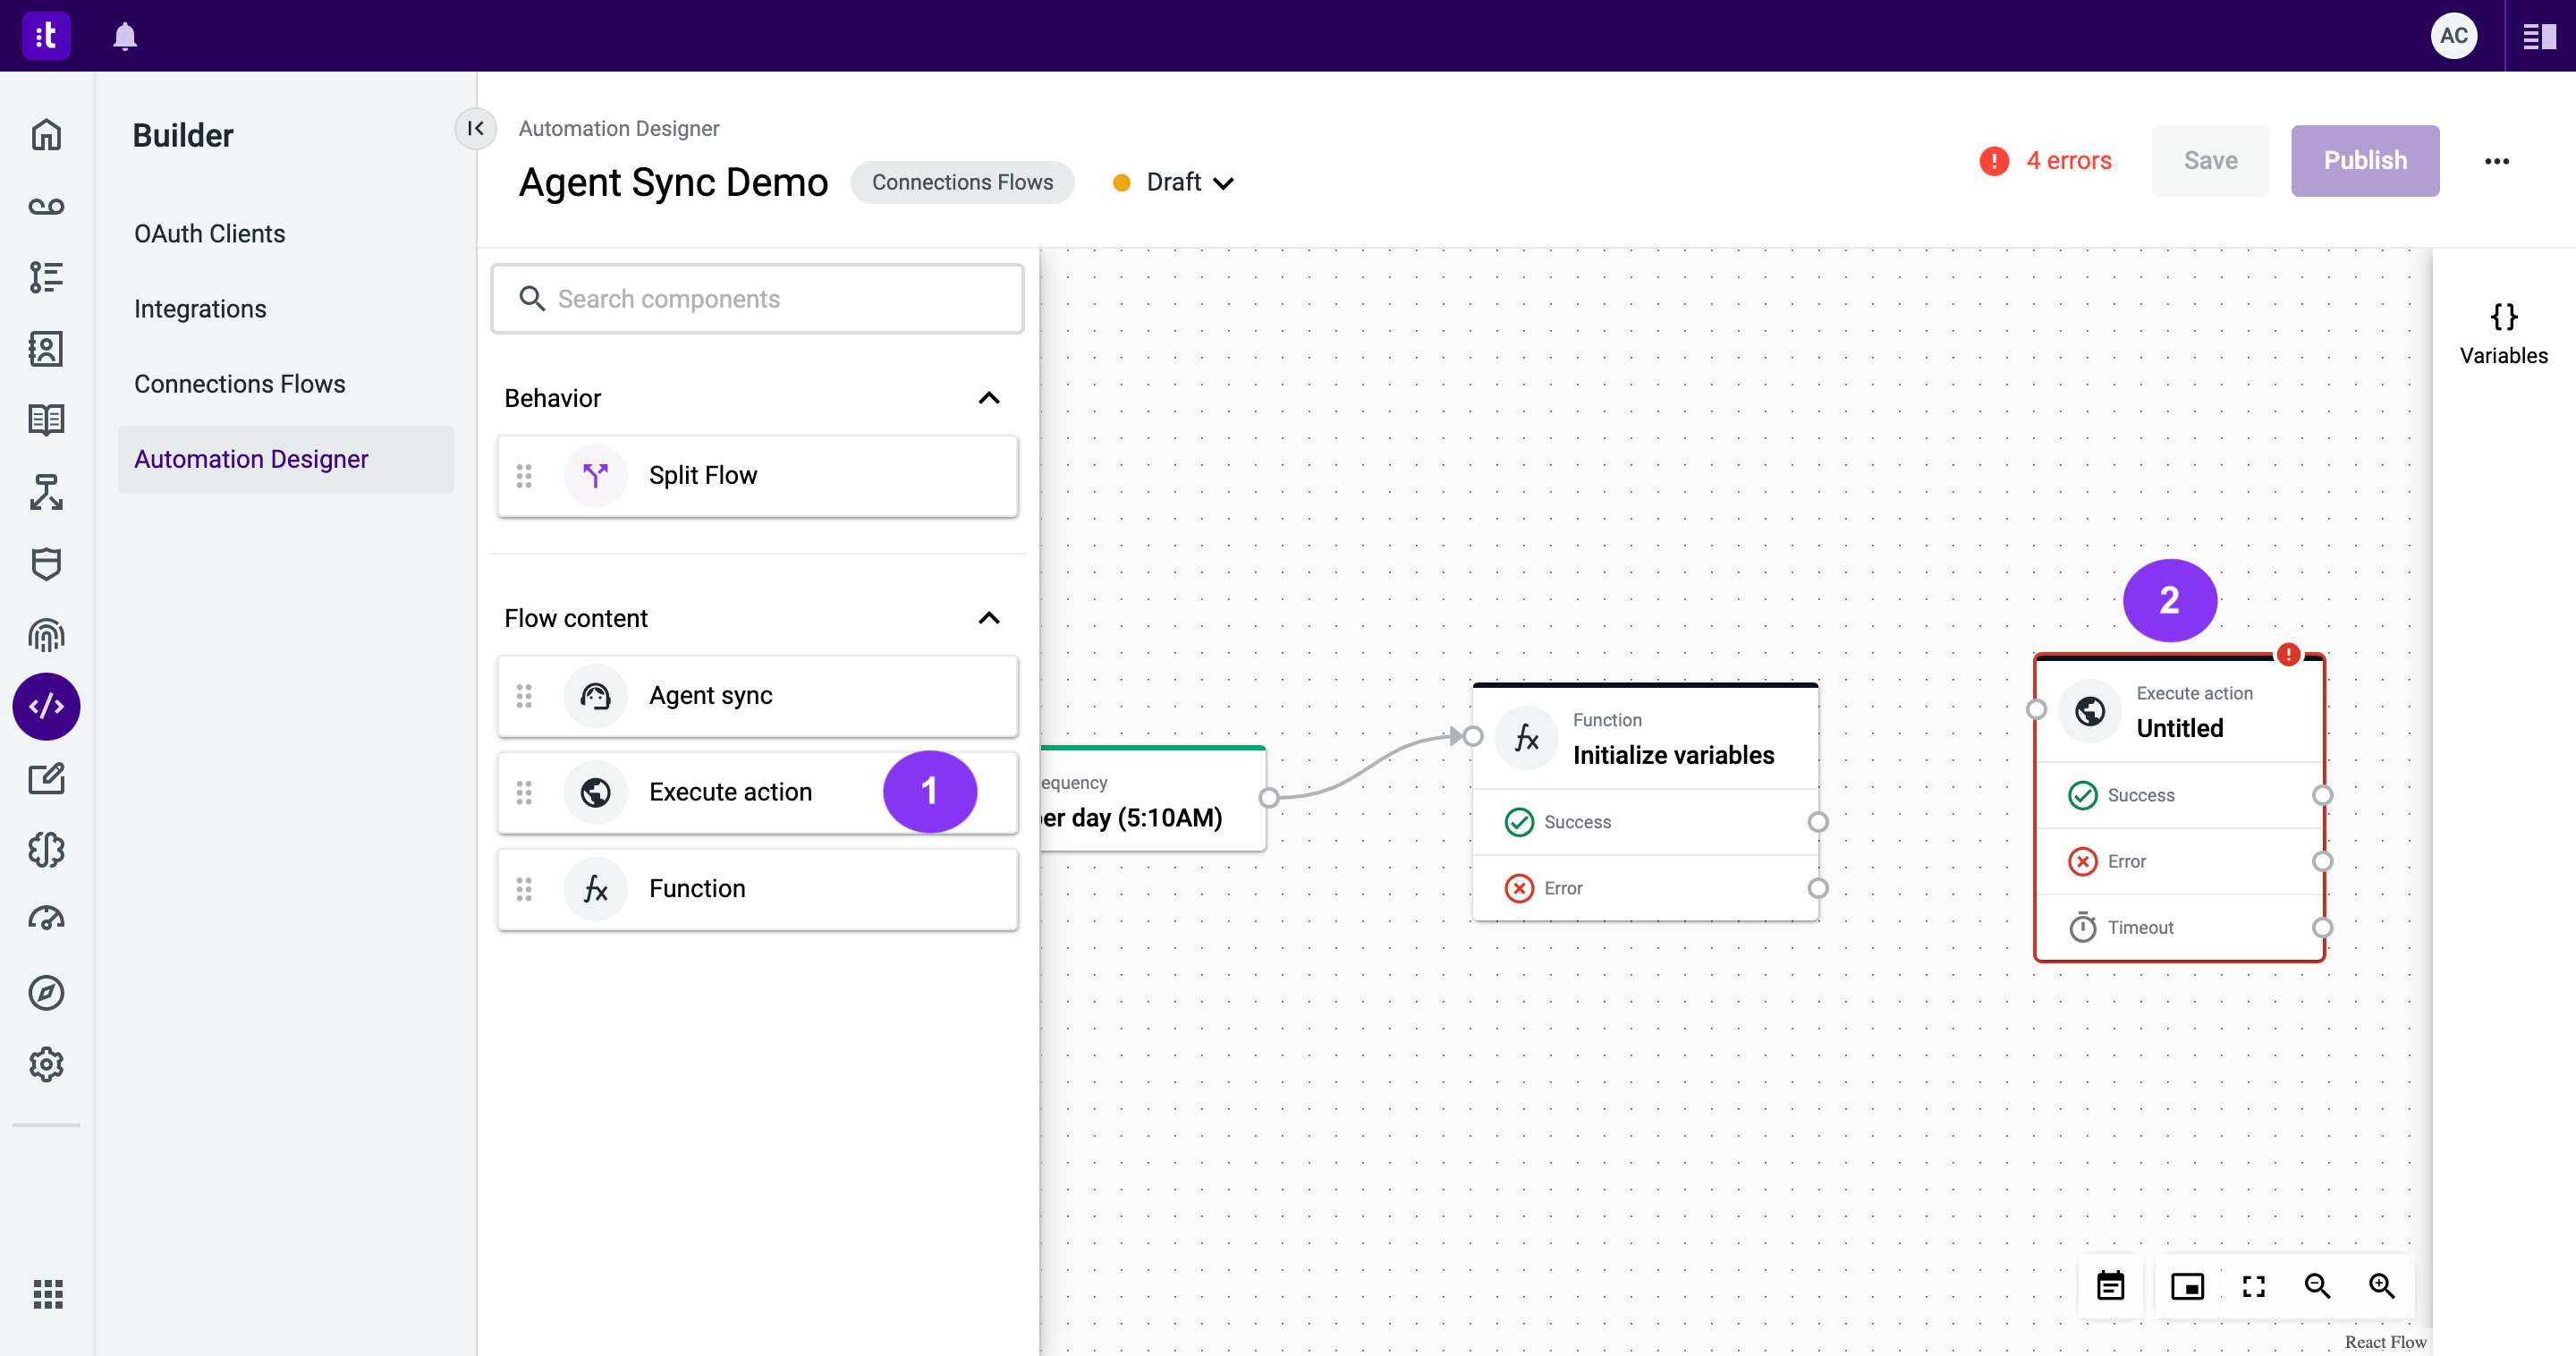
Figure 6 - Execute Action component
4.2 - Double-click the Exectute Action component (Figure 6 - 2) to access its configuration panel (Figure 7 - 1).
4.3 - Set up the Connection (in this case, the Punch Clock Integration; Figure 7 - 2) and the Action (in this case the formatted version of Get users; Figure 7 - 3).
4.4 - Use the variable page as the parameter for the new Action (Figure 7 - 4).
4.5 - If you are using the mock Connection/Action, you will find three output variables (Figure 7 - 5). On each drop down for this output, click the Add new variable button (Figure 7 - 6) and then confirm to create each of these variables.
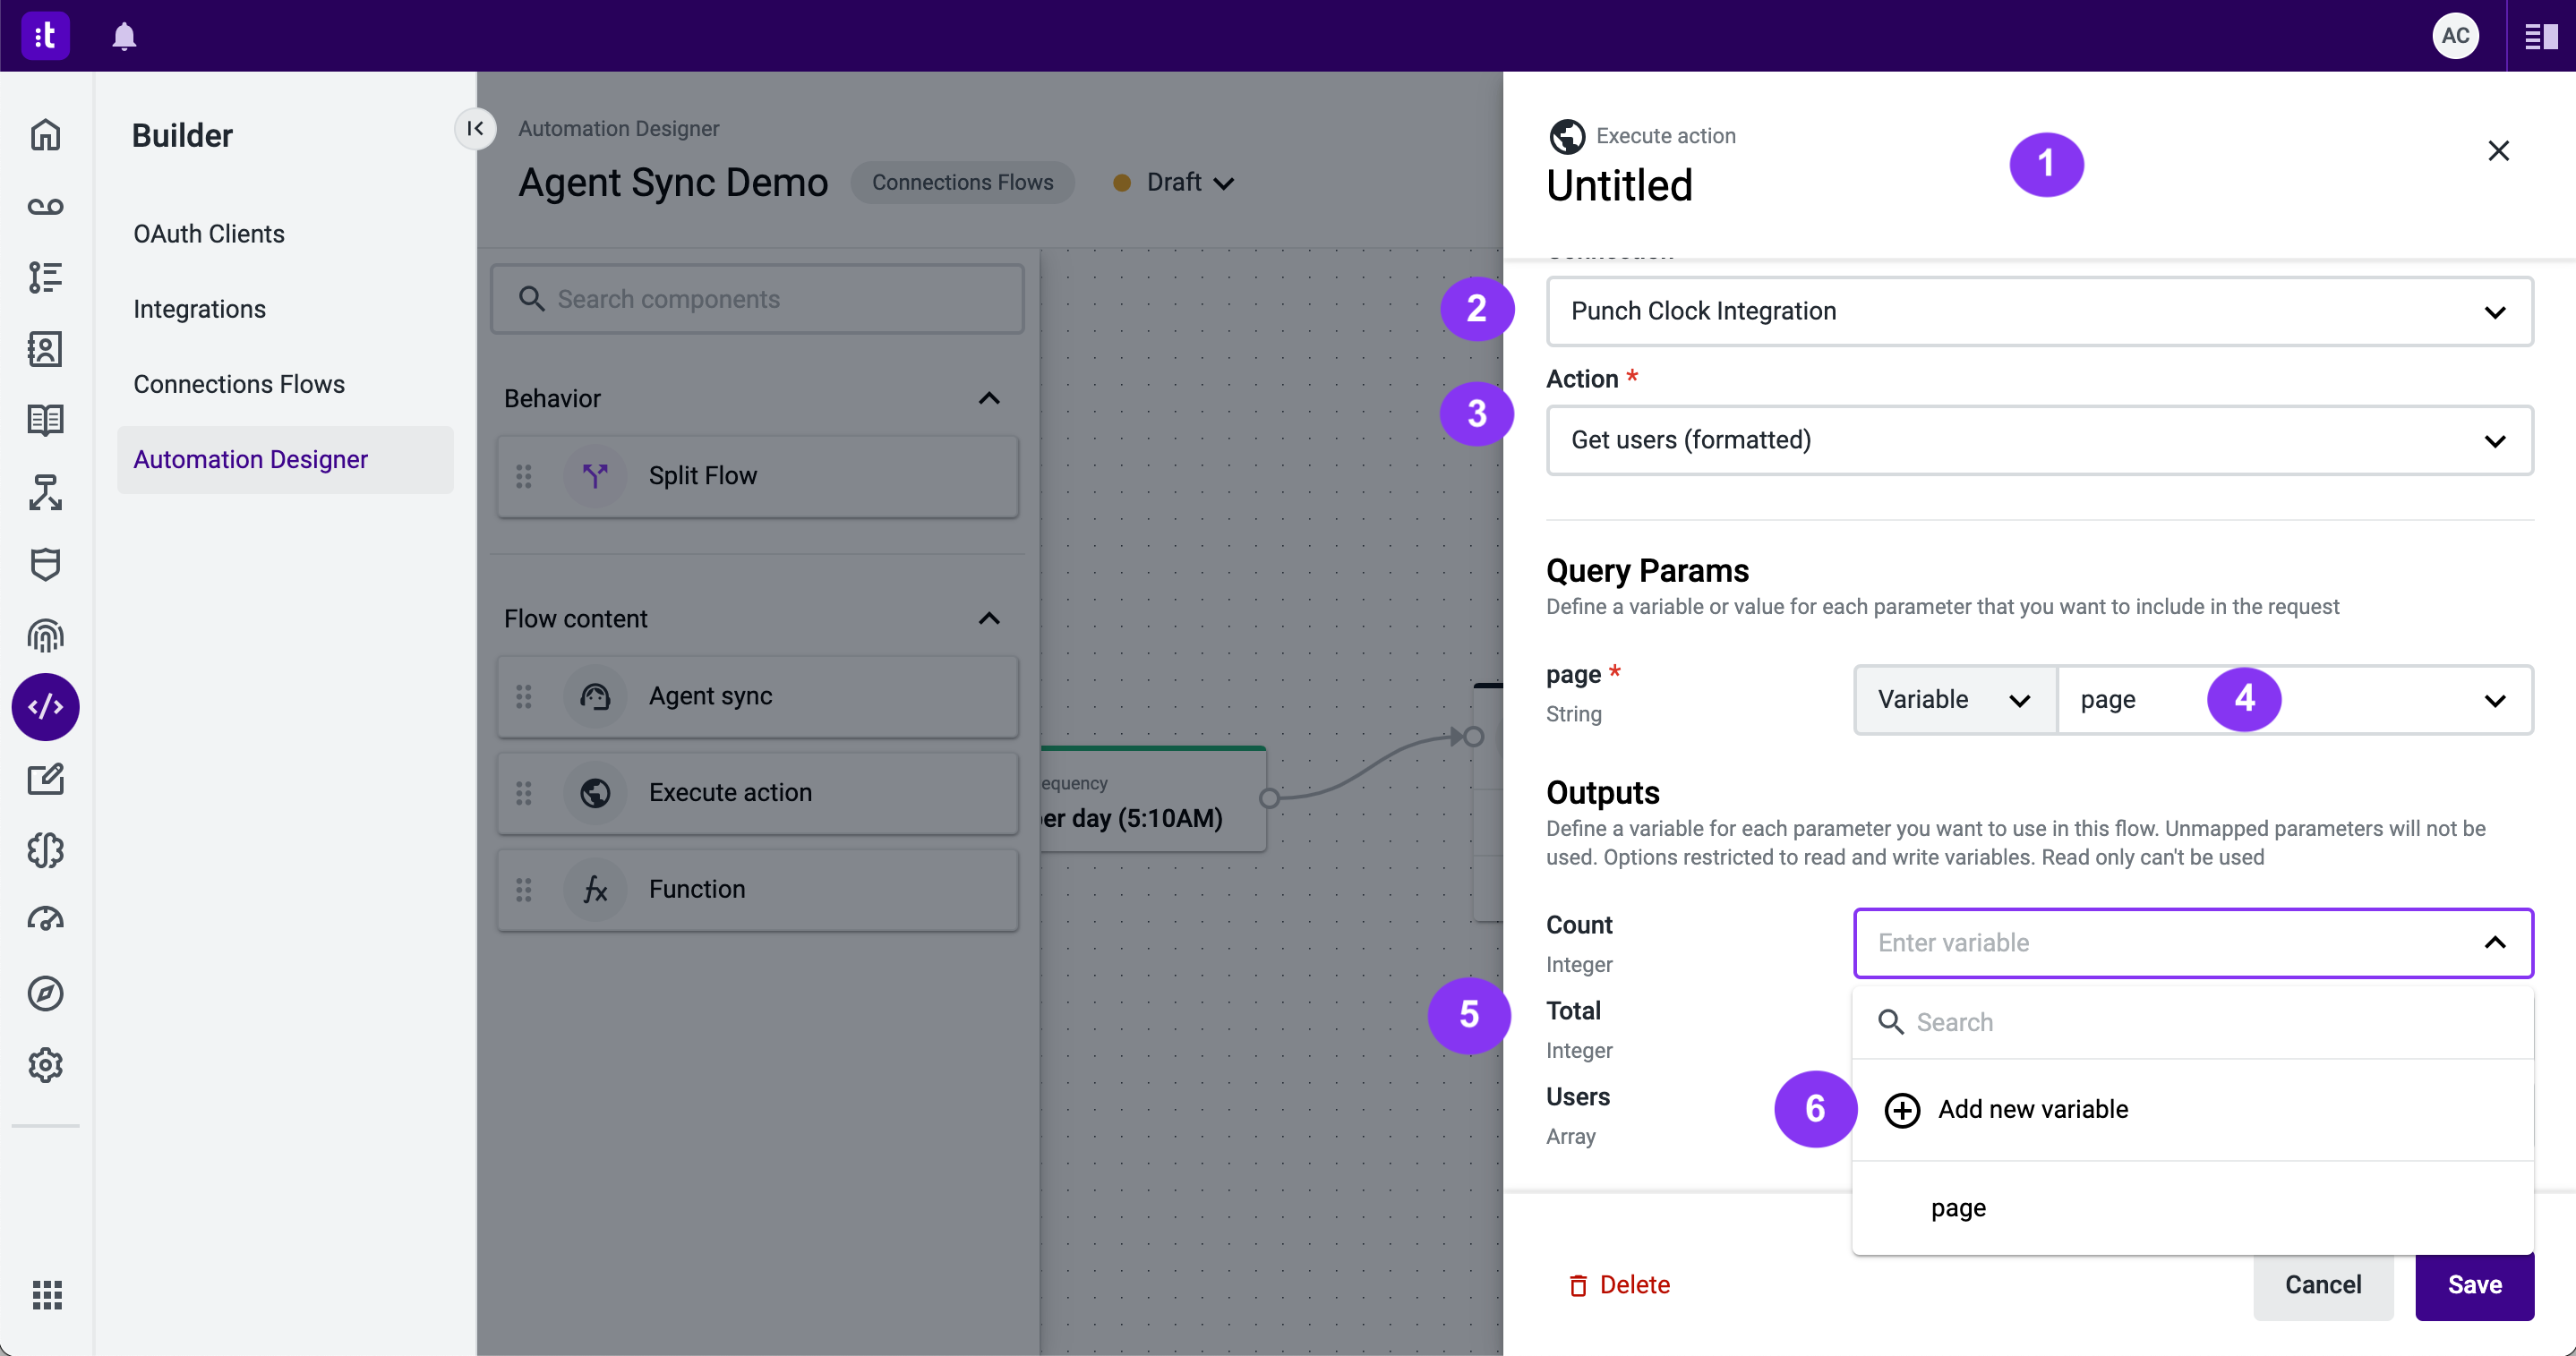
Figure 7 - Execute Action component configuration
In this example, the variables used on Outputs (Figure 8 - 1) are:
-
page_count(Count; Figure 8 - 2). -
total(Total; Figure 8 - 3). -
formatted_users(Users; Figure 8 - 4).4.6 - After completing the configuration, click Save (Figure 8 - 5).
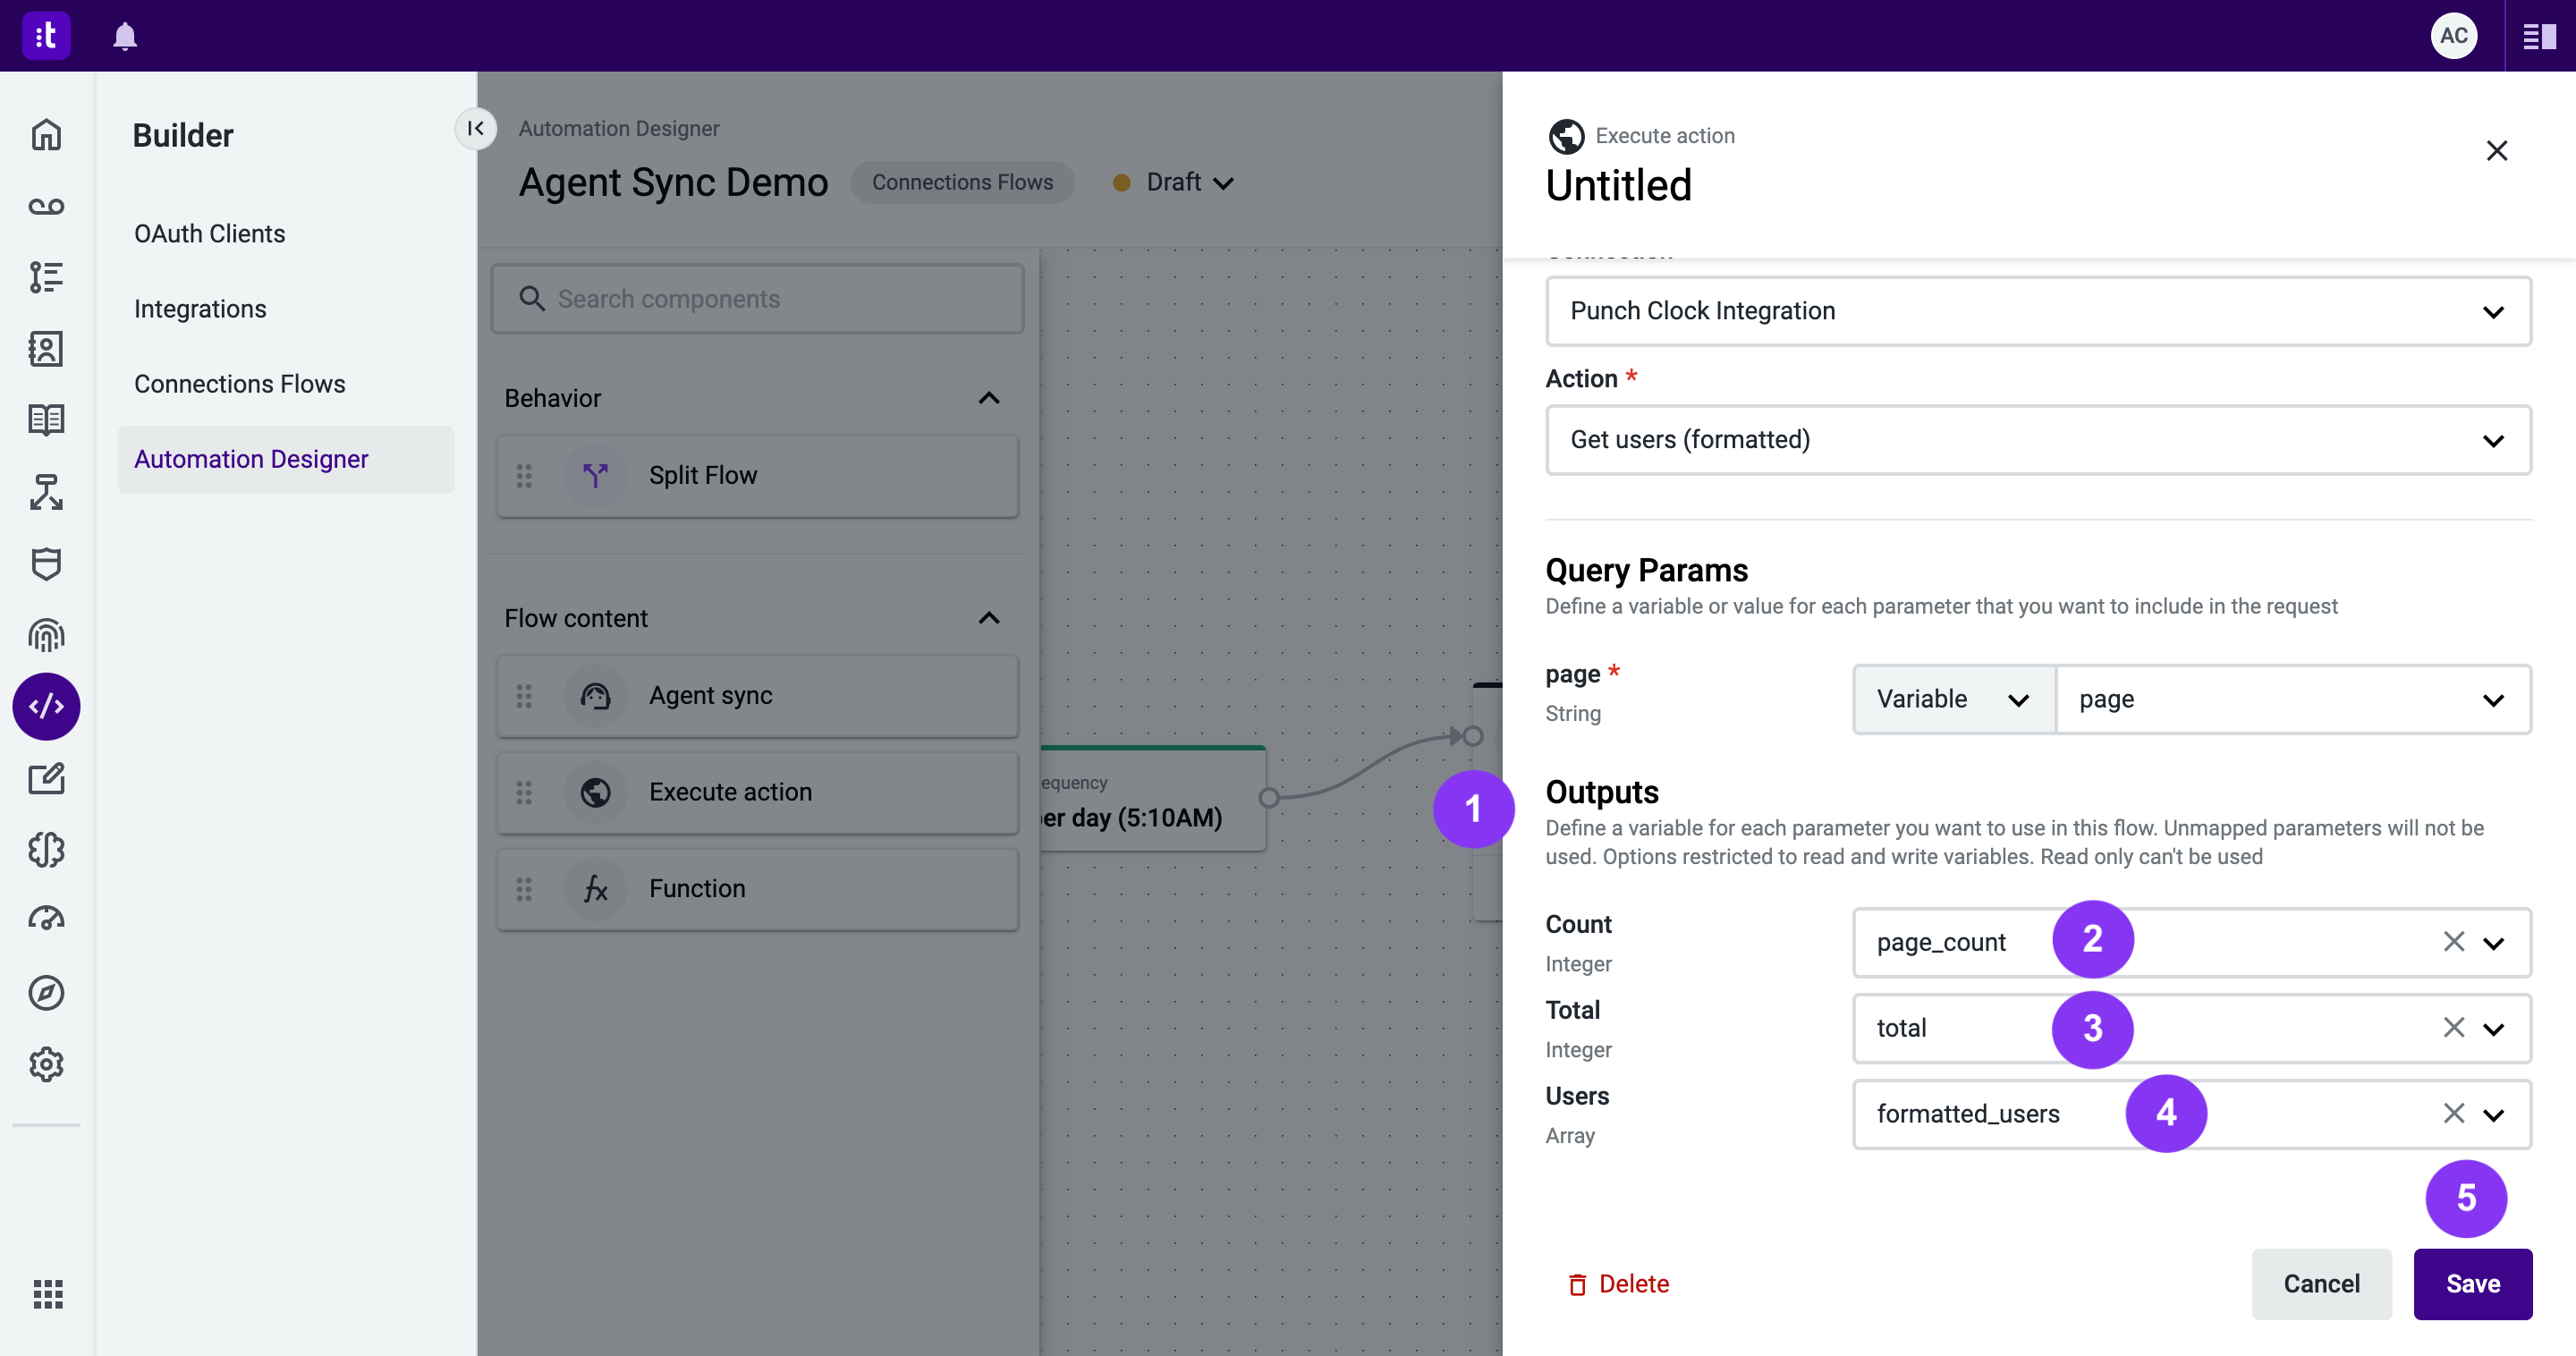
Figure 8 - Outputs configuration
5 - Synchronize agents
Since the Action being executed in step 4 already retrieves the users in Talkdesk’s expected format (an array of objects with the email and ID keys), you can now simply drag and link the Agent Sync component to the Execute Action component (Figure 9 - 1).
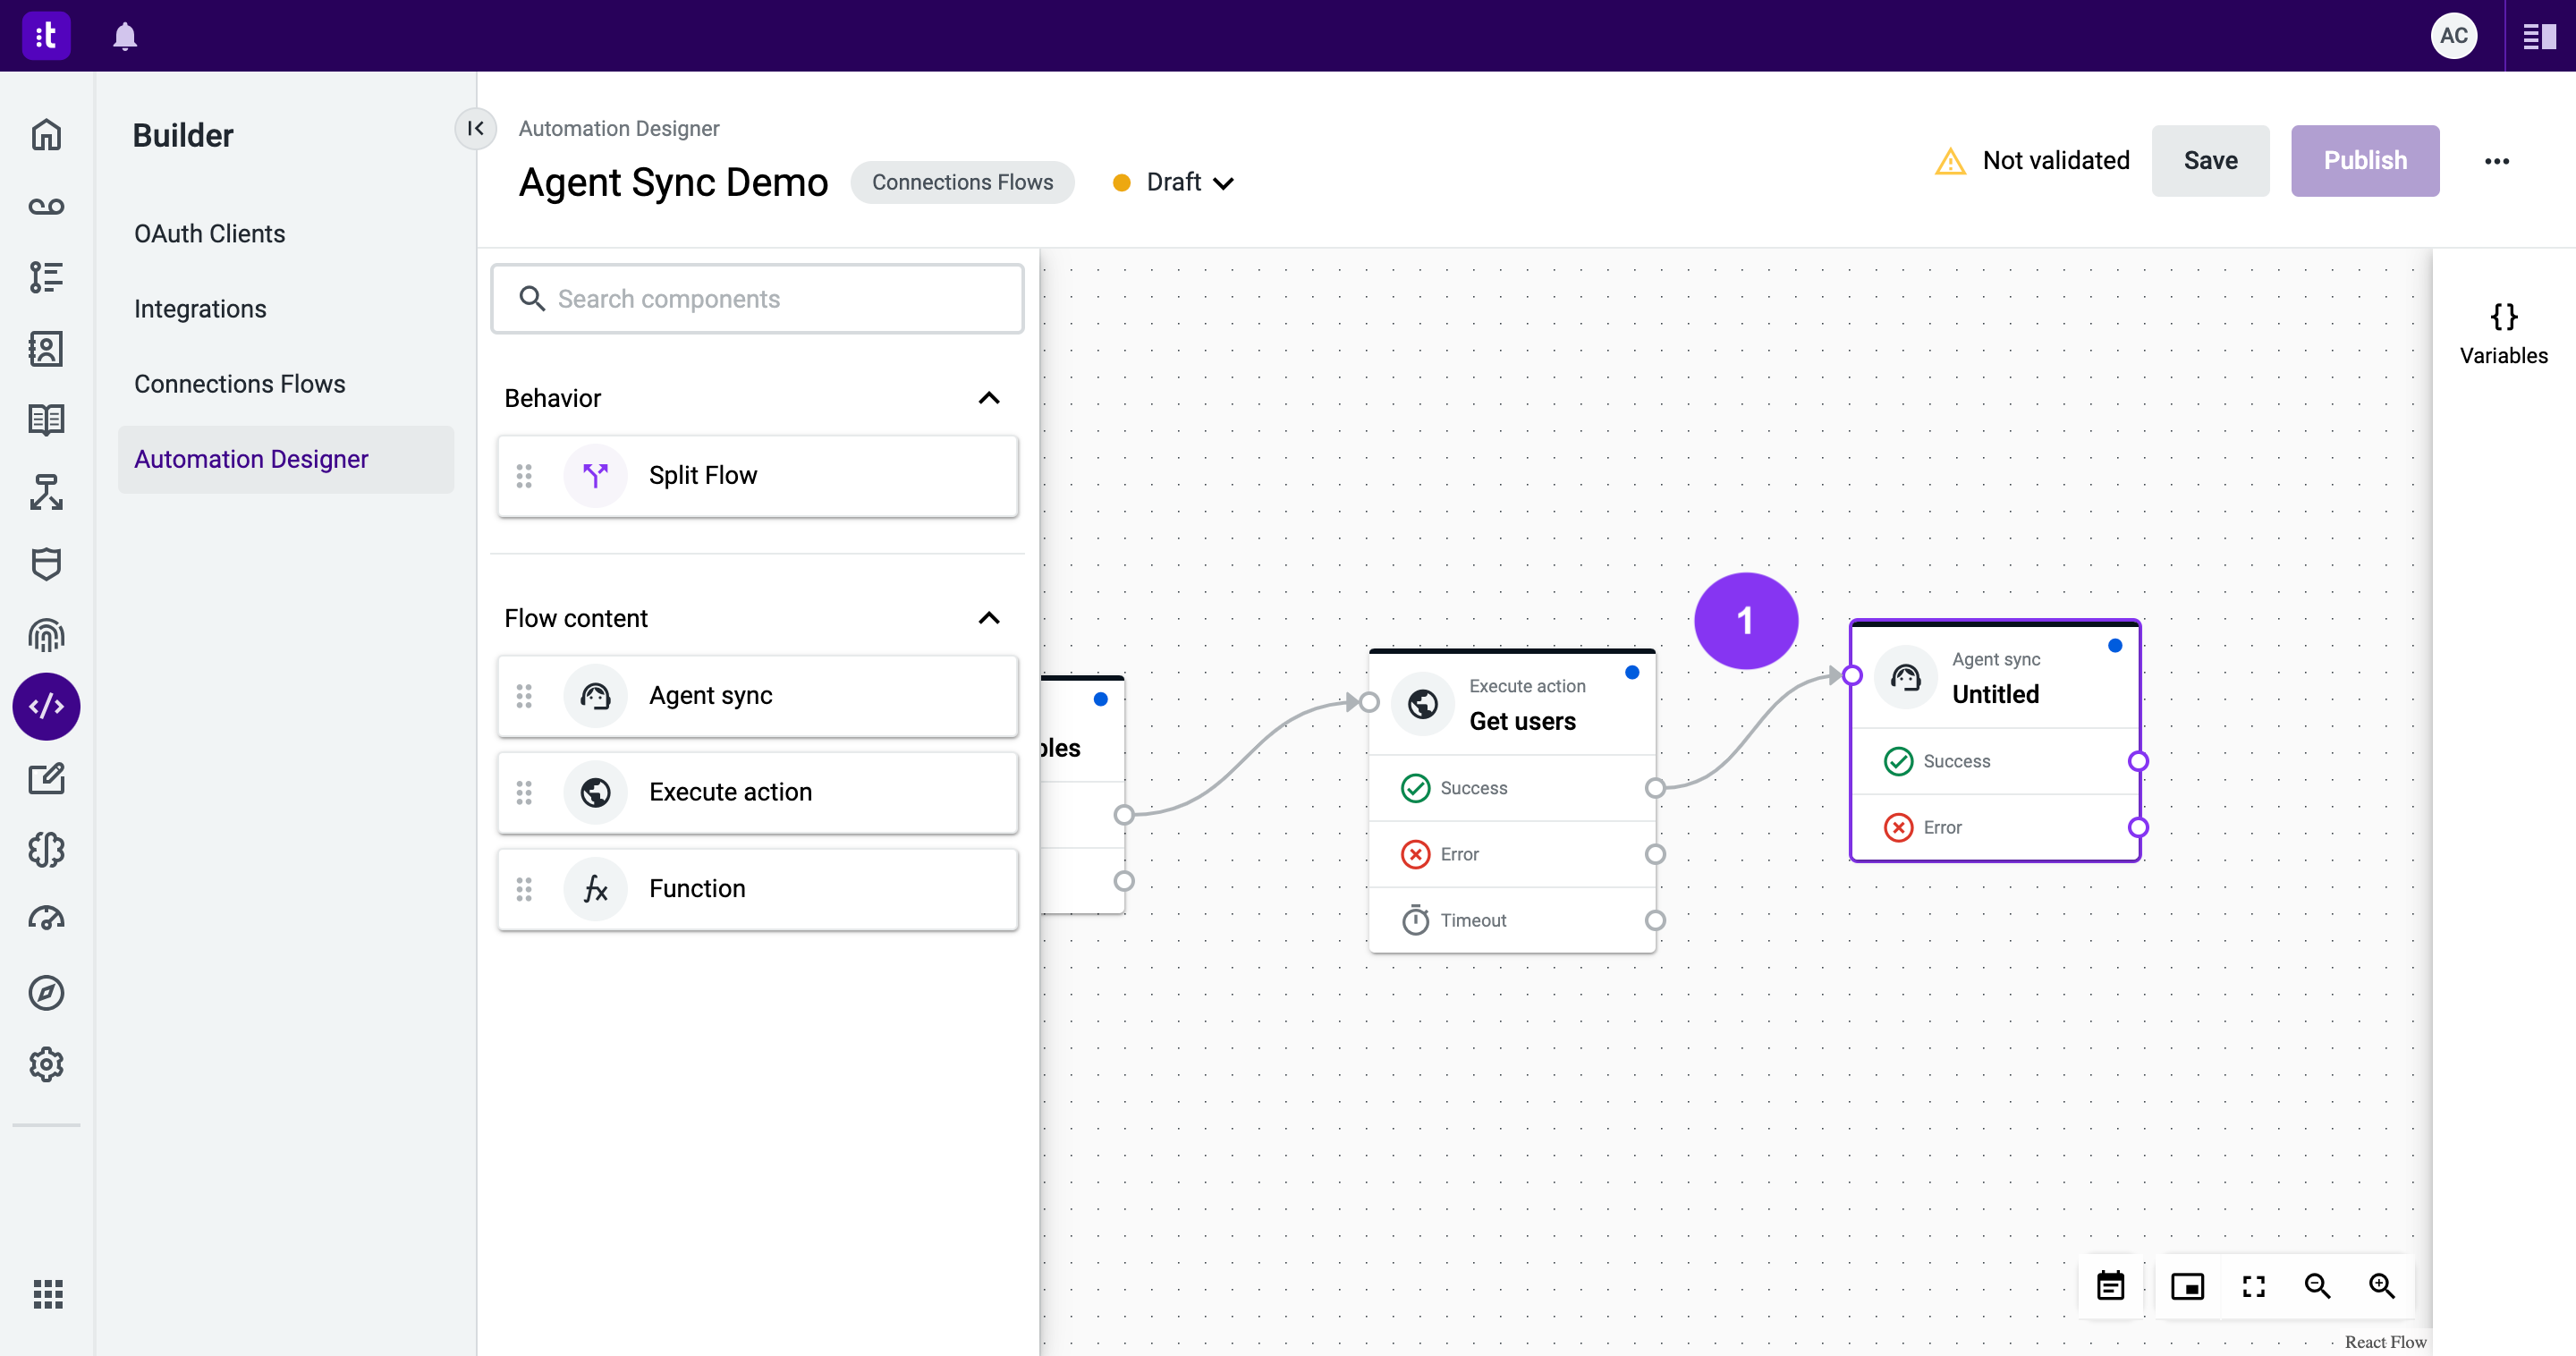
Figure 9 - Linking the Agent Sync component to the Execute Action component
5.1 - Double-click the Agent Sync component to open its configuration panel (Figure 10 - 1).
5.2 - Insert the component name (in this case, it's Synchronize Agents; Figure 10 - 2).
5.3 - Select the Connection (Punch Clock integration; Figure 10 - 3) and the variable formatted_users; Figure 10 - 4) defined in step 4.
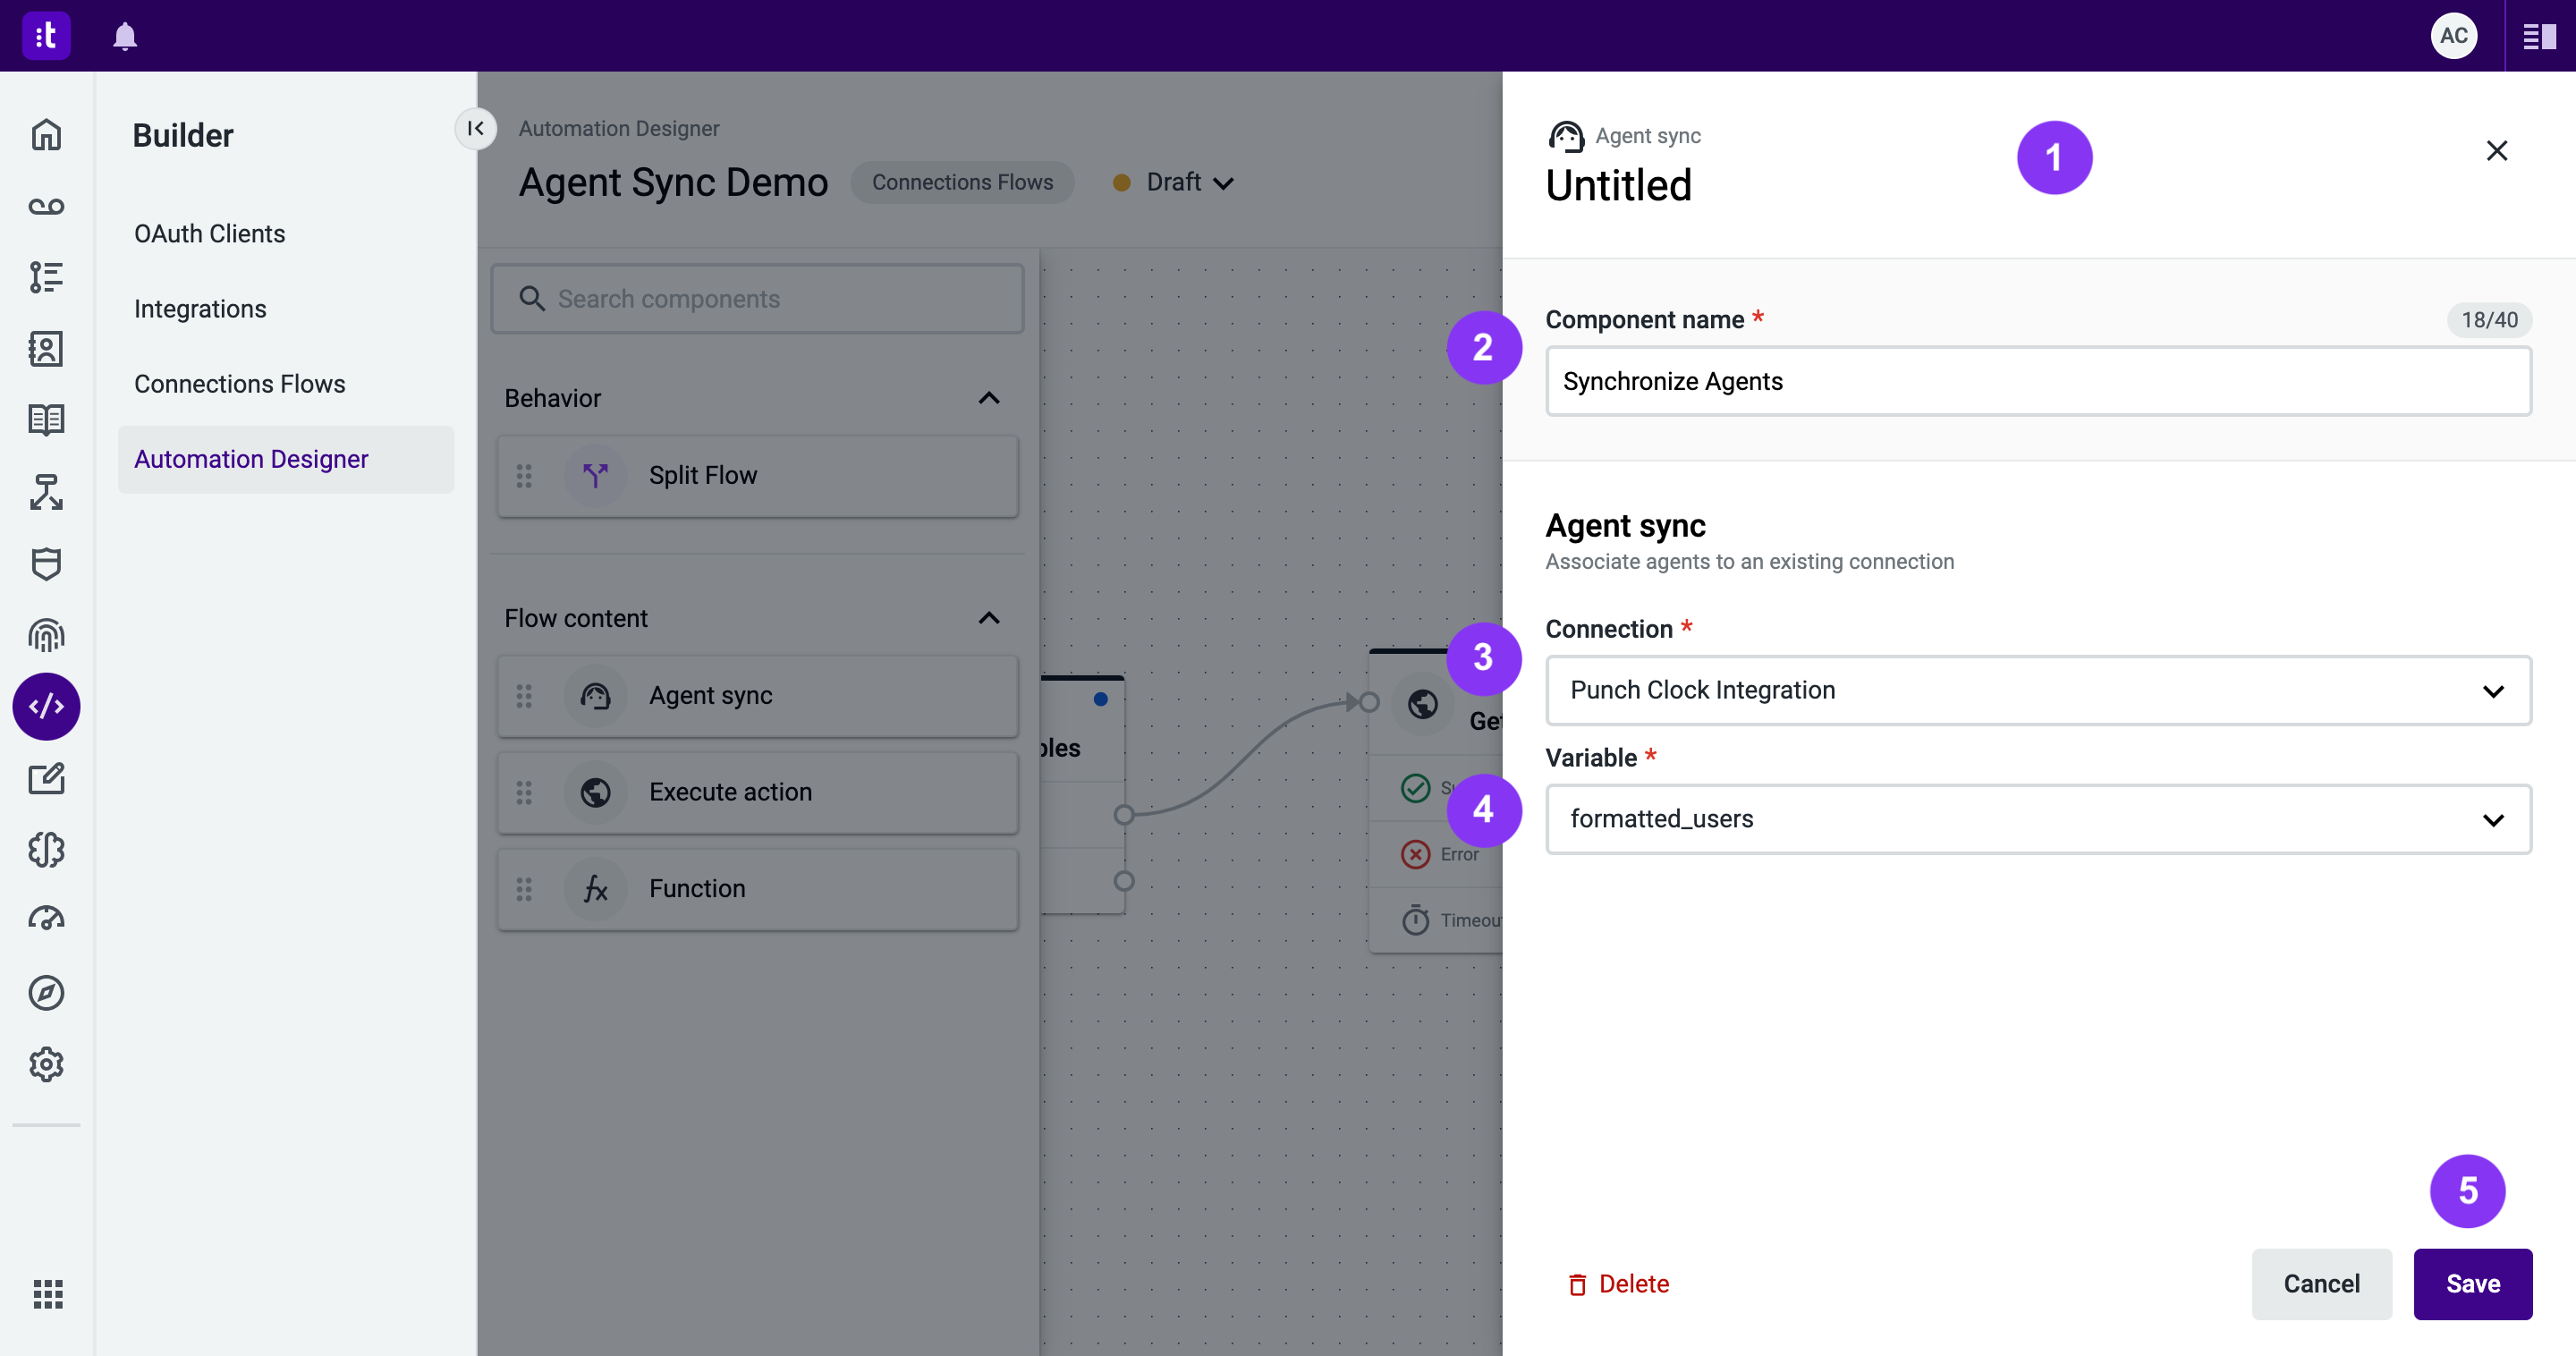
Figure 10 - Agent Sync configuration
5.4 - After completing the configuration, click Save (Figure 10 - 5).
6 - Test your automation
6.1 - You now have the initial version of the automation designed to synchronize the first page of formatted users. Save the automation (Figure 11 - 1), then publish it (Figure 11 - 2).
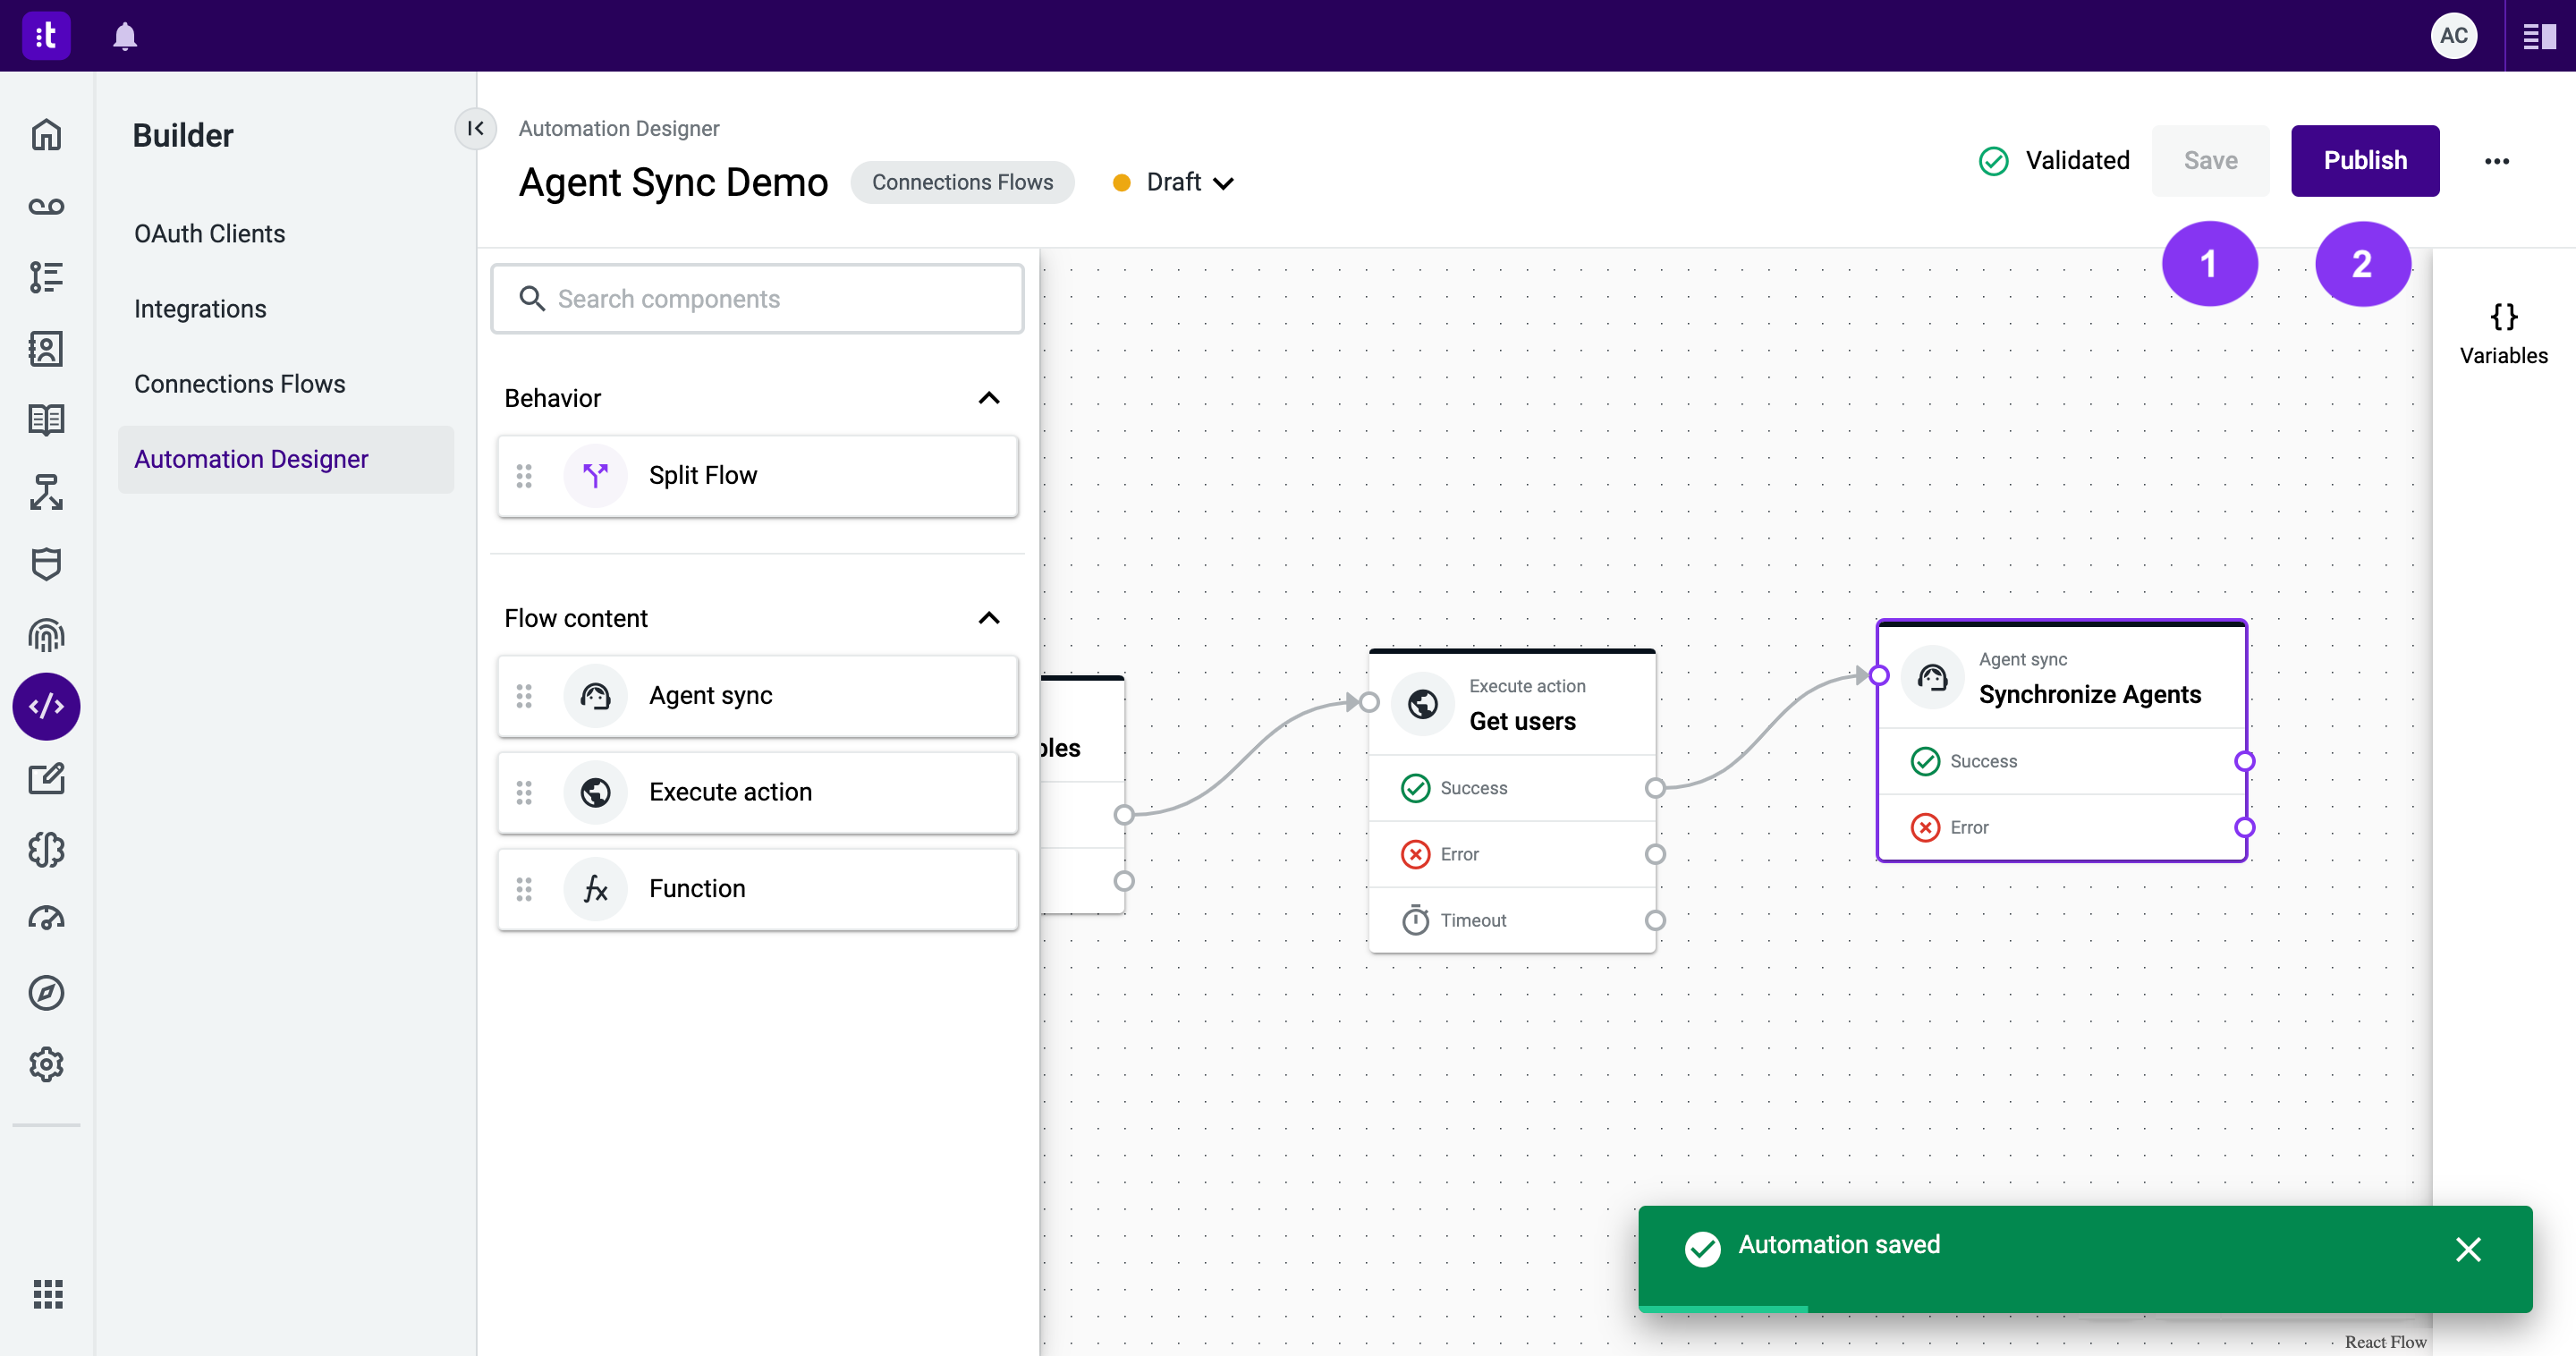
Figure 11 - Save and publish the automation
6.2 - To use this automation, navigate to the Connections flow tab (Figure 12 - 1) and enable the automation by toggling the switch (Figure 12 - 2).
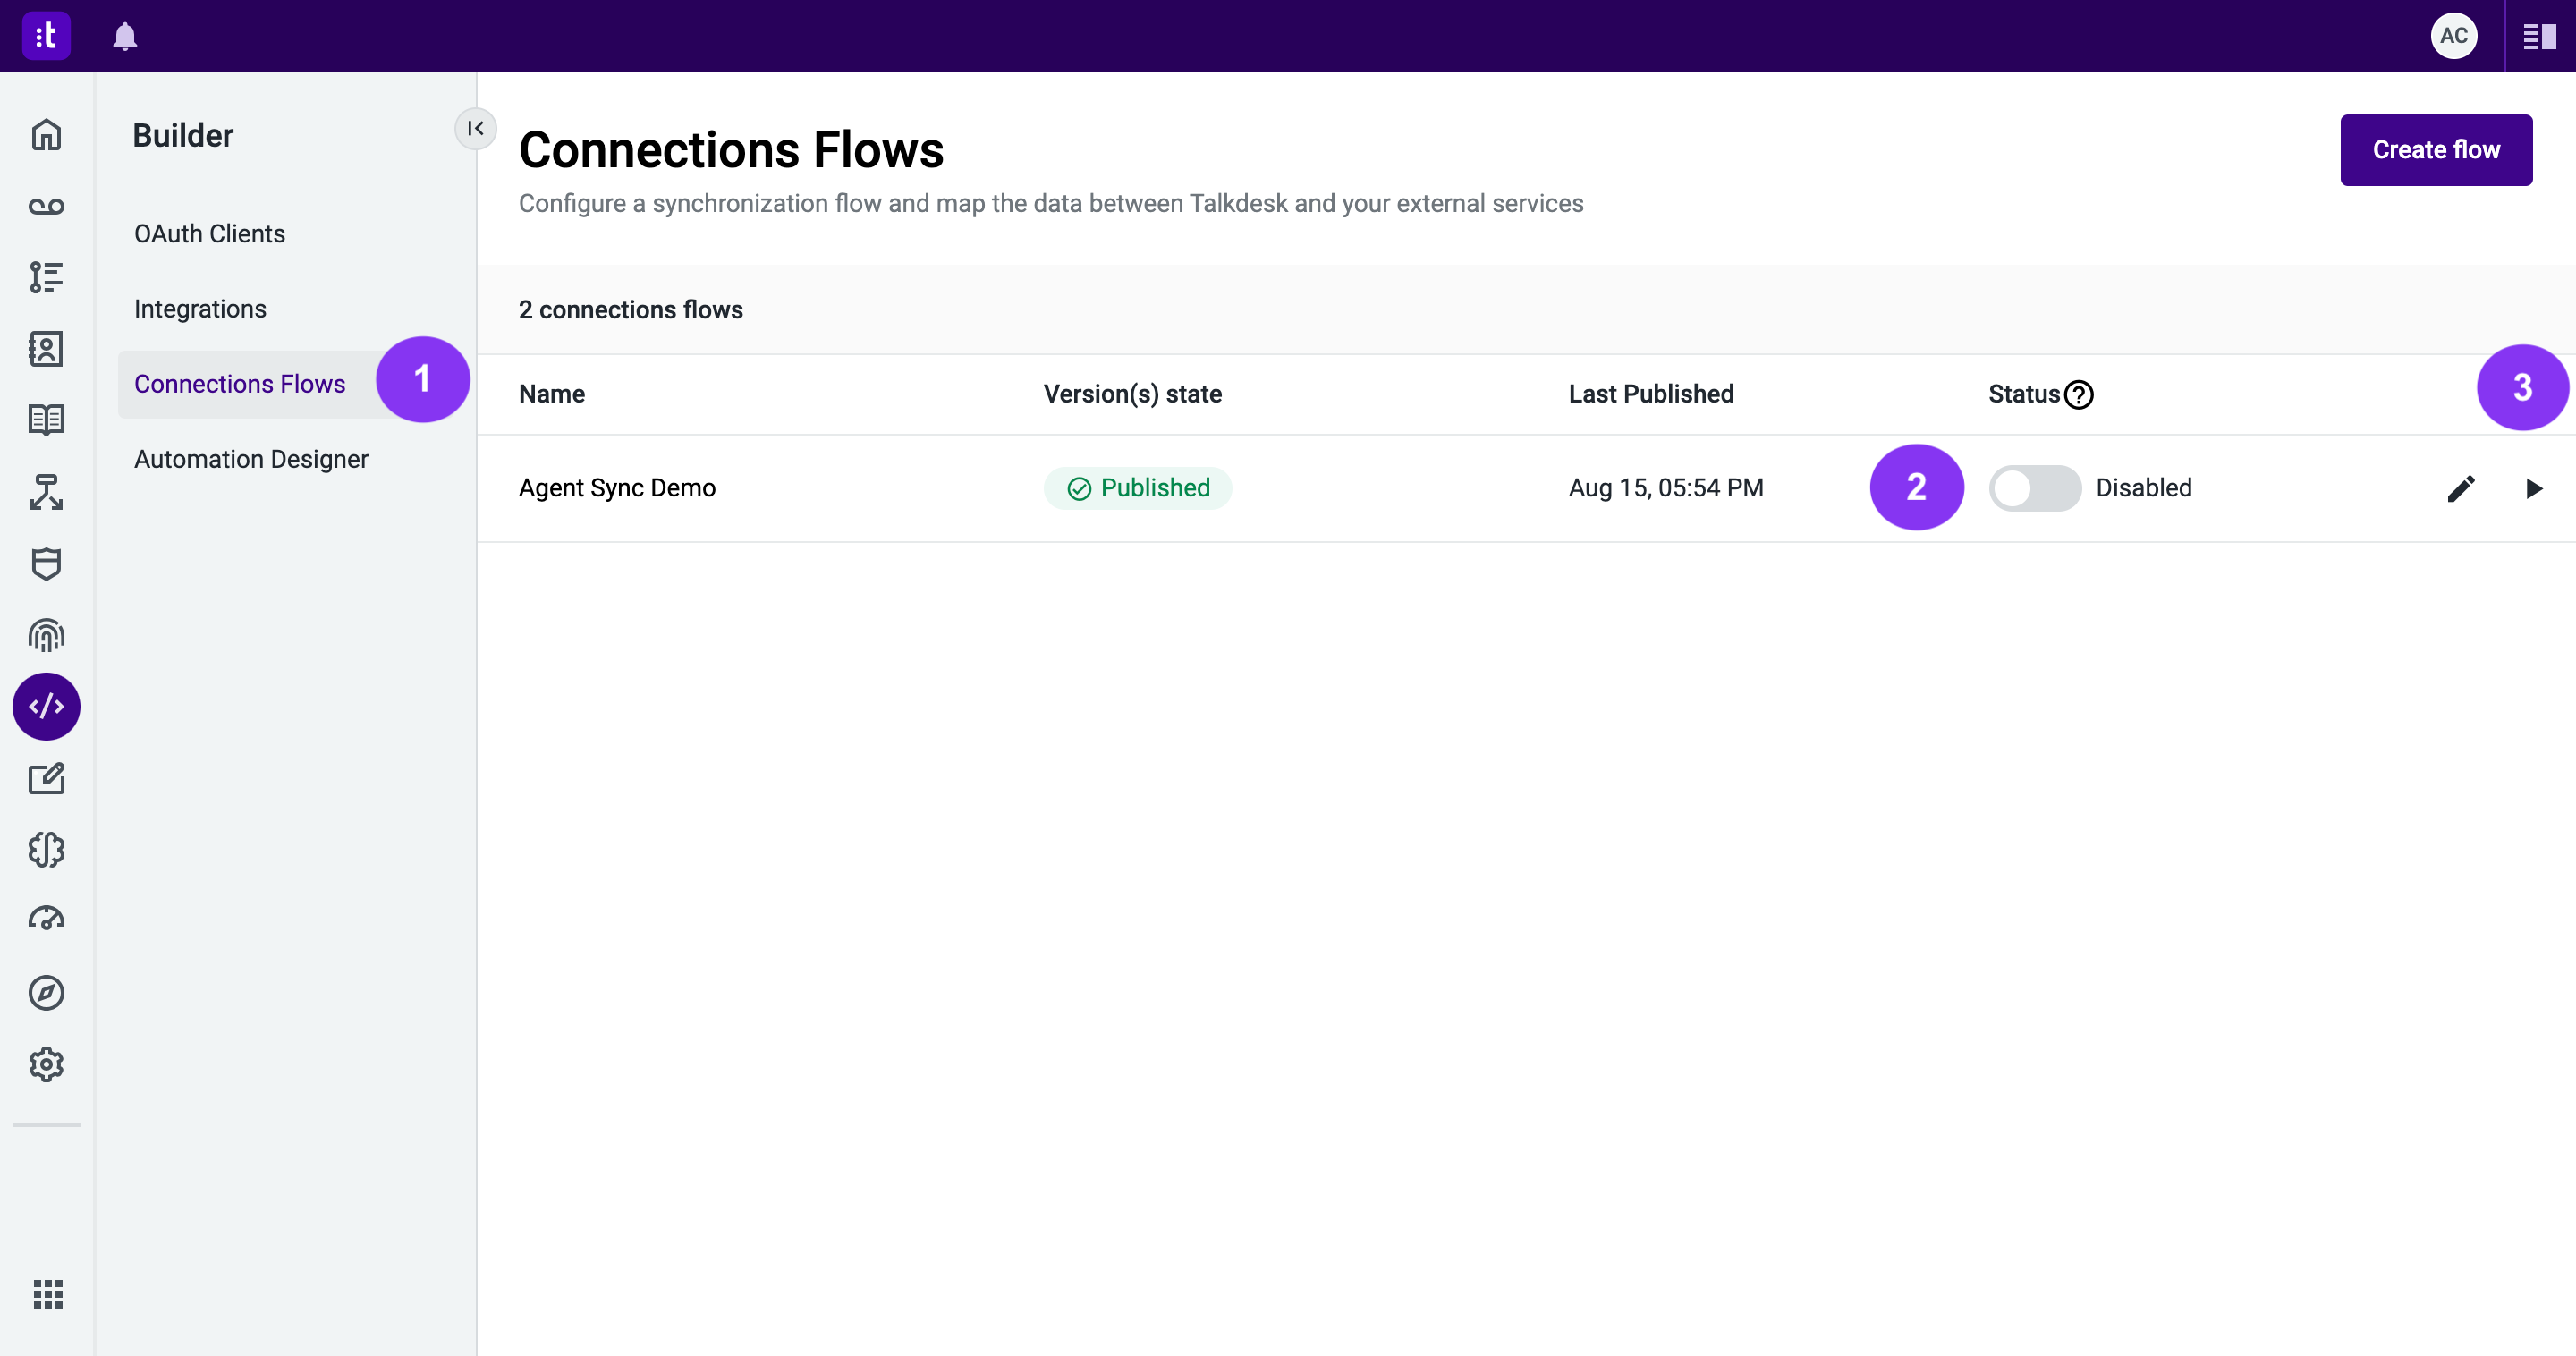
Figure 12 - Enable the automation
6.3 - Click the Force flow execution button (Figure 12 - 3) to run it and verify if it produces the expected results.
If you are using the suggested mock server from Postman, you will now be able to observe these calls in the mock server logs when you log in with one of the Talkdesk agents listed on the first page of the API that retrieves users. Keep in mind that this step will be repeated to test other versions of the flow as more components are added.
7.1 - Open the variables panel (Figure 13 - 1), and click the Add variable button (Figure 13 - 2).
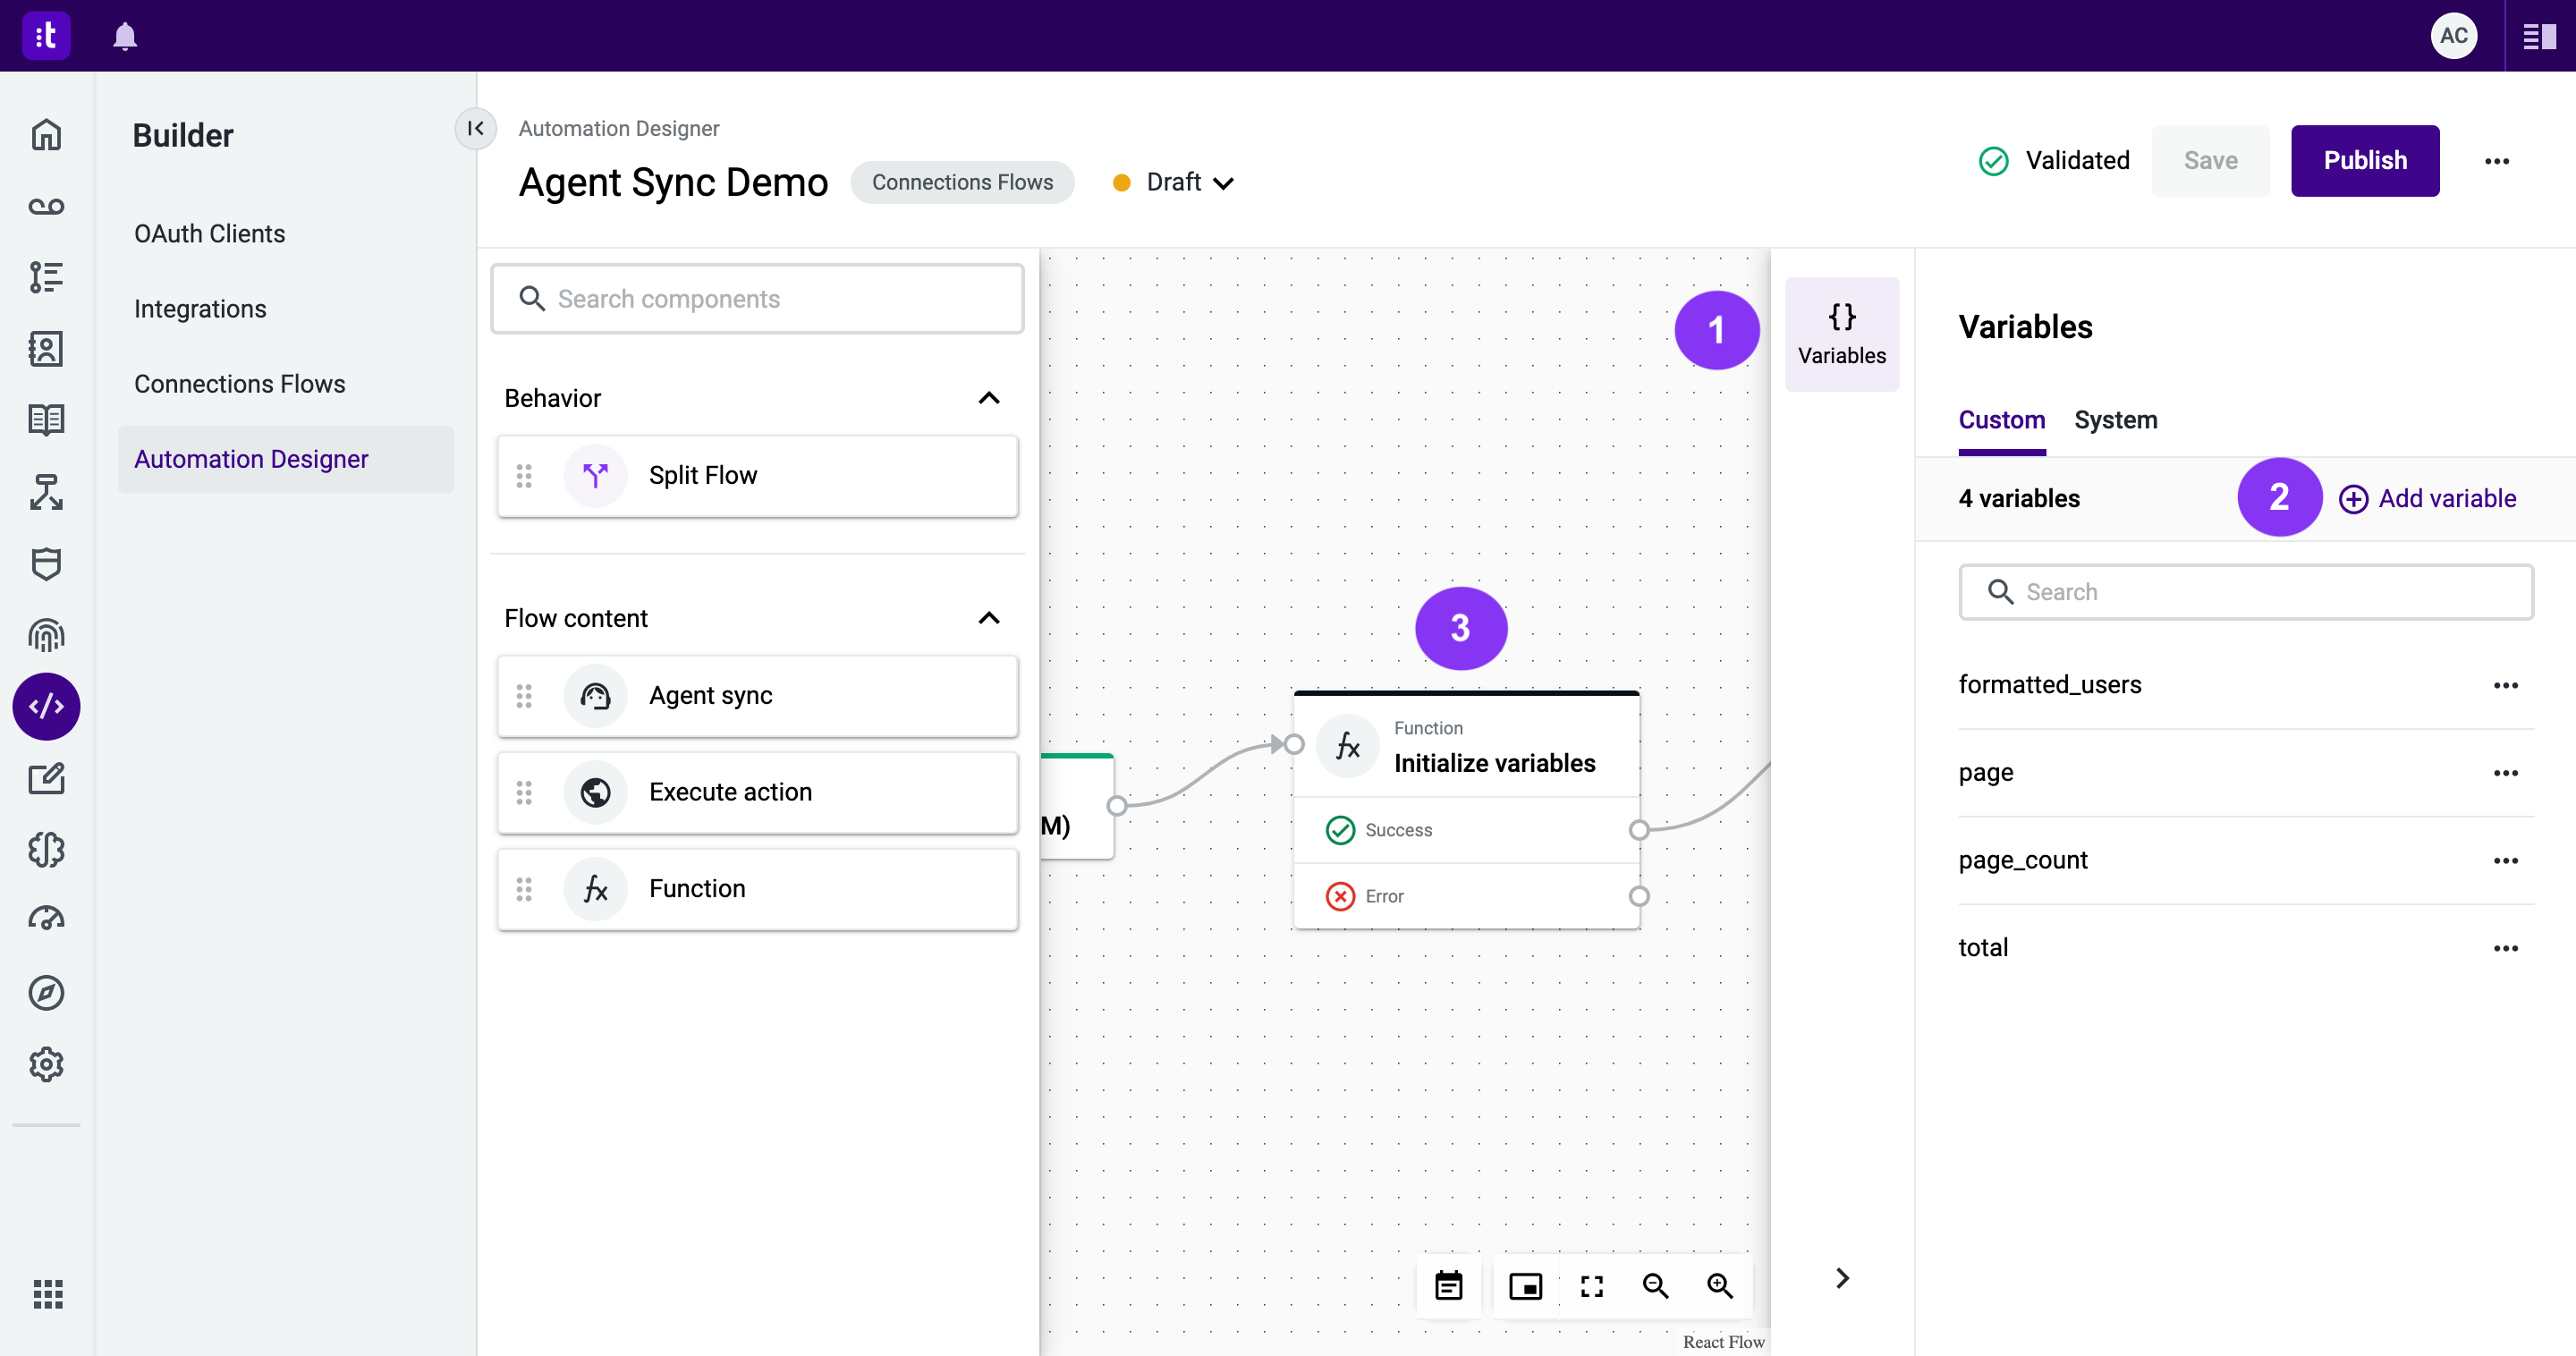
Figure 13 - Iterate through the flow pages
7.2 - A modal will open (Figure 14 - 1). Here, insert the variable name total_processed (mandatory field; Figure 14 - 2). After completing the configuration, click Confirm (Figure 14 - 3).
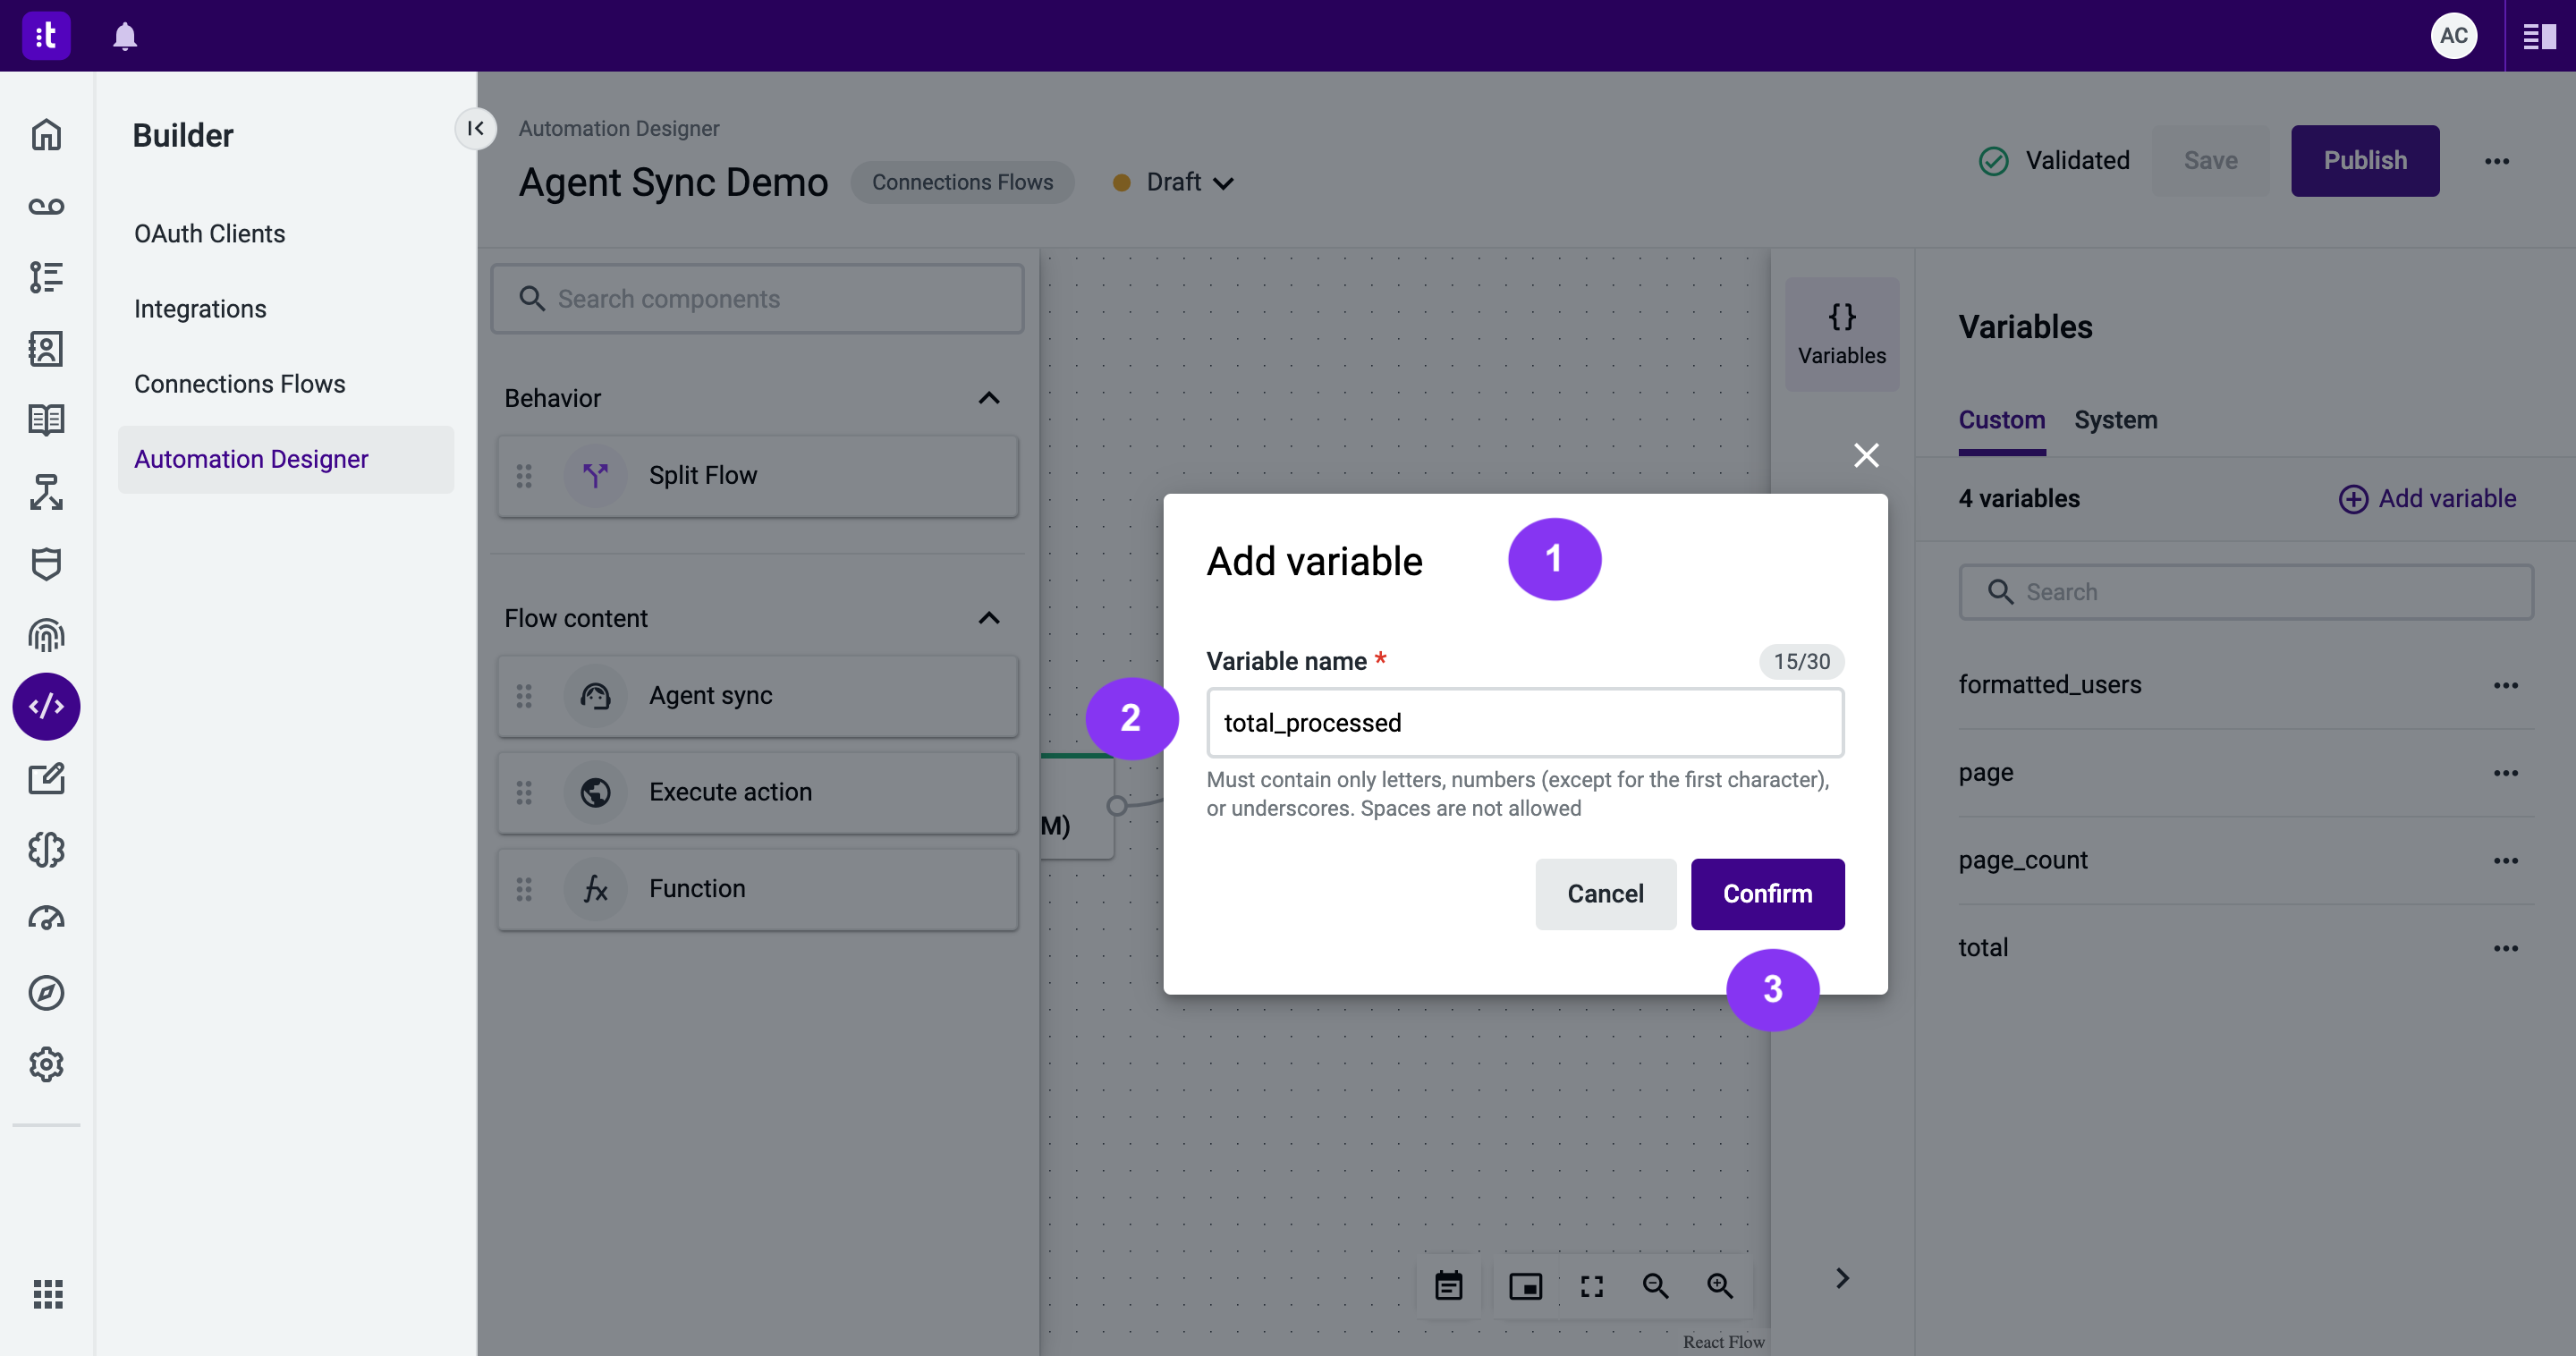
Figure 14 - Add variable
7.3 - Double-click the Function component (Figure 13 - 3) used to initialize variables. Its configuration panel will open (Figure 15 - 1).
7.3.1 - Insert the component name (Figure 15 - 2).
7.3.2 - Update the Function code (Figure 15 - 3) to initialize the total_processed variable, using this snippet:
Context.setVariable("page", 1)
Context.setVariable("total_processed", 0)
7.3.3 - After completing the configuration, click Save (Figure 15 - 4).
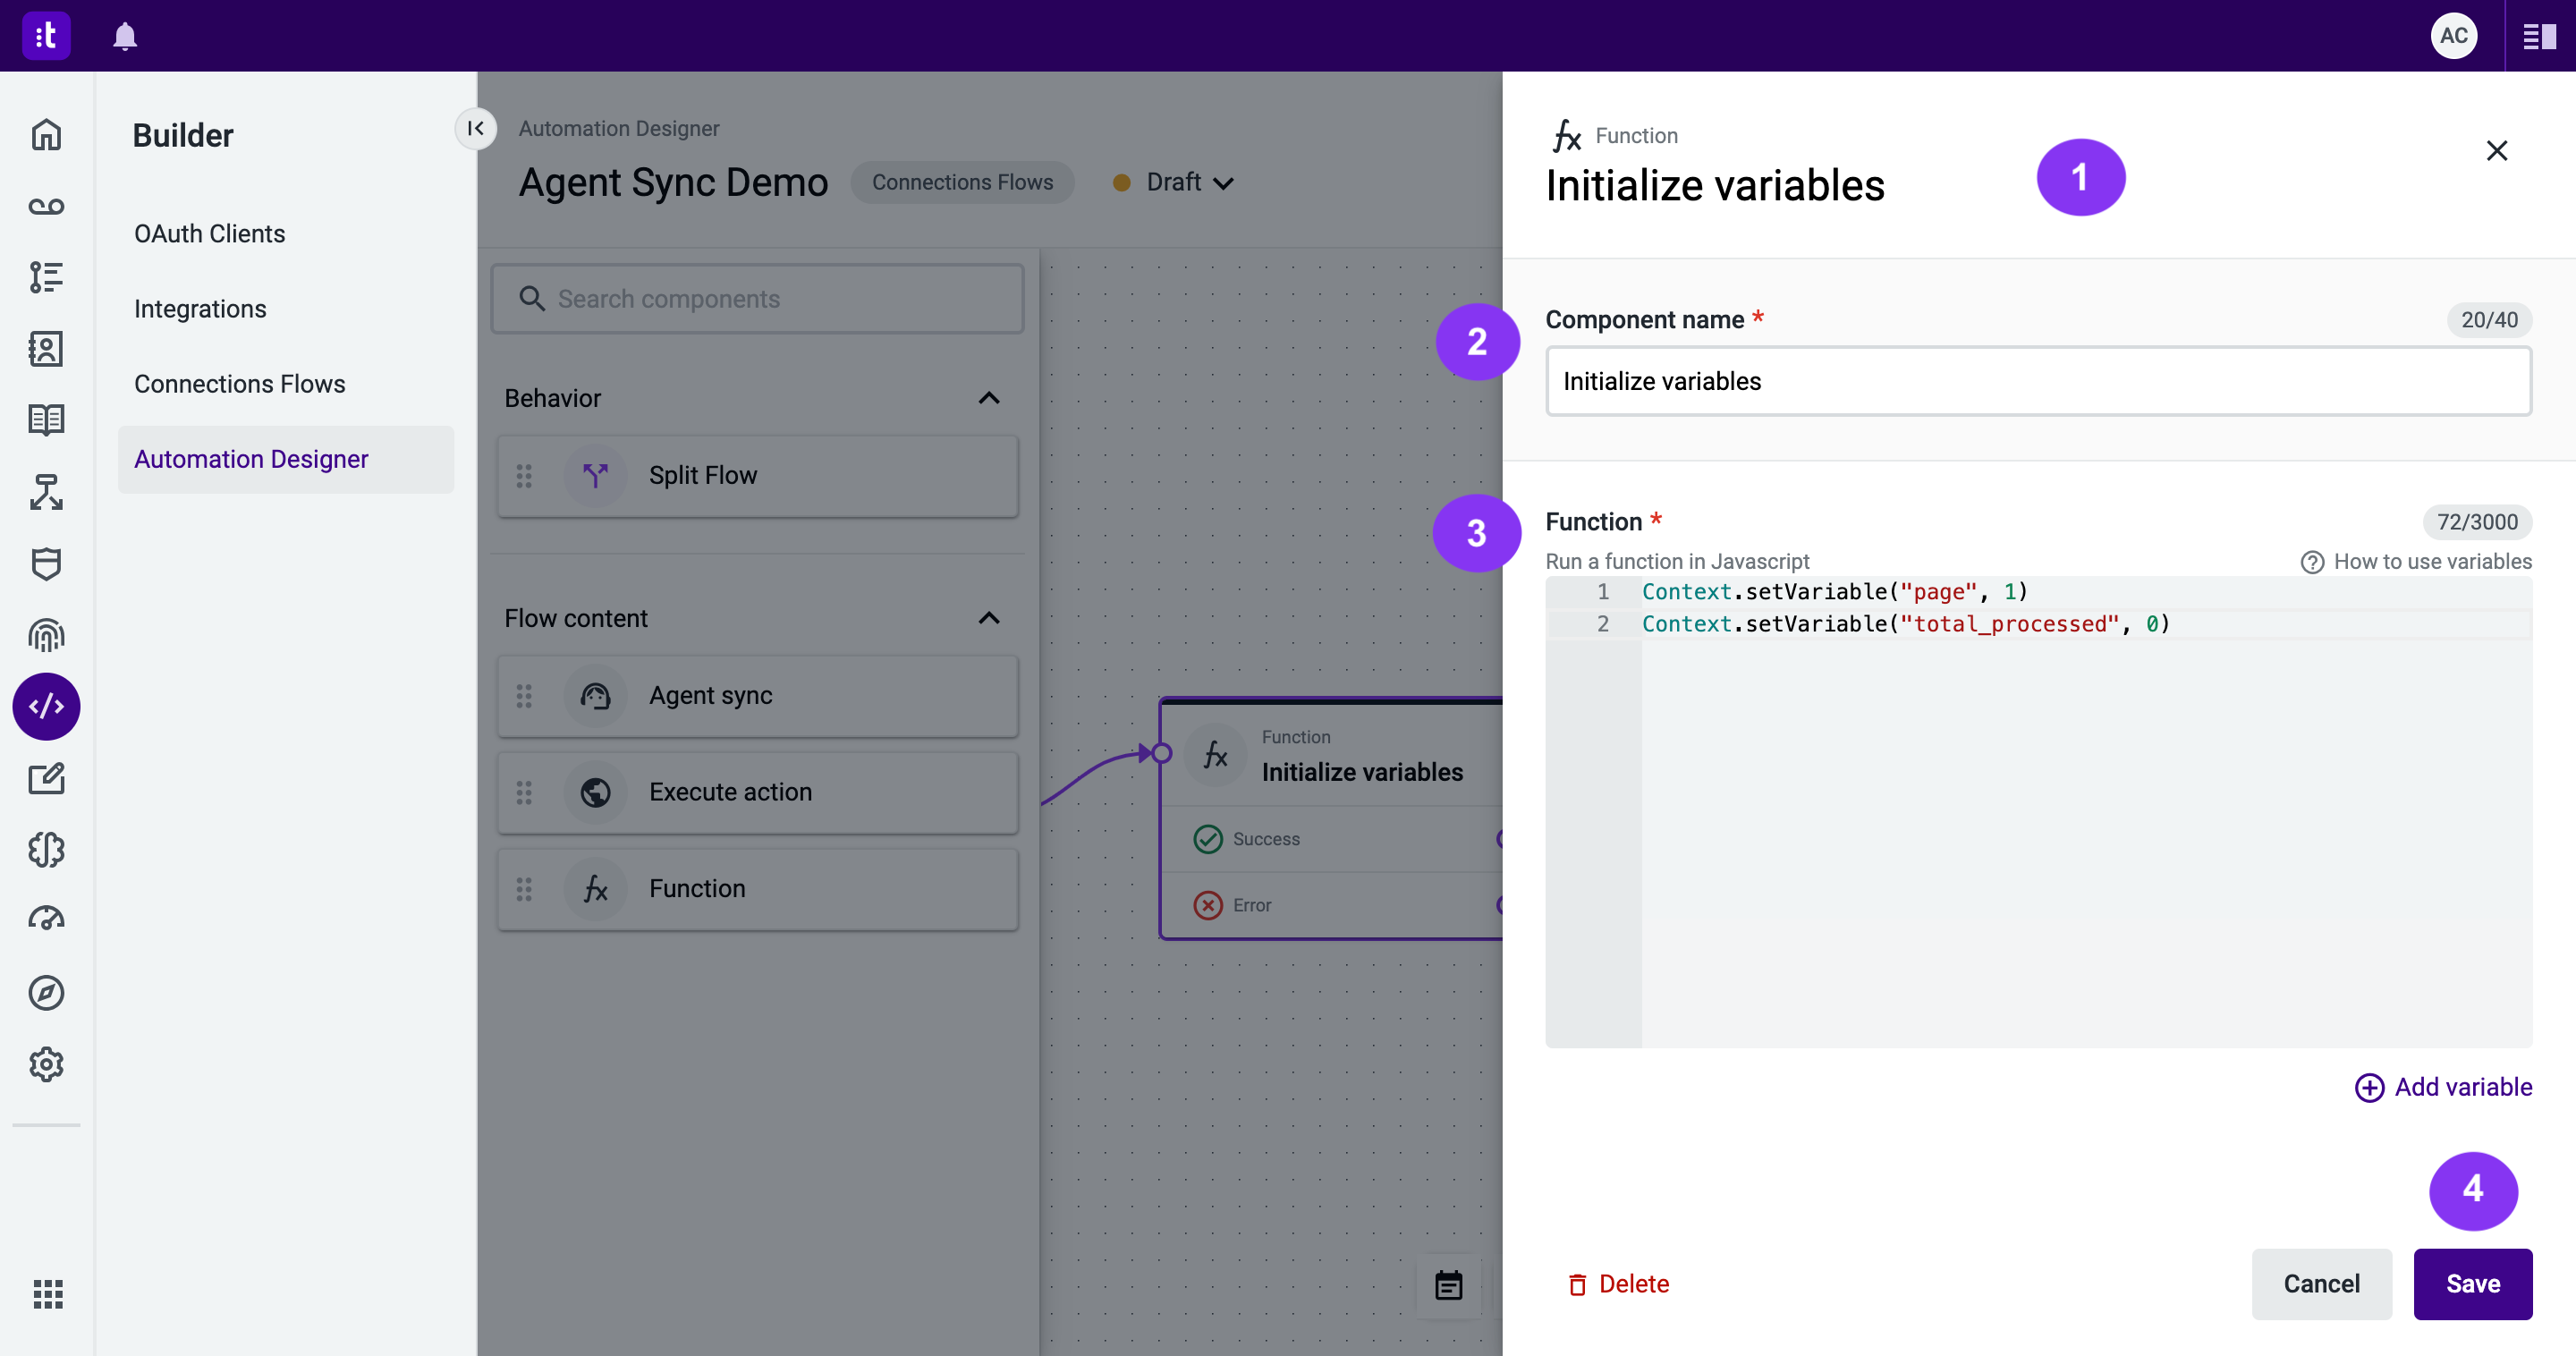
Figure 15 - Function code
7.4 - Drag a new Function component after the Agent Sync (Figure 16).
7.4.1 - Delete the existing link between the Get Users Execute Action component and the Agent Sync component.
7.4.2 - Link the new Function component between the Get Users Execute Action component and the Agent Sync component. This function component will update the page. It will look like Figure 16.
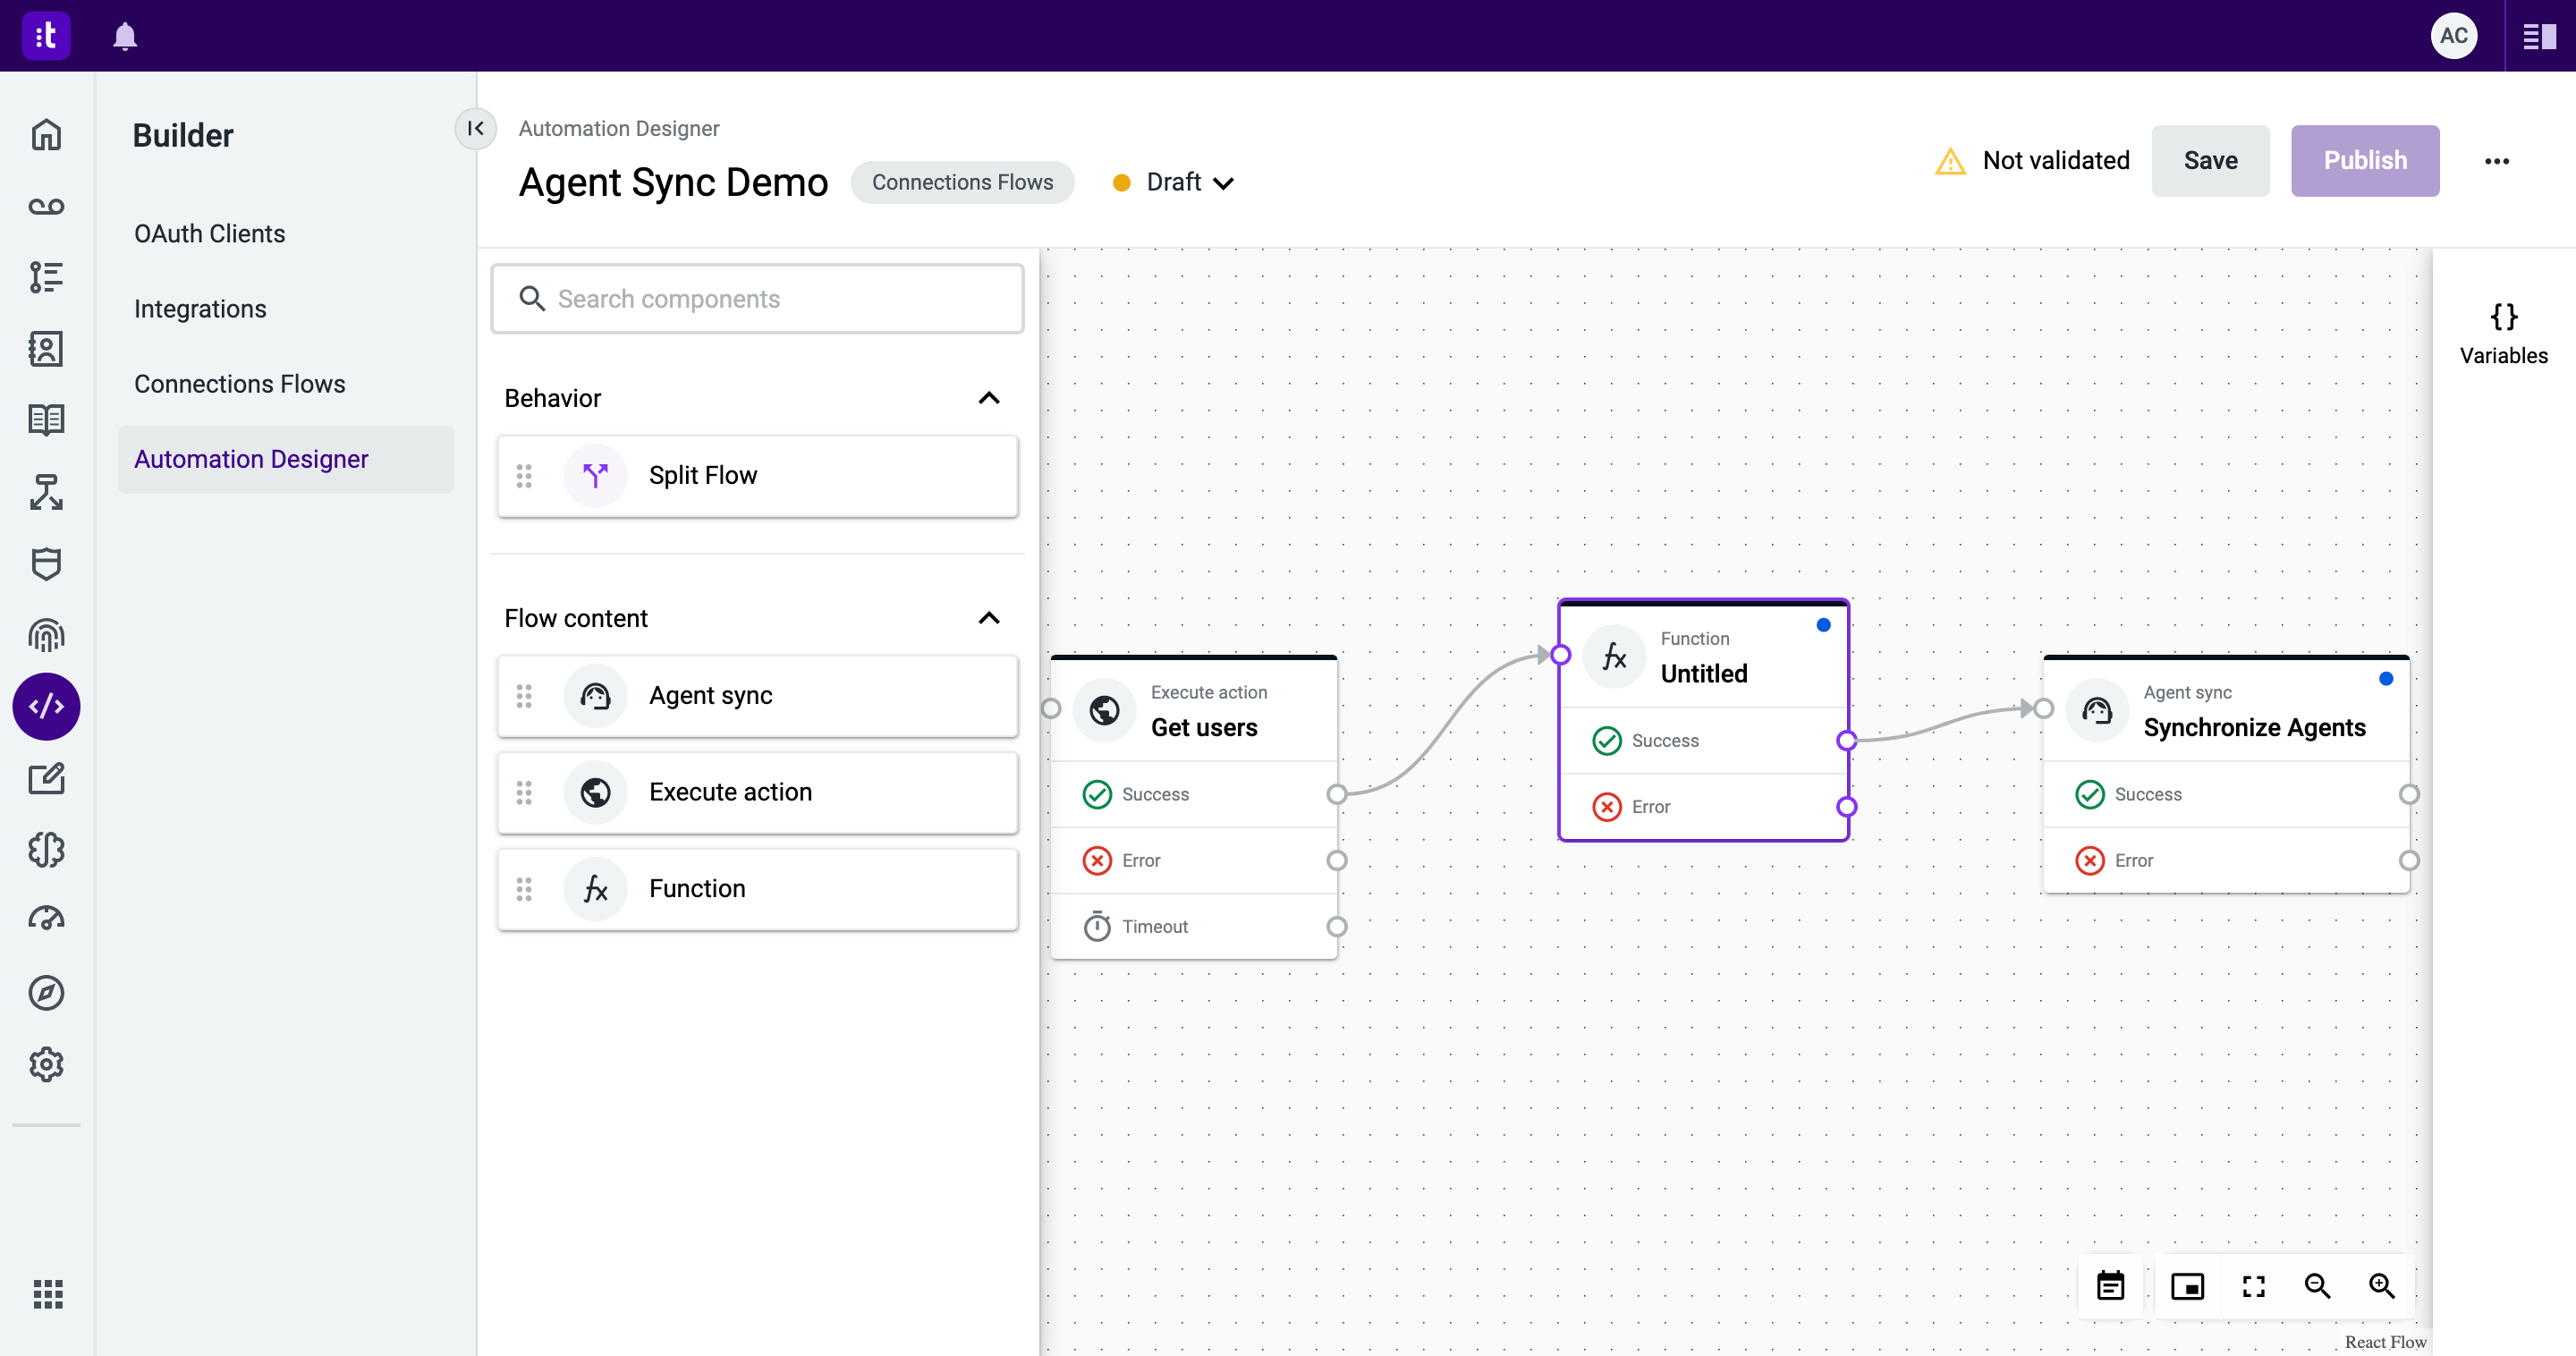
Figure 16 - New function component
This mock API provides the number of elements given on a certain page, and the
total_processedvariable holds the number of total agents processed through the several pages. This allows to determine when the stop condition is met (see step 8).
7.5 - Insert the component name (mandatory field; Figure 17 - 1).
7.5.1 - Insert the Function code below (mandatory field; Figure 17 - 2).
const page = Context.getVariable("page")
const pageCount = Context.getVariable("page_count")
const totalProcessed = Context.getVariable("total_processed")
Context.setVariable("total_processed", totalProcessed + pageCount)
Context.setVariable("page", page + 1)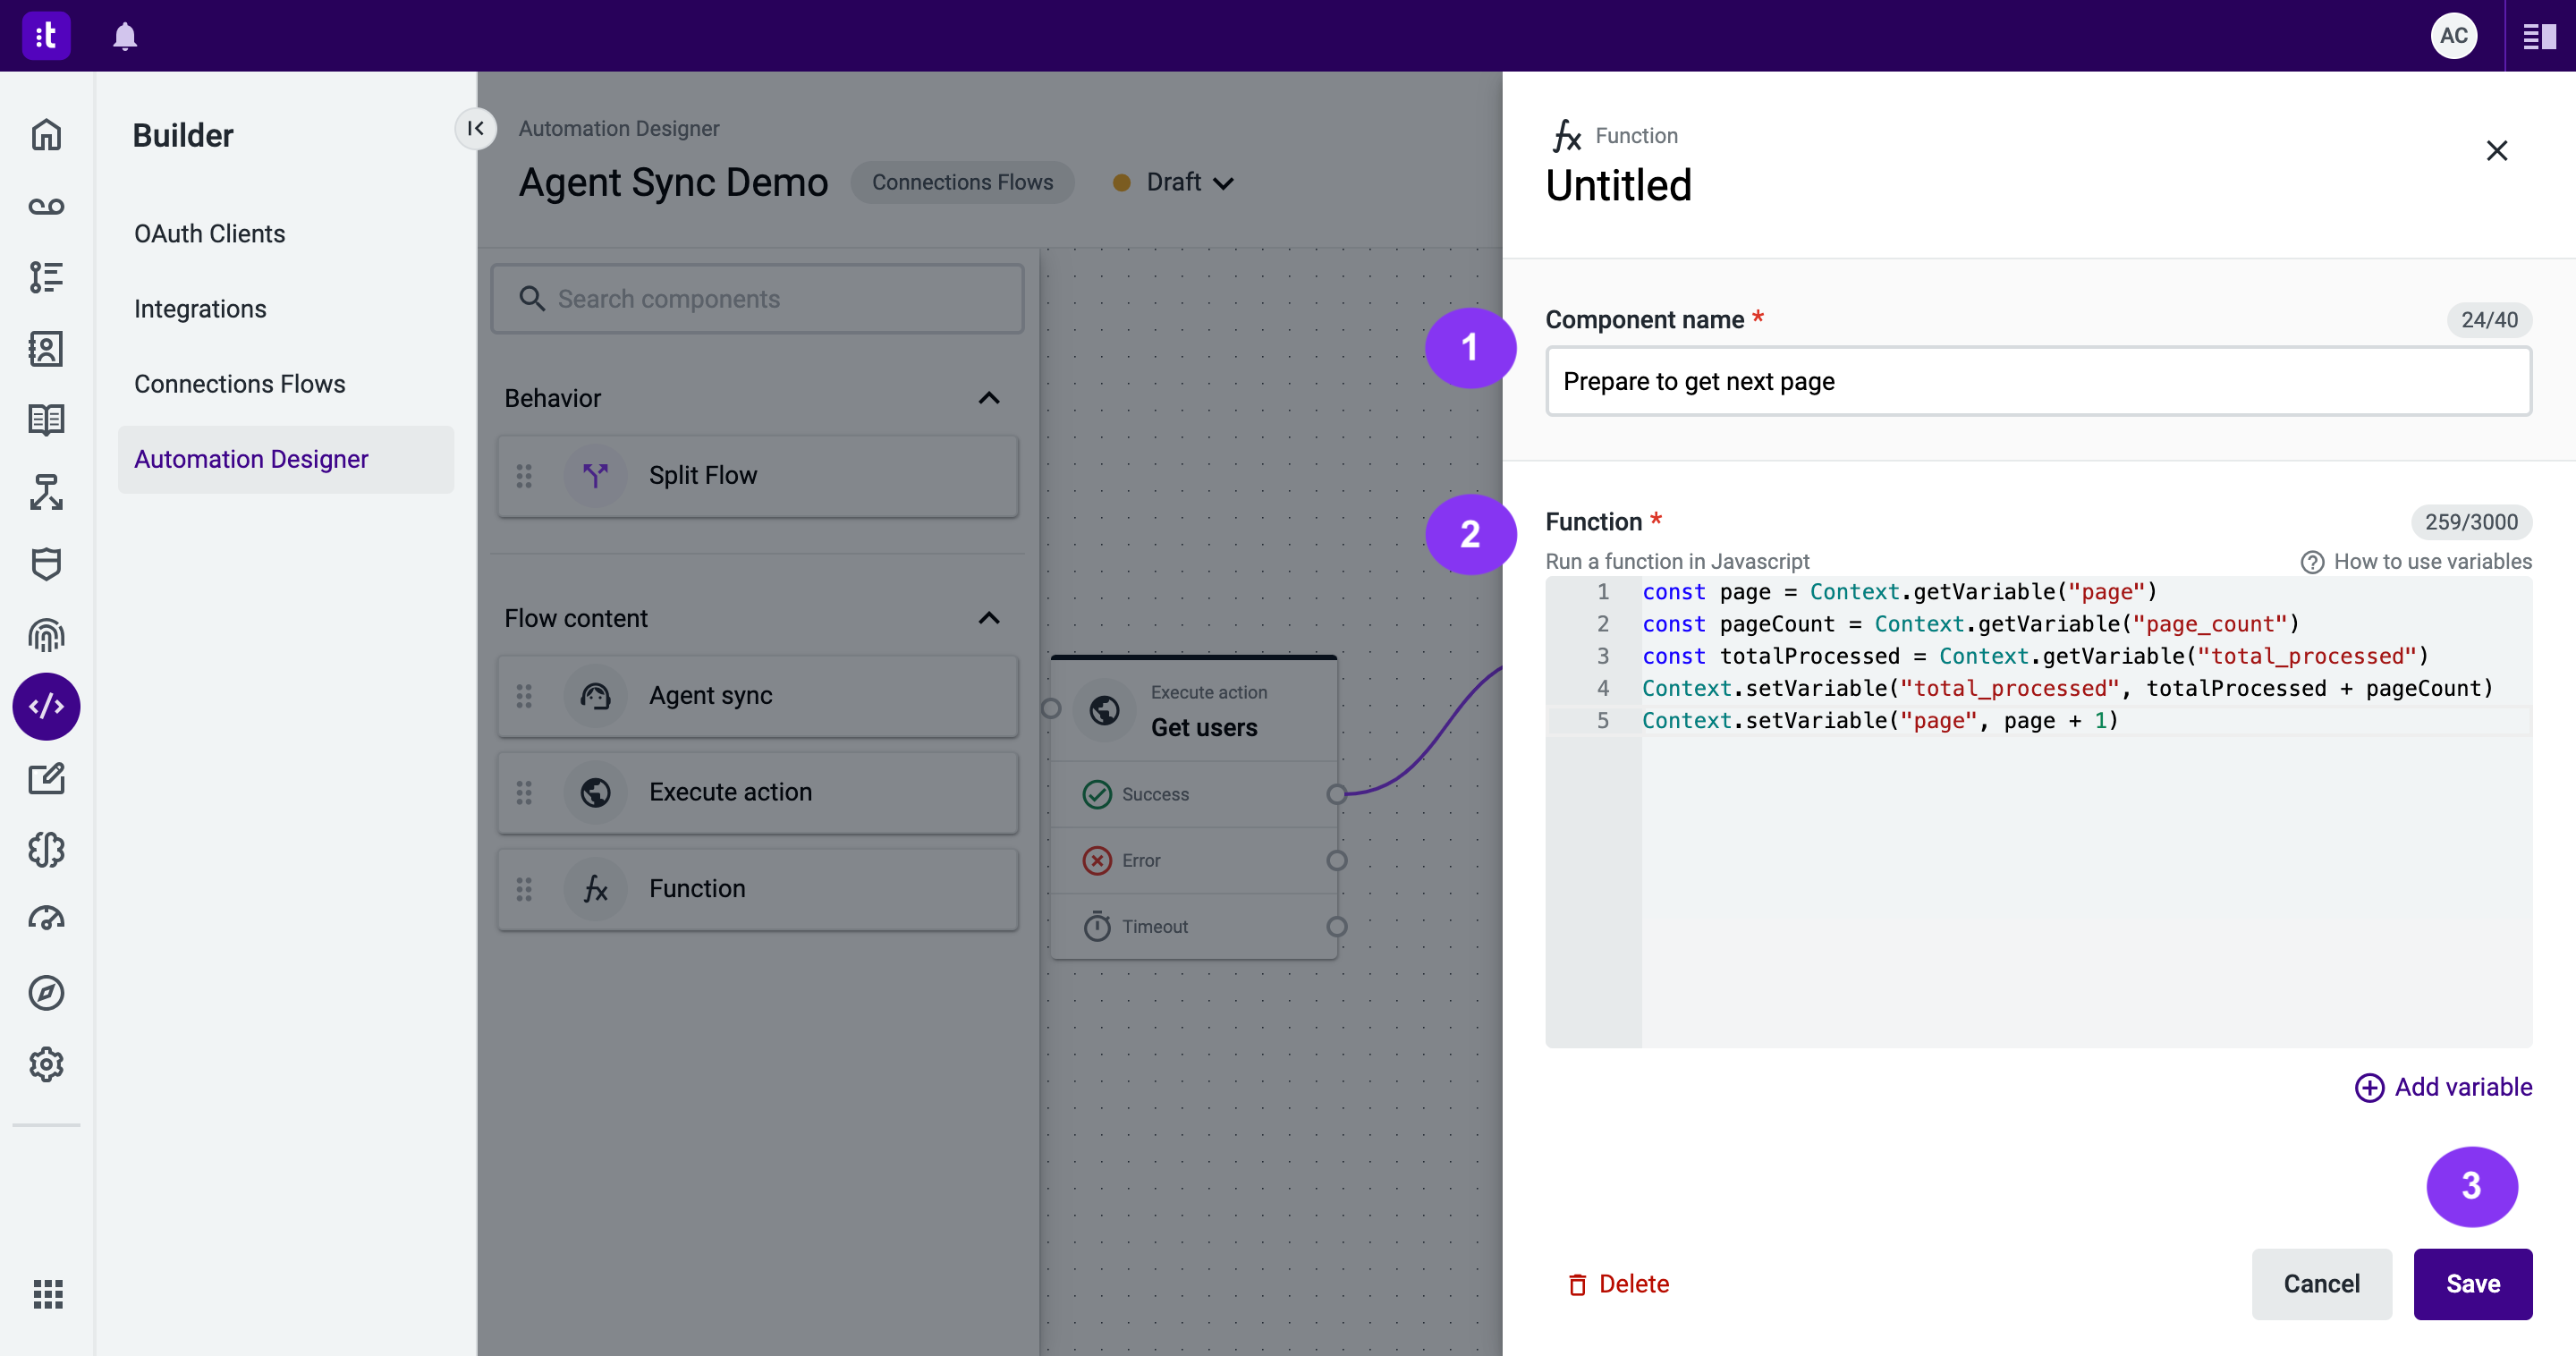
Figure 17 - Function code
7.5.2 - After completing the configuration, click Save.
8 - Decide whether to iterate to a new page or stop
8.1 - Drag a new Split Flow component (Figure 18 - 1), and link the success exit of the Function that updates the page variables to the entry point of the Split flow component (Figure 18 - 2).
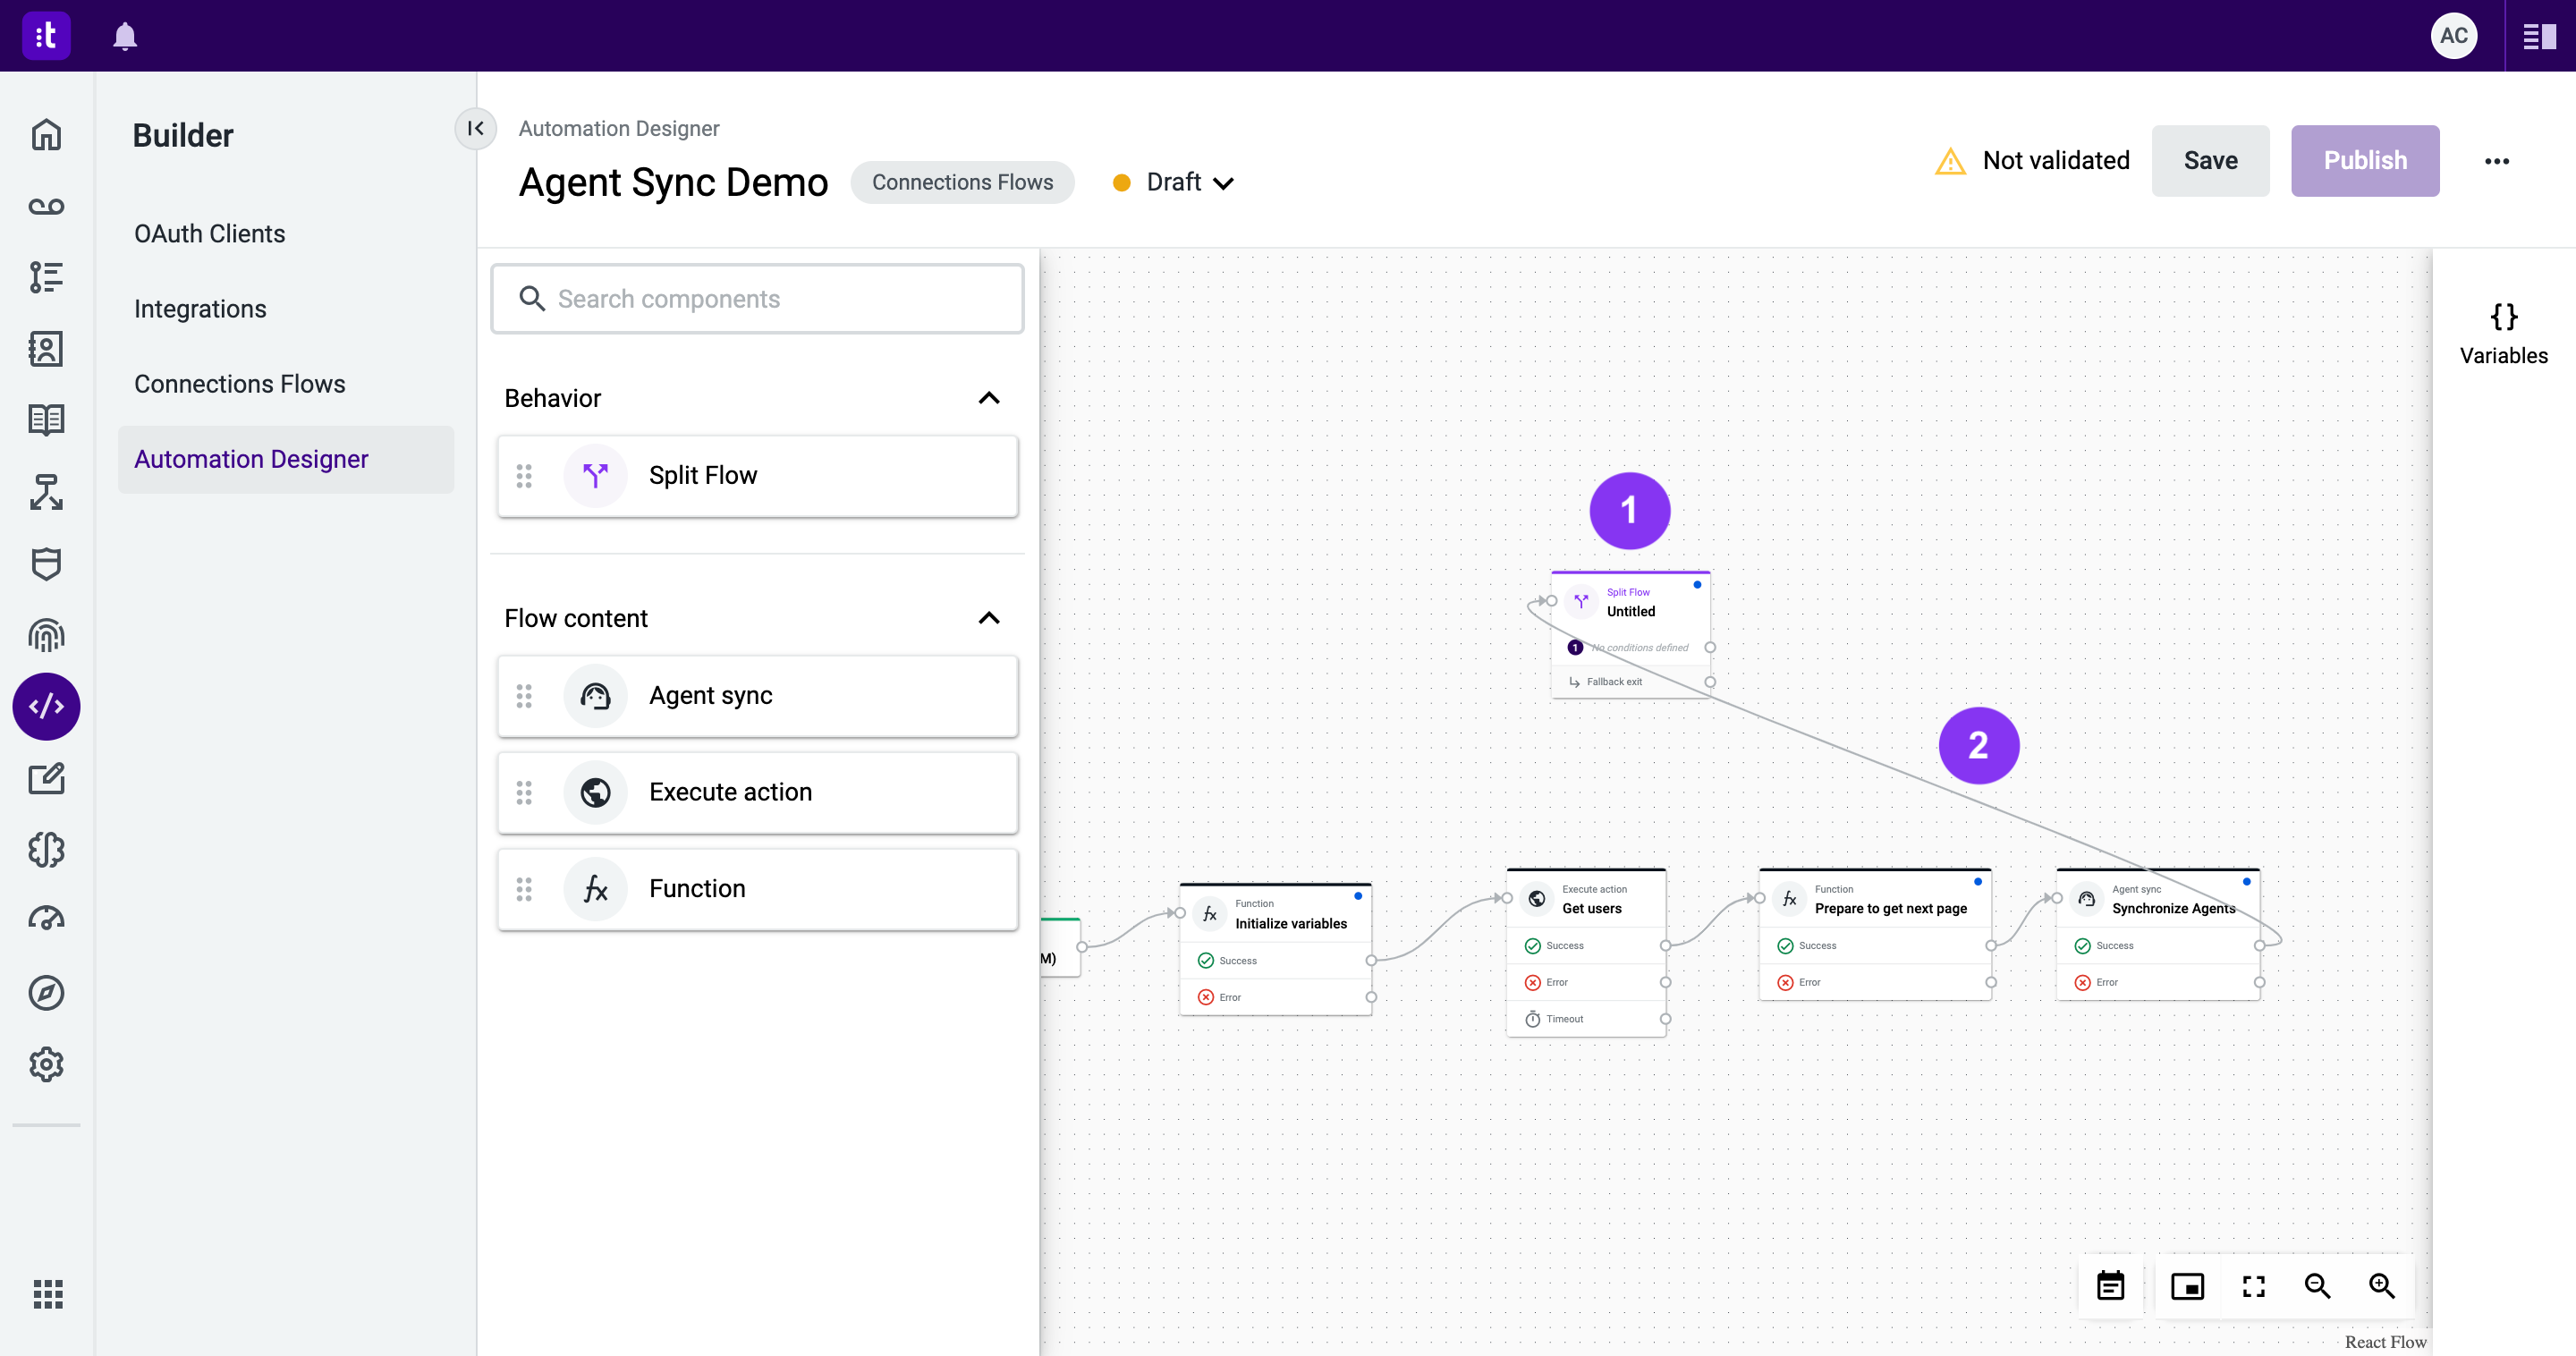
Figure 18 - New Split Flow component
8.2 - Double-click the new Split Flow component to open its configuration panel (Figure 19 - 1).
8.2.1 - Insert a component name (mandatory field; Figure 19 - 2).
8.2.2 - Add a new exit with the conditions total_processed; less than; total (Figure 19 - 3).
8.2.3 - After completing the configuration, click Save (Figure 19 - 4).
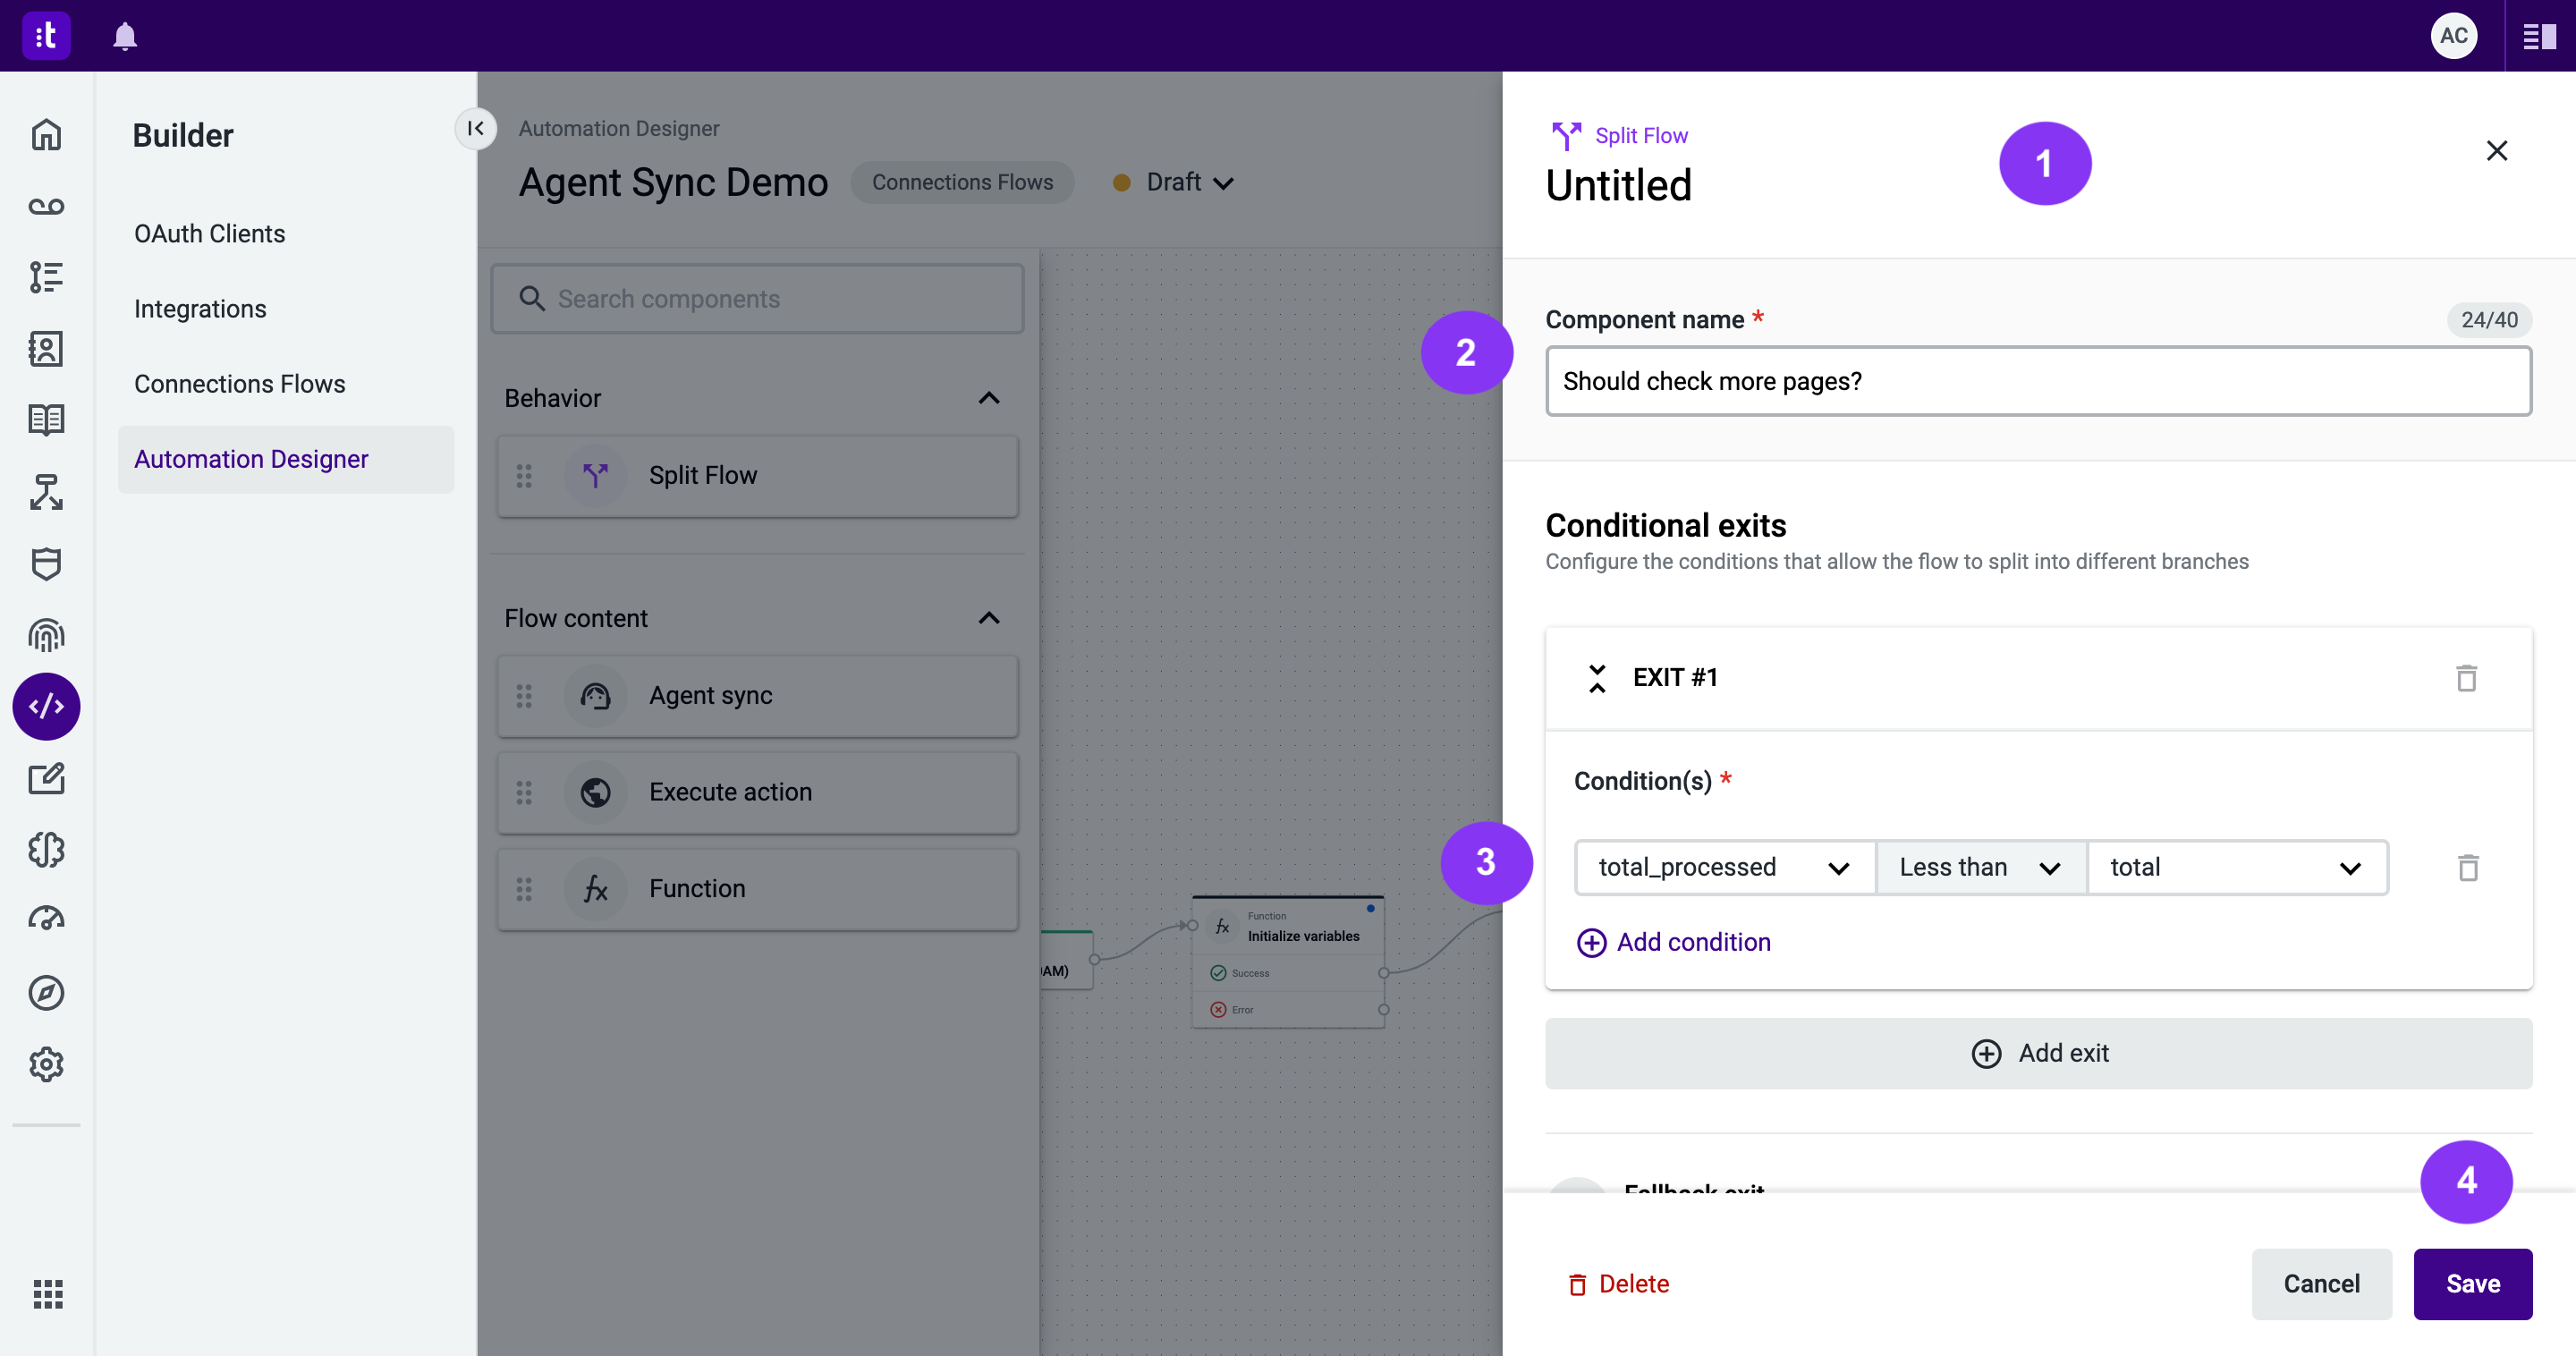
Figure 19 - New Split Flow component configuration
8.3 - Link this new exit to the Execute Action component responsible for fetching a new page of users (Figure 20).

Figure 20 - Link new exit to the Execute action component
If this condition is not met, the automation will stop, as no exit is successful. This way, you don’t need to add any new exits.
9 - Test your automation
You can again save and publish the automation, and redo step 6 to test your automation again. Now it also works when you login with Talkdesk agents that are only retrieved by the second page of the mock API.
10 - Update the Get Users component to retrieve non formatted users
Now you will take a look into what happens when your API doesn’t retrieve the users in the exact format required to do the Agent Sync.
10.1 - Double-click the existing Execute action component (Figure 21 - 1). The configuration panel will open (Figure 21 - 2).
10.1.1 - On the Action field, select the option Get users (non-formatted) (Figure 21 - 3).
10.1.2 - In the Outputs section, you will need to fill in the variables for page_count (Figure 21 - 4) and total (Figure 21 - 5).
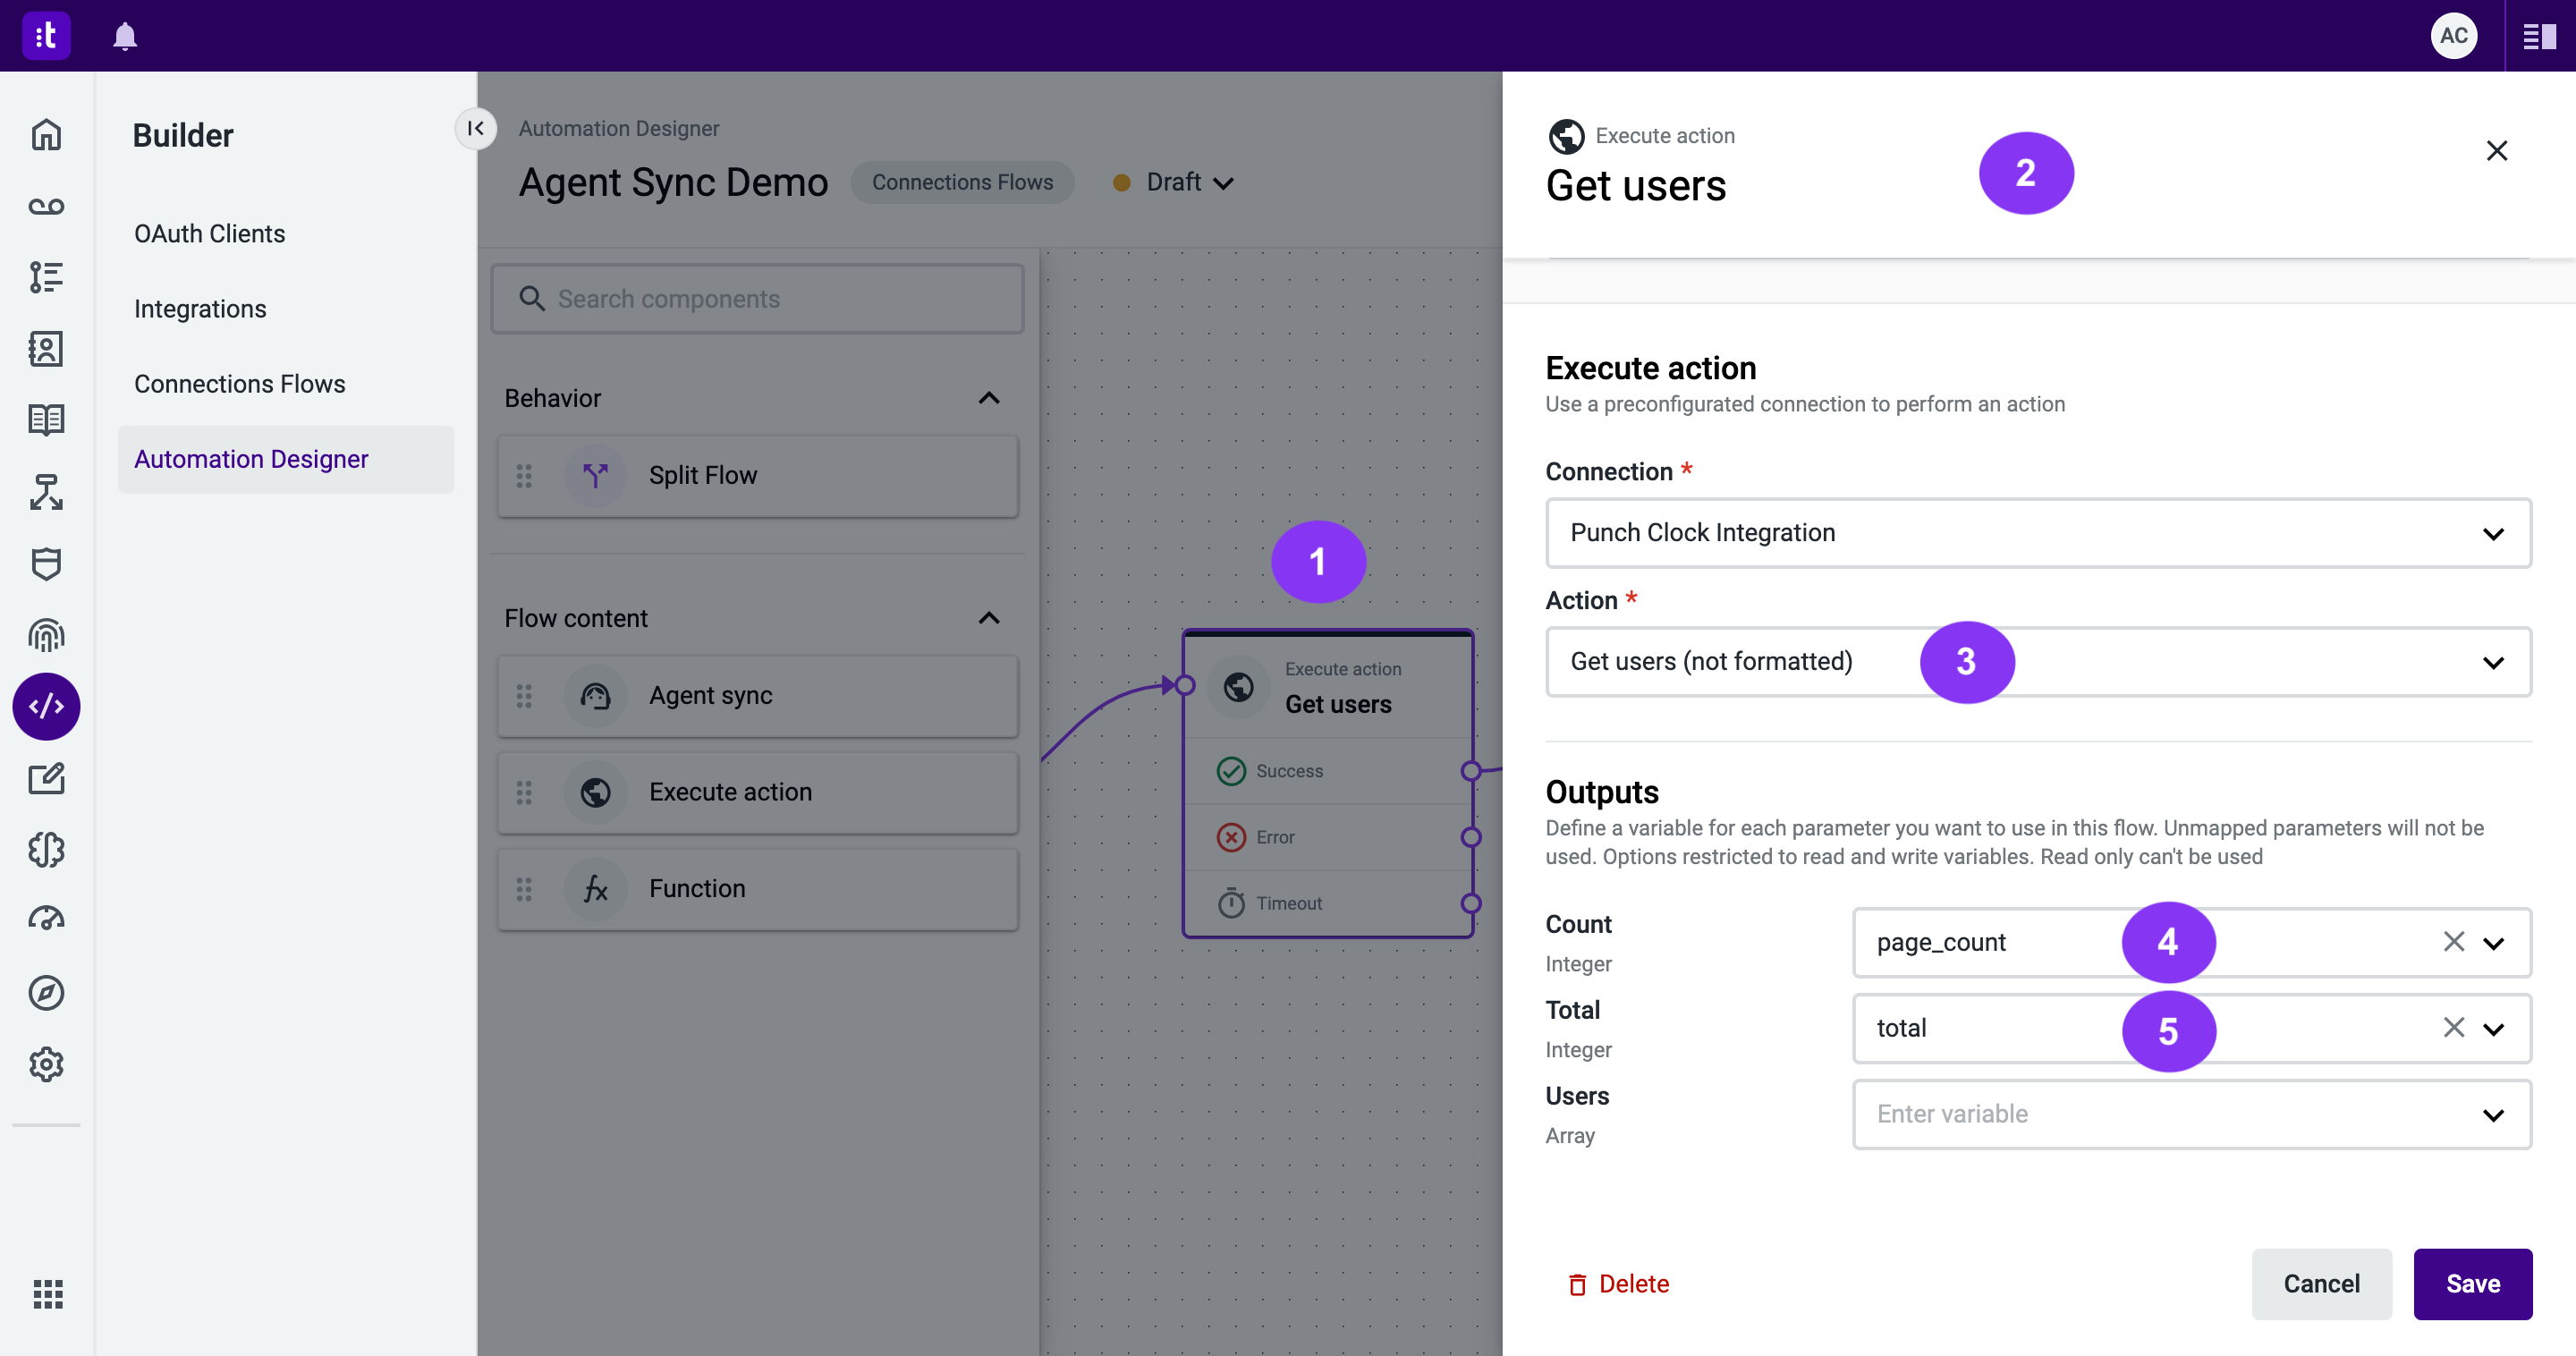
Figure 21 - Update the Get Users component
10.1.3 - Again, in the Outputs section, select the Users dropdown to add a new variable. A modal will appear (Figure 22 - 1). Name it non_formatted_users (Figure 22 - 2). Then, click Confirm (Figure 22 - 3) when you're finished.
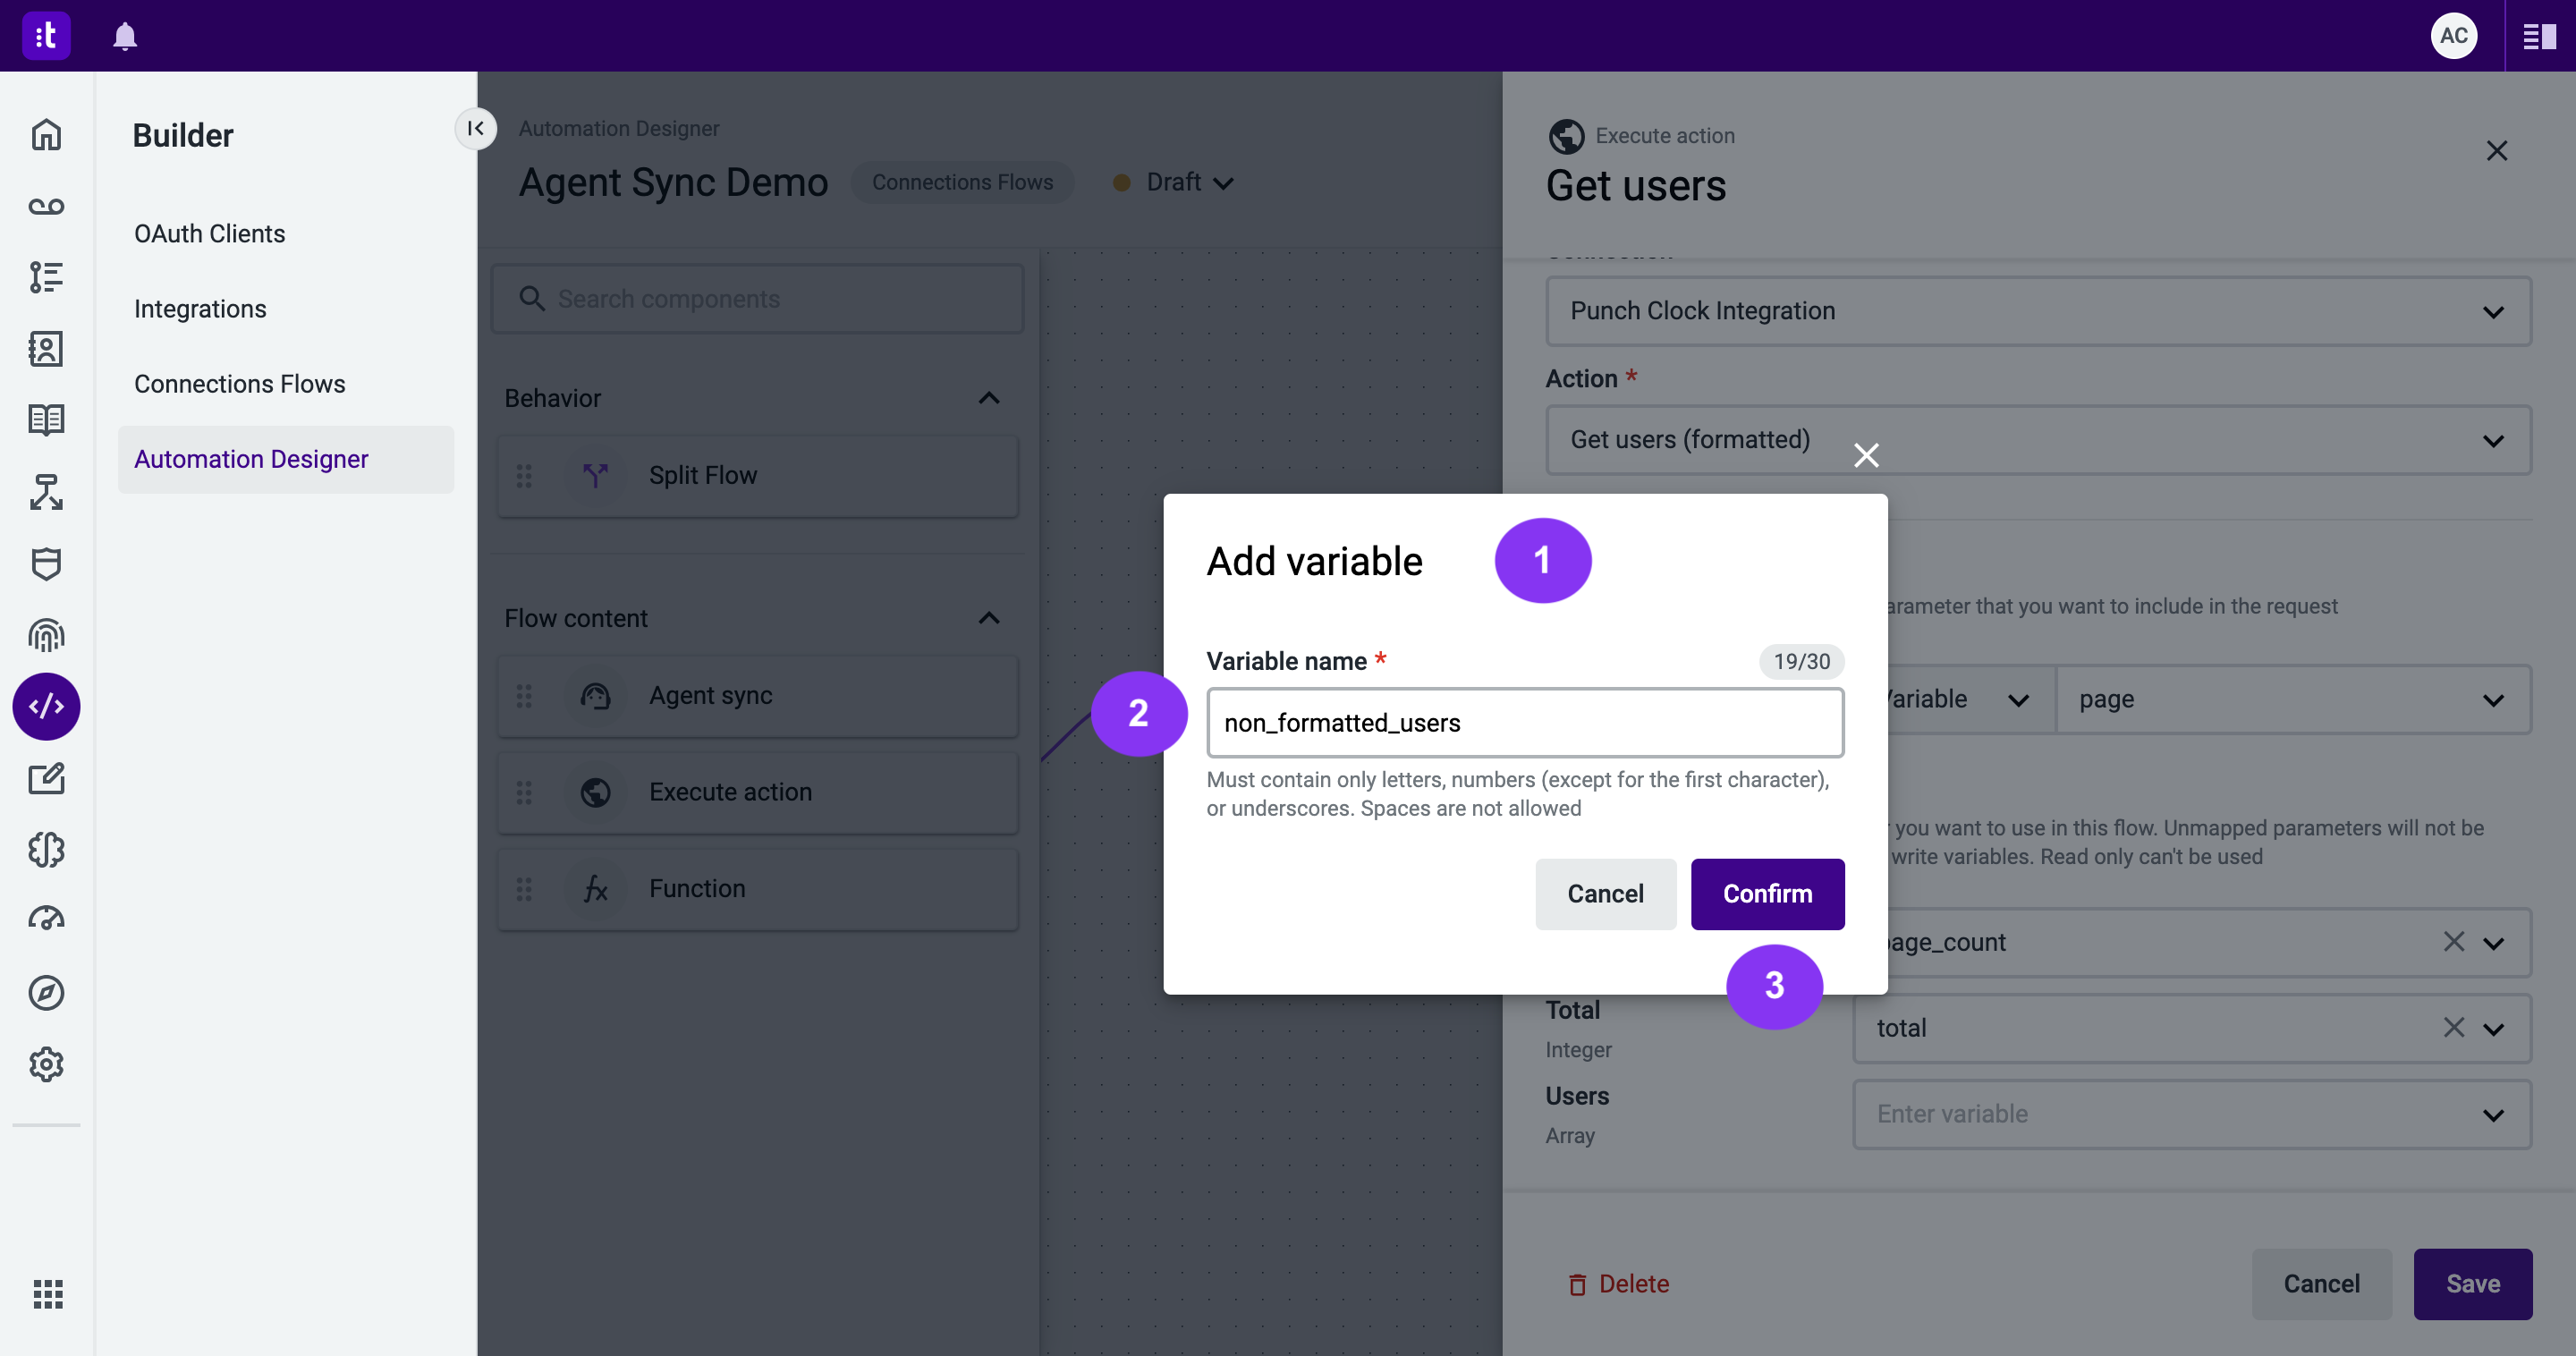
Figure 22 - Add variable
10.1.4 - Click Save to save the changes (Figure 23 - 1).
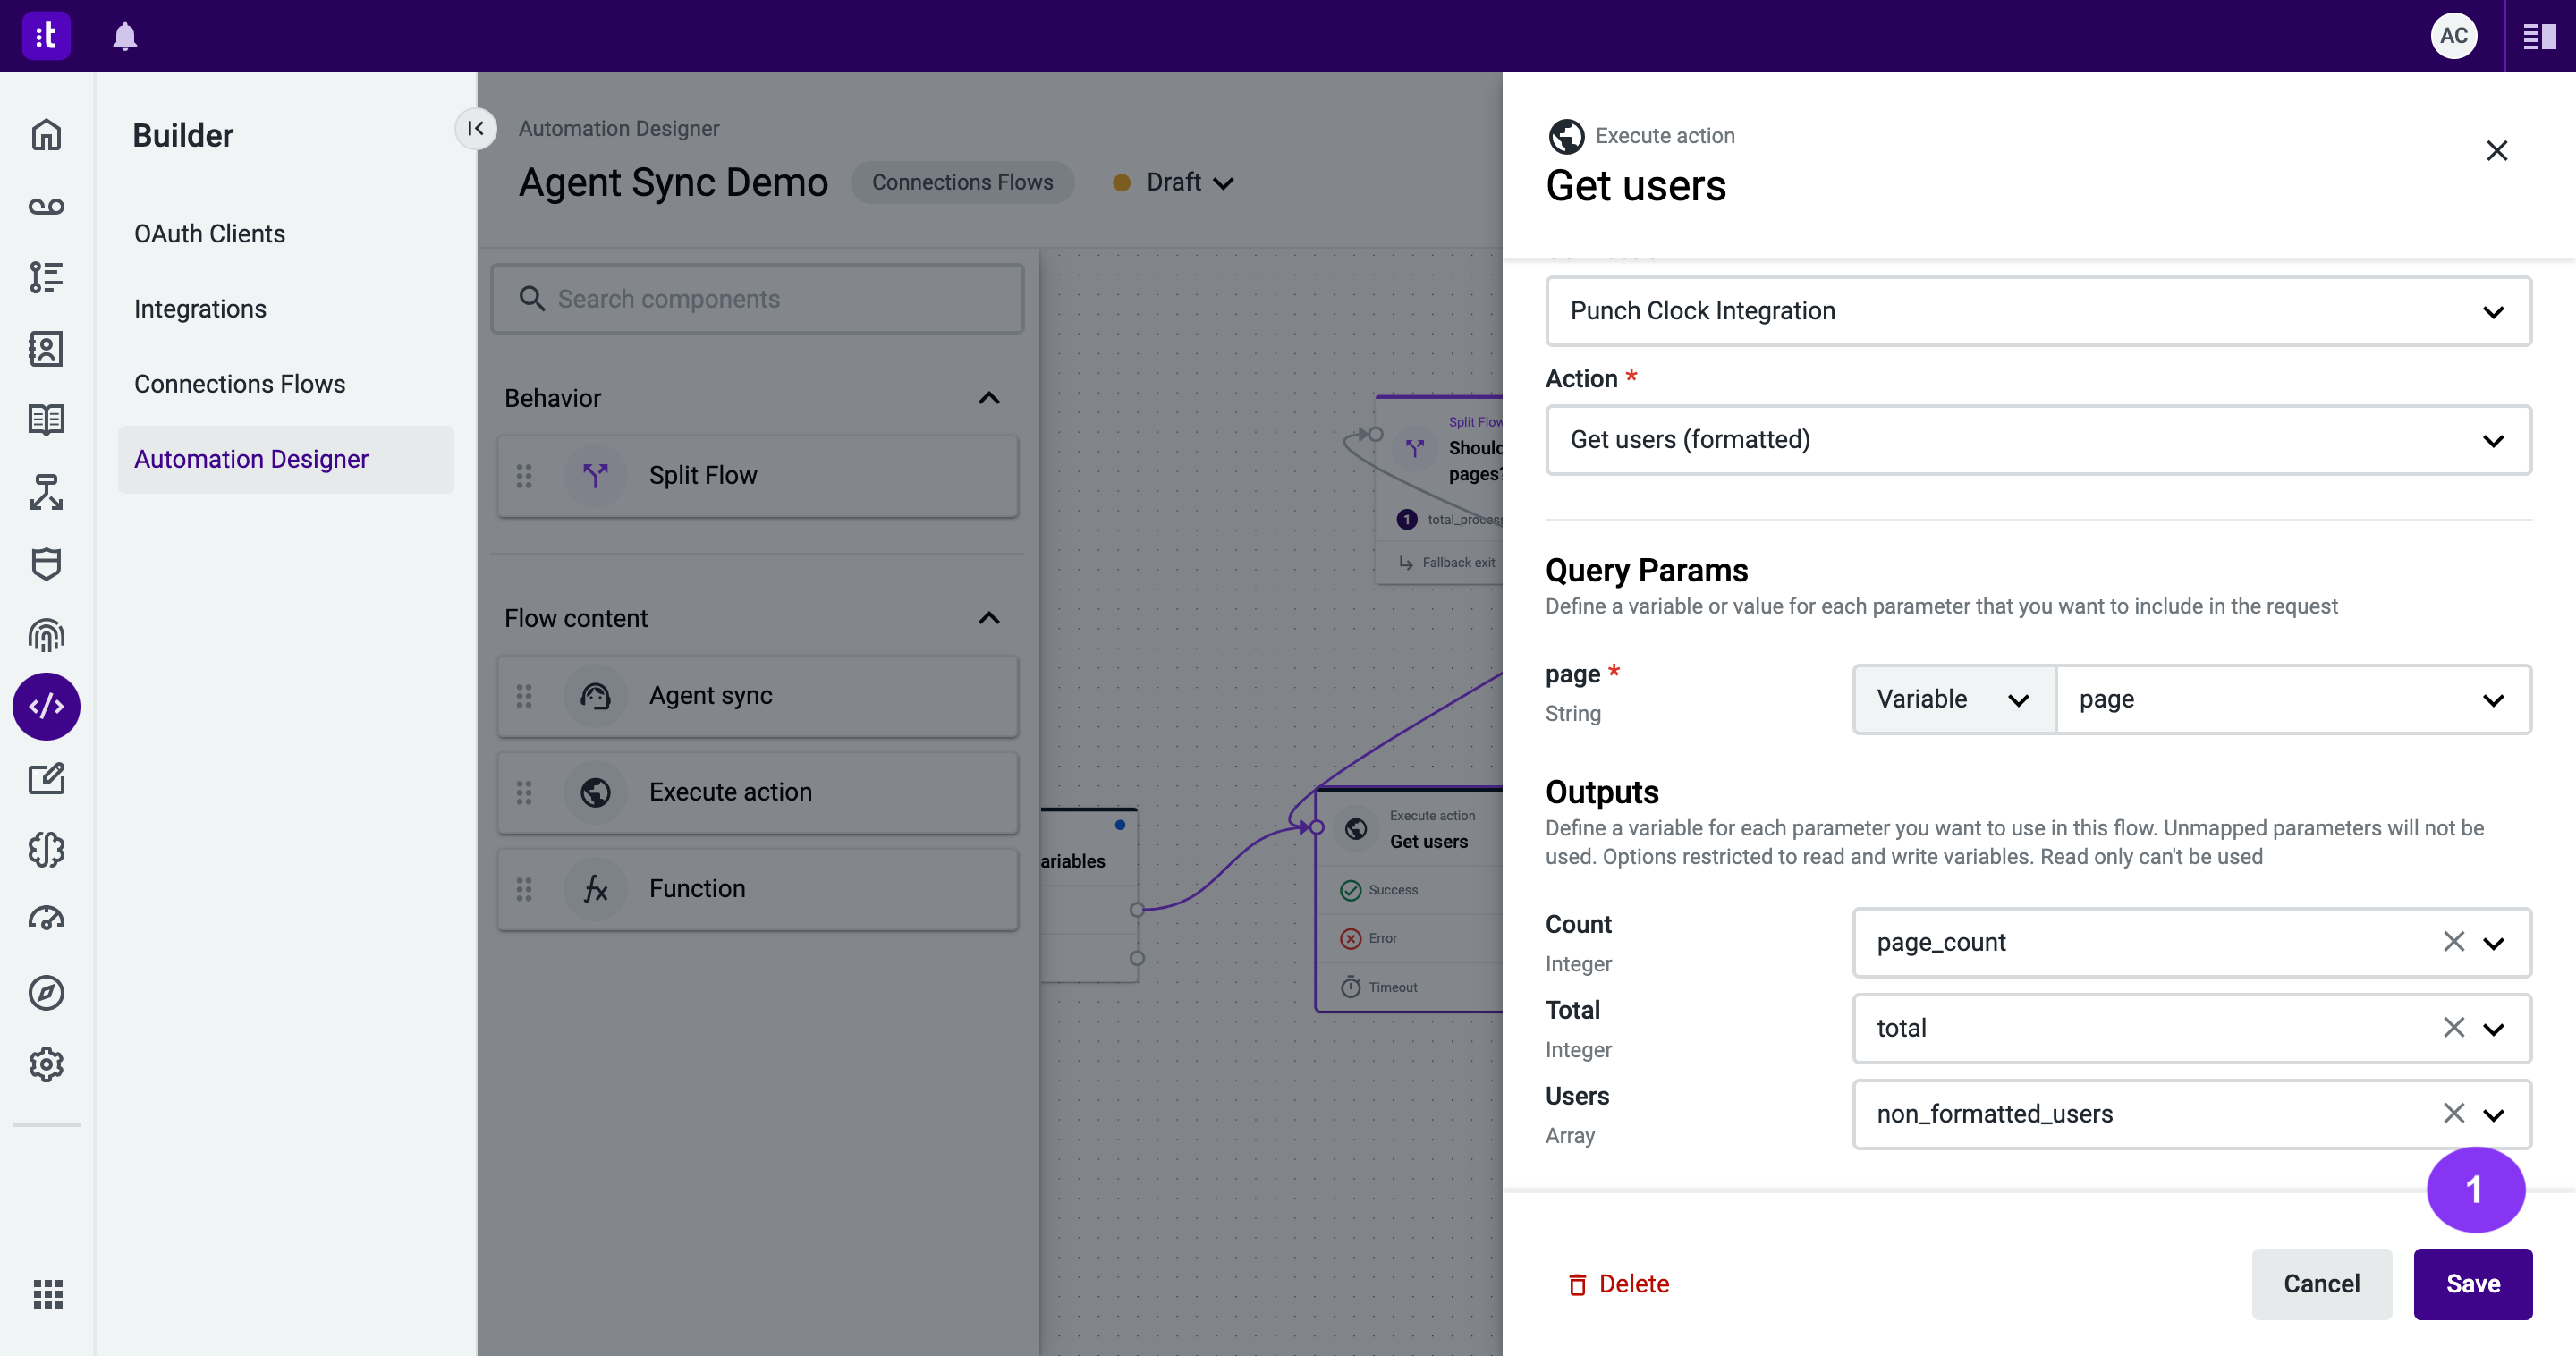
Figure 23 - Save changes
11 - Map the non-formatted users to formatted users
In this step, the difference in keys between the non-formatted users' output and the expected format will be addressed. To do this, a Function component will be used to map the user array to an array with the expected keys
In the mock API, the non-formatted users output only has different keys. This means you need to iterate the user array and map it to an array with the expected keys:
11.1 - Drag a Function component from the Flow content menu (Figure 24 - 1). This component will help you map the non-formatted user data to the expected format.
11.2 - Link its entrance to the exit of the existing Get users component (Figure 24 - 2), and its exit to the Agent Sync component (Figure 24 - 3).
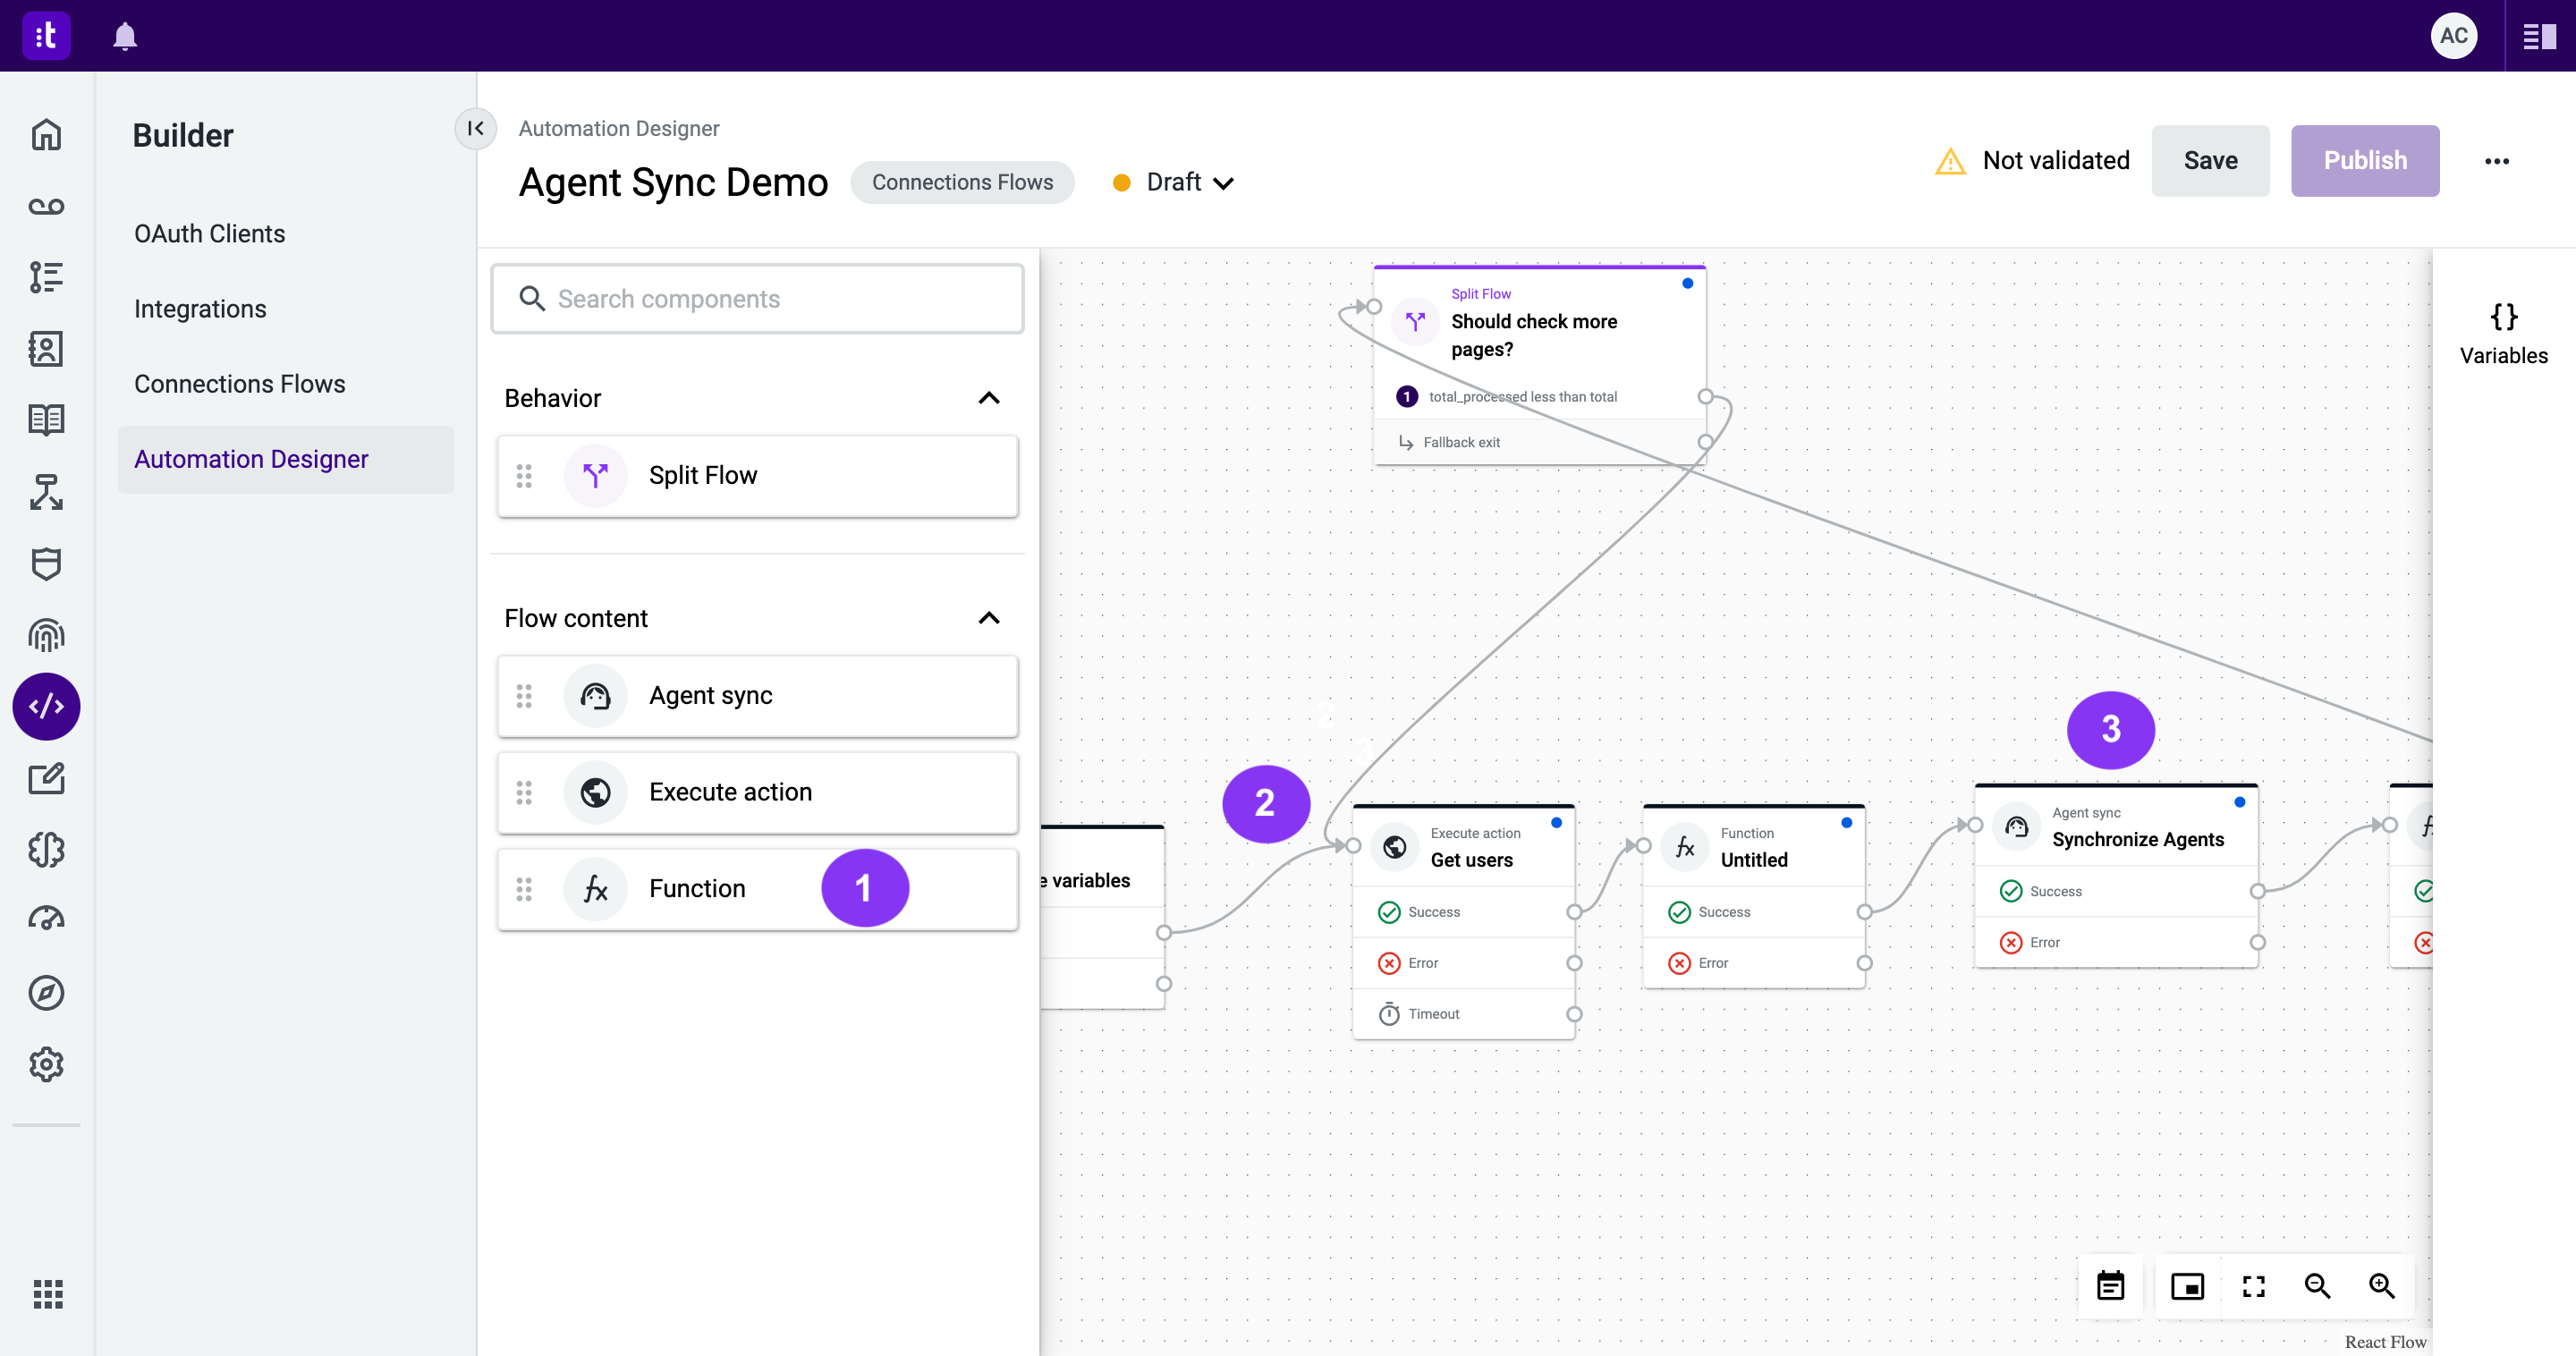
Figure 24 - Iterate the user array
11.3 - Double-click the Function component to open its configuration panel (Figure 25 - 1).
11.3.1 - Insert the component's name (mandatory field; Figure 25 - 2).
11.3.2 - Update the Function field (Figure 25 - 3) with the following code required for the mapping. In the case of the mock API, use this snippet:
const users = Context.getVariable("non_formatted_users");
const convertedUsers = users.map((user) => ({
  id: user.punch_clock_id,
  email: user.punch_clock_email
}));

Context.setVariable("formatted_users", convertedUsers);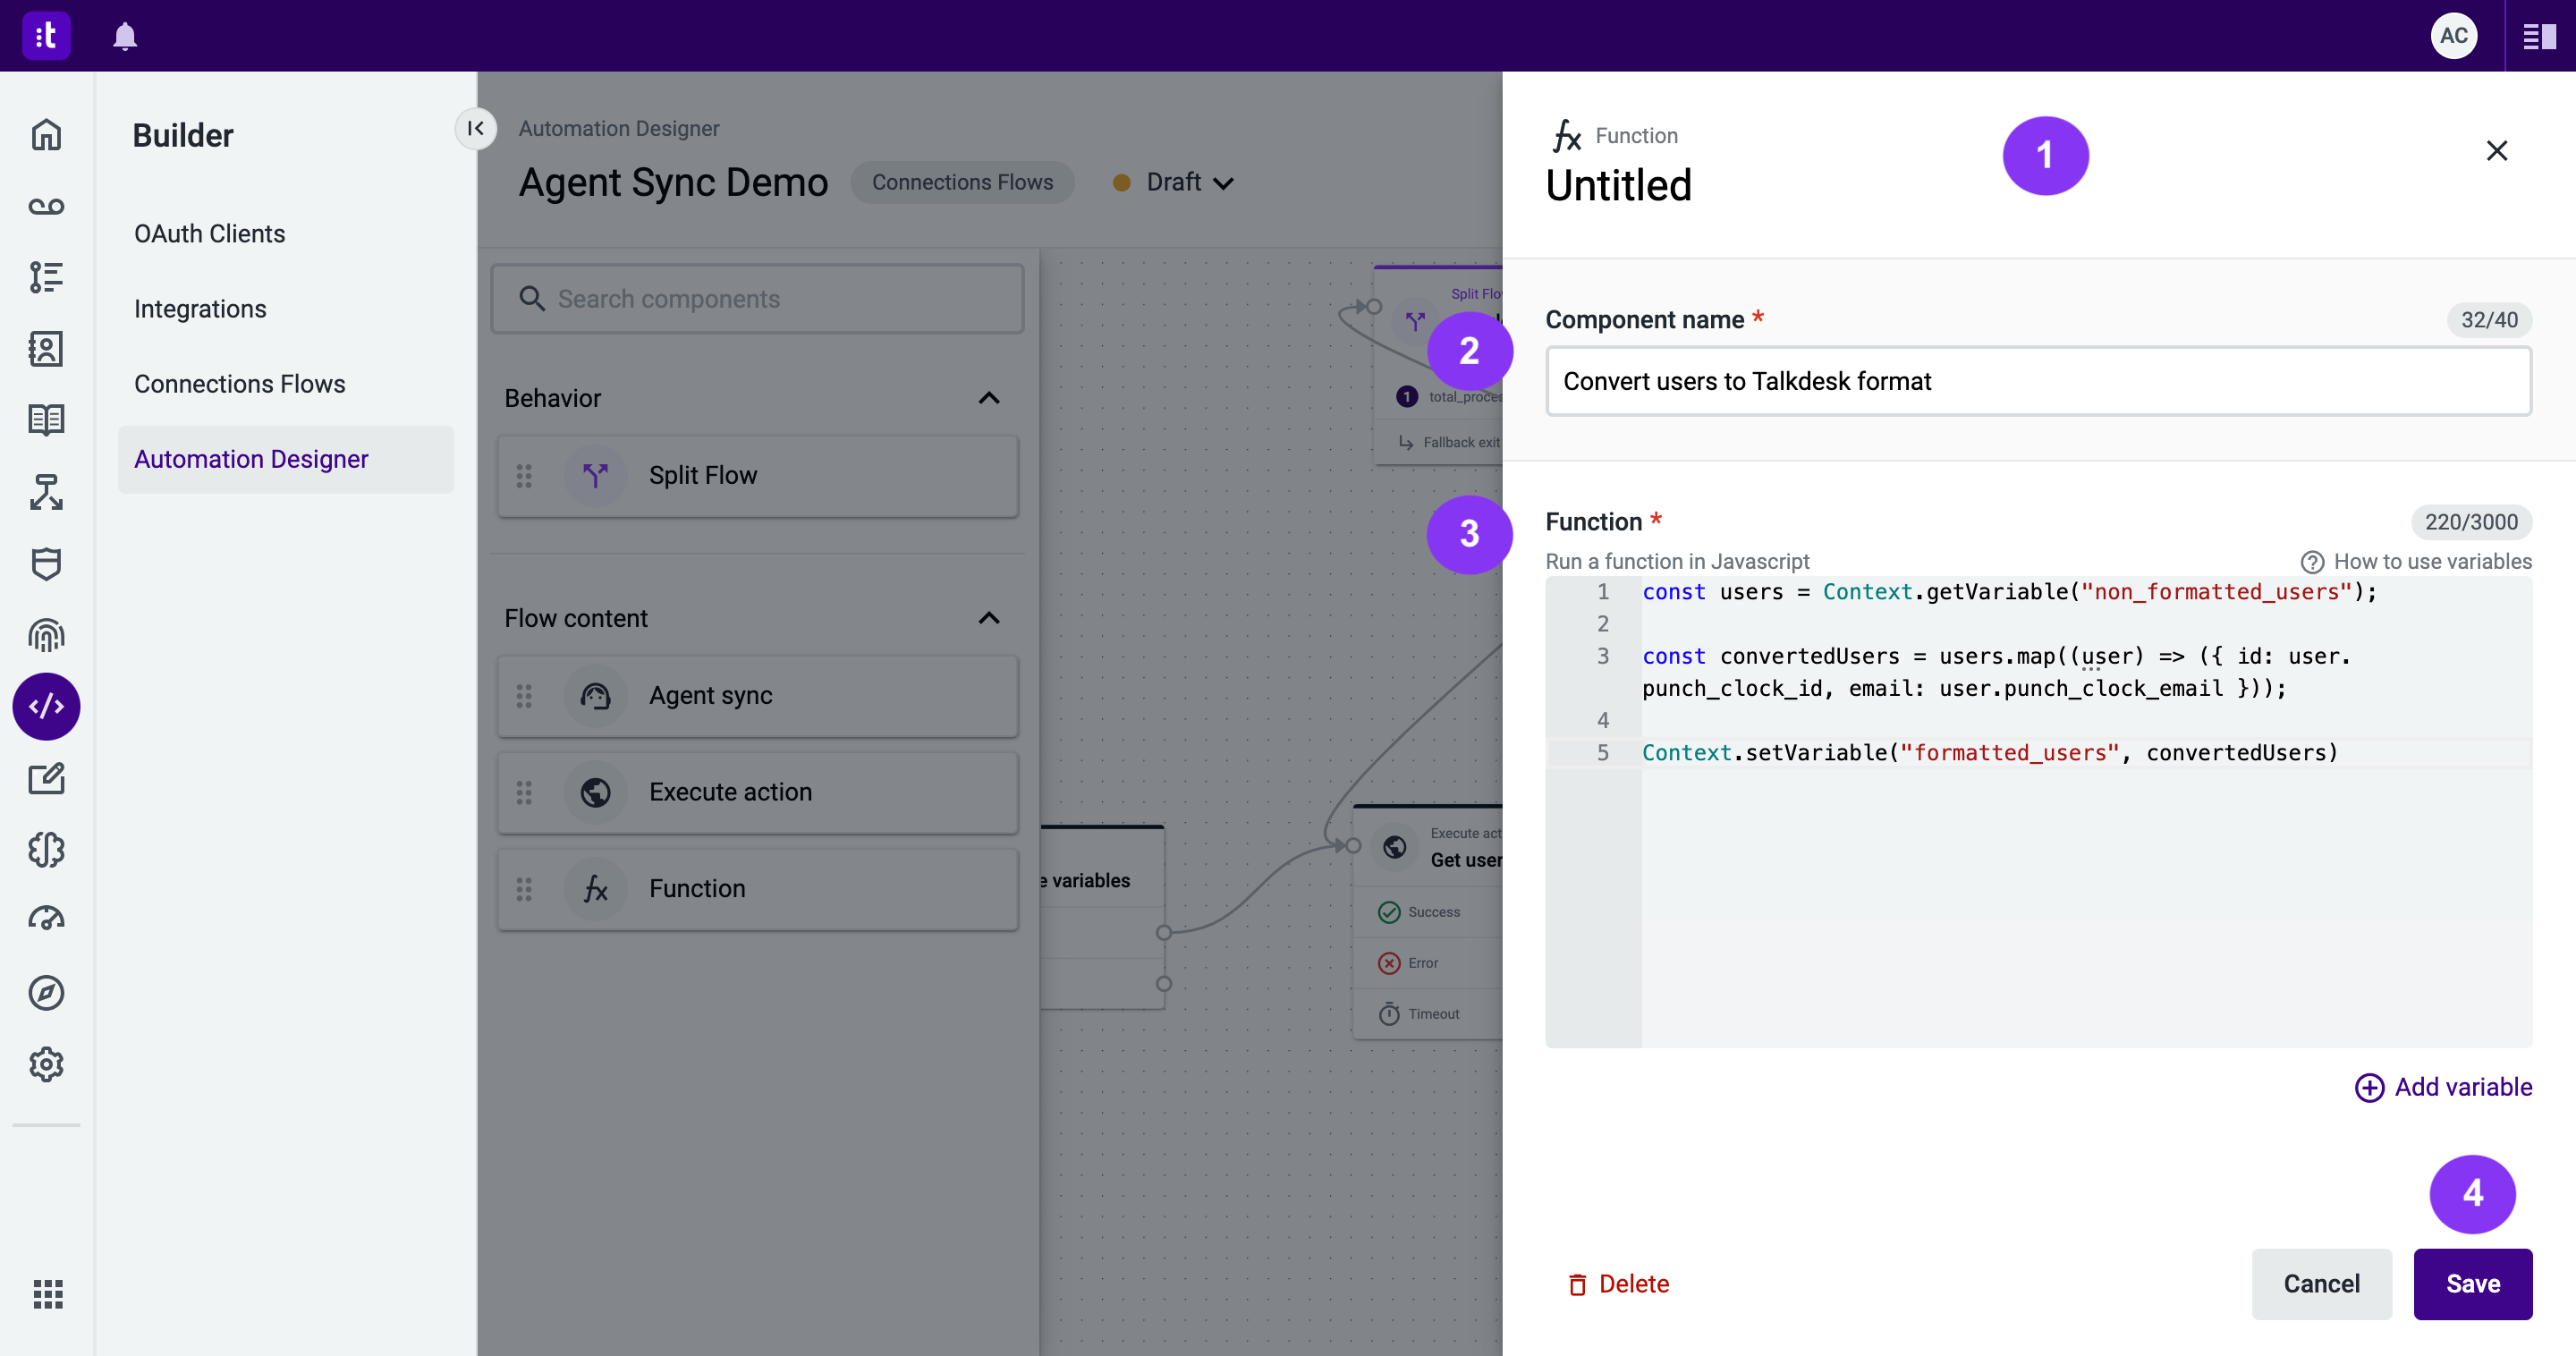
Figure 25 - Update the funcion code
This way, users who initially had the keys punch_clock_id and punch_clock_email will now be mapped to the Talkdesk standard ID and email format. The resulting data is saved in the same formatted_users variable used when the users were initially returned in the standard format. This means you don’t need to make any further changes to the automation.
11.3.3 - After completing the configuration, click Save (Figure 25 - 4).
Your canvas will resemble Figure 26.
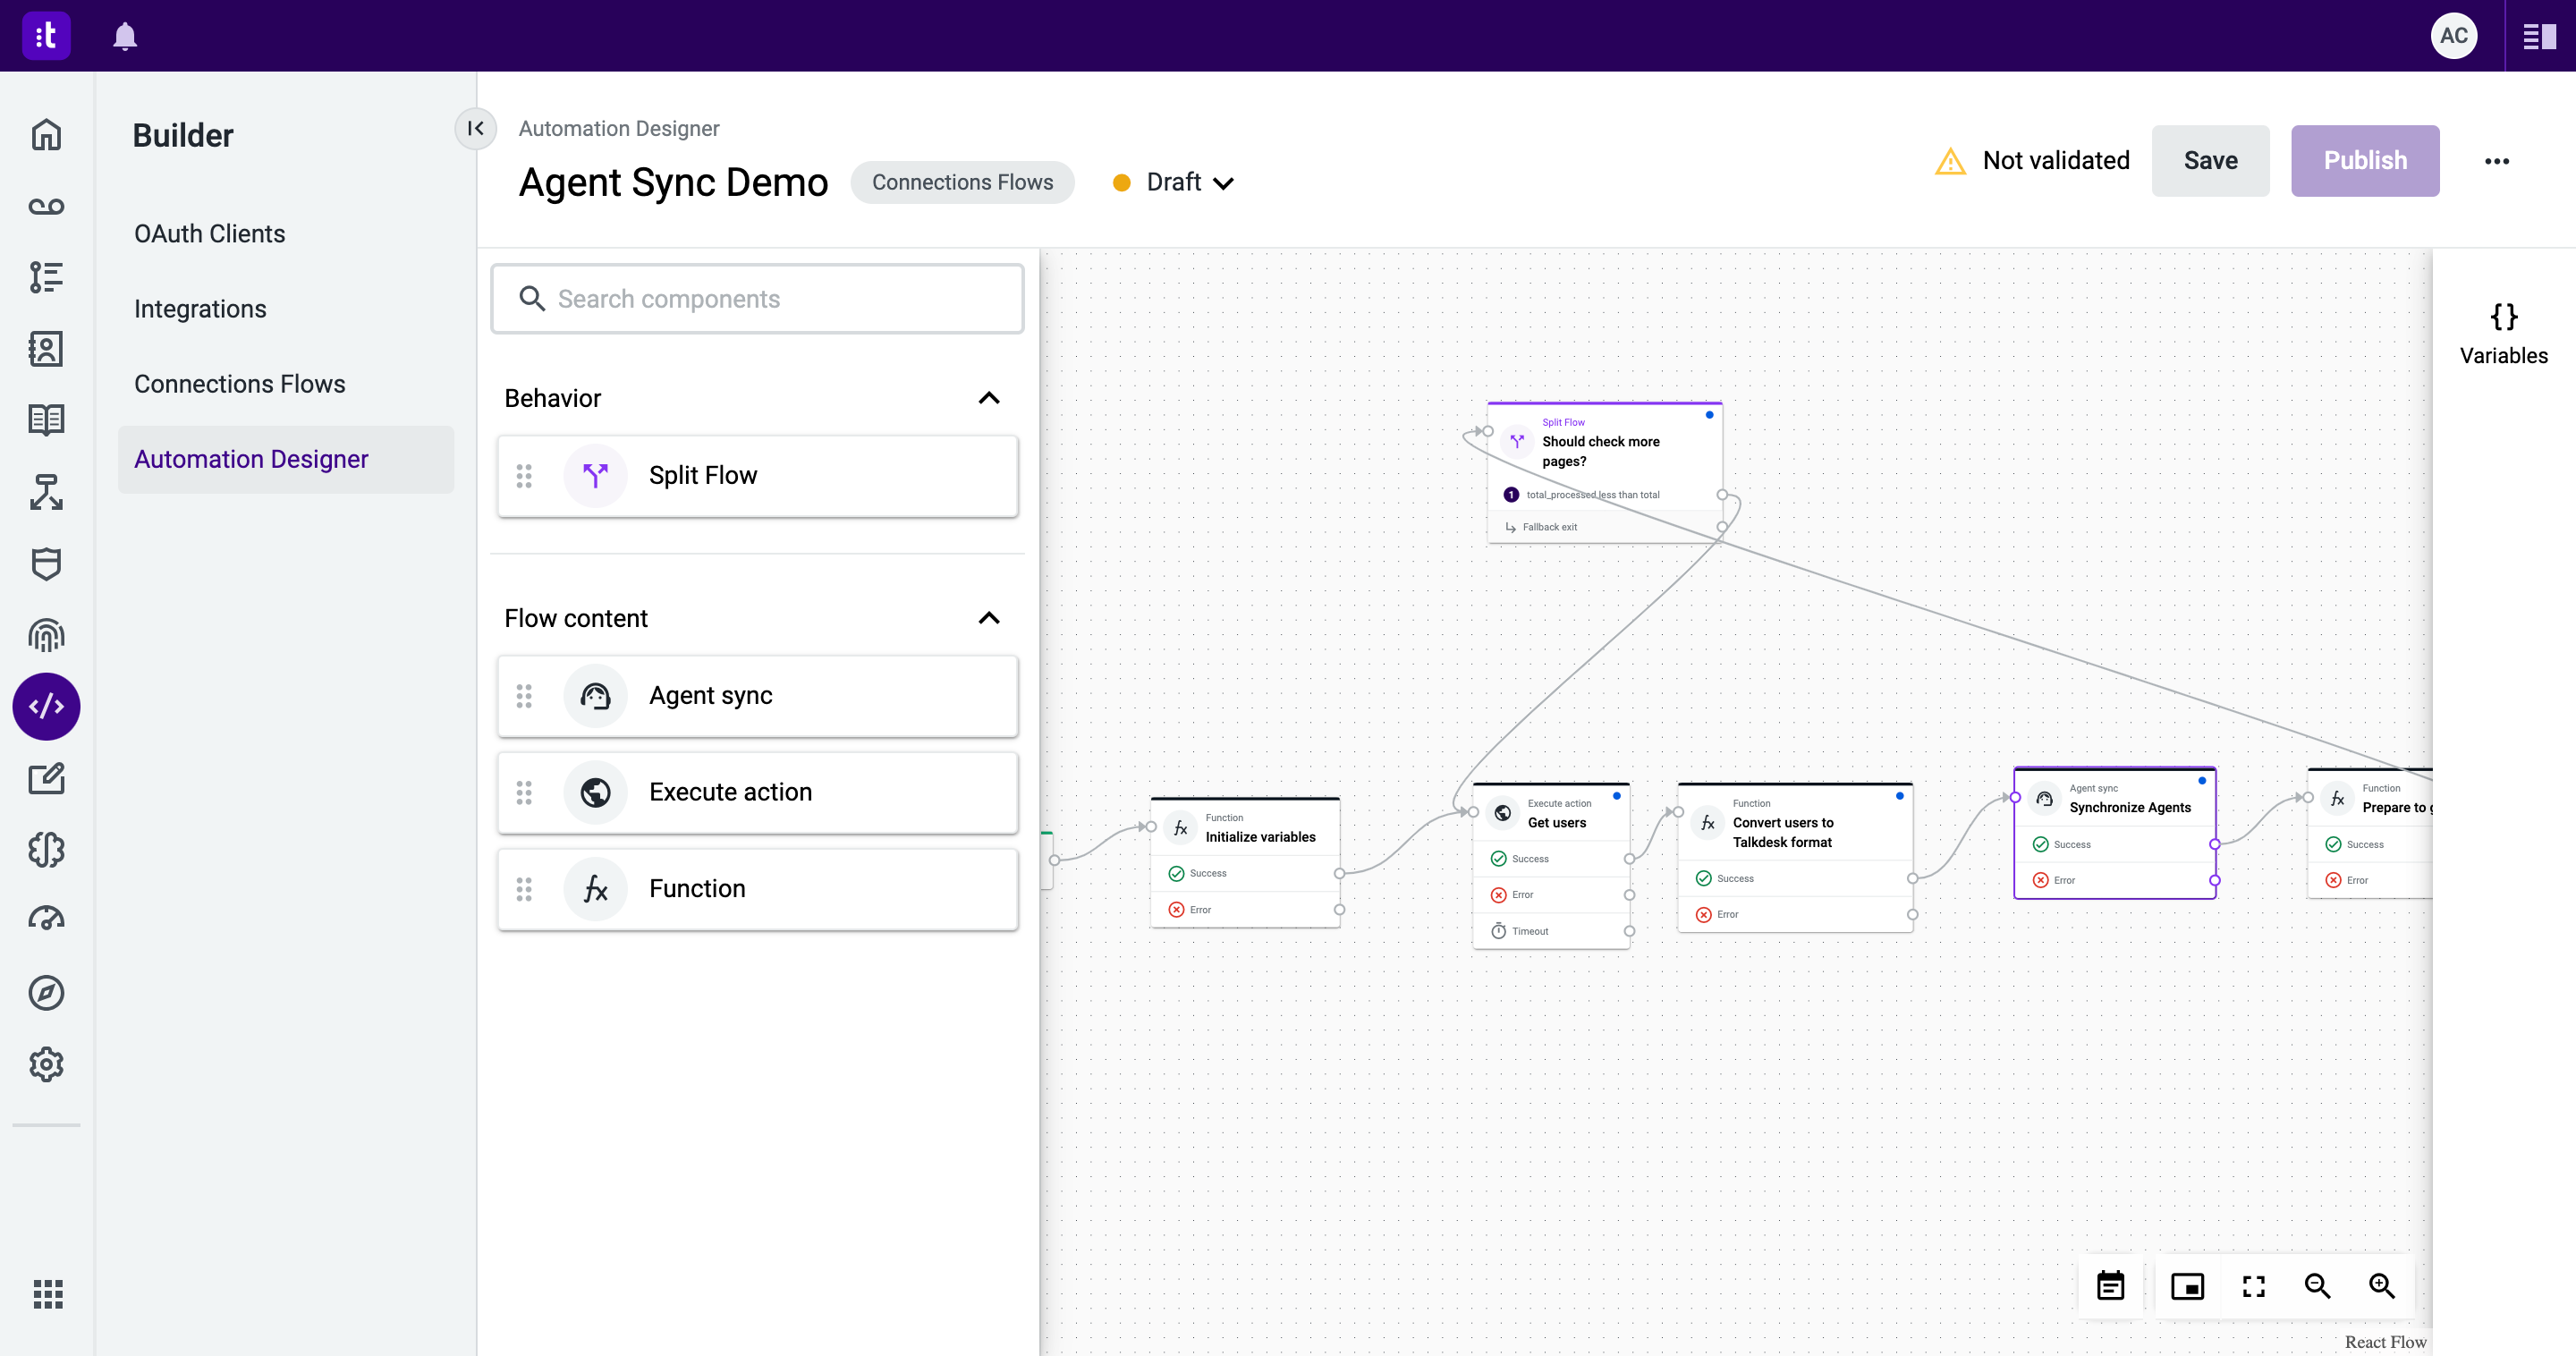
Figure 26 - Canvas
12 - Test your automation
Save and publish your automation, and repeat step 6 to test it.
You have successfully synchronized Talkdesk agents with an external integration and utilized their external IDs to trigger an API via an automation.
To verify the process, try logging in with different agents and review the call logs on your mock server.
TroubleshootingIf you have questions or technical issues, please open a ticket using this form.
Updated 4 months ago