Components
Components represent a specific step within a Connection Flow and are designed to perform specific tasks. To configure a component, double-click it, which opens the Configuration Side Panel.
All components have a Component Name field. This allows you to provide a clear and concise identifier for the component within the flow, up to 40 characters in length.
Additionally, each component has a custom configuration based on its purpose within the flow. Here are the components included in a Connection Flow:
Behavior
The Nehavior components alter the flow itself, and select which component/step to execute next.
Split Flow
This component determines the next step to execute based on specified conditions. Conditions are evaluated sequentially, and if none are met, the flow follows a fallback exit.
Once you're done configuring, click Save or Publish (Figure 1 - 1 / 2).
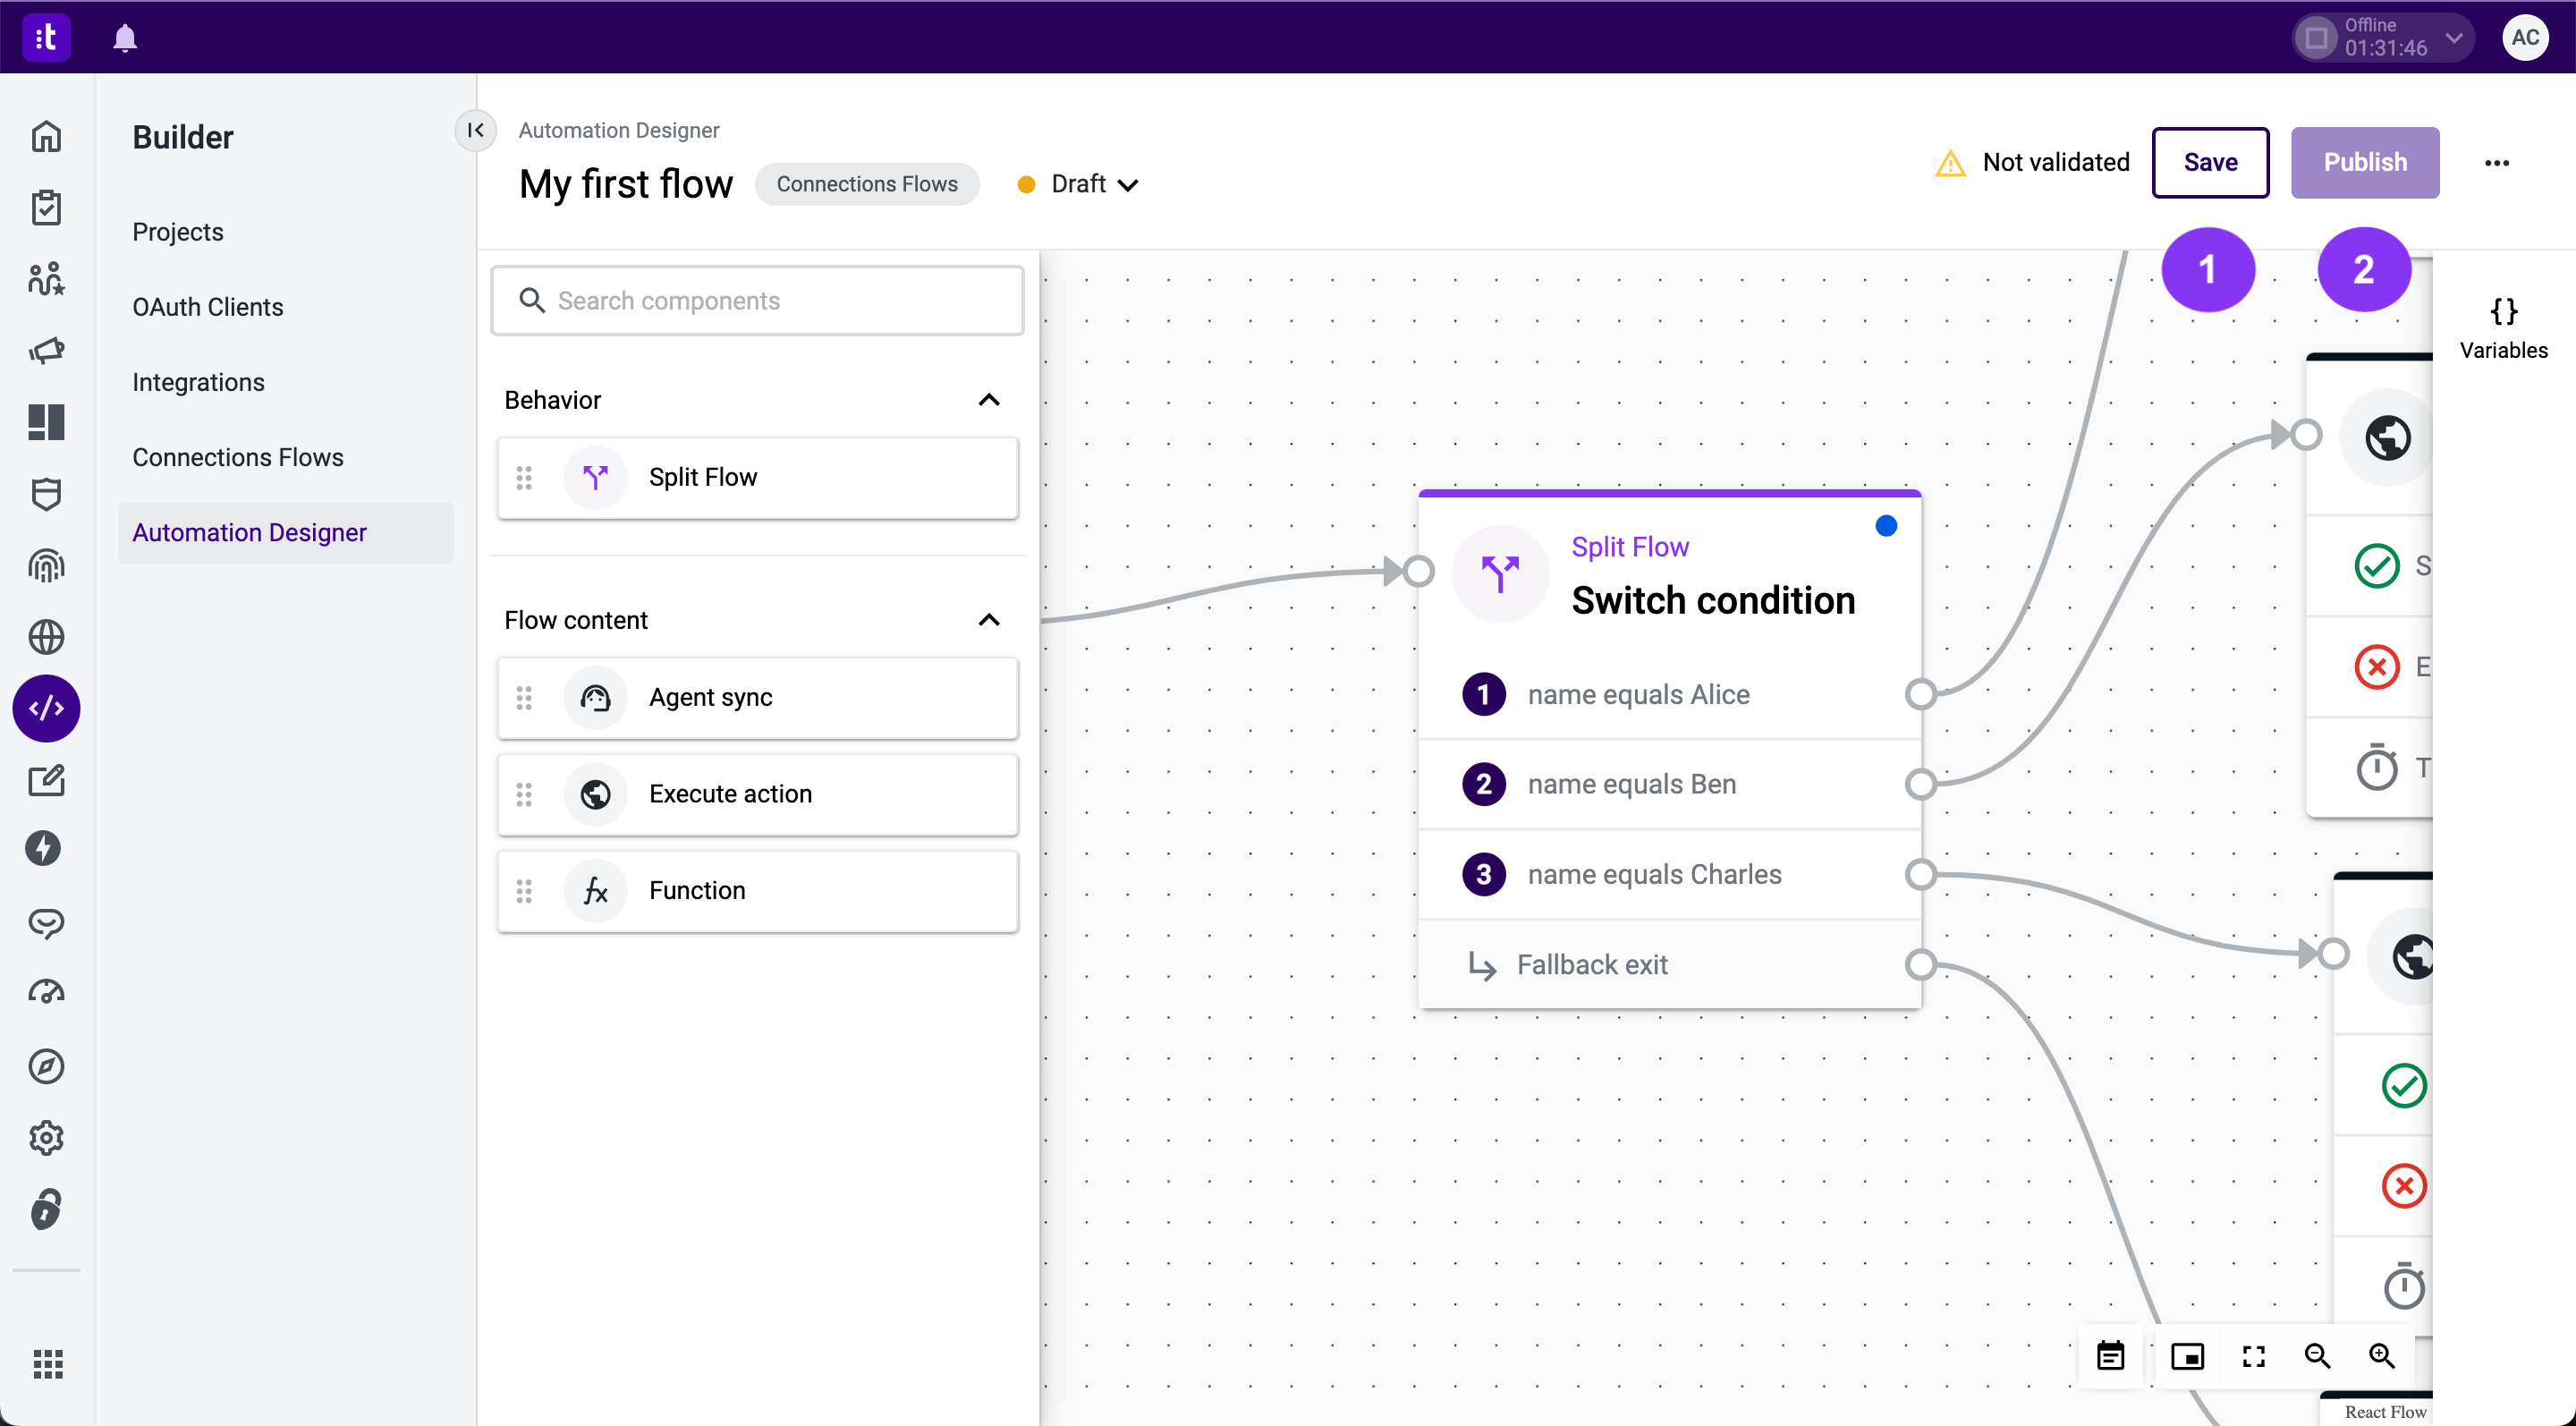
Figure 1 - Split flow
Limitations and Prerequisites
- Split Flow allows between 1 and 10 conditional exits.
- Conditional exits allow between 1 and 10 conditions.
- Conditional exits cannot be reordered; instead, you need to delete and recreate or modify a specific conditional exit's configuration.
Configuration
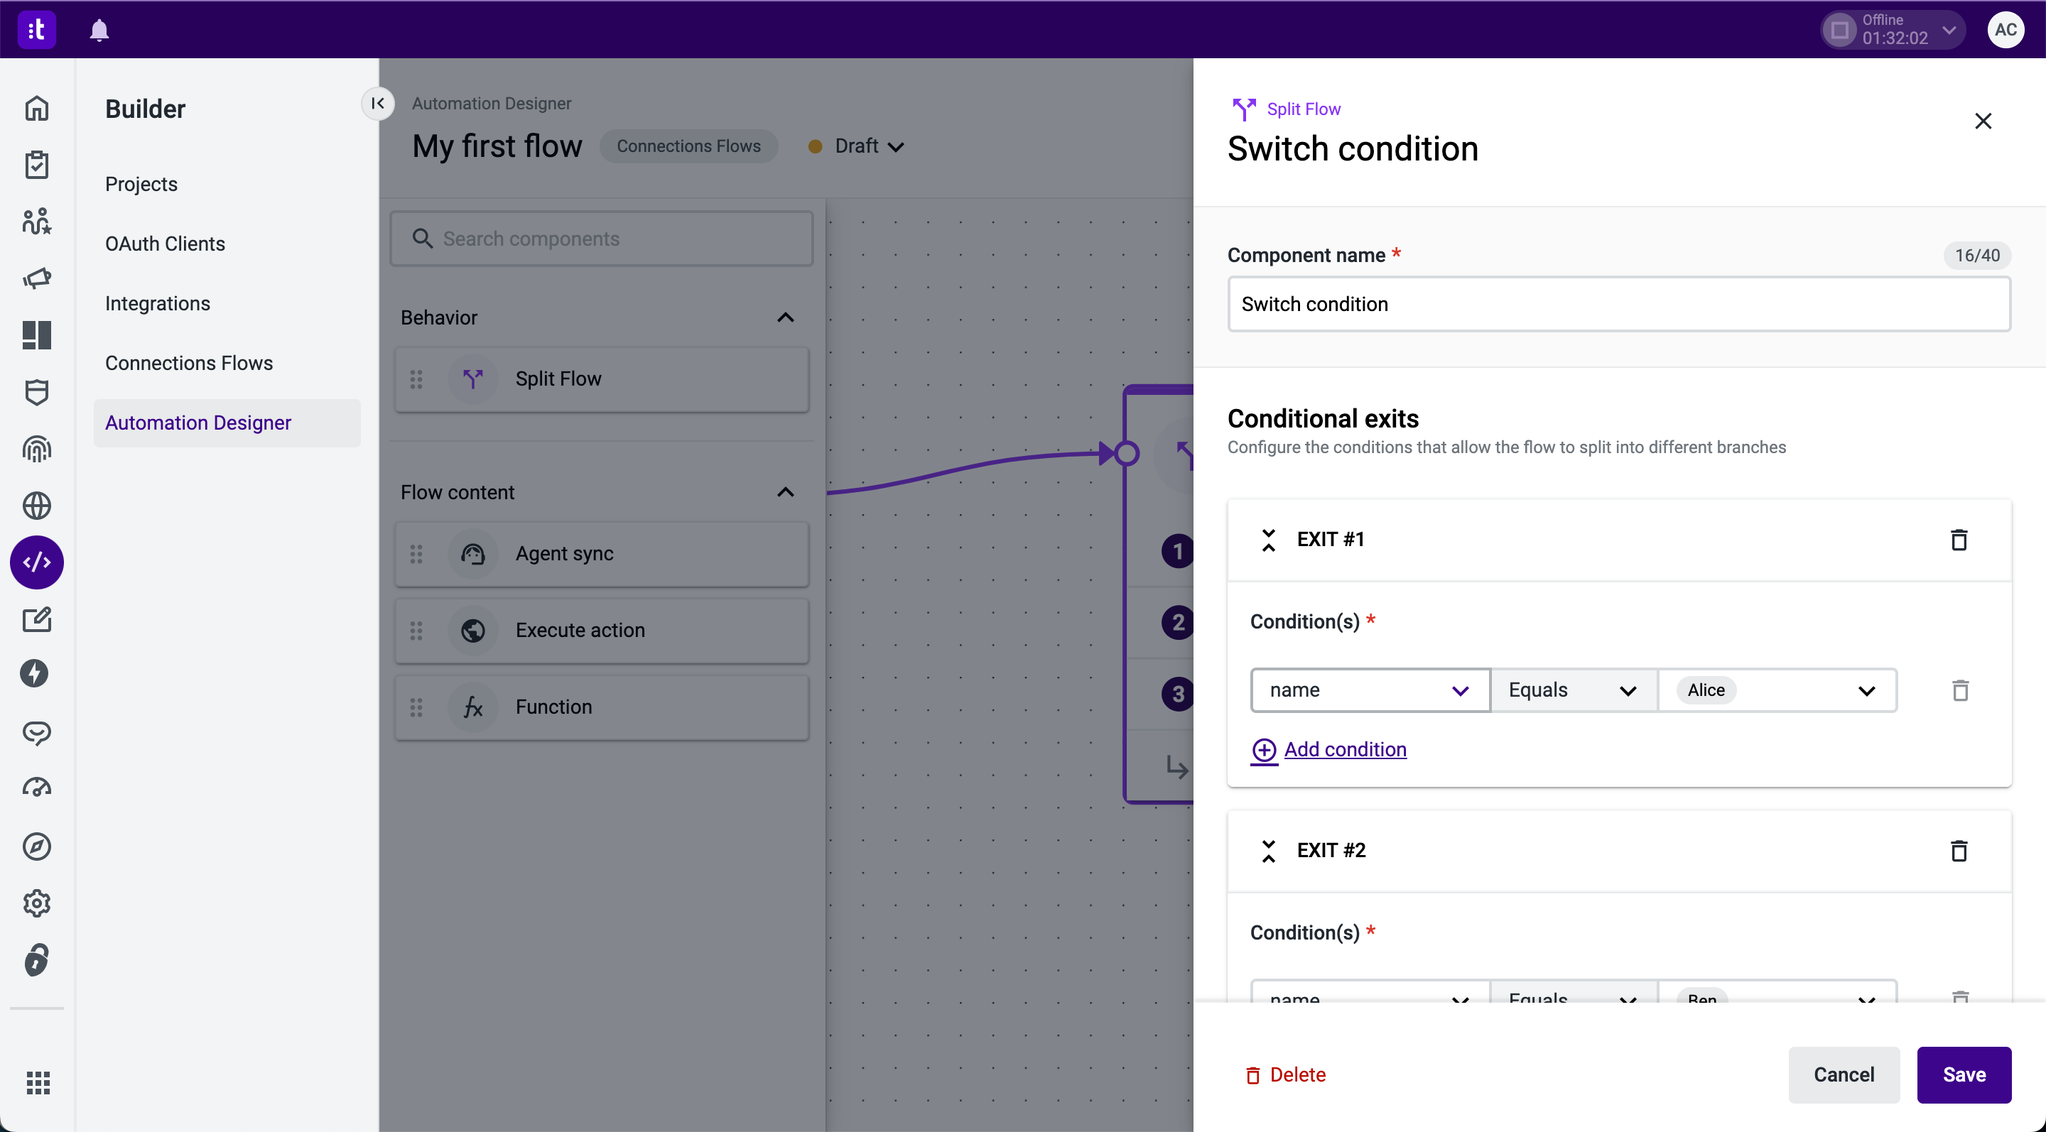
Figure 2 - Split flow configuration
Add a Conditional Exit
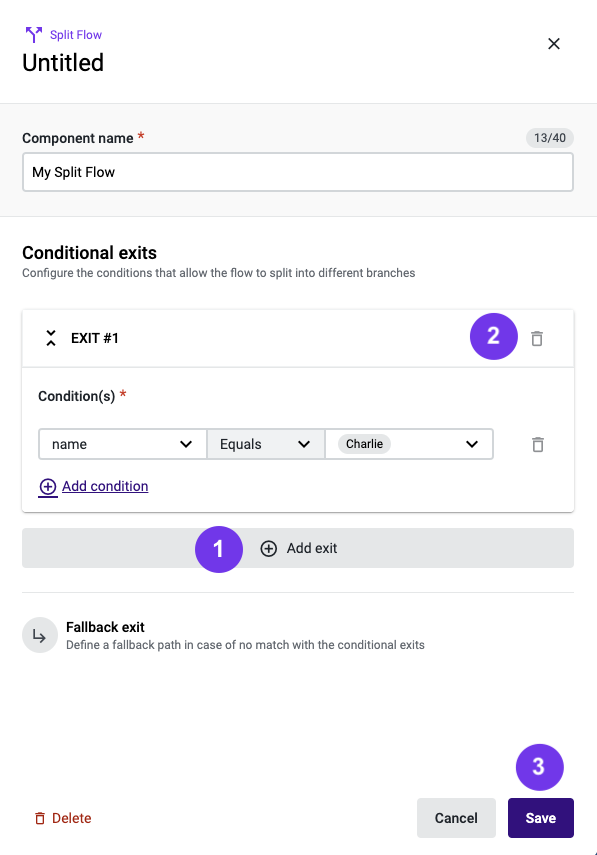
Figure 3 - Add a Conditional Exit
To add a conditional exit, click the _Add exit" button (Figure 3 - 1). Conditional exits are evaluated in order, and the flow follows the first exit where the conditions are met. To delete a conditional exit, click the trash icon (Figure 3 - 2). Click the Save button (Figure 3 - 3) once you've finished configuring to make the changes effective.
Delete a Conditional Exit
Click the trash icon (Figure 3 - 2) to delete it.
A Split Flow must have at least one conditional exit.
Set up a Condition
To set up a condition, use the dropdown (Figure 4 - 1) to select the context variable for the condition.
Click the Save button (Figure 4 - 2) once you've finished configuring to make the changes effective.
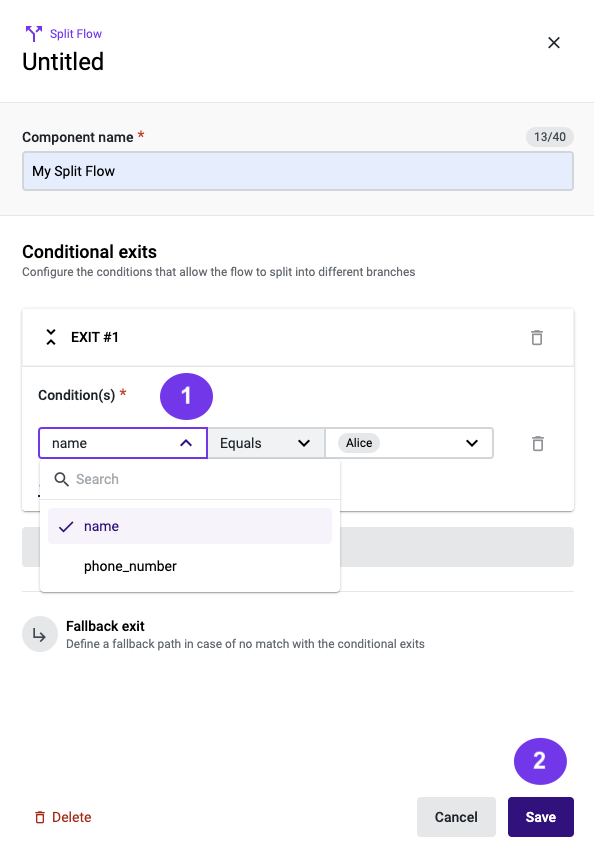
Figure 4 - Set up a condition
Click the dropwdown (Figure 5 - 1) to choose how to compare the variable with the value or values on the right. You can choose from Equals, Different than, Contains, Does not contain, Greater than or Greater than or Equals. Make sure to select a comparison method that makes sense for the type of variable you selected, as variables themselves are not typed.
Click the Save button (Figure 5 - 2) once you've finished configuring to make the changes effective.
If the types of variables within a comparison are not compatible, the condition will evaluate to false.
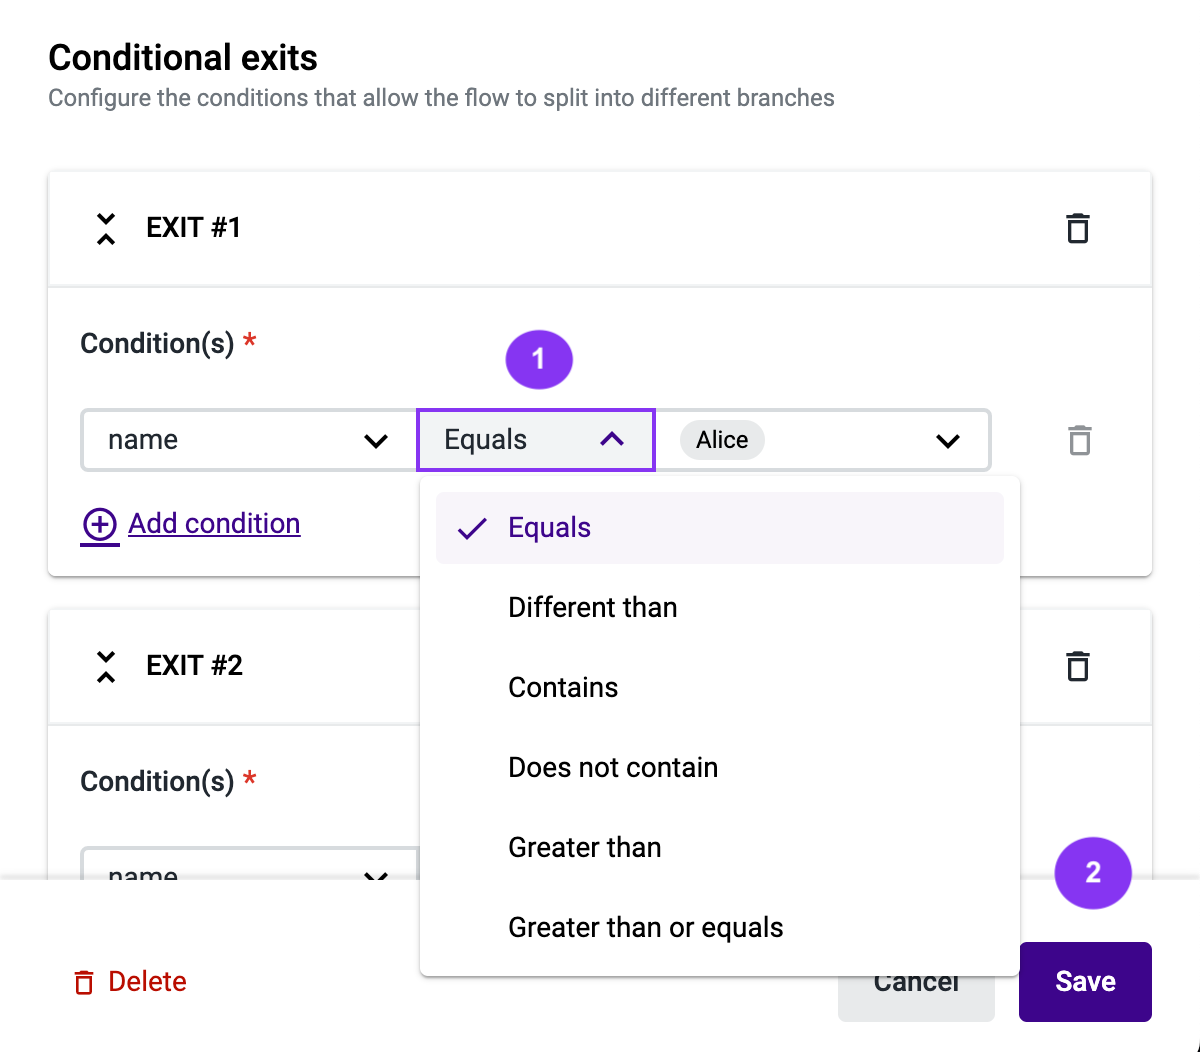
Figure 5 - Select variables
Click the dropdown (Figure 6 - 1) to enter values. Add a value to the input and press enter. You can also include a context variable (instead of a fixed value), by clicking Choose Variables (Figure 6 - 2) and selecting an existing variable.
Even though you can add a list of values, only the first value will be considered for comparison.
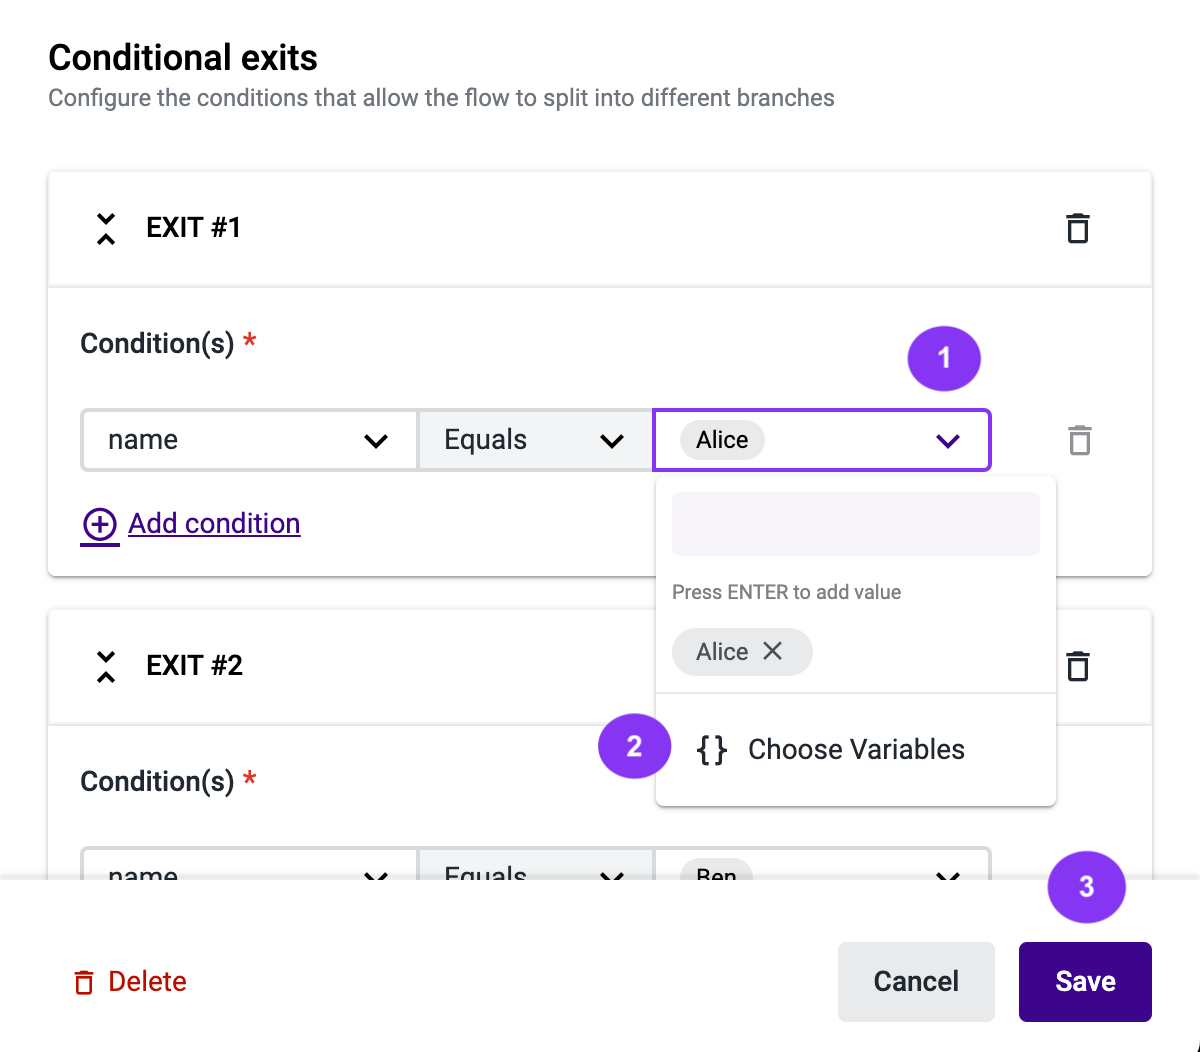
Figure 6 - Add values
Click the Save button (Figure 6 - 3) once you've finished configuring to make the changes effective.
Add a Condition to a Conditional Exit
Click the Add condition button (Figure 7 - 1) to add a condition to a conditional exit. You can add up to 10 conditions in one conditional exit. By default, all conditions must be met (Matching all, Figure 7 - 2). You can change the matching rules and select Matching any (Figure 7 - 3) so that the exit is selected if at least one of the conditions is met.
Click the Save button (Figure 7 - 5) once you've finished configuring to make the changes effective.
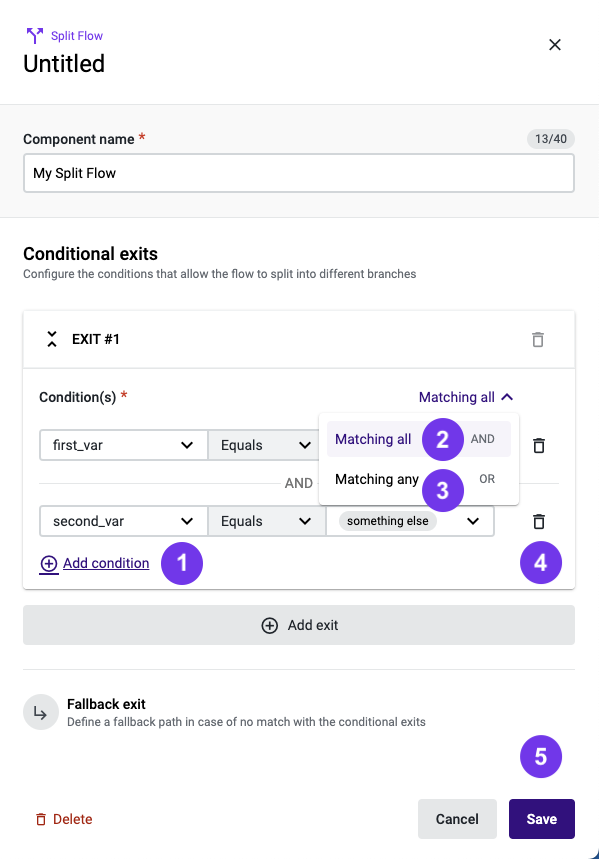
Figure 7 - Add a condition to a conditional exit
Deleting a Condition
Click the trash icon (Figure 7 - 4) to delete a condition. A conditional exit must have at least one condition.
Outputs
- Conditional Exit - up to 10 conditional exits can be defined, and conditions must be met as defined by the matching rules for the flow to exit successfully through a specific conditional exit.
- Fallback Exit - if none of the conditions defined in the conditional exits are met, the flow will exit via the fallback exit.
When you're done configuring the component, click the Save button in the bottom right corner.
Flow Content
Agent Sync
The Agent Sync component maps Talkdesk users (agents) to their equivalent users in an external system. This requires a custom integration using Connections. Once agents are synchronized with the external system equivalents, their external IDs can be used in Automations. This will trigger specific actions for those users in the external system.
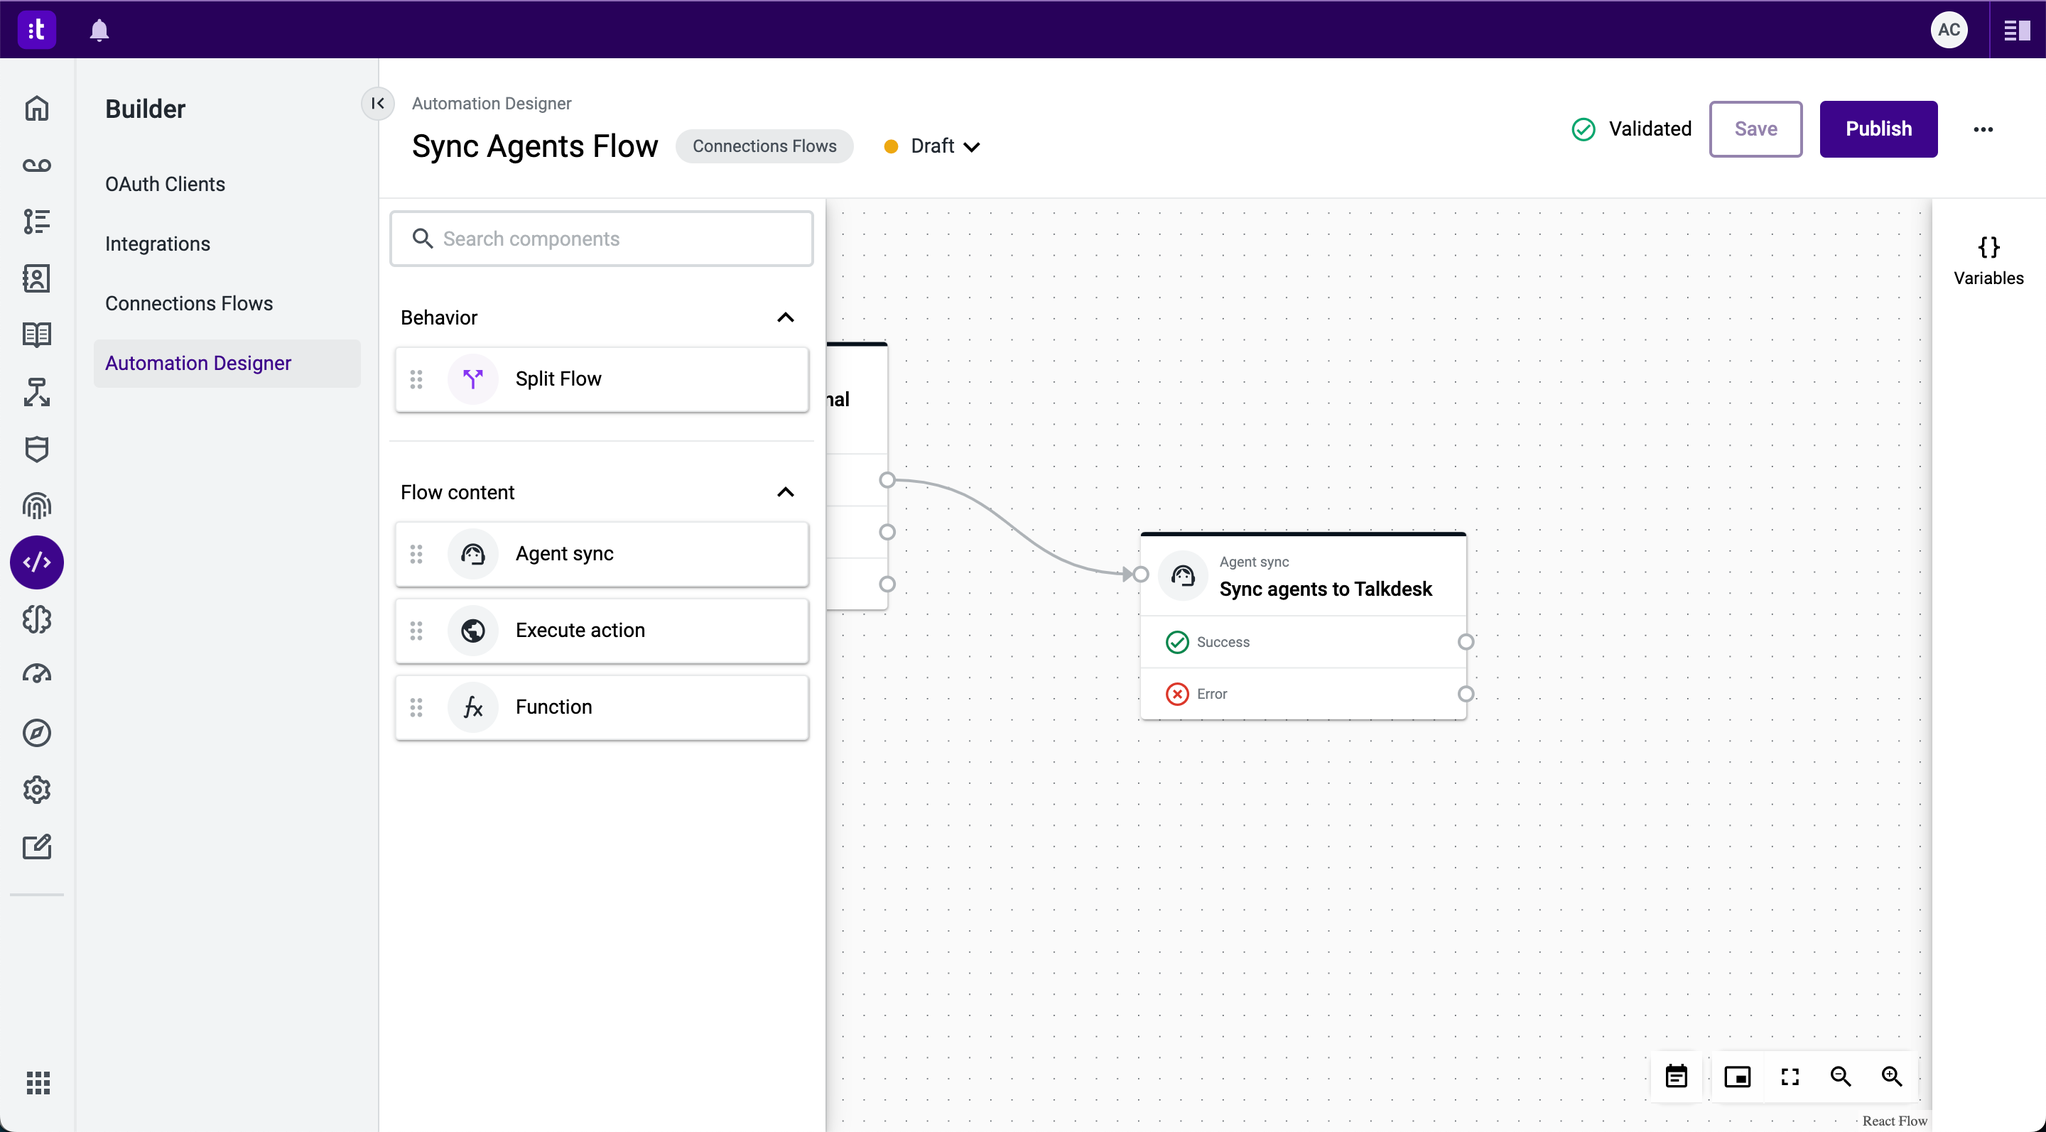
Figure 8 - Agent sync
Limitations and Prerequisites
- Agent Sync is used with a custom integration built with Connections for external system mapping.
- It allows syncing up to 50 agents at a time, and the Split Flow component can be used for larger syncs.
- In a specific format, the agents' contact information must be written to a variable. You can utilize the Execute Action component to retrieve the users' information from the external system and the Function component to transform the information into the format accepted by the Agent Sync component.
Configuration
Enter the component name (Figure 9 -1).
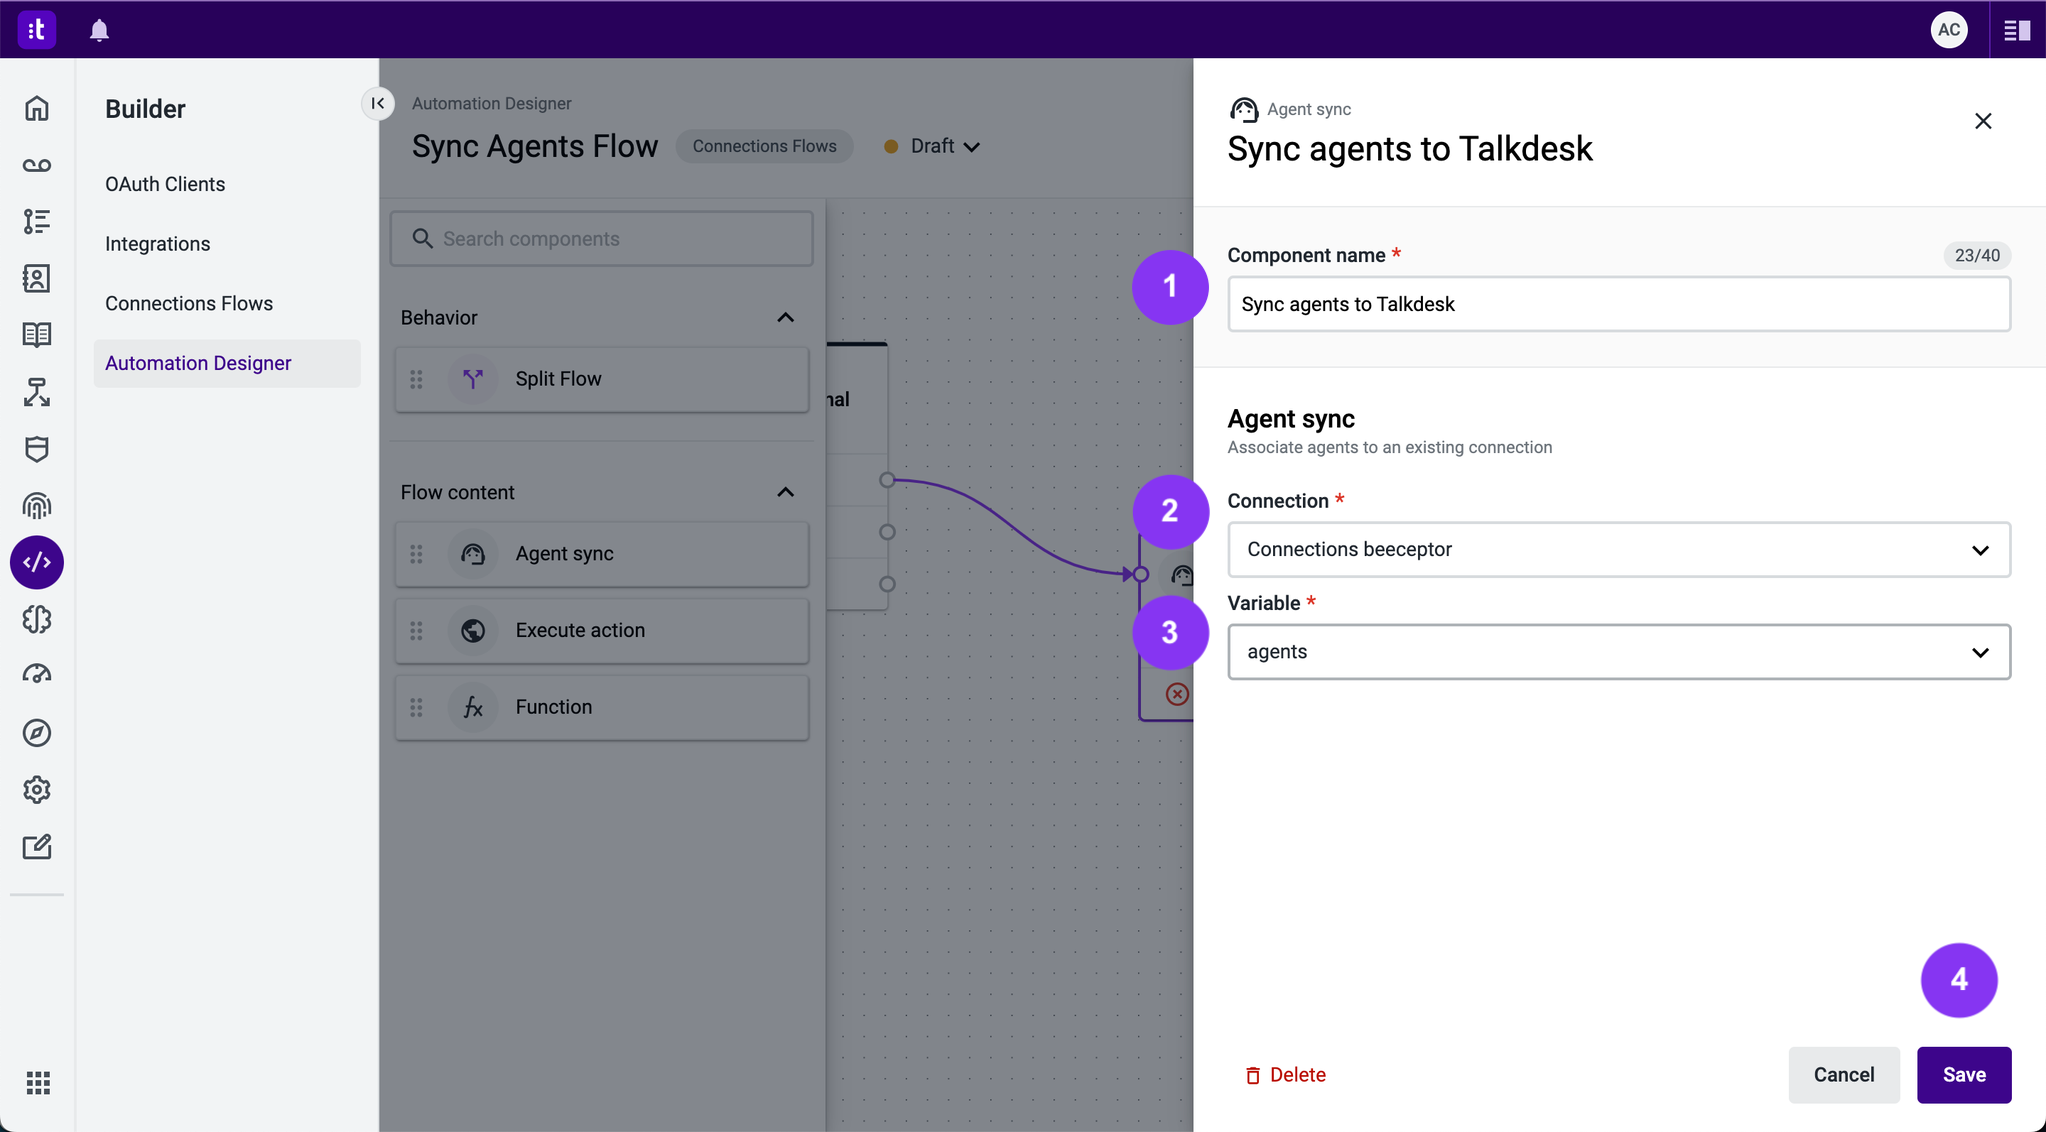
Figure 9 - Agent sync configuration
Connection (Figure 9 - 2)
Select the custom integration of the external system (using Connections) to map a set of External IDs to existing Talkdesk agents. Once the Agent Sync component runs, you can use an Automation to trigger an Action for a specific user in the external system using this External ID.
Variable (Figure 9 - 3)
Specify the context variable that stores agent information. This variable must be an array containing JavaScript objects. Each object represents a user in the external system and contains two keys:
id: the user's external ID in the external system (integrated via Connections).email: the user's email (the agent with the same email within Talkdesk will be mapped to the corresponding ID).
[
 {
   "id": "001",
   "email": "[email protected]"
 },
 {
   "id": "002",
   "email": "[email protected]"
 }
]
Outputs
- Success - followed if the Agent Sync works correctly.
- Error - if the Agent Sync fails.
When you have finished configuring the component, click the Save button (Figure 9 - 4).
Execute Action
The Execute Action component (Figure 10) allows you to trigger an Action defined for a custom integration built with Connections.
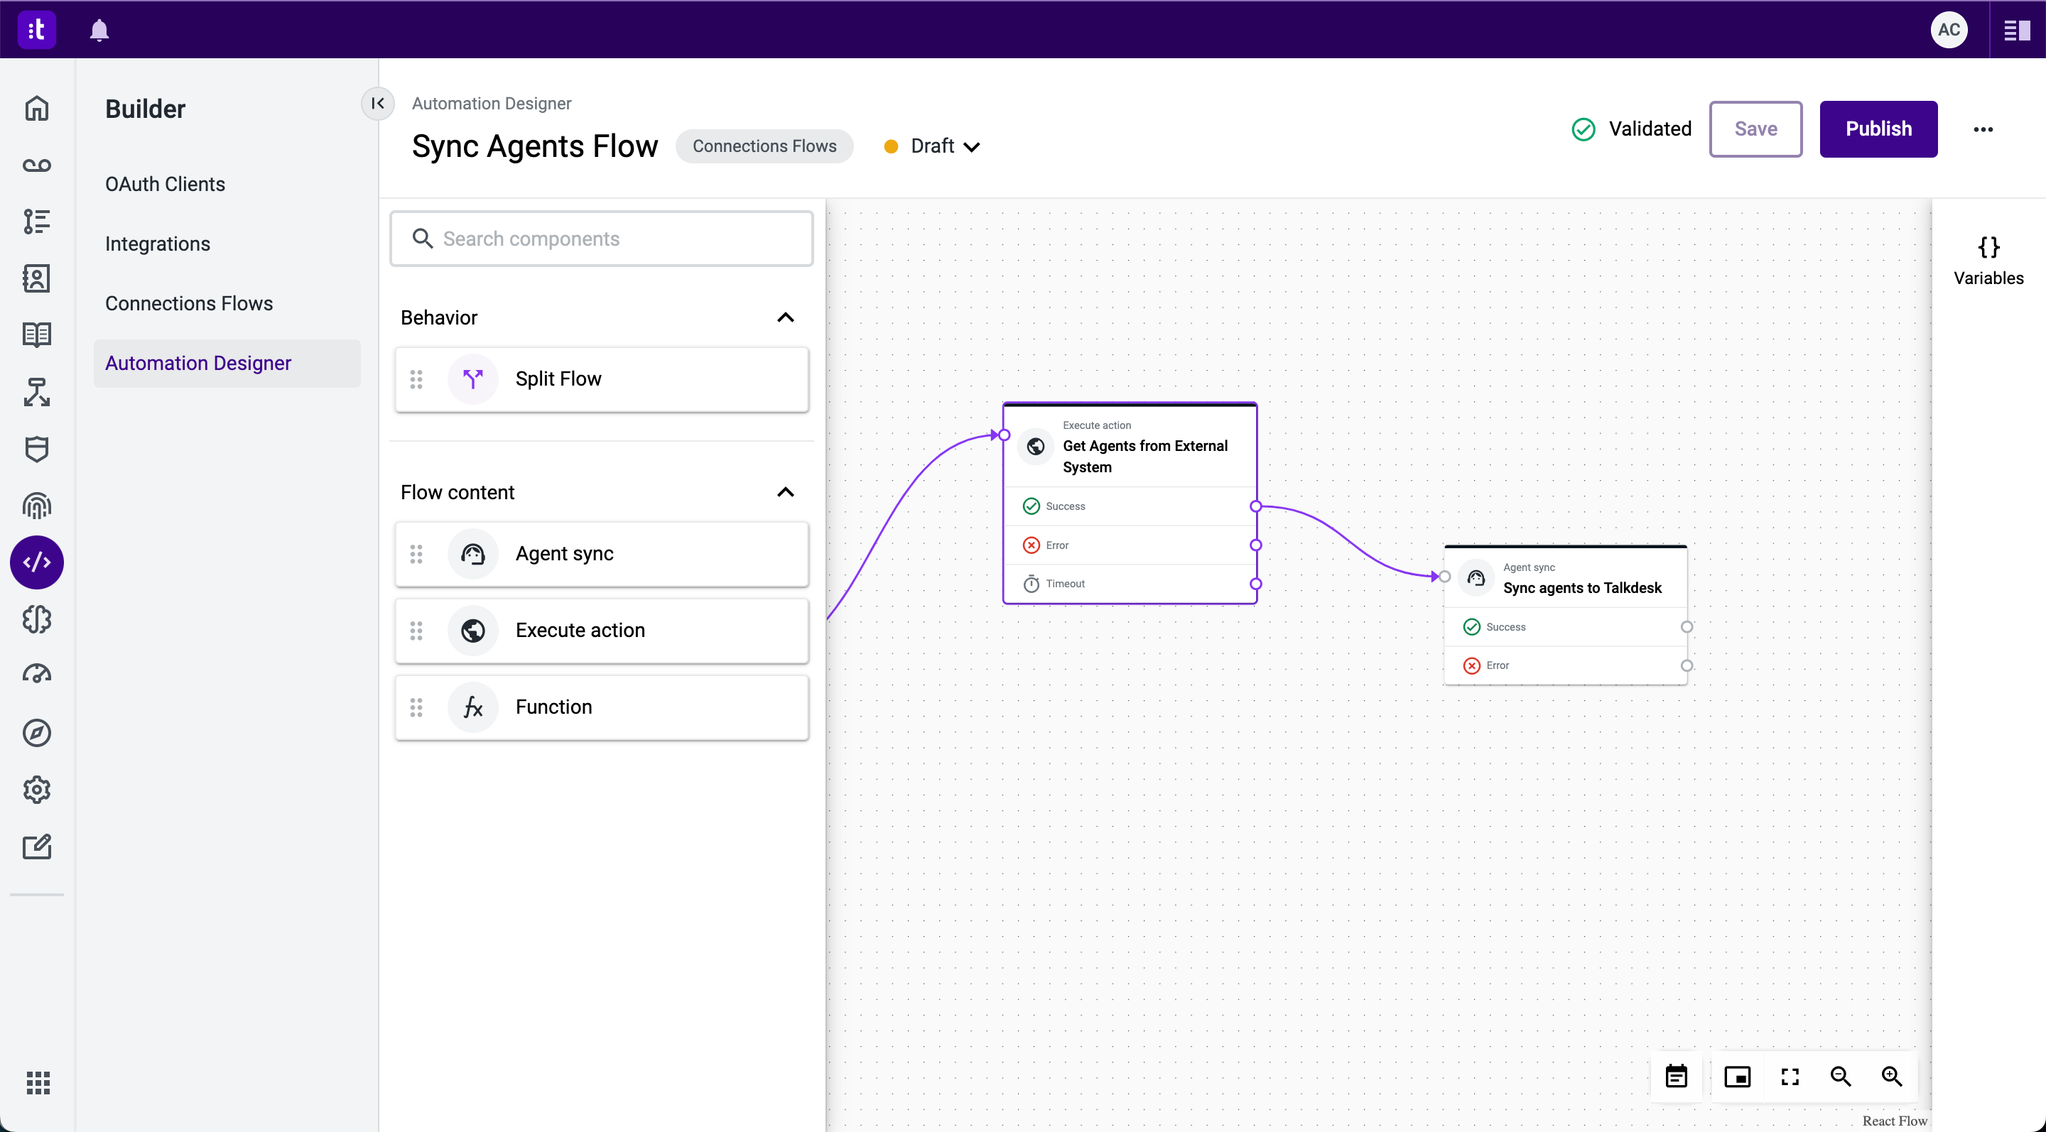
Figure 10 - Execute Action component
Prerequisites and Limitations
- A Connection.
- An Action defined for that Connection. The Action must be executed under the timeout defined by the Action.
Configuration
Enter the component name (Figure 11 -1).
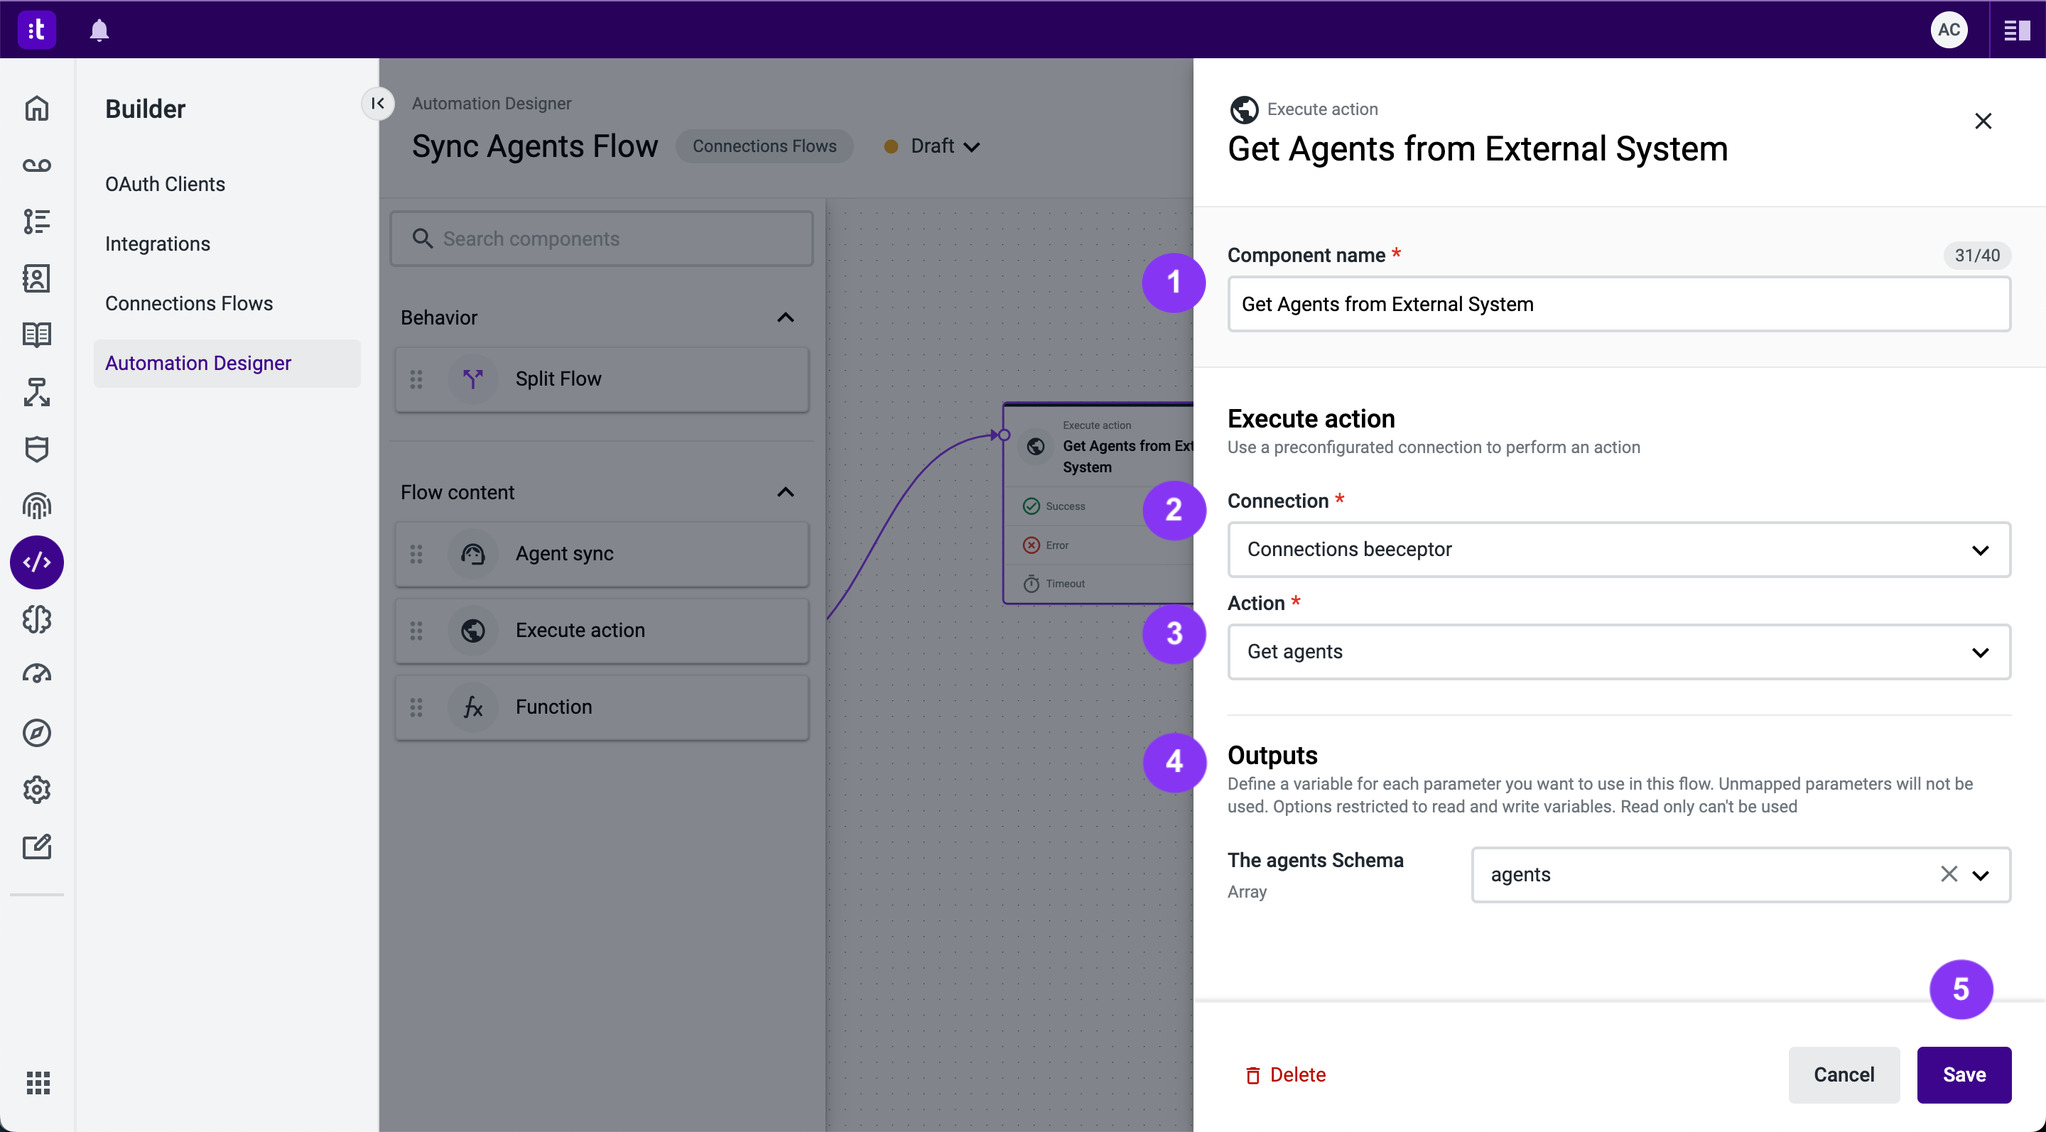
Figure 11 - Execute action configuration
Connection (Figure 11 - 2)
Choose an existing Connection.
Action (Figure 11. -3)
Select the Action to execute. This is an Action from the set defined for the selected Connection.
Outputs (Figure 11 - 4)
- Success - if the Action is executed successfully.
- Error - if executing the Action results in an error of any type.
- Timeout - if the Action takes longer to execute than the defined timeout.
When you have finished configuring the component, click the Save button (Figure 11 - 5).
Function
The Function component enables you to transform data by executing JavaScript code that can read and write context variables.
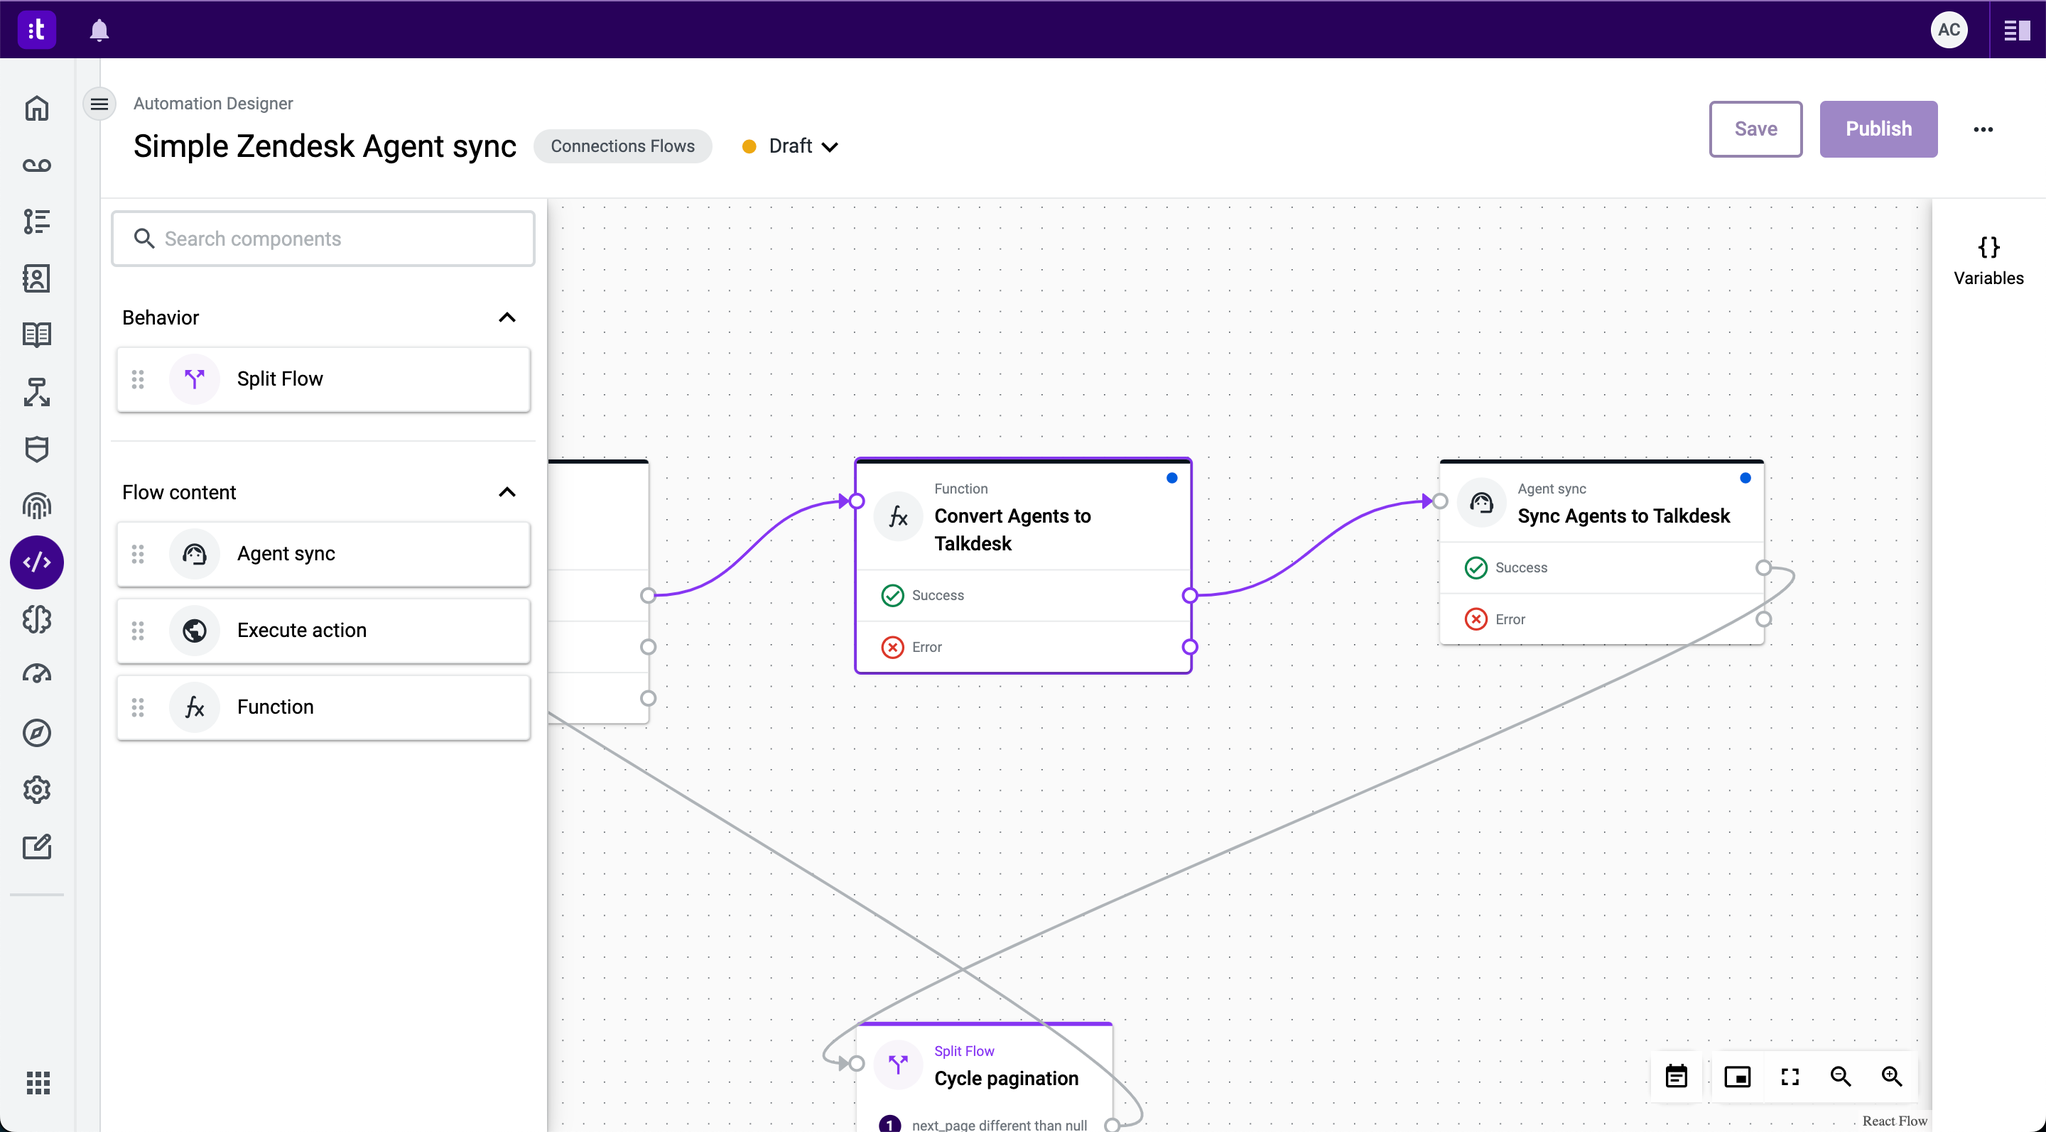
Figure 12 - The Function component
Prerequisites and Limitations
- The JavaScript function must be written in 3000 characters or fewer.
- JavaScript global variables such as
setTimeout,setInterval,requireor the browser-specificconsole,window,documentare not available. - The JavaScript defined in this component does not support:
- Importing libraries.
- Logging.
- Asynchronous code.
- Executing HTTP calls to external systems (use the Execute Action component with Connections for this purpose).
Configuration
Enter the component name (Figure 13 - 1).
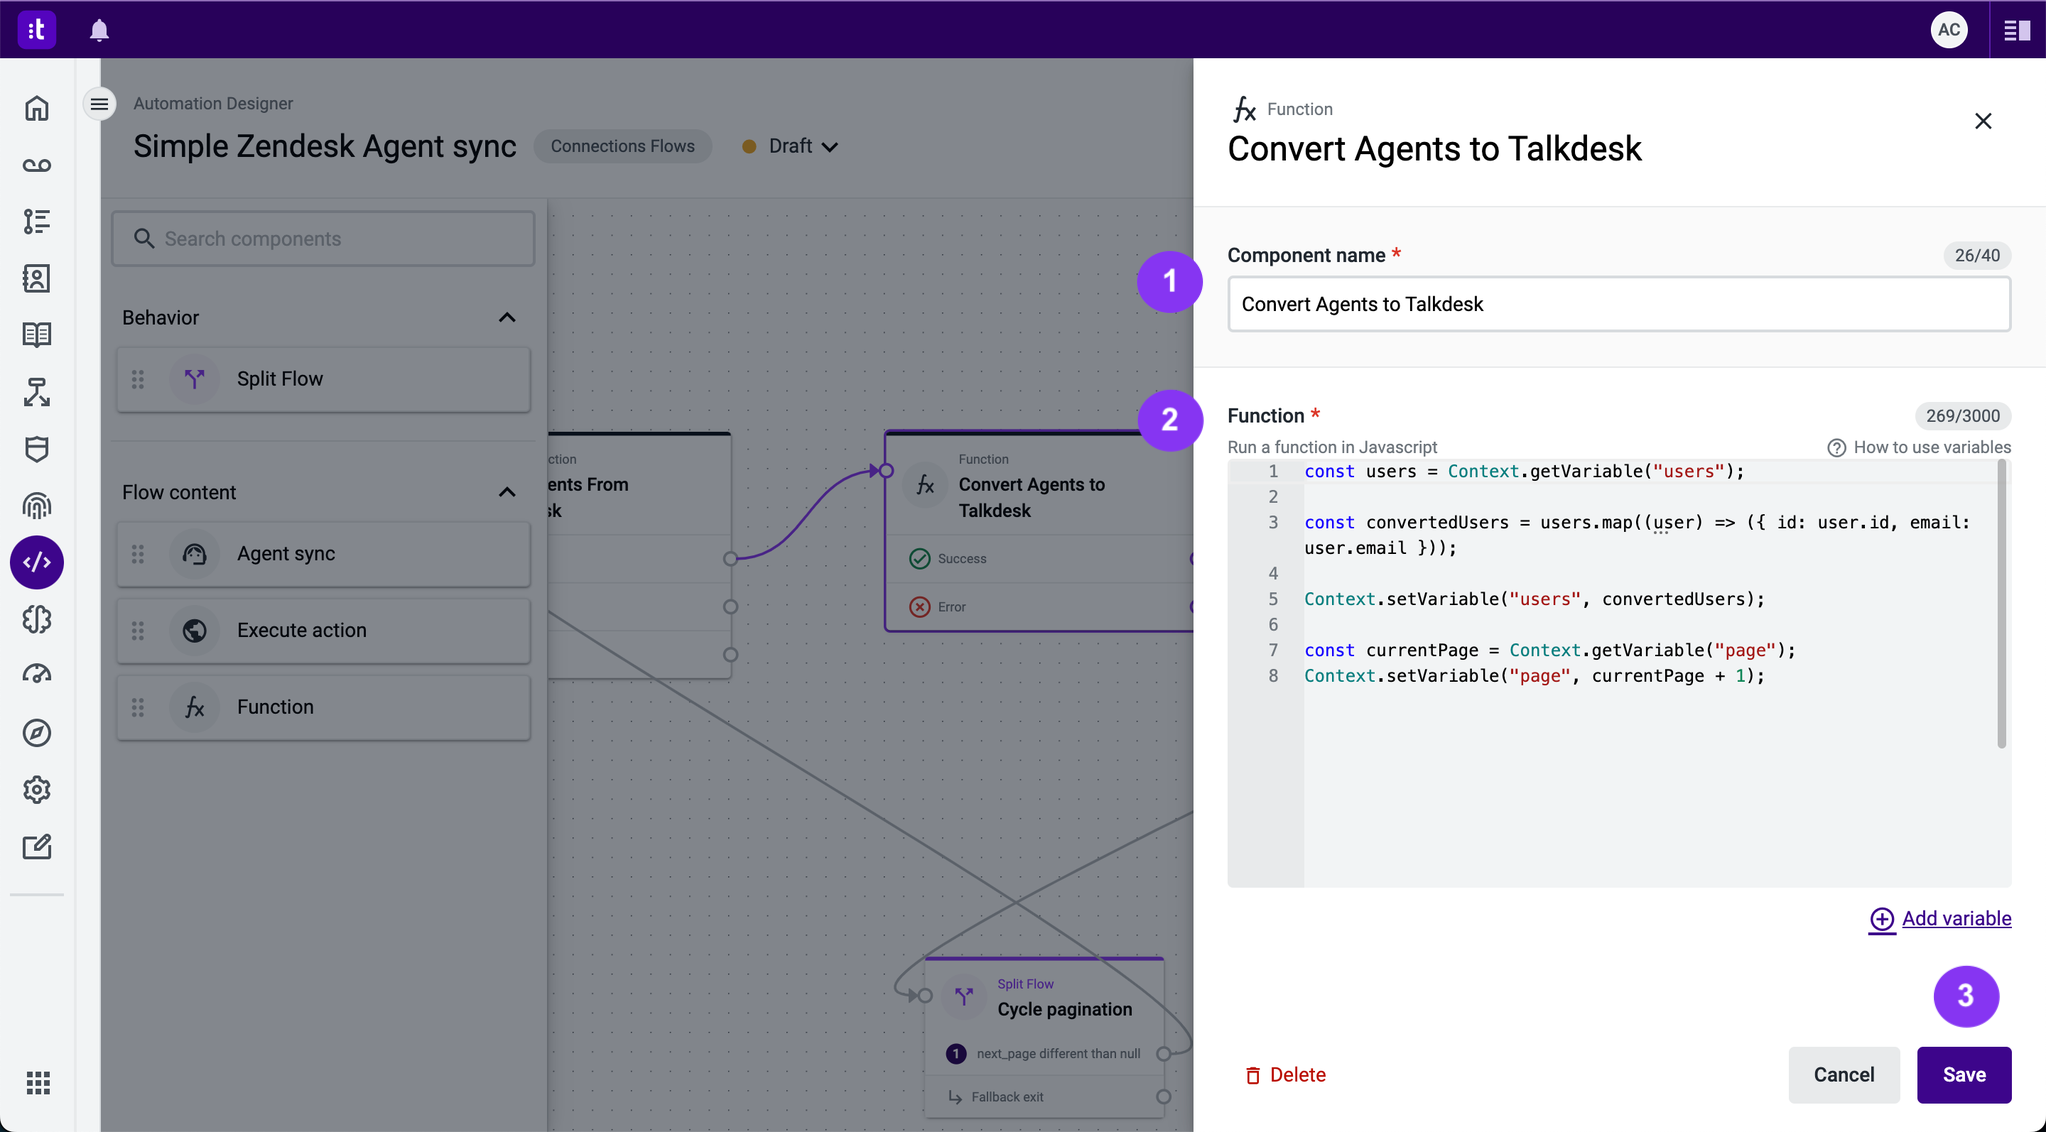
Figure 13 - Function component configuration
Function (Figure 13 - 2),
Write a JavaScript function in the provided text area. The JavaScript code in this function can have a maximum of 3000 characters. To access context variables, use Context.getVariable(VAR NAME). To set a new value of a context variable that can be accessed by other flow components, use Context.setVariable(VAR NAME, VALUE). In both cases, VAR NAME is a string representing the name of the context variable you want to get or set, respectively. VALUE is the placeholder for the value you want to set the variable to.
Add variable
You can click the Add variable button to quickly add a Custom context variable. This is a shortcut equivalent to adding a Custom variable via the Variables side panel.
Outputs
- Success - if the JavaScript function runs successfully.
- Error - if any error is thrown during the function execution.
When you have finished configuring the component, click the Save button (Figure 13 - 3).
TroubleshootingIf you have questions or technical issues, please open a ticket using this form.